One of the core services of AWS Cloud is Amazon Elastic Compute Cloud (Amazon EC2). Amazon EC2 is a web service that provides secure and resizable compute capacity in the cloud via virtual servers. Each virtual server is started from the Amazon Machine Images (AMIs), containing information about EBS volume snapshots and their mapping to the server. This Boto3 Snapshots and AMIs tutorial covers using Python to interact with the Amazon EC2 to manage EBS volume Snapshots and AMIs.
Table of contents
Prerequisites
To start automating Amazon EC2 and making API calls to manage EBS volume Snapshots and AMIs, you must first configure your Python environment.
In general, here’s what you need to have installed:
- Python 3
- Boto3
- AWS CLI tools
Just in case, here’s how to Install Python 3 development environment for Ubuntu Linux.
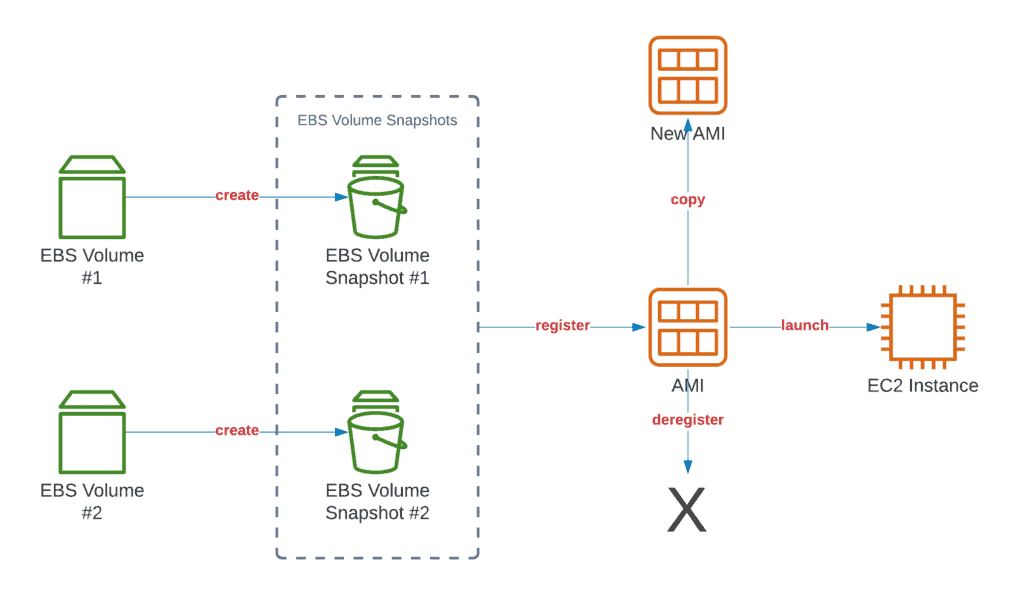
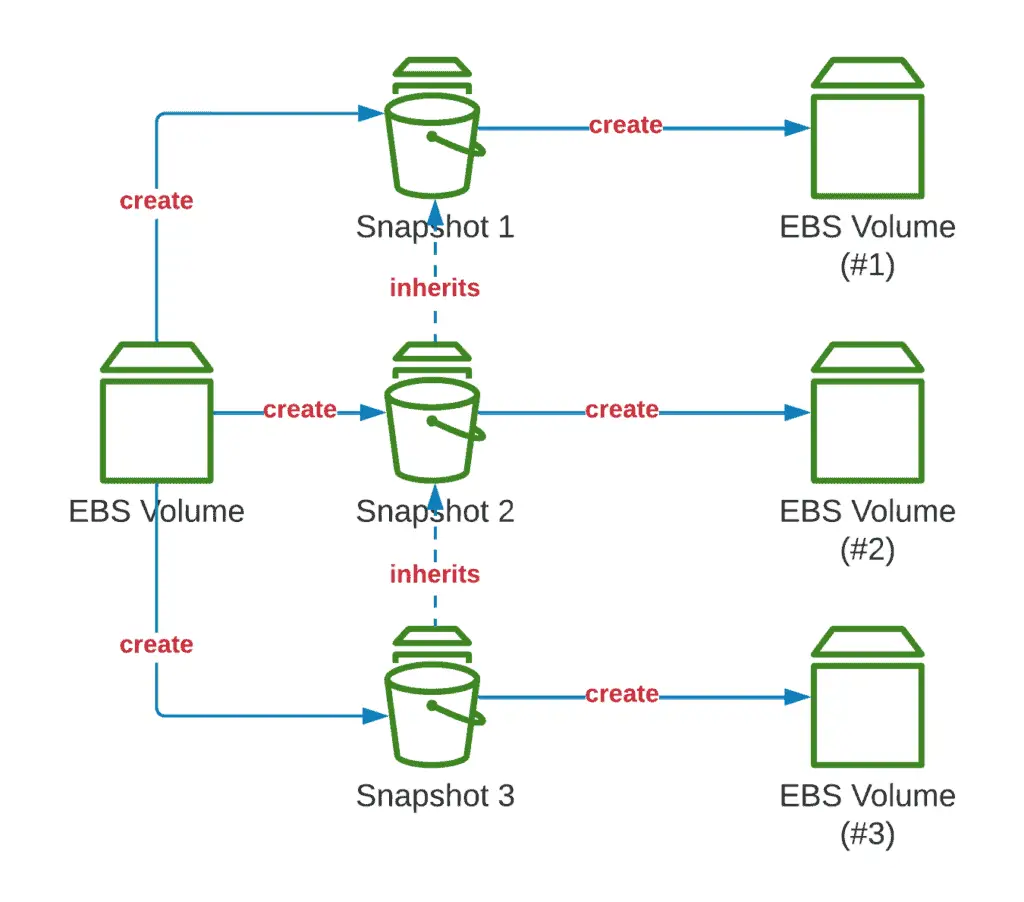
Here’s an additional visualization that ties EBS volumes, EBS volume Snapshots, and AMIs:
Working with EBS volume Snapshots using Boto3
This article will cover the most commonly usedEBS volume Snapshot operations in Boto3.
What is an EBS snapshot?
EBS volume Snapshots allow you to back up your data stored on the EBS volumes to the Amazon Simple Storage Service (Amazon S3). Each EBS volume Snapshot stores incremental changes in your EBS volume data. This means that the first Snapshot contains a complete copy of your EBS volume data, the next one will contain only changes that have been made from the last snapshot operation, and so on.
How to create a Snapshot from an EBS volume using Boto3?
To create the EBS volume snapshot from any volume, you can use the create_snapshot() of the EC2 resource.
EBS snapshots are commonly used for EBS volume backups; they help you copy EBS volume data between the regions or save data before shutting down an instance.
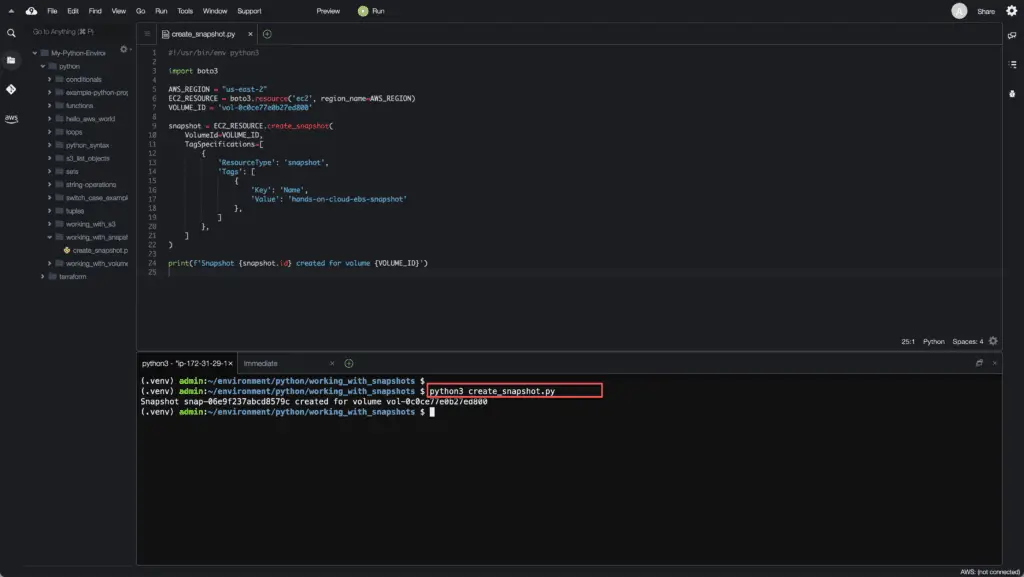
#!/usr/bin/env python3
import boto3
AWS_REGION = "us-east-2"
EC2_RESOURCE = boto3.resource('ec2', region_name=AWS_REGION)
VOLUME_ID = 'vol-0c0ce77e0b27ed800'
snapshot = EC2_RESOURCE.create_snapshot(
    VolumeId=VOLUME_ID,
    TagSpecifications=[
        {
            'ResourceType': 'snapshot',
            'Tags': [
                {
                    'Key': 'Name',
                    'Value': 'hands-on-cloud-ebs-snapshot'
                },
            ]
        },
    ]
)
print(f'Snapshot {snapshot.id} created for volume {VOLUME_ID}')
Here’s an execution output:
The EBS volume snapshot is a long-running operation. The immediate response that you’re getting in the code above means only that the snapshot operation has been started and will continue in the background.
If you need to wait for the operation completion, you have t use the waiter, that waits until the snapshot operation is completed. This method calls EC2.Waiter.snapshot_completed.wait() which polls EC2.Client.describe_snapshots() every 15 seconds until a successful state is reached or dies after 40 attempts with an error.
Here’s an extended example of the waiter implementation:
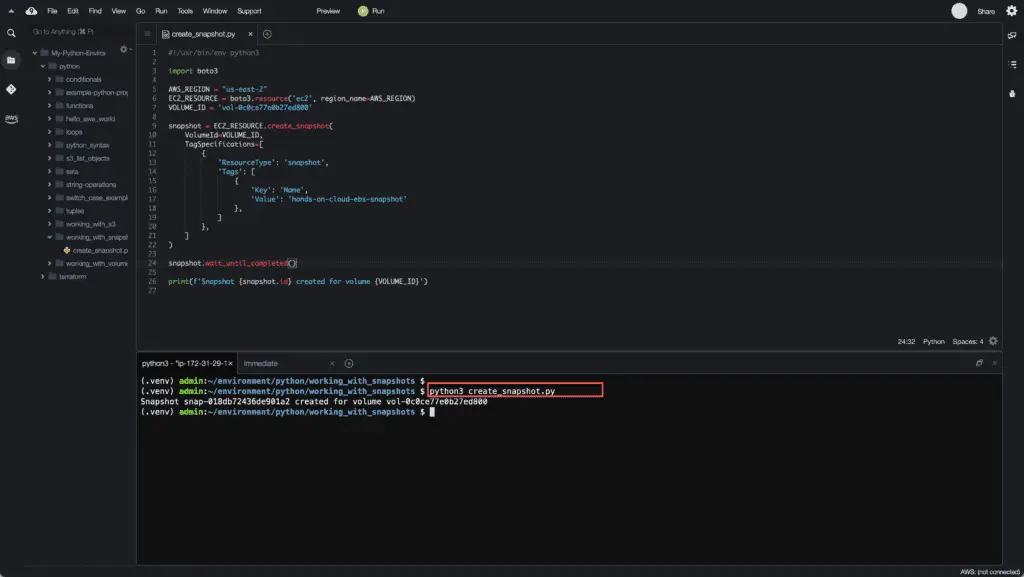
#!/usr/bin/env python3
import boto3
AWS_REGION = "us-east-2"
EC2_RESOURCE = boto3.resource('ec2', region_name=AWS_REGION)
VOLUME_ID = 'vol-0c0ce77e0b27ed800'
snapshot = EC2_RESOURCE.create_snapshot(
    VolumeId=VOLUME_ID,
    TagSpecifications=[
        {
            'ResourceType': 'snapshot',
            'Tags': [
                {
                    'Key': 'Name',
                    'Value': 'hands-on-cloud-ebs-snapshot'
                },
            ]
        },
    ]
)
snapshot.wait_until_completed()
print(f'Snapshot {snapshot.id} created for volume {VOLUME_ID}')
Here’s an execution output:
As soon as you see the printed output, you can be 100% sure that the EBS volume snapshot has been created.
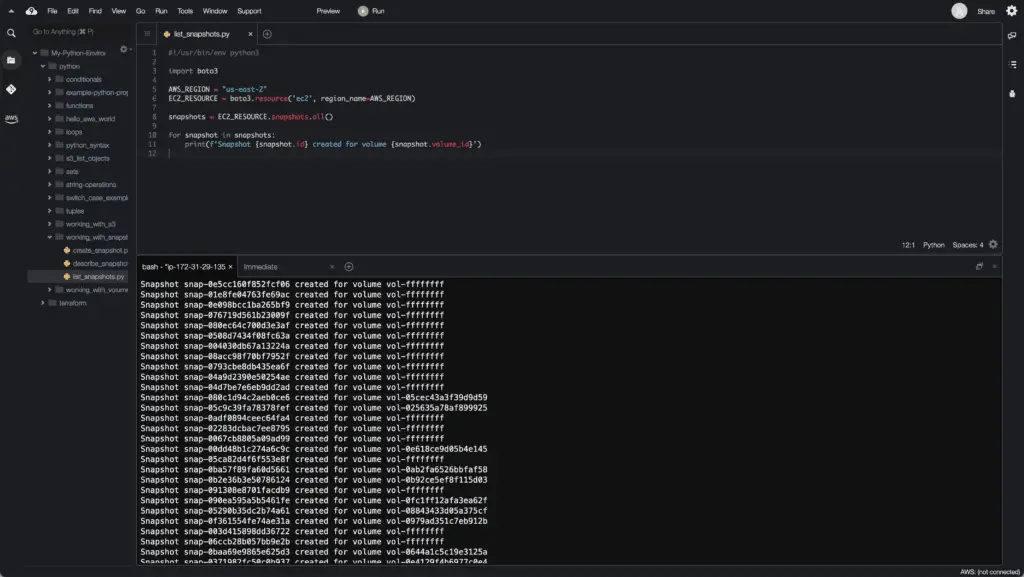
How to list all EBS volume snapshots using Boto3?
In the same way, as for listing the EBS volumes, you can use snapshots collection and the all() method to get a list of all snapshots of your EBS volumes.
Attention:the all() method returns snapshots owned by you and all publicly available snapshots (more than 17,000 snapshots). We strongly recommend you use the filter() method (described in the next section) to reduce the amount of returned records.
#!/usr/bin/env python3
import boto3
AWS_REGION = "us-east-2"
EC2_RESOURCE = boto3.resource('ec2', region_name=AWS_REGION)
snapshots = EC2_RESOURCE.snapshots.all()
for snapshot in snapshots:
    print(f'Snapshot {snapshot.id} created for volume {snapshot.volume_id}')
Here’s an execution output:
How to search/filterEBS volume snapshots using Boto3?
The snapshots collection of the EC2 resource has the filter() method, which acts in the same was the filter() method we used for filtering EBS volumes.
FilterEBS volume snapshots by Account ID
Let’s filter snapshots that belong to the current account only:
#!/usr/bin/env python3
import boto3
AWS_REGION = "us-east-2"
EC2_RESOURCE = boto3.resource('ec2', region_name=AWS_REGION)
STS_CLIENT = boto3.client('sts')
CURRENT_ACCOUNT_ID = STS_CLIENT.get_caller_identity()['Account']
snapshots = EC2_RESOURCE.snapshots.filter(
    OwnerIds=[
        CURRENT_ACCOUNT_ID
    ]
)
for snapshot in snapshots:
    print(f'Snapshot {snapshot.id} created for volume {snapshot.volume_id}')
Now, instead of getting thousands of records, we’re getting only a limited number of them:

We’re using the STS client to get information about the current AWS account ID in the example above. For more information, check out Testing AWS credentials using the Boto3 library.
FilterEBS volume snapshots by Volume ID
To filter EBS volume Snapshots by Volume ID, you need to use the same filter() method but specify the Filters argument:
#!/usr/bin/env python3
import boto3
AWS_REGION = "us-east-2"
EC2_RESOURCE = boto3.resource('ec2', region_name=AWS_REGION)
STS_CLIENT = boto3.client('sts')
CURRENT_ACCOUNT_ID = STS_CLIENT.get_caller_identity()['Account']
snapshots = EC2_RESOURCE.snapshots.filter(
    Filters=[
        {
            'Name': 'volume-id',
            'Values': [
                'vol-0c0ce77e0b27ed800'
            ]
        }
    ]
)
for snapshot in snapshots:
    print(f'Snapshot {snapshot.id} created for volume {snapshot.volume_id}')
Here’s an execution output:

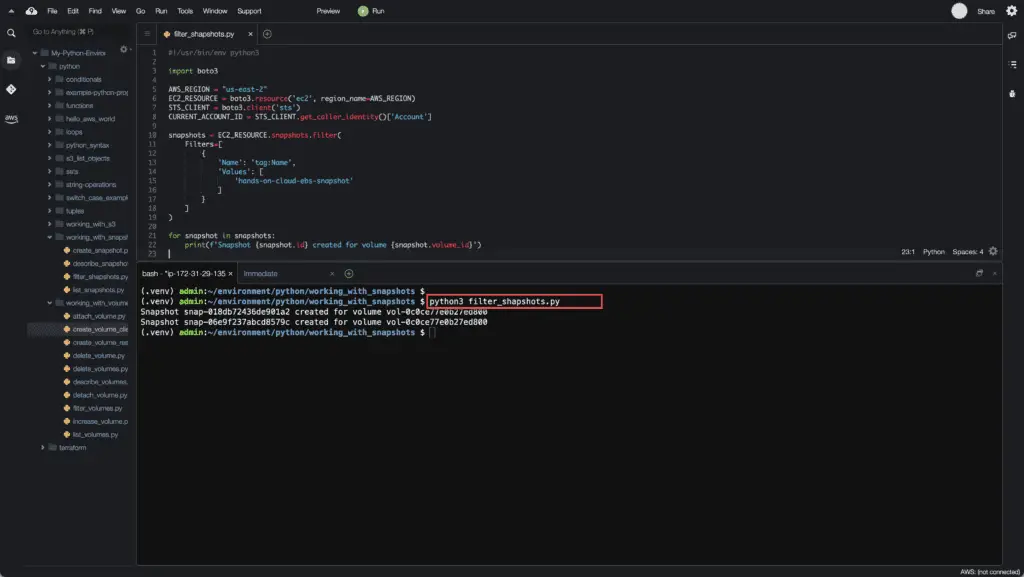
FilterEBS volume snapshots by Tag
To filter EBS volume Snapshots by Tag, you need to use the same filter() method but specify the Filters argument:
#!/usr/bin/env python3
import boto3
AWS_REGION = "us-east-2"
EC2_RESOURCE = boto3.resource('ec2', region_name=AWS_REGION)
STS_CLIENT = boto3.client('sts')
CURRENT_ACCOUNT_ID = STS_CLIENT.get_caller_identity()['Account']
snapshots = EC2_RESOURCE.snapshots.filter(
    Filters=[
        {
            'Name': 'tag:Name',
            'Values': [
                'hands-on-cloud-ebs-snapshot'
            ]
        }
    ]
)
for snapshot in snapshots:
    print(f'Snapshot {snapshot.id} created for volume {snapshot.volume_id}')
Here’s an execution output:
How to describe the EBS volume snapshot?
Like describing the EBS volumes, you can get all information about any snapshots by calling thedescribe_snapshots() method of the EC2 client. Pay attention thatthedescribe_snapshots() method takes the same arguments as the filter() method.
#!/usr/bin/env python3
import json
from datetime import date, datetime
import boto3
AWS_REGION = "us-east-2"
EC2_CLIENT = boto3.client('ec2', region_name=AWS_REGION)
SNAPSHOT_ID = 'snap-018db72436de901a2'

# Helper method to serialize datetime fields
def json_datetime_serializer(obj):
    if isinstance(obj, (datetime, date)):
        return obj.isoformat()
    raise TypeError ("Type %s not serializable" % type(obj))

describe_response = EC2_CLIENT.describe_snapshots(
    SnapshotIds=[
        'snap-018db72436de901a2'
    ]
)
print('Snapshot information:')
print(json.dumps(describe_response, indent=4, default=json_datetime_serializer))
Here’s an example output:
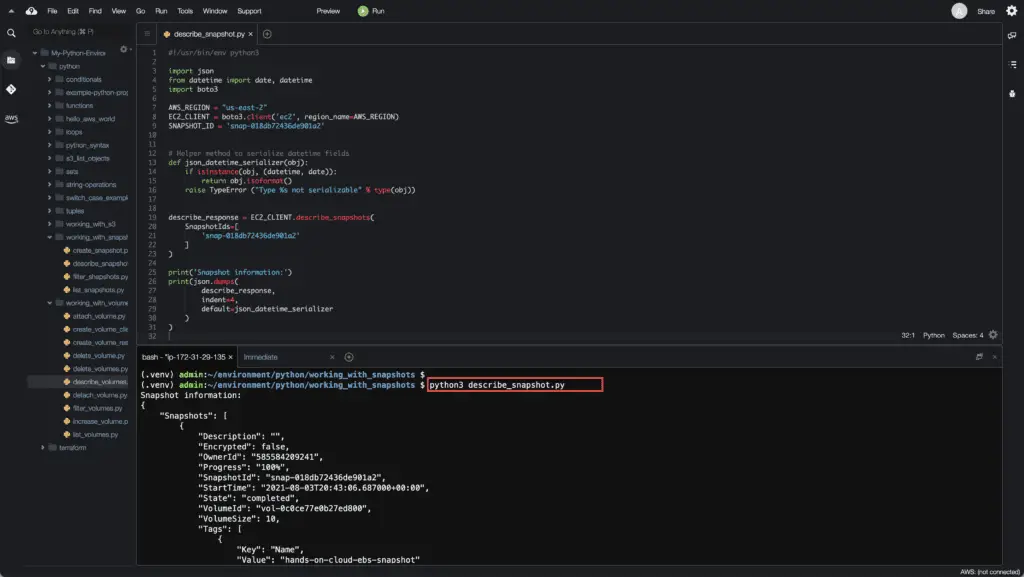
Here we’re using thejson_datetime_serializer() helper method that helps us to serialize datetime.datetime objects returned by thedescribe_snapshots() response into a JSON string.
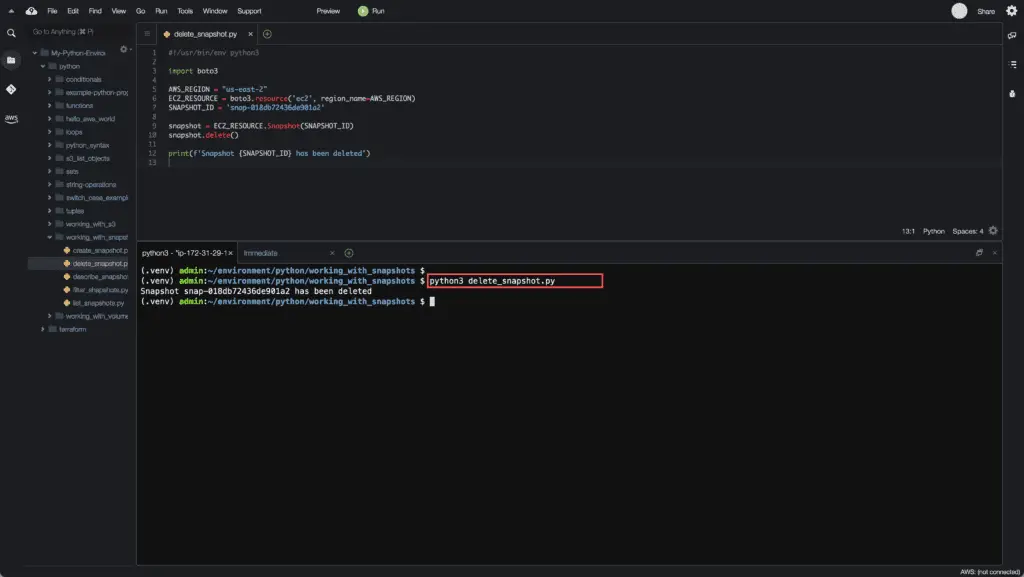
How to delete EBS volume Snapshot using Boto3?
To delete an EBS volume Snapshot, you need to use the delete() method of the Snapshot class:
#!/usr/bin/env python3
import boto3
AWS_REGION = "us-east-2"
EC2_RESOURCE = boto3.resource('ec2', region_name=AWS_REGION)
SNAPSHOT_ID = 'snap-018db72436de901a2'
snapshot = EC2_RESOURCE.Snapshot(SNAPSHOT_ID)
snapshot.delete()
print(f'Snapshot {SNAPSHOT_ID} has been deleted')
When you delete the EBS volume Snapshot, only the data not needed for any other snapshot is removed. So regardless of which volume snapshots you’ve deleted, all active snapshots will still have access to the required information needed to restore the EBS volume.
Here’s an execution output:
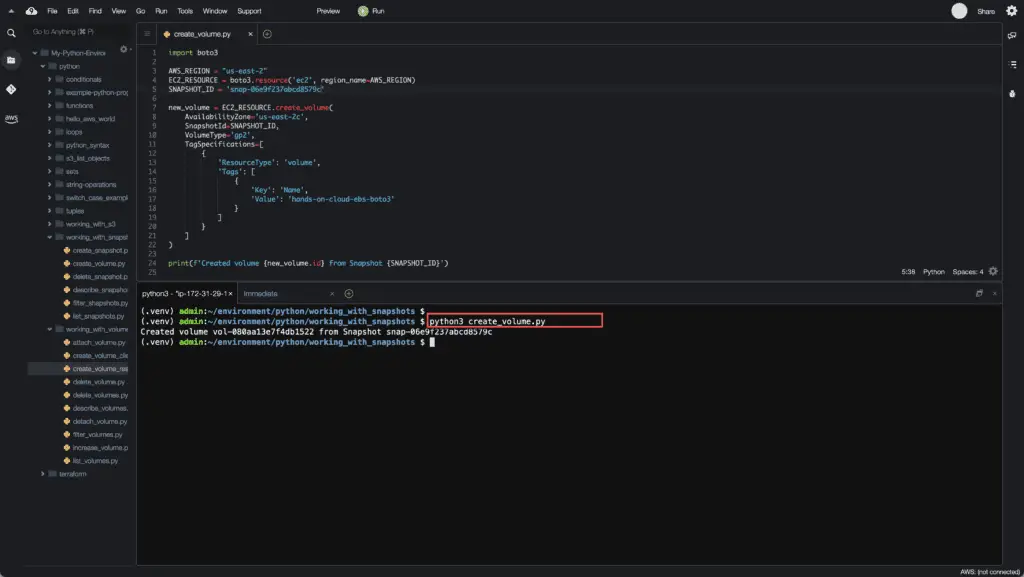
How to create an EBS volume from a Snapshot using Boto3?
You can use the create_volume() method of EC2 resource that is used for creating a new EBS volume to create a new EBS volume from a Snapshot:
import boto3
AWS_REGION = "us-east-2"
EC2_RESOURCE = boto3.resource('ec2', region_name=AWS_REGION)
SNAPSHOT_ID = 'snap-06e9f237abcd8579c'
new_volume = EC2_RESOURCE.create_volume(
    AvailabilityZone='us-east-2c',
    SnapshotId=SNAPSHOT_ID,
    VolumeType='gp2',
    TagSpecifications=[
        {
            'ResourceType': 'volume',
            'Tags': [
                {
                    'Key': 'Name',
                    'Value': 'hands-on-cloud-ebs-boto3'
                }
            ]
        }
    ]
)
print(f'Created volume {new_volume.id} from Snapshot {SNAPSHOT_ID}')
In this case, we have specified SnapshotId as a source for the new volume.
Here’s an execution output:
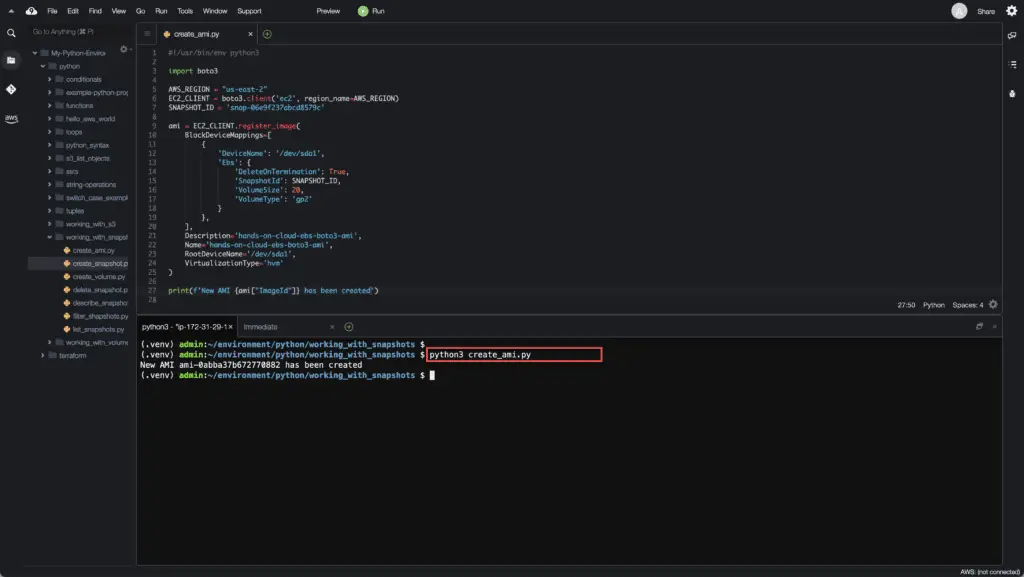
How to create an AMI from a Snapshot using Boto3?
As we’ve mentioned in the introduction section of this article, Amazon Machine Images (AMIs) are templates of EC2 instances that store information about instance virtualization type and block-device mappings of the snapshots to the instances. For more information about creating AMIs, see Creating your own AMIs.
To create an AMI from the EBS volume Snapshot, you need to use theregister_image() method of the EC2 client:
# import boto3 package
import boto3
# Let's use Amazon EC2
ec2 = boto3.client('ec2')
# create a AMI from snapshot
image = ec2.register_image(
    BlockDeviceMappings=[
        {
            'DeviceName': '/dev/sda1',
            'Ebs': {
                'DeleteOnTermination': True,
                'SnapshotId': 'snap-010c70a359a80d2e5',
                'VolumeSize': 20,
                'VolumeType': 'gp2'
            }
        },
    ],
    Description='hands-on-cloud-ebs-boto3-ami-from-snapshot',
    Name='hands-on-cloud-ebs-boto3-ami-from-snapshot',
    RootDeviceName='/dev/sda1',
    VirtualizationType='hvm'
)
# print the resource ID of created EBS volume
print(image)
To create an AMI, we’ve used the following arguments for theregister_image() method:
BlockDeviceMappingsdescr the mapping of snapshots to virtual machine devicesRootDeviceNamedefines the root volume devide for the AMI (bootable EC2 instance disk)VirtualizationTypedefines the type of virtualization for the EC2 instance
Here’s an execution output:
Working with EC2 Instance AMIs
In this section of the article, we’ll cover the most common AMI operations that you might need to automate using the Boto3 library.
What is the Amazon Machine Image (AMI)?
Amazon Machine Images (AMIs) are templates for launching EC2 instances that contain all required information (block-device mapping and virtualization type) to launch an EC2 instance.
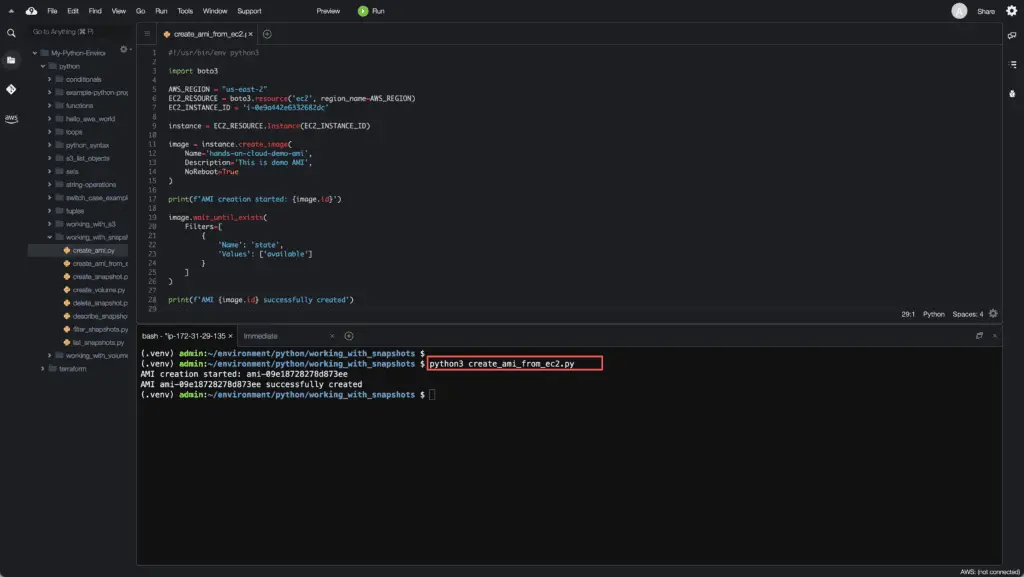
How to create an AMI from the EC2 instance using Boto3?
You can create an AMI from the EC2 instance by using the create_image() method from the Instance class of the EC2 resource:
#!/usr/bin/env python3
import boto3
AWS_REGION = "us-east-2"
EC2_RESOURCE = boto3.resource('ec2', region_name=AWS_REGION)
EC2_INSTANCE_ID = 'i-0e9a442e6332682dc'
instance = EC2_RESOURCE.Instance(EC2_INSTANCE_ID)
image = instance.create_image(
    Name='hands-on-cloud-demo-ami',
    Description='This is demo AMI',
    NoReboot=True
)
print(f'AMI creation started: {image.id}')
image.wait_until_exists(
    Filters=[
        {
            'Name': 'state',
            'Values': ['available']
        }
    ]
)
print(f'AMI {image.id} successfully created')
In the code above, we’re using the following parameters for thecreate_image() method:
Descriptiondefine the description for the imageNamespecifies the name for the image (must be unique)NoRebootis set toTrueto avoid EC2 instance reboot.
Note: Please, keep in mind, to avoid data loss, it is recommended to stop the EC2 instance before creating an AMI
To wait till AMI creation finishes, we’re using thewait_until_exists() with specified Filters argument, which describes that we’re waiting for the available status of the AMI.
Here’s an execution output:
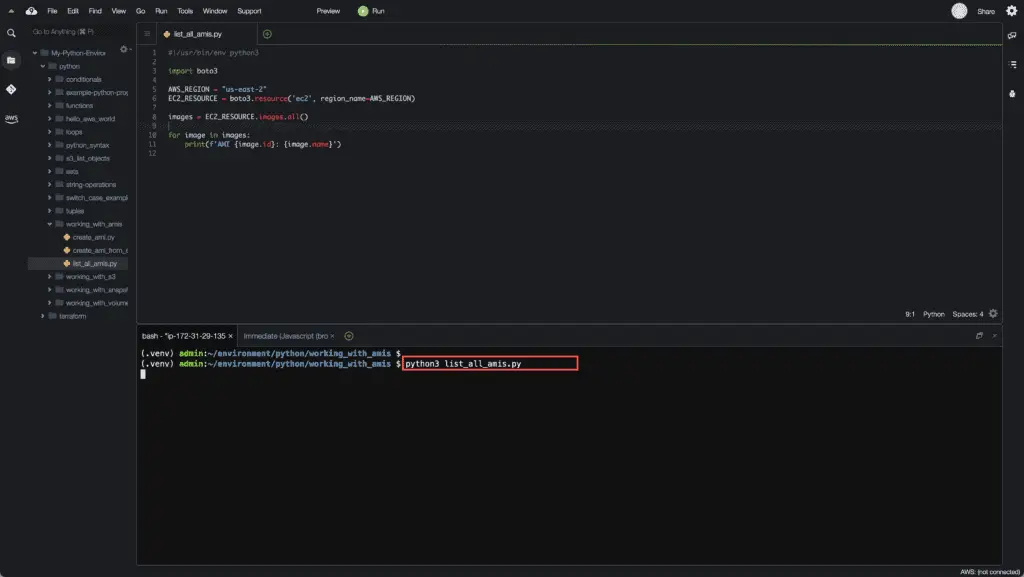
How to list all AWS AMIs using Boto3?
You can use the “images” collection and the all() method to get a list of all publicly available AMIs.
Attention: the all() method return not only AMIs owned by you but also all publicly available AMIs (that’s a giant list). We strongly recommend you use the filter() method (described in the next section) to reduce the amount of returned records.
#!/usr/bin/env python3
import boto3
AWS_REGION = "us-east-2"
EC2_RESOURCE = boto3.resource('ec2', region_name=AWS_REGION)
images = EC2_RESOURCE.images.all()
for image in images:
    print(f'AMI {image.id}: {image.name}')
Here’s an execution example:
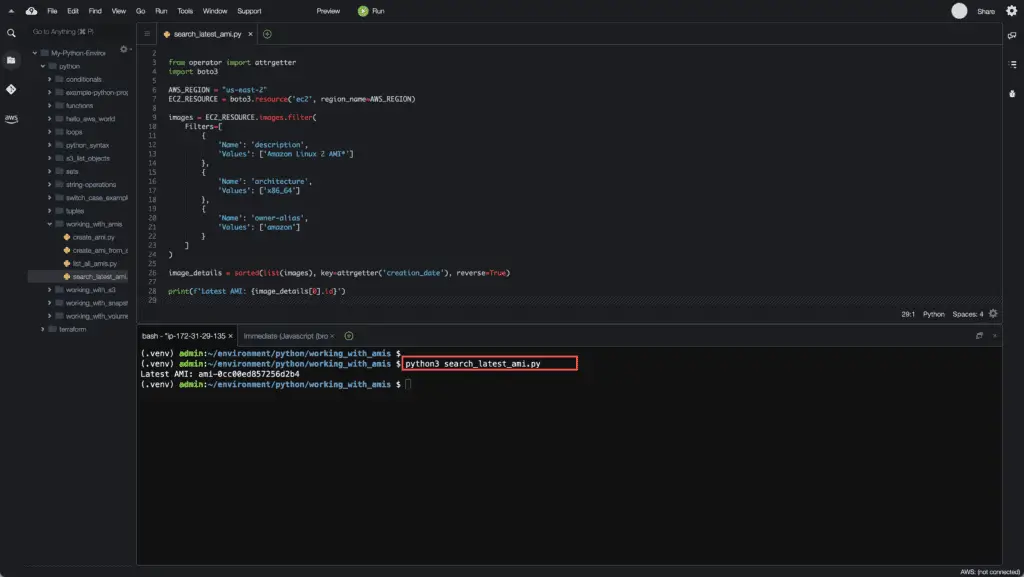
How to search/filter for the AMIs using Boto3?
Similarly to the filtering EBS volume Snapshots operation, you can search for AMIs using the filter() method ofthe “images” collection by applying various Filters as an argument.
Here’s an example of searching the latest AMI of Amazon Linux:
#!/usr/bin/env python3
from operator import attrgetter
import boto3
AWS_REGION = "us-east-2"
EC2_RESOURCE = boto3.resource('ec2', region_name=AWS_REGION)
images = EC2_RESOURCE.images.filter(
    Filters=[
        {
            'Name': 'description',
            'Values': ['Amazon Linux 2 AMI*']
        },
        {
            'Name': 'architecture',
            'Values': ['x86_64']
        },
        {
            'Name': 'owner-alias',
            'Values': ['amazon']
        }
    ]
)
image_details = sorted(list(images), key=attrgetter('creation_date'), reverse=True)
print(f'Latest AMI: {image_details[0].id}')
Here’s an execution output:
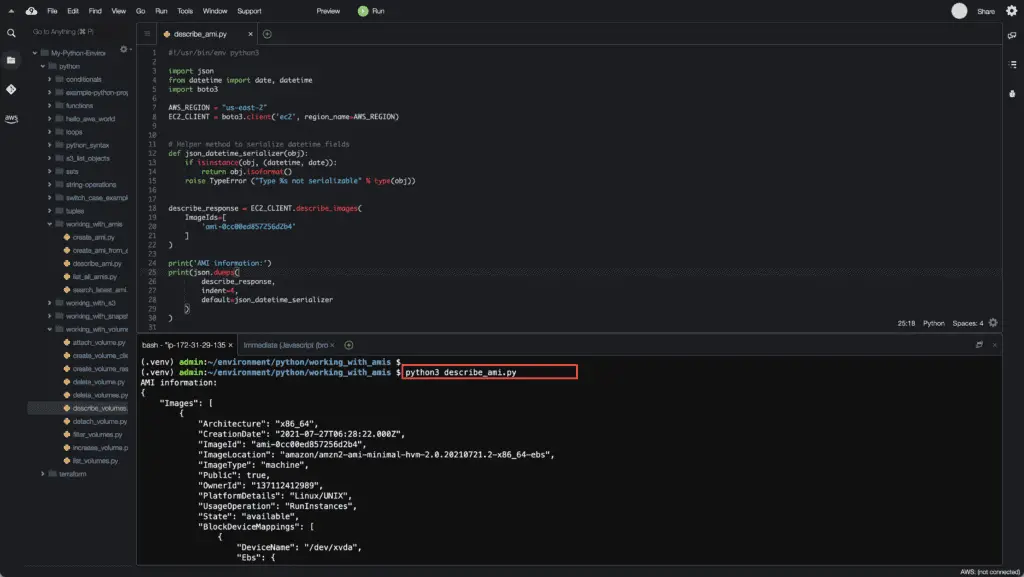
How to describe AWS AMI using Boto3?
Todescribe AWS AMIs, it is recommended to use thedescribe_images() method of EC2 client resource as it returns JSON object which contains complete information about the AMI:
# import boto3 package
import boto3
# Let's use Amazon EC2
ec2 = boto3.client('ec2')
# describe AMIs
response = ec2.describe_images(
    ImageIds=[
        'ami-086b19a034232efea'
    ]
)
print(response)Note: thedescribe_images() method supports the same arguments asthe filter() method ofthe “images” collection.
Here’s an execution output:
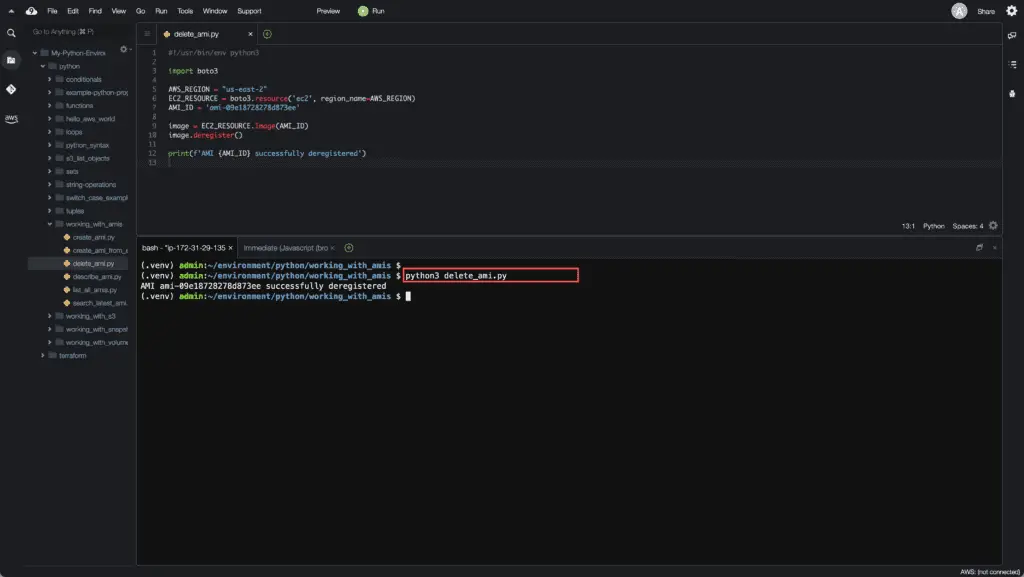
How to delete (deregister) AMI using Boto3?
To delete the AMI, you can use the deregister() method of the Image class of the EC2 resource:
#!/usr/bin/env python3
import boto3
AWS_REGION = "us-east-2"
EC2_RESOURCE = boto3.resource('ec2', region_name=AWS_REGION)
AMI_ID = 'ami-09e18728278d873ee'
image = EC2_RESOURCE.Image(AMI_ID)
image.deregister()
print(f'AMI {AMI_ID} successfully deregistered')
Here’s an execution output:
Summary
This article covered how to use Python to interact with the Amazon EC2 service to create, list, describe, search, and delete EBS volume Snapshots and AMIs using the Boto3 library.
