CloudFormation Tutorial – EC2 Instance Automation
This article continues CloudFormation article series and describes how to automate EC2 instances in 5 minutes using this step-by-step guide. Get complete the CloudFormation template at the end and deep-dive explanation by the road. Become the CloudFormation expert in a couple of minutes! All source code is available for you in our GitHub folder.
Table of contents
What is CloudFormation
CloudFormation is a service that allows you to model and provide AWS infrastructure and AWS resource.
You’re describing your infrastructure template and have it saved as a JSON file or YAML file with the respective syntax. Then, you pass your description to CloudFormation, and the service does the rest.
By using CloudFormation you can:
- Create new infrastructure with all required dependencies from scratch.
- Update existing infrastructure and its dependencies.
- Completely delete your infrastructure.
If you want to configure and create or update a DNS record for your EC2 instance, this is the perfect case for CloudFormation. The service will provision the EC2 instance first and then create the DNS record.
Long story short, AWS CloudFormation orchestrates the provisioning of the desired infrastructure state.
CloudFormation Pros and Cons
There are many different tools that can solve a similar task. Terraform is one of them. And, one of the most common questions I get is what is better, Terraform or CloudFormation?
I like CloudFormation, because:
- It is a native AWS service and I do not need to deal with anything else except infrastructure template.
- I can extend it using custom resources (based on AWS Lambda functions) written in Python.
- Splitting the infrastructure into the layers is simple.
I do not like CloudFormation, because:
- It is usually a bit delayed with the support of new AWS services.
- Developing Custom Functions is pain.
- Boilerplate code is growing very fast (thanks to AWS CDK for fixing that).
CloudFormation VPC Example (bonus)
Before we can provision an EC2 instance in AWS, we must have Cloudformation Stacks for VPC and a Subnet.
You may use your default VPC. But if you’d like to create a new one, you may easily deploy one from the code snippet below. This is baseline VPC for many simple projects.
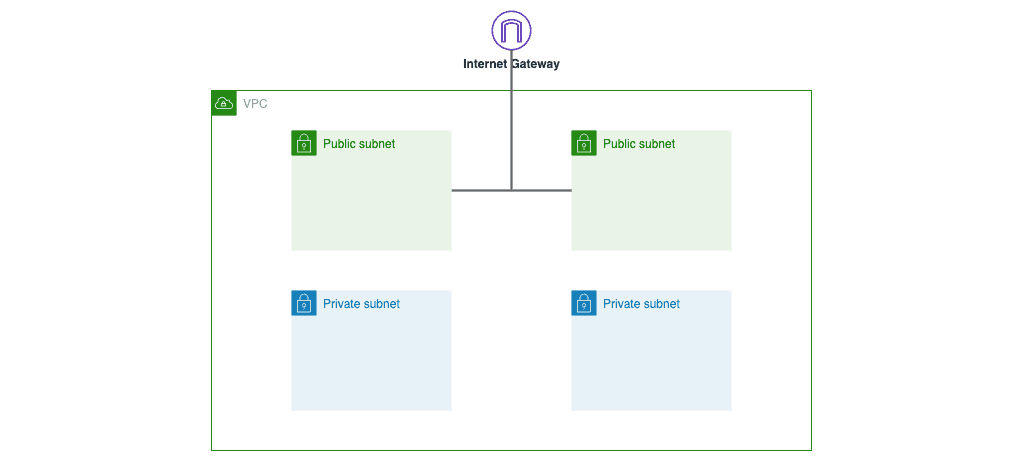
It consists of the stack resources and, more importantly, four subnets:
- 2 public subnets.
- 2 private subnets.
Here’s what you’ll get by the end:
Provide all the AWS resources that you want to include in the stack as well as the four subnets given above in the CloudFormation sample template for this VPC automation(written in YAML formatted text file):
AWSTemplateFormatVersion: '2010-09-09'
Description: >
    This stack creates basic VPC infrastructure with two public and two private subnets.
Parameters:
    pVpcCidrBlock:
      Description: >
                VPC CIDR block
      Type: String
      Default: 192.168.0.0/24
Resources:
    rVpc:
        Type: AWS::EC2::VPC
        Properties:
            CidrBlock: !Ref pVpcCidrBlock
            EnableDnsHostnames: true
            EnableDnsSupport: true
            InstanceTenancy: default
            Tags:
                -
                    Key: Name
                    Value: !Sub '${AWS::StackName}-vpc'
    rPrivateSubnetOne:
        Type: AWS::EC2::Subnet
        Properties:
            AvailabilityZone:
                Fn::Select:
                    - 0
                    - Fn::GetAZs: {Ref: 'AWS::Region'}
            VpcId: !Ref rVpc
            CidrBlock: !Select [ 0, !Cidr [ !GetAtt rVpc.CidrBlock, 4, 6 ]]
            Tags:
                -
                    Key: Name
                    Value: !Sub '${AWS::StackName}-private-subnet-one'
    rPrivateRouteTable:
        Type: AWS::EC2::RouteTable
        Properties:
            VpcId: !Ref rVpc
            Tags:
                -
                    Key: Name
                    Value: !Sub '${AWS::StackName}-private-rt'
    rPrivateRouteTableSubnetAssociationOne:
        Type: AWS::EC2::SubnetRouteTableAssociation
        Properties:
            RouteTableId: !Ref rPrivateRouteTable
            SubnetId: !Ref rPrivateSubnetOne
    rPrivateRouteTableSubnetAssociationTwo:
        Type: AWS::EC2::SubnetRouteTableAssociation
        Properties:
            RouteTableId: !Ref rPrivateRouteTable
            SubnetId: !Ref PrivateSubnetTwo
    PrivateSubnetTwo:
        Type: AWS::EC2::Subnet
        Properties:
            AvailabilityZone:
                Fn::Select:
                    - 1
                    - Fn::GetAZs: {Ref: 'AWS::Region'}
            VpcId: !Ref rVpc
            CidrBlock: !Select [ 1, !Cidr [ !GetAtt rVpc.CidrBlock, 4, 6 ]]
            Tags:
                -
                    Key: Name
                    Value: !Sub '${AWS::StackName}-private-subnet-two'
    rPublicSubnetOne:
        Type: AWS::EC2::Subnet
        Properties:
            AvailabilityZone:
                Fn::Select:
                    - 0
                    - Fn::GetAZs: {Ref: 'AWS::Region'}
            VpcId: !Ref rVpc
            CidrBlock: !Select [ 2, !Cidr [ !GetAtt rVpc.CidrBlock, 4, 6 ]]
            Tags:
                -
                    Key: Name
                    Value: !Sub '${AWS::StackName}-public-subnet-one'
    rPublicSubnetTwo:
        Type: AWS::EC2::Subnet
        Properties:
            AvailabilityZone:
                Fn::Select:
                    - 1
                    - Fn::GetAZs: {Ref: 'AWS::Region'}
            VpcId: !Ref rVpc
            CidrBlock: !Select [ 3, !Cidr [ !GetAtt rVpc.CidrBlock, 4, 6 ]]
            Tags:
                -
                    Key: Name
                    Value: !Sub '${AWS::StackName}-public-subnet-two'
    rInternetGW:
        Type: AWS::EC2::InternetGateway
        Properties:
            Tags:
                -
                    Key: Name
                    Value: !Sub '${AWS::StackName}-igw'
    rGatewayAttachement:
        Type: AWS::EC2::VPCGatewayAttachment
        Properties:
          VpcId: !Ref rVpc
          InternetGatewayId: !Ref rInternetGW
    rPublicRouteTable:
        Type: AWS::EC2::RouteTable
        Properties:
            VpcId: !Ref rVpc
            Tags:
                -
                    Key: Name
                    Value: !Sub '${AWS::StackName}-public-rt'
    rPublicRoute:
        Type: AWS::EC2::Route
        DependsOn: rGatewayAttachement
        Properties:
            RouteTableId: !Ref rPublicRouteTable
            DestinationCidrBlock: 0.0.0.0/0
            GatewayId: !Ref rInternetGW
    rPublicRouteTableSubnetAssociationOne:
        Type: AWS::EC2::SubnetRouteTableAssociation
        Properties:
            RouteTableId: !Ref rPublicRouteTable
            SubnetId: !Ref rPublicSubnetOne
    rPublicRouteTableSubnetAssociationTwo:
        Type: AWS::EC2::SubnetRouteTableAssociation
        Properties:
            RouteTableId: !Ref rPublicRouteTable
            SubnetId: !Ref rPublicSubnetTwo
The simplest way to deploy it, is to use CloudFormation Designer. Go to CloudFormation service and select Designer at the left menu.

Paste VPC code snippet(your template resources) to the Designer.
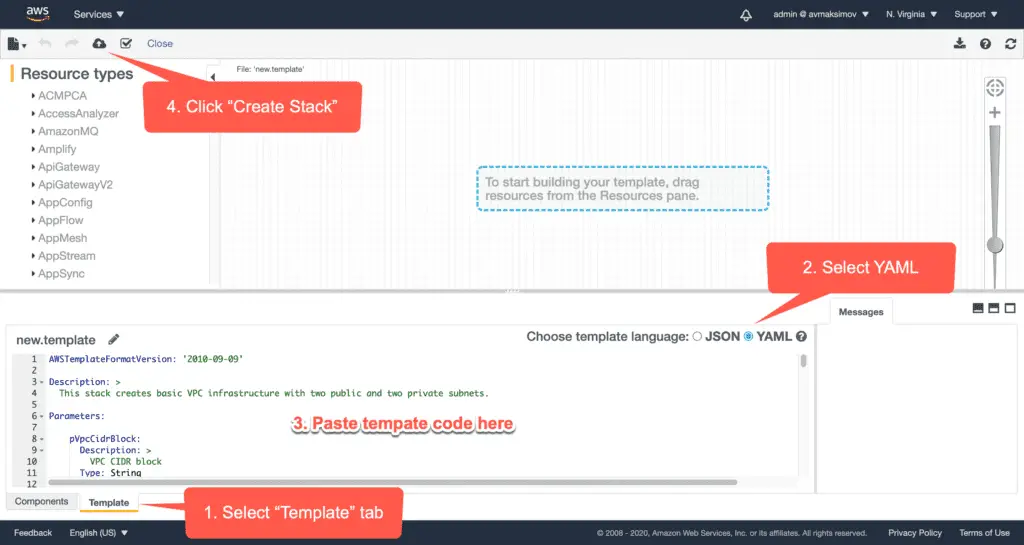
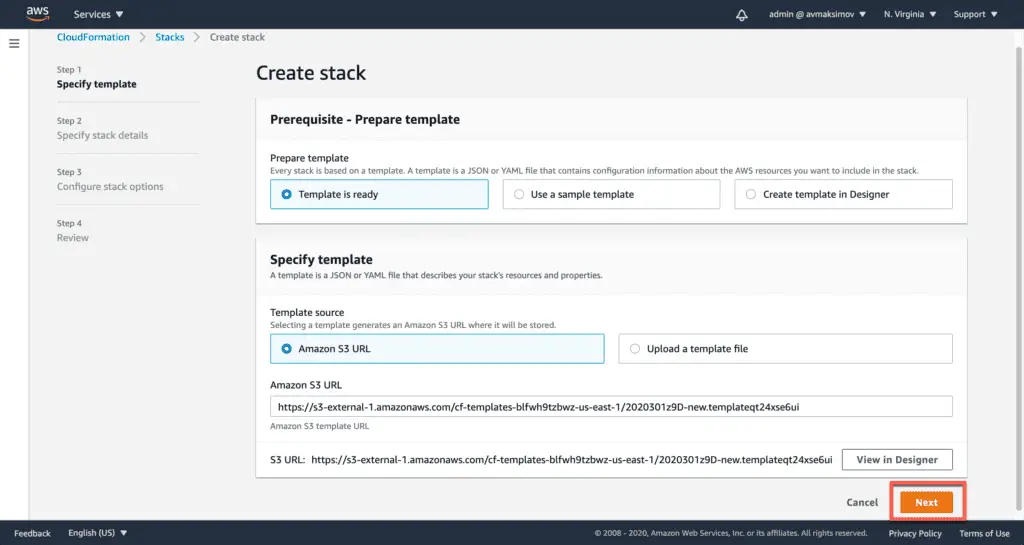
Do not change any of the template parameters and click Next:
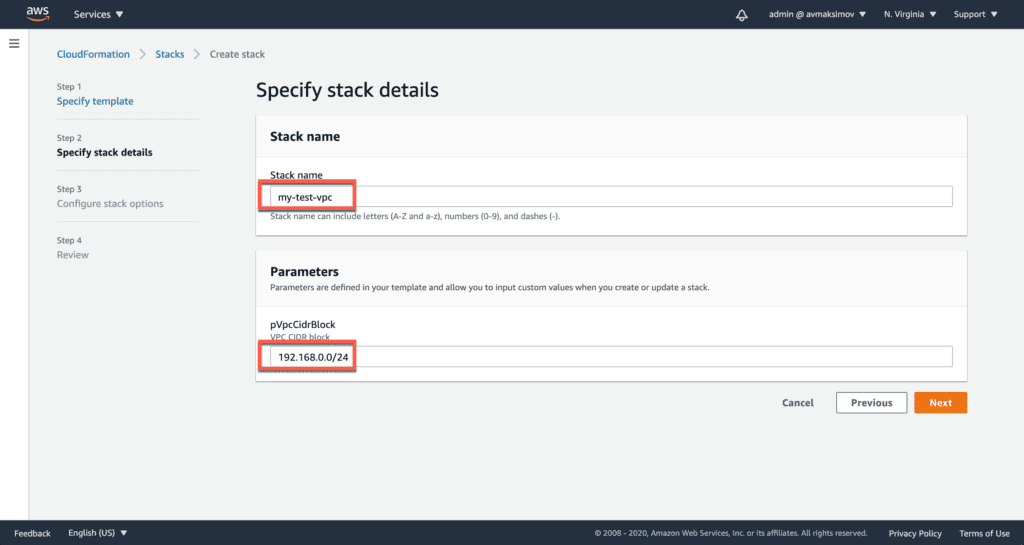
Fill Stack Name and VPC CIDR with any/custom values:
Do not change anything at the next screens and finish the process by clicking Next and Finish.
As soon as the stack deployed, you should see your VPC and Subnets at the VPC service section of the AWS CloudFormation console:
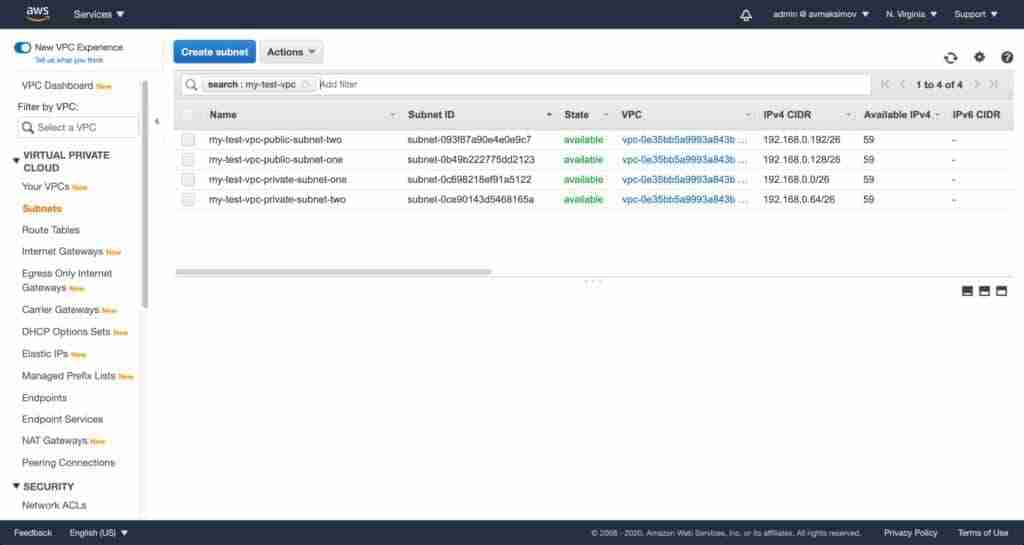
Now we can jump to EC2 instance deployment.
EC2 Instance Automation Example
For this demo, we’ll launch an Amazon Linux EC2 instance at one of the public subnets.

We’ll use CloudFormation Metadata (AWS::CloudFormation::Init) to automate Docker installation at the host.
This will be a JumpHost instance. It is a common solution to get access to private subnets of your VPC.
We’ll attach an instance profile with full Administrative permissions to your AWS accounts. Feel free to restrict permissions for your use-case.
I use such configuration a lot, especially, when doing automation stuff.
So, here’s our EC2 instance CloudFormation template:
AWSTemplateFormatVersion: '2010-09-09'
Description: >
This stack deploys an Amazon Linux EC2 host inside your VPC and
automatically installs Docker inside of it.
Parameters:
pSshKeyName:
Description: Amazon EC2 Key Pair for JumpHost instance
Type: "AWS::EC2::KeyPair::KeyName"
pVpcID:
Description: VPC ID to deploy JumpHost instance to
Type: "AWS::EC2::VPC::Id"
pSubnetID:
Description: Subnet ID to deploy JumpHost instance to
Type: "AWS::EC2::Subnet::Id"
pInstanceType:
Description: JumpHost EC2 instance types
Type: String
Default: t2.micro
AllowedValues:
- t1.micro
- t2.nano
- t2.micro
- t2.small
- t2.medium
Resources:
rPublicAccessSecurityGroup:
Type: AWS::EC2::SecurityGroup
Properties:
VpcId: !Ref pVpcID
GroupDescription: Allows SSH access to JumpHost instance
GroupName: !Sub '${AWS::StackName}-jumphost-ssh-access'
SecurityGroupIngress:
-
CidrIp: '0.0.0.0/0'
Description: 'Replace this rule on more strict one'
FromPort: 22
ToPort: 22
IpProtocol: tcp
Tags:
-
Key: Name
Value: !Sub '${AWS::StackName}-jumphost-ssh-access'
rJumpHostInstanceRole:
Type: 'AWS::IAM::Role'
Properties:
AssumeRolePolicyDocument:
Version: '2012-10-17'
Statement:
-
Effect: Allow
Principal:
Service:
- ec2.amazonaws.com
Action:
- 'sts:AssumeRole'
ManagedPolicyArns:
- 'arn:aws:iam::aws:policy/AdministratorAccess'
rJumpHostInstanceProfile:
Type: AWS::IAM::InstanceProfile
Properties:
Path: /
Roles:
- !Ref rJumpHostInstanceRole
rJumpHost:
Type: AWS::EC2::Instance
Metadata:
AWS::CloudFormation::Init:
configSets:
ec2_bootstrap:
- install_docker
install_docker:
packages:
yum:
docker: []
services:
sysvinit:
docker:
enabled: "true"
ensureRunning: "true"
commands:
docker_for_ec2_user:
command: usermod -G docker ec2-user
CreationPolicy:
ResourceSignal:
Timeout: PT5M
Properties:
# Amazon Linux 2 AMI us-east-1
IamInstanceProfile: !Ref rJumpHostInstanceProfile
ImageId: ami-0947d2ba12ee1ff75
KeyName: !Sub '${pSshKeyName}'
InstanceType: !Sub '${pInstanceType}'
UserData:
Fn::Base64:
!Sub |
#!/bin/bash -xe
function cfn_fail
{
cfn-signal -e 1 --stack ${AWS::StackName} \
--resource rJumpHost \
--region ${AWS::Region}
exit 1
}
function cfn_success
{
cfn-signal -e 0 --stack ${AWS::StackName} \
--resource rJumpHost \
--region ${AWS::Region}
exit 0
}
yum -y install git python3-pip
until git clone https://github.com/aws-quickstart/quickstart-linux-utilities; do
echo "Retrying...";
done
cd quickstart-linux-utilities;
source quickstart-cfn-tools.source;
qs_update-os || qs_err;
qs_bootstrap_pip || qs_err "pip bootstrap failed ";
qs_aws-cfn-bootstrap || qs_err "CFN bootstrap failed ";
echo "Executing config-sets";
cfn-init -v --stack ${AWS::StackName} \
--resource rJumpHost \
--configsets ec2_bootstrap \
--region ${AWS::Region} || cfn_fail
[ $(qs_status) == 0 ] && cfn_success || cfn_fail
NetworkInterfaces:
-
AssociatePublicIpAddress: true
DeviceIndex: "0"
GroupSet:
- !Ref rPublicAccessSecurityGroup
SubnetId: !Ref pSubnetID
Tags:
-
Key: Name
Value: !Sub '${AWS::StackName}-jumphost'
Outputs:
JumpHostPublicHostname:
Description: JumpHost public hostname
Value: !GetAtt rJumpHost.PublicDnsName
Export:
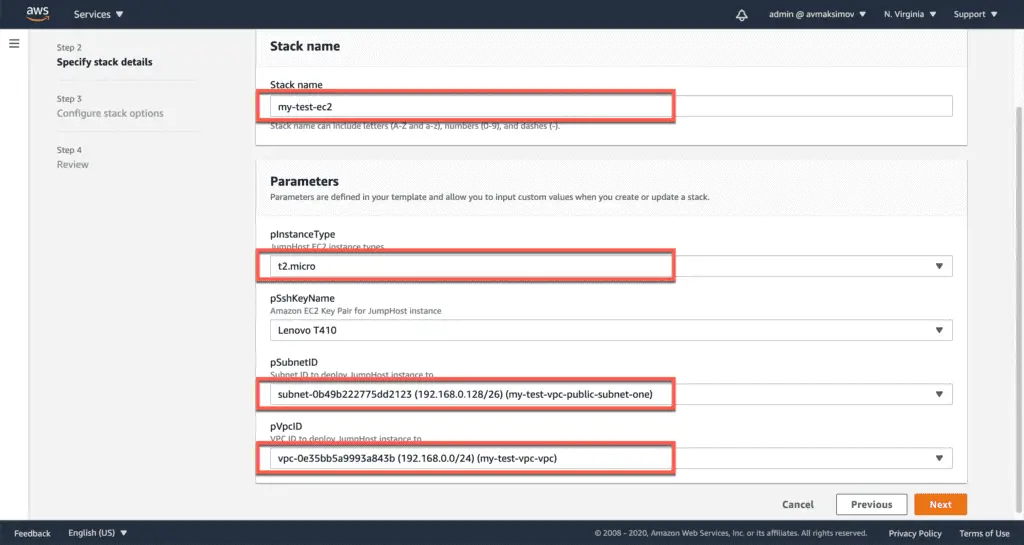
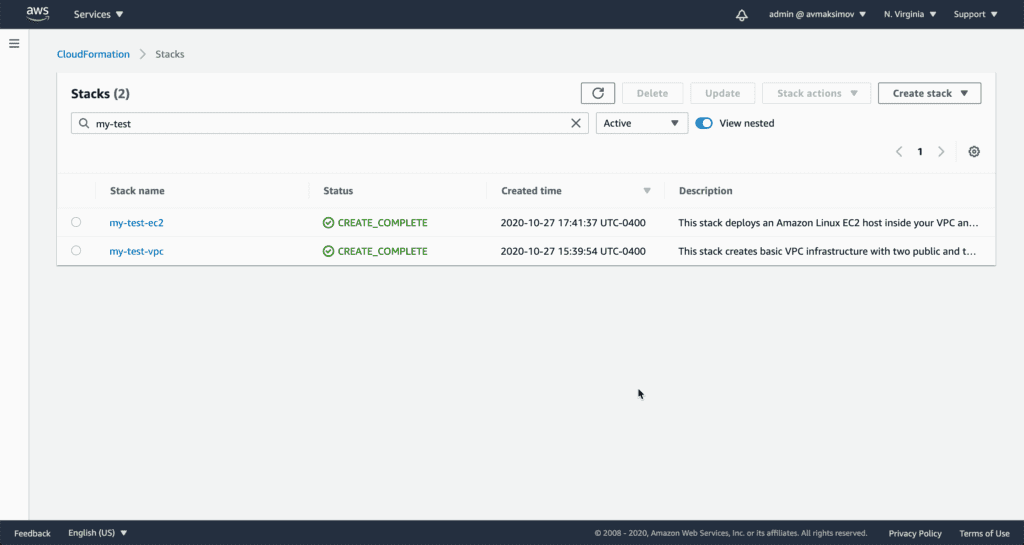
Name: !Sub '${AWS::StackName}-ec2-jumphost-public-ip'The stack creation process is almost the same as the previous way of creating stacks and all the other resources. All you need to do is to specify the correct parameters:
- Stack name:
my-test-ec2. - VPC:
Your VPC ID. - Subnet ID:
Your PUBLIC Subnet ID. - SSH Key:
Your public SSH key.
The only difference in the process is the required IAM capabilities checkbox:
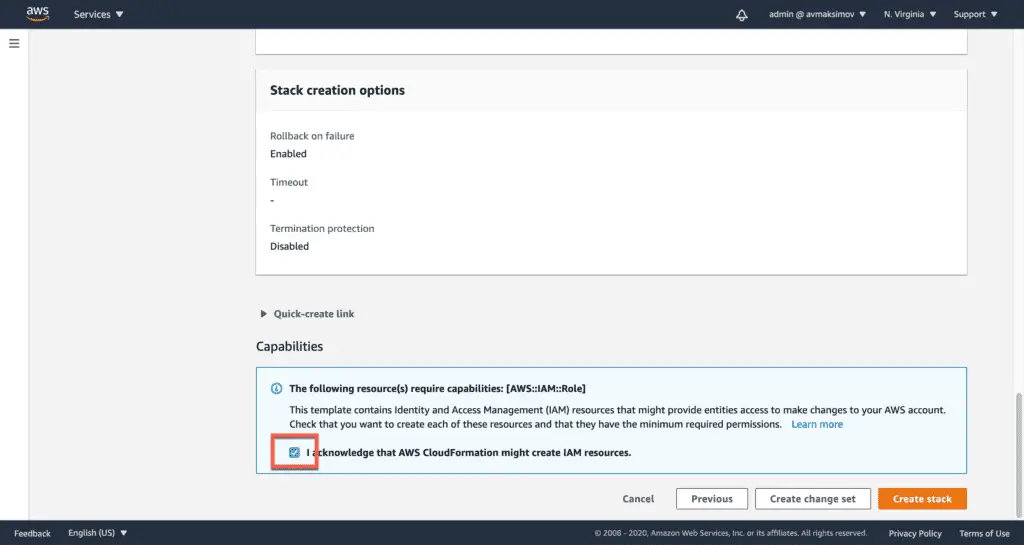
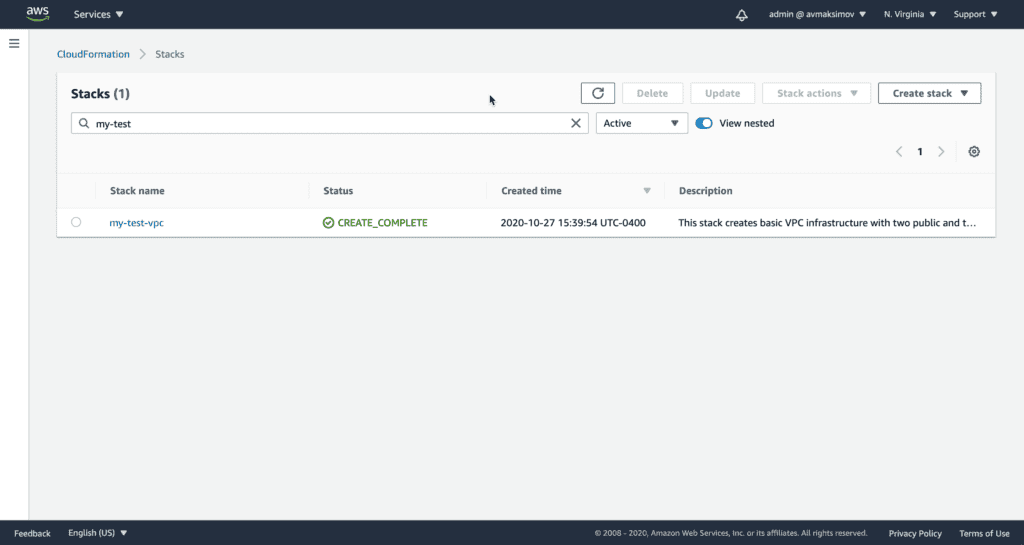
Click Create stack and in a couple of minutes, you should see your stack in CREATE_COMPLETE state.
Stack Description
There’re several important metadata blocks, which are used for JumpHost instance.
CreationPolicy:
    ResourceSignal:
        Timeout: PT5M
This block waits 15 minutes for a successful resource creation signal. If success signal not received, CloudFormation will rollback stack changes back.
This signal is sent by cfn_success or cfn_fail function depending on your automation script logic.
Project quickstart-linux-utilities simplifies cfn-init installation for the instances.
cfn-init -v --stack ${AWS::StackName} \
    --resource JumpHost \
    --configsets ec2_bootstrap \
    --region ${AWS::Region} || cfn_fail
This block tells cfn-init scripts to install everything, what described in Metadata block:
- Install Docker using yum.
- Enable Docker system service.
- Allow ec2-user execute docker command.
Metadata:
    AWS::CloudFormation::Init:
        configSets:
            ec2_bootstrap:
                - install_docker
        install_docker:
            packages:
                yum:
                    docker: []
            services:
                sysvinit:
                    docker:
                        enabled: "true"
                        ensureRunning: "true"
            commands:
                docker_for_ec2_user:
                    command: usermod -G docker ec2-user
Conclusion
In this article we used two CloudFormation templates to deploy VPC and EC2 instances to your web server. We automated Docker installation on EC2 instance using cfn-init too. Finally, we allowed ec2-user to execute docker command without sudo.
I hope, this article will save you some time! If you have any questions or comments, please, feel free to share them in the comments section below!
