To build the image in Docker, first, generate the Dockerfile. Then, create the new image by reading the build context from the Dockerfile through the “docker build” command. To publish the image to Docker Hub, tag the image with the registry user name. Then, log in to the Docker Hub registry and push the image to Docker Hub through the “docker push <image-name>” command.
Let’s first understand Docker Image and Docker Hub. Then, build and publish the container image to Docker Hub repository.
What is Docker Image?
Docker images are simple instruction files that guide containers on creating and deploying the application inside the container. Docker images are also known as blueprints, snapshots, or templates of containers. These images include all the instructions such as source code, dependencies, essential package details, commands to install packages, and configuration settings.
The Docker images are generated through simple Dockerfile instructions or commands such as “FROM”, “COPY”, “RUN”, “EXPOSE”, “CMD”, and so on.
What is Docker Hub?
Docker Hub is the world’s largest Docker repository that is used to publish, manage, and download container images. It provides hundreds of official images to execute and build the base containers, manage the application data through database images, and many more. It is frequently used by open-source and independent software developers and container community developers. Docker Hub is also used to store the application builds in a central space (Docker Hub) to make them accessible to other developers.
Steps to Build and Push Docker Image to Docker Hub
To create the Docker image and publish it to Docker Hub (official registry), go through the following steps:
- Build Docker Image
- Tag Docker Image
- Log In to Docker Hub
- Push Image to Docker Hub
- Verification
Build Docker Image
To generate the Docker image to dockerize the application in the Docker container, the user first needs to generate the Dockerfile. After that, make a new Docker image (container’s snapshot) through the “docker build” command. For a practical demonstration, check out the following instructions.
Step 1: Create a Program File
First, generate the program file in the nano editor through the “nano filename” command. For demonstration, we will dockerize the simple HTML program:
sudo nano index.html
Paste the following HTML program snippet into the “index.html” file:
<!DOCTYPE html>
<html>
<head>
	<title>Sample Application</title>
	<style>
		body {
			background-color: #D2B48C;
		}
		.container {
			text-align: center;
			padding: 50px;
		}
		p {
			color:#800000;
			font-weight: bold;
		}
	</style>
</head>
<body>
<div class="container">
	<h1>Welcome to Hands-on Cloud</h1>
	<p>Build and Push Image Tutorial</p>
	</div>
</body>
</html>
Step 2: Create Dockerfile
Now, create the Dockerfile in a nano text editor. This file will be used to generate the container image to dockerize the HTML program:
sudo nano Dockerfile
Add the following commands to the Dockerfile:
FROM nginx:latest
COPY index.html /usr/share/nginx/html/index.html
EXPOSE 80
ENTRYPOINT ["nginx", "-g", "daemon off;"]
In the above code block:
- The “FROM” command is utilized to set the parent image for the Docker container
- The “COPY” command will copy the program file to the container’s specified path.
- The “EXPOSE” command will describe the container’s exposed port from where the application is accessible from inside the container.
- The “ENTRYPOINT” will describe the default points from where the container will start execution.
Step 3: Build Image
In the next step, generate the image (container snapshot) from the Dockerfile instructions. To do so, run the mentioned command:
docker build -t html-image .In the mentioned command, the “-t” option will be used to set the image name, and “.” is used to read the Dockerfile from the current working directory:

For confirmation, list down the Docker images:
docker imagesThe given output indicates that we have effectively built the “html-image” image from the Dockerfile:

Step 4: Fire Up the Container
In order to execute the image to Dockerize the application, utilize the “docker run -p <host port>:<cont-port> –name <cont-name> <image-name>” command:
docker run -p 80:80 --name demo-cont html-imageIn the above command, the “-p” option is utilized to publish the container port on the host system to access the containerized application outside the container in the real world. The “–name” will set the name of the container:

For confirmation, open the browser, navigate to “http://localhost:80”, and check if the application is accessible or not:

That is how the Docker image is generated and executed.
Tag the Docker Image
In Docker, the “docker tag” command is utilized to tag the container images. It is widely used to tag the image to push it to the Docker repository, set the version of the image, or rename the Docker image. In our case, we need to tag the image with a Docker Hub username to publish the image on Docker Hub.
To tag the image, utilize the “docker tag <image-name> <Docker Hub user-name>/<image-name>:<version>” command:
docker tag html-image dockeruser019/html-image:1.0In the above command, we have tagged the “html-image” as “dockeruser019/html-image:1.0”. Here, “1.0” is the version of our tagged Docker image:

Now, list down the images and check if we have tagged the image or not:
docker images
Log In to Docker Hub
In the next step, to push the image to the Docker Hub registry, the user must have a Docker Hub account. You can sign up for a Docker Hub account free of cost from the official Docker Hub website.
After that, log in to your Docker Hub account by utilizing the “docker login” command:
docker loginThis operation will require the username and password for the account. Type in the Docker Hub login credentials and hit Enter.

The above result indicates that we have successfully logged in to the Docker Hub account.
Push the Image to Docker Hub
After accessing the Docker Hub account, the user can now publish the Docker images on the Docker registry. For this purpose, simply use the “docker push <tagged docker image>” command:
docker push dockeruser019/html-image:1.0
Verification
For verification, navigate to the Docker Hub official website and sign in to the Docker Hub account. For this purpose, first, open the “Sign In” menu. After that, provide the Docker Hub username and hit the “Sign in” button:

From the next wizard, provide the Docker Hub account password and hit the “Continue” button:

From the Docker Hub “Repositories” menu, the user can view the “html-image” repository followed by the Docker Hub account username. Click on the repository to open it:
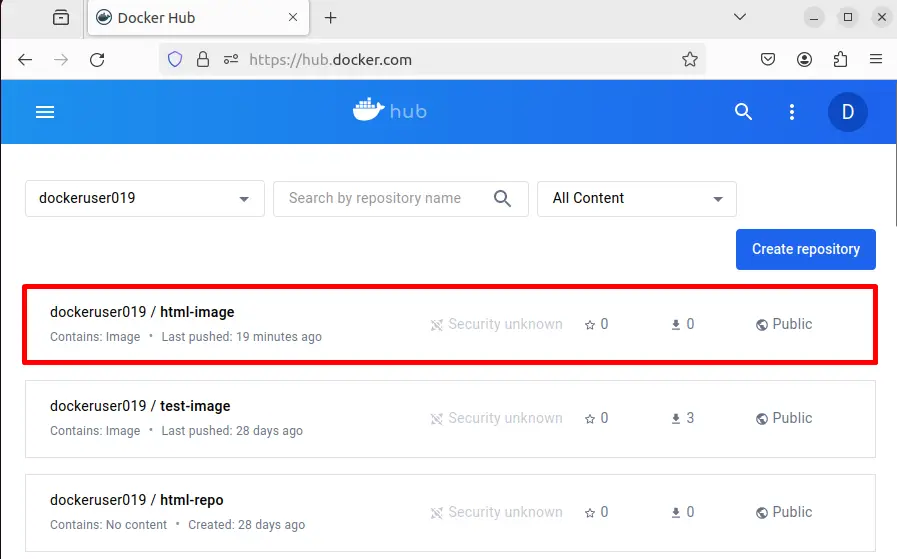
From the below output, the “html-image” tag “1.0” is successfully published on Docker Hub:

That is how users can build and publish the image on the Docker Hub registry.
Bonus Tip: How to Download and Use Published Docker Image
After publishing the Docker image in the published repository of the official Docker registry, the user can now download the image at any time from any system. For instance, let’s first remove the image from the system repository. Then, pull and execute the container image from Docker Hub.
Go through the below step-by-step procedure from the illustration.
Step 1: Remove Pushed Image
First, remove the pushed image from the system repository through the “docker rmi <tagged image>” command:
docker rmi -f dockeruser019/html-image:1.0Here, “-f” option is used to remove the image forcefully:

For confirmation, list down the Docker images through the “docker images” command:
docker imagesHere, we have removed the Docker image from the local repository of the system:

Step 2: Download the Published Image From Docker Hub
Now, download the image from the Docker Hub registry. For this purpose, simply execute the “docker pull <tagged image>” command:
docker pull dockeruser019/html-image:1.0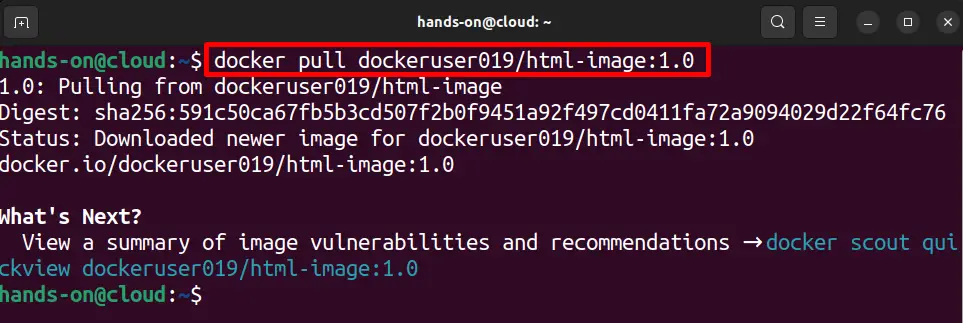
Step 3: Execute the Downloaded Image
For verification, execute the tagged image to containerize the application through the “docker run -p <host port>:<container port> <tagged image>” command:
docker run -p 80:80 dockeruser019/html-image:1.0
After that, launch the system’s default browser, search for the “http://localhost:80” URL, and verify if the application is executing or not. The given output indicates that we have effectively downloaded the published Docker image from the Docker Hub:

We have covered the steps to build and push the Docker image to Docker Hub. Also, demonstrate how to download the published image from Docker Hub.
Conclusion
To build and push the image to Docker Hub, first generate the Docker image from Docker file commands by utilizing the “docker build -t <image name> .” command. After that, tag the Docker image with the Docker Hub user name through the “docker tag <image name> <Docker Hub username>/<image name>:<version>” command. Then, publish the container image to the Docker Hub repository through the “docker push <tagged image name>” command. In order to download or pull the published image from the Docker Hub, simply use the “docker pull <published image name>” command. This write-up has discussed the steps to generate and publish the Docker image to Docker Hub.
