To build the image with extended features and by imposing buildkit builder capabilities, Docker introduces another plugin named “Docker Buildx” in Docker version 19 or more.
What is Docker Buildx?
Docker Buildx is one of the Docker command line plugins used to build the image (container snapshot) by imposing the buildkit builder. It is more similar to “docker build” but it offers advanced and extended features and is a fine choice to replace “docker build”.
By using “Docker buildx”, users can generate the container snapshot for different platforms or architectures. This will be helpful in building an application by executing the same image natively on multiple platforms or CPU architectures. Additionally, users can use in-container driver support through advanced build kit functionality which enables us to run the build within the container in Docker or through the remote driver.
How to Set up Docker Buildx Plugin in Docker
On Windows and MacOS, the Docker Desktop installation package includes the Docker compose and Buildx plugin and these will be automatically installed and enabled with Docker Desktop installation.
On Linux, the user needs to install the Docker buildx plugin package with docker-ce, docker-ce-cli, and other packages. To install the Docker buildx plugin to extend the build capabilities through buildkit, utilize the below command:
sudo apt install docker-buildx-plugin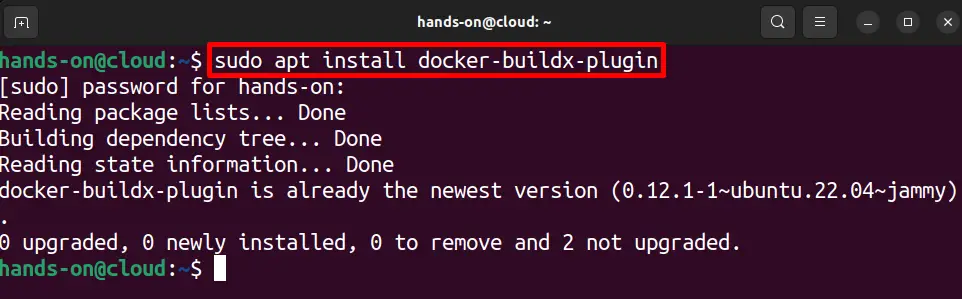
Enable Experimental Feature on Linux to Use Docker Buildx
After installing the Docker buildx on Linux, set the environment variable “DOCKER_CLI_EXPERIMENTAL” and make it enable by setting its value as “enabled”:
export DOCKER_CLI_EXPERIMENTAL=enabled
Enable Experimental Feature on Windows/MacOS to Use Docker Buildx
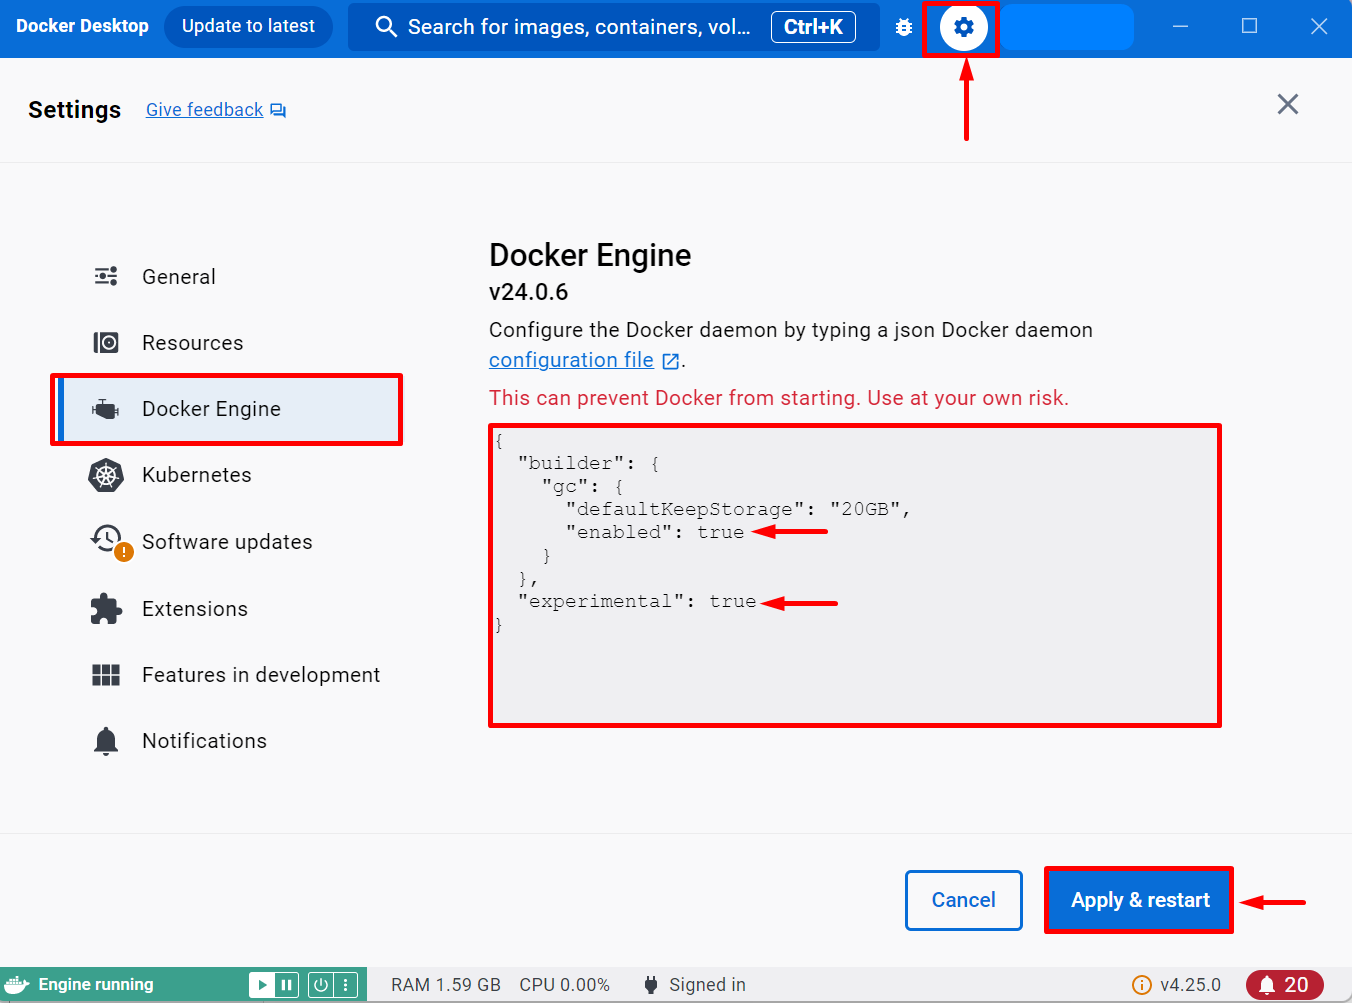
On Windows and MacOS, by default, docker buildkit builder, and experimental features are enabled. If these are not enabled, enable them manually.
For this purpose, first launch the Docker Desktop application. After that, click on the below pointed “Gear” icon to open Docker settings. Navigate to the “Docker Engine” setting from the left pane and enable the below-pointed “builder” and “experimental” features by setting their values as “true”. After that, implement the changes by clicking on the “Apply & restart” button:
Buildx Manual
To view the Docker buildx supported commands and command line manual, simply run the “docker buildx” command on the terminal:
docker buildxThe below-pointed commands are used to manage and build the image with extended buildkit capabilities:

Let’s understand the use of the Docker Buildx plugin by following the below section.
How to Use Docker Buildx Command?
The Docker buildx command line manual in the above sections shows the different “docker buildx” commands that are used to manage and create the Docker images with extended buildkit features such as the “docker buildx bake” command is used to build the buildx instance from the file, “docker buildx build” will generate the container snapshot (image) with extended features such as generate an image for multiple CPU architectures and many more.
To use the “docker buildx” command or to view the illustration of the Docker buildx plugin working, follow the below-listed commands:
- Docker Buildx Version
- Create Buildx Instance
- List the Builds Instance
- Inspect Buildx Instance
- Use Buildx Instance
- Create Image For Multiple Platforms Using Docker Buildx
- Remove Buildx Instance
Docker Buildx Version
To check the Docker buildx plugin version and to verify if the Docker buildx plugin is installed and enabled, execute the “docker buildx version” command:
docker buildx versionHere, you can see we have currently buildx version “v0.12.1” on our Ubuntu system:

Create Buildx Instance
In Docker, the builder instance is referred to as the isolated environment in which the image builds can be invoked. By default, “docker buildx” uses the default builder.
To create a new builder instance in Docker, run the “docker buildx create –name <instance-name>” command:
docker buildx create --name demo-builder
List the Builds Instance
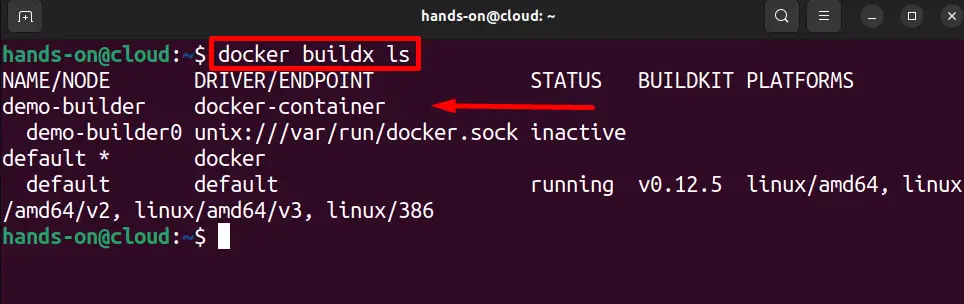
To list down all the buildx builder instances in Docker, go through the below command:
docker buildx lsThis command will show a short summary or detail about the buildx instance such as builder status, builder-supported platform, driver, and so on:
Inspect Buildx Instance
In order to inspect the builder instance through the “docker buildx” command to view the detailed summary of the builder, execute the “docker buildx inspect <builder-instance-name>” command:
docker buildx inspect demo-builder
Use Buildx Instance
In order to activate and use the builder instance of Docker buildx, utilize the “docker buildx use <builder-instance-name>” command:
docker buildx use demo-builderThis will activate and use the builder for the next or upcoming builds:

Create Image For Multiple Platforms Using Docker Buildx
In order to create the image to containerize the application with extended buildkit capabilities, utilize the “docker buildx build” command instead of the “docker build” command. This command also enables us to generate the container snapshot (image) for various architecture and platforms. To generate the container snapshot for different platforms, go through the following demonstration.
Step 1: Create Dockerfile
First, make a new file in Nano or any text editor named “Dockerfile”:
sudo nano DockerfileAdd the below instructions to the Dockerfile. Here, the “FROM” command will set the base template of the container, the “COPY” command copies the program or source file to a provided path of the container, and “ENTRYPOINT” will set the executable points for the container:
FROM nginx:latest
COPY index.html /usr/share/nginx/html/index.html
ENTRYPOINT ["nginx", "-g", "daemon off;"]
Step 2: Generate Docker Image
Now, generate the image for various platforms through buildkit capabilities. For this purpose, execute the “docker buildx build –platform <platform1>,<platform2>,<platform3>… -t <image-name> .” command:
docker buildx build --platform linux/arm64,linux/amd64 -t html-img .In the given command, we have containerized the application for two different platforms. The docker buildx build will read and access the “Dockerfile” instruction from the currently opened directory, therefore, we have used “.” only.
In case, if your Dockerfile is placed in another directory, you need to use the “-f” option along with the path to the Dockerfile in the given command:

Note: The warning shows that the build result will remain in the build cache and cannot be used. To use an image to containerize the application, the user needs to push or load the image to the Docker registry.
Generate an Image and Push it to the Repository
To push the image to the Docker repository directly while generating an image, utilize the “docker buildx build –platform <platform1>,<platform2>,<platform3>… -t <User-name/image-name> –push .” command:
docker buildx build --platform linux/arm64,linux/amd64 -t dockeruser019/html-img --push .In the above command, we have just replaced the image name with “<Docker Hub user-name/image-name>” and added the “–push” option to directly push the image to the specified username repository:

For verification, navigate to the Docker Hub repository and check if the image is created and pushed or not. The below output shows that we have effectively created the Docker image for Linux “arm64” and “amd64” platforms:

Step 3: Execute the Image
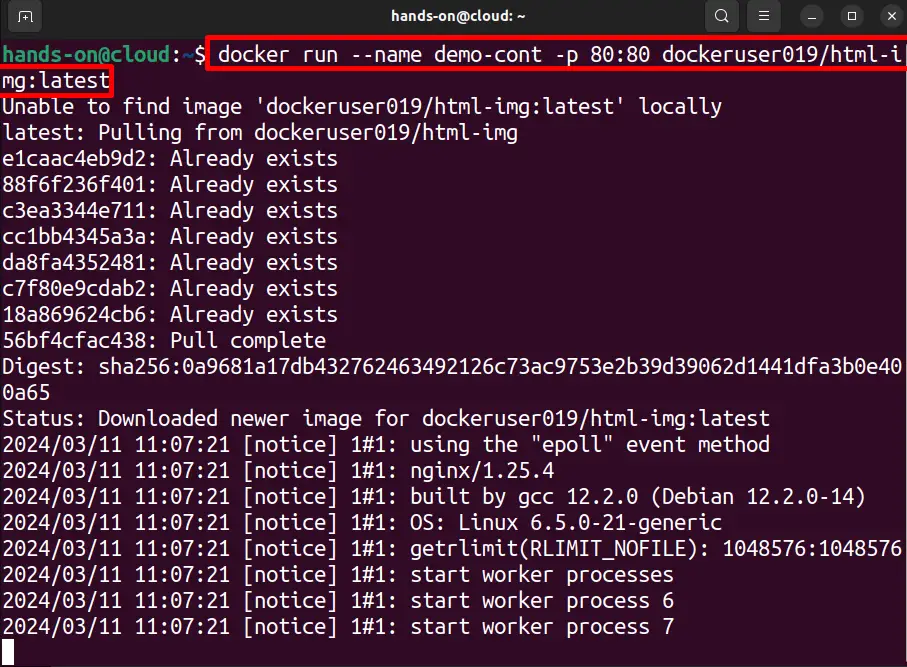
To execute the multi-platform image, simply execute the “docker run <tagged-image-name>” command:
docker run --name demo-cont -p 80:80 dockeruser019/html-img:latestHere, the “-p” option is used to expose the containerized application on Docker host port “80” and “–name” sets the name for the Docker container:
For verification, launch the browser, open the “http://localhost:80” URL, and check if the multi-platform application is executing or not:

That is how multi-platform container images are generated and used.
Remove Buildx Instance
To remove the builder instance from Docker, first, stop the builder and then remove the inactive builder. Follow the below commands to stop and remove the builder instance from Docker:
Step 1: Stop Builder Instance
First, stop the buildx builder instance through the “docker buildx stop <builder-name>” command:
docker buildx stop demo-builder
Step 2: Remove Builder Instance
Next, remove the dangling, inactive builder instance of buildx using the given command:
docker buildx rm --all-inactive --forceHere, the “–all-inactive” option is used to remove all inactive builder’s instances, and “–force” will remove these instances forcefully:

We have explained over on the Docker Buildx Plugin and how to use it in detail.
Conclusion
Docker Buildx is a Docker command line plugin utilized to build the container snapshot(image) for multiple platforms or architectures by imposing the buildkit extended features. It offers various commands such as “docker buildx create” to create a new builder instance, “docker buildx build” to generate a container image with extended buildkit functionalities, “docker buildx rm” to remove inactive builder instances and many more. This post has illustrated what is Docker Buildx and how to use it.
