To save the container changes in a Docker image, the user can create a container snapshot (image) from the existing container by utilizing the “docker commit”. The specified command is also used to create the backup of Docker containers by saving the container as an image.
What is the “docker commit” Command?
Docker is a well-liked containerization tool that is utilized to package applications, software, and programs along with essential dependencies in small executable containers. To manage and operate these containers, Docker provides a vast command line utility (Docker CLI).
The “docker commit” is a Docker CLI command that is utilized to save the changes of the Docker container in a new Docker image. It is also used to save the container data and create a backup of the container when the user wants to cleanly restart the Docker development environment.
However, this command will never save the data in an image that exists in the external bound volume of the container.
The “docker commit” supports different flags that provide an extra layer of functionalities. These are represented below in tabular form:
| Flag | Description |
|---|---|
| -a, –author | This option is utilized to set the name of the author who is making the commit and generate the image from the container. |
| -c, –change | This is used to commit the changes to an image by adding Dockerfile instructions. |
| -m, –message | This option is utilized to set the commit message for an image. |
| -p, –pause | It is used to pause the Docker container during the commit. By default, its value is “true”. To prevent the container from pausing, the user can set its value as “false”. |
Syntax:
To utilize the “docker commit” Docker CLI command, the following syntax will be used:
docker commit [OPTIONS] [Container Name/Container ID] [Image Name]Let’s check out the method to save the container as a Docker image by utilizing the “docker commit” command.
How to Save a Container as a Docker Image Using Docker Commit?
Usually, after containerizing the application from the Docker image, the user may need to make changes in the application or container configuration or the user wants to update the containerized application. In this scenario, they may make changes directly from the container by accessing the container interactive shell, or copy the changes to the container through the “docker cp” command.
However, these committed changes will update the container but the container image will not be updated. Whenever the user runs the image, it will containerize the old application. The user can generate a new image from the existing container through the “docker commit” to save the docker container changes.
To understand how Docker containers commit the changes and how new image is generated from the container, check out the following procedure:
- Generate Container From Image
- Copy Changes to Container
- Save Container as an Image Using “docker commit”
- Delete Old Container
- Execute New Container From Committed Image
Generate Container From Image
To generate the container from the image or to Dockerize the user application, check out the following procedure:
Step 1: Create Program
First, create a program file in any text editor. For instance, we have created an “index.html” file in the Ubuntu Nano editor:
sudo nano index.htmlNow, add the following HTML code snippet into the file to containerize the simple HTML program:
<!DOCTYPE html>
<html>
<head>
	<title>Sample Application</title>
	<style>
		body {
			background-color: #D2B48C;
		}
		.container {
			text-align: center;
			padding: 50px;
		}
		p {
			color:#800000;
			font-weight: bold;
		}
	</style>
</head>
<body>
	<div class="container">
		<h1>Welcome to Hands-On.Cloud</h1>
	</div>
</body>
</html>
Step 2: Generate Dockerfile
In the next step, create another file in the nano editor named “Dockerfile”. This file will contain the commands that are used to generate container snapshots:
sudo nano DockerfileAdd the following commands to the file:
FROM nginx:latest
COPY index.html /usr/share/nginx/html/index.html
EXPOSE 80
ENTRYPOINT ["nginx", "-g", "daemon off;"]
The explanation of the Dockerfile command mentioned above is as follows:
- The “FROM” command will set the parent image for the container.
- The “COPY” copies the source or program file to the described path of the container.
- The “EXPOSE” command will specify the container port on which the containerized application will be executed.
- The “ENTRYPOINT” command will set the starting points for the container.
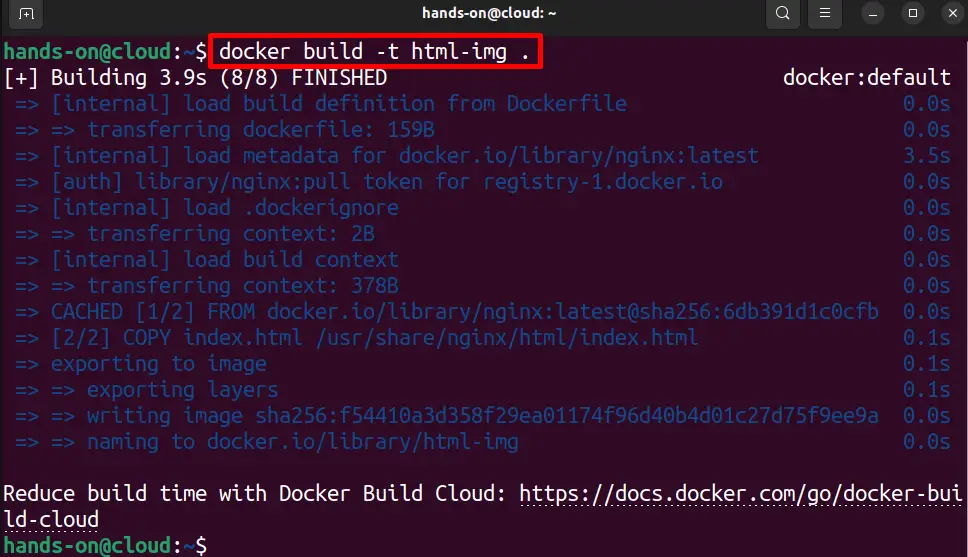
Step 3: Generate Image
Now, create the container snapshot from the Dockerfile commands:
docker build -t html-img .In the mentioned command, the “-t” option will tag the image, and “.” will tell the Daemon to read the file from the current working directory:
Step 4: View Images
For verification, view the images in Docker through “docker images”:
docker images
Step 5: Generate a Container From the Image
Now, create and fire up the container to execute the container’s snapshot:
docker run -p 80:80 --name demo-cont -d html-imgIn the given command, the “-p” option will forward the container port on the host system to access the application on the host machine outside the container. The “–name” is utilized to set the container’s name and “-d” will process the container as a backend service in detached mode:

For confirmation, list down the Docker containers:
docker ps -a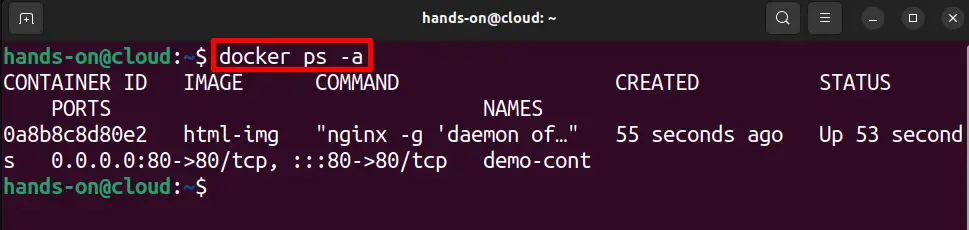
Now, navigate to the “http://localhost” from the browser and verify if the application is executing or not:
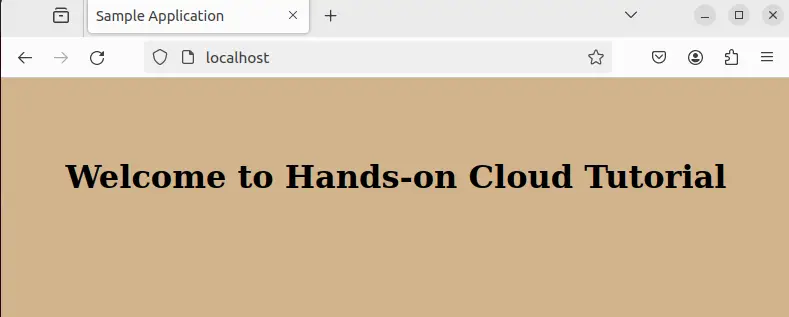
Let’s make minor changes in the application user interface to commit the changes to a new image.
Copy Changes to Container
To make the changes in a container, let’s modify the “index.html” file. To do so, check out the below steps:
Step 1: Make Changes in the Program File
Open the “index.html” program file in the nano editor:
sudo nano index.htmlHere, we have added “<p>” tag and style the tag in “<style>” tag section:
<!DOCTYPE html>
<html>
<head>
    <title>Sample Application</title>
    <style>
    body {
            background-color: #D2B48C;
         }
        .container {
            text-align: center;
            padding: 50px;
        }
        p {
            color:#800000;
            font-weight: bold;
        }
    </style>
</head>
<body>
<div class="container">
    <h1>Welcome to Hands-on Cloud</h1>
    <p> Saving Container as an Image Using "docker commit" Command</p>
    </div>
</body>
</html>
Save the changes through “CTRL + S” and exit the editor using “CTRL + X”.
Step 2: Copy File in Container
Now, copy the changes in the path of the “demo-cont” container where the old “index.html” file is placed:
docker cp index.html demo-cont:/usr/share/nginx/html/index.htmlThe above command will overwrite the container’s “index.html” file with the updated file:

For verification, again open the browser and launch the containerized application by navigating to the “http://localhost” URL:

The above output shows that we have effectively committed the changes in the Docker container. But these changes are still not saved and committed in the container snapshot “html-img”.
Save Container as Docker Image Using “docker commit”
To commit the changes of the existing container as an image, utilize the “docker commit <container name> <new image name>” command:
docker commit demo-cont updated-html-imgHere, we have saved the “demo-cont” container as an “updated-html-img” image:

For confirmation, again view the Docker images through the below command:
docker imagesThe below result shows that we have successfully saved the container as an “updated-html-img” image:
Delete Old Container
Let’s remove the old container to generate the new one from the updated container snapshot. For this purpose, remove the container through the below demonstration:
Step 1: Stop Docker Container
First, terminate the executing container:
docker stop demo-contStep 2: Delete Docker Container
Next, remove the Docker container using the “docker rm <container name/id>” command:
docker rm demo-cont
For confirmation, view the container from the Docker host:
docker ps -aHere, we have effectively removed the old container:

Execute the Container From the New Image
In the next step, now execute the updated image and check if it saves the container changes or not. For this purpose execute the “docker run -p 80:80 –name <container name> <updated image>” command:
docker run -p 80:80 --name demo-cont -d updated-html-imgHere, we have used the same container name “demo-cont” to start and execute the new container from the “updated-html-img”:

Open the system default browser, navigate to “http://localhost” and check if the committed changes of the older container are applied in the new one or not:
This is how the image can be generated from a Docker container.
Bonus Tip: Set the Author and Commit Message of a Docker Image
While generating the image from the container, the user can set the author name and commit message for an image through the “docker commit” command’s options. For a demonstration, check out the below
Step 1: Set the Author and a Commit Message of an Image
Set the author of the image who is saving the container as an image using the “-a” option. To set the comment or message of commit, utilize the “-m” option. To do so, utilize the “docker commit -a <author name> -m <message or comment> <container name> <new image name>” command:
docker commit -a hands-on -m "Saving Container Changes in New Image" demo-cont updated-html-img
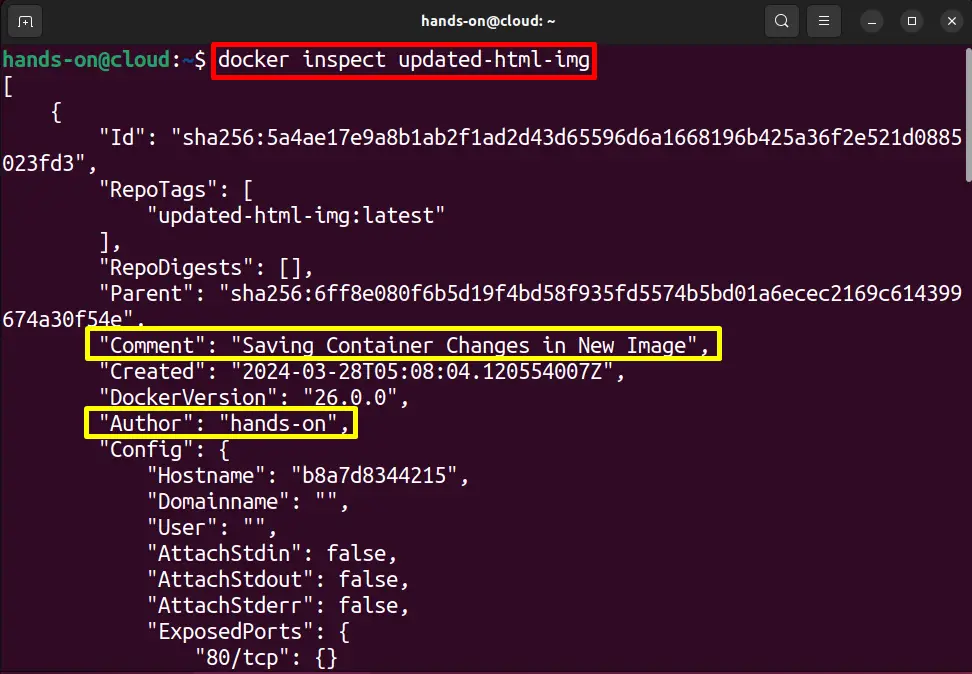
Step 2: Inspect the Committed Image
For verification, inspect the Docker image through the “docker inspect <new image name>” command:
docker inspect updated-html-imgHere, the output shows that we have effectively set the image comment and author name:
That is all about saving the Docker container as an image using the “docker commit” command.
Conclusion
To save the Docker container as an image either after making changes or for backup purposes, simply use the “docker commit <container name> <image name>” command. You can utilize the “-a” flag to set the author of the image and a commit message or comment can be set through the “-m” option in the “docker commit” command. This write-up has elaborated the procedure to save the existing container as a Docker image.
