How To Import Oracle To AWS Guide
Migration of Oracle database to AWS documentation is a common task for many different Enterprises nowadays. And there’re many different ways of doing that. This article will summarize the manual steps and commands helping to import Oracle to AWS cloud. As per the AWS Documentation, Amazon RDS for Oracle does not allow access to SYSDBA administrative users, as it might damage the Oracle data dictionary and affect the stability of your database.
Table of contents
If you’re interested in the DB migration topic, it might be worth checking out our article “CloudFormation: How to create DMS infrastructure for DB migration.”
Enable S3 integration
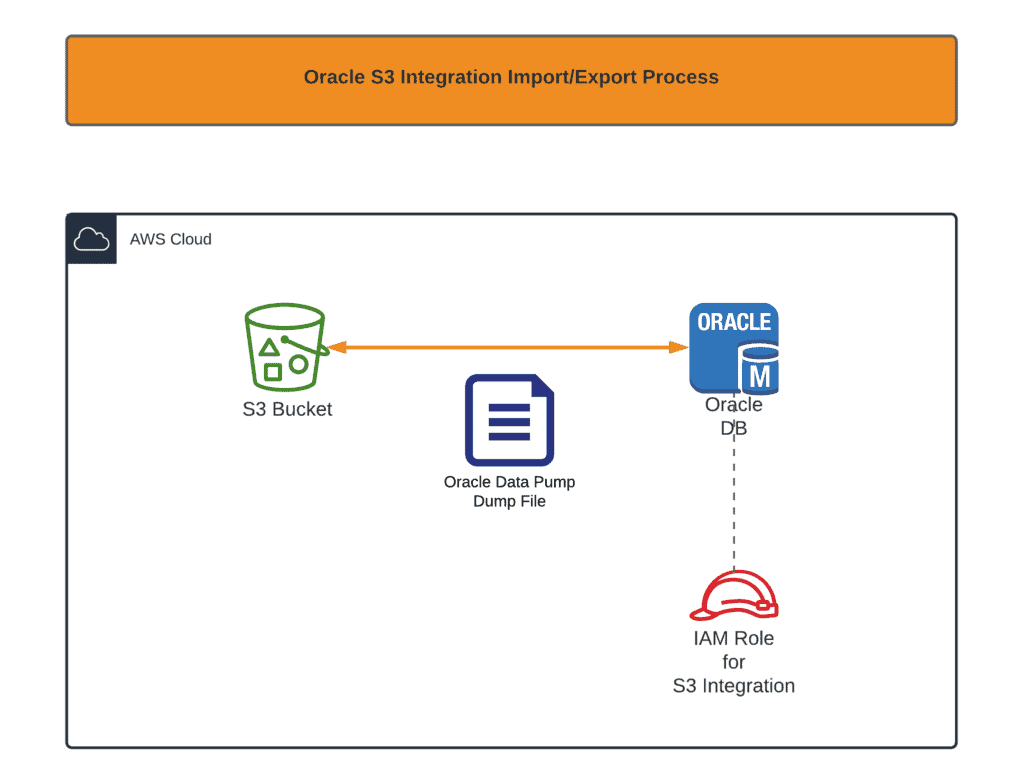
First of all, you need to enable Oracle S3 integration. The whole process is thoroughly described in the official documentation. In summary, it provides your Oracle RDS instance with the ability to get access to the Amazon S3 bucket. For those of you, who’re using CloudFormation to do that, here are some snippets:
DbOptionGroup:
  Type: "AWS::RDS::OptionGroup"
  Properties:
    EngineName: oracle-ee
    MajorEngineVersion: "12.2"
    OptionConfigurations:
      -
        OptionName: S3_INTEGRATION
    OptionGroupDescription: "Oracle DB Instance Option Group for S3 Integration"
DbInstanceS3IntegrationRole:
  Type: "AWS::IAM::Role"
  Properties:
    AssumeRolePolicyDocument:
      Version: "2012-10-17"
      Statement:
        - Effect: Allow
          Principal:
            Service: rds.amazonaws.com
          Action: "sts:AssumeRole"
    Path: "/"
    Policies:
    - PolicyName: S3Access
      PolicyDocument:
        Version: '2012-10-17'
        Statement:
        - Effect: Allow
          Action:
            - s3:GetObject
            - s3:ListBucket
            - s3:PutObject
          Resource:
            - !Sub "arn:aws:s3:::${DbDumpBucketName}"
            - !Sub "arn:aws:s3:::${DbDumpBucketName}/*"
Now, if you’re planning continuously create and delete RDS Oracle instances using CloudFormation, it is better not to attach DbOptionGroup To your Oracle instance. CloudFormation will not be able to delete your stack because:
- An automatic RDS instance snapshot is created during RDS provisioning time.
- RDS instance snapshot depends on Options Group.
As a result, the Option Group at your stack will be locked by an automatically created DB snapshot, and you will not be able to remove it.
Importing Oracle Data Pump file
Now, we will talk about data pump import Oracle to AWS, but before you migrate data with the following migration techniques, we recommend you back up your database. You can back up your RDS for Oracle DB instances by creating snapshots, but we will discuss that at another time. Moving on, create all necessary tablespaces if needed. Each can be created by:
CREATE TABLESPACE MY_TABLESPACE DATAFILE SIZE 5G
AUTOEXTEND ON NEXT 1G;
Create the required schemas(user and password) and provide it the necessary privileges:
CREATE USER MY_USER IDENTIFIED BY "MY_PASSWORD";
GRANT UNLIMITED TABLESPACE TO MY_USER;
GRANT CREATE SESSION, RESOURCE, DBA to MY_USER;
ALTER USER MY_USER QUOTA 100M on users;
Also, for every tablespace you made:
ALTER USER MY_USER QUOTA 100M ON MY_TABLESPACE;To initiate dump file copy from the S3 bucket, execute the following query:
SELECT rdsadmin.rdsadmin_s3_tasks.download_from_s3(
    p_bucket_name => 'your_s3_bucket_name',
    p_s3_prefix => '',
    p_directory_name => 'DATA_PUMP_DIR')
AS TASK_ID FROM DUAL
This query returns task-id, which can be used to track transfer status:
SELECT text FROM table(rdsadmin.rds_file_util.read_text_file('BDUMP','dbtask-.log'))Replace <task_id> with the value returned from the previous query.
You may list all uploaded files using the following query:
select * from table(RDSADMIN.RDS_FILE_UTIL.LISTDIR('DATA_PUMP_DIR')) order by filename;Note: sometimes, it’s required to delete the imported file. You may do it with the following command:
exec utl_file.fremove('DATA_PUMP_DIR','your_file_name');As soon as the file is transfected from the S3 bucket to the Oracle instance, you may start the import job:
DECLARE
hdnl NUMBER;
BEGIN
hdnl := DBMS_DATAPUMP.OPEN( operation => 'IMPORT', job_mode => 'SCHEMA', job_name=>null);
DBMS_DATAPUMP.ADD_FILE( handle => hdnl, filename => 'your_file_name', directory => 'DATA_PUMP_DIR', filetype => dbms_datapump.ku$_file_type_dump_file);
DBMS_DATAPUMP.ADD_FILE( handle => hdnl, filename => 'imp.log', directory => 'DATA_PUMP_DIR', filetype => dbms_datapump.ku$_file_type_log_file);
DBMS_DATAPUMP.METADATA_FILTER(hdnl,'SCHEMA_EXPR','IN (''your_schema_name'')');
DBMS_DATAPUMP.START_JOB(hdnl);
END;
Replace your_file_name and your_schema_name with your values.
To check the status of your job, execute the following query:
SELECT owner_name, job_name, operation, job_mode,DEGREE, state FROM dba_datapump_jobs where state='EXECUTING'You have now imported Oracle to AWS! Note that you can read the import log file to get more information about errors or unexpected results:
SELECT text FROM table(rdsadmin.rds_file_util.read_text_file('DATA_PUMP_DIR','imp.log'))Exporting Oracle Data Pump file
Now, we will talk about how to export data from Oracle to AWS. Note that the following dump query may not export ALL your tables if some tables may not be extent allocated. So, it would be best if you generated a script to alter those tables:
SELECT 'ALTER TABLE '||table_name||' ALLOCATE EXTENT;' FROM user_tables WHERE segment_created = 'NO';Run generated queries before executing dump query to get a complete dump.
To export the Oracle Data Pump file, you need to export your DB first:
DECLARE
hdnl NUMBER;
BEGIN
hdnl := DBMS_DATAPUMP.OPEN( operation => 'EXPORT', job_mode => 'SCHEMA', job_name=>null);
DBMS_DATAPUMP.ADD_FILE( handle => hdnl, filename => 'your_file_name', directory => 'DATA_PUMP_DIR', filetype => dbms_datapump.ku$_file_type_dump_file);
DBMS_DATAPUMP.ADD_FILE( handle => hdnl, filename => 'exp.log', directory => 'DATA_PUMP_DIR', filetype => dbms_datapump.ku$_file_type_log_file);
DBMS_DATAPUMP.METADATA_FILTER(hdnl,'SCHEMA_EXPR','IN (''your_schema_name'')');
DBMS_DATAPUMP.START_JOB(hdnl);
END;
Replace your_file_name and your_schema_name with your desired values.
To check the status of your job, execute the following query:
SELECT owner_name, job_name, operation, job_mode,DEGREE, state FROM dba_datapump_jobs where state='EXECUTING'Also, you may read exp.log during export operation:
SELECT text FROM table(rdsadmin.rds_file_util.read_text_file('DATA_PUMP_DIR','exp.log'))As soon as the export finishes, you may copy your exported file to the S3 bucket:
SELECT rdsadmin.rdsadmin_s3_tasks.upload_to_s3(
      p_bucket_name    =>  'your_s3_bucket_name',
      p_prefix         =>  '',
      p_s3_prefix      =>  '',
      p_directory_name =>  'DATA_PUMP_DIR')
AS TASK_ID FROM DUAL;
And again, to check upload status, execute the following query:
SELECT text FROM table(rdsadmin.rds_file_util.read_text_file('BDUMP','dbtask-.log'))Importing regular exported file
Sometimes you may be dealing with dumps, which have been exported by Oracle Export utility. Their import is not that efficient, but we have no other option if we have to transfer.
Create necessary tablespace if needed:
CREATE TABLESPACE MY_TABLESPACE DATAFILE SIZE 5G
AUTOEXTEND ON NEXT 1G;
Create schema (user) for the imported database:
create user MY_USER identified by ;
grant create session, resource, DBA to MY_USER;
alter user MY_USER quota 100M on users;
Grant your user all necessary permissions, allowing you to import DB:
grant read, write on directory data_pump_dir to MY_USER;
grant select_catalog_role to MY_USER;
grant execute on dbms_datapump to MY_USER;
grant execute on dbms_file_transfer to MY_USER;
Next, you must install Oracle Instant Client to the Amazon EC2 instance.
Download the following RPMs:
- Base.
- Tools.
And install them:
sudo yum -y install oracle-instantclient19.6-basic-19.6.0.0.0-1.x86_64.rpm
sudo yum -y install oracle-instantclient19.6-tools-19.6.0.0.0-1.x86_64.rpm
Now you may import your dump file using the Oracle Import utility:
/usr/lib/oracle/19.6/client64/bin/imp \
MY_USER@rds-instance-connection-endpoint-url/ORCL \
FILE=/opt/my_exported_db.dmp FULL=y GRANTS=y
As soon as the process finishes, I recommend exporting your DB using Oracle Data Pump to have the ability to import it much faster next time.
Common errors
Oracle S3 integration not configured:
ORA-00904: "RDSADMIN"."RDSADMIN_S3_TASKS"."UPLOAD_TO_S3": invalid identifier
00904. 00000 -  "%s: invalid identifier"
*Cause:
*Action:
Error at Line: 52 Column: 8
You must apply to the correct Option Group or check the S3 integration role.
