How to Build Your First Python Google Cloud Function
Google Cloud Functions are serverless computing services offered within the Google Cloud Platform. It allows developers to create small, single-purpose functions that react to various events without the need to manage the underlying infrastructure. In serverless computing, cloud functions provide similar functionality as AWS Lambda or Azure Functions. This tutorial will demonstrate how to set up your first Google Cloud Function using Python. You will also learn how to use the cloud function to automatically send emails, respond to changes in the cloud bucket, and interact with other services, such as Google Sheets, to retrieve data at runtime.
Table of contents
Why Use Google Cloud Functions?
There are several reasons to use cloud functions (sometimes referred to as Functions as a Service – FaaS):
- Ease of use: Cloud Functions are easy to set up and use, with a simple interface and pre-built libraries and frameworks.
- Cost savings: Cloud functions only run when triggered, so you don’t have to pay for idle resources.
- Scalability: Cloud Functions automatically scale up or down based on demand, so you can handle bursts of traffic or usage spikes without manually adjusting your resources. This makes it easy to build applications that handle a wide range of workloads and user volumes.
- Integration with other Google Cloud services: Cloud Functions integrates seamlessly with other GCP services, such as Cloud Storage, Cloud Pub/Sub, and Cloud Firestore. This makes building applications that leverage the full range of GCP services and capabilities easily.
Breaking Down Functions
The architecture of Google Cloud Functions is based on the concept of triggers, which in turn execute the function. You can trigger Google Cloud Function using a variety of ways, such as:
- Cloud Storage: A function will be executed when a specified event occurs on the Cloud Storage bucket, such as a file upload, delete, rename, etc.
- Pub/Sub: This function will execute whenever a message is published to a specified Pub/Sub topic.
- HTTP: This function will execute whenever an HTTP request is made to a specified URL.
- Cloud Scheduler: This function will run on a specified schedule, such as every hour or every day.
Now, it is time to get started with our first cloud function using the Python language.
Prerequisites
To start with Google Cloud Functions, we must use an existing project or create a new one on the Google Cloud Console(GCP). In case you don’t have your own Google account (Google Cloud Platform account), you can sign up for it now using our fantastic offer (Receive $350 in free credits and free usage of 20+ products on Google Cloud):

Sign up today to receive $350 in free credits and free usage of 20+ products on Google Cloud!
Creating a Google Cloud project
Once you have an active GCP account, you can create a new project.
On the main screen of the Google Cloud Platform Console, find “Select a project” by going to the projects menu at the top of the page. Expand the list of all active projects and then click on the option to create a “New Project.”
When the “New Project” creation window appears, enter a meaningful name in the Project name field. We’ll use “HandsOnCloudGCPFunctionDemo” as the project name, something you can easily associate with this how-to article.
Activate the Google Cloud Functions API
First, we need to activate the Cloud Function API for our Google Cloud project to start using them. The following steps are involved in the process:
- From the Goole Console side menu, go to “APIs & Services“
- Click on the “Enable APIs and Services” button
- Type “Cloud Functions API” in the search box and select it from the results
- Click on the “Enable” button to activate the API
Activation may take a few minutes to complete. Once it is activated, we can start using it in our project
Creating Event-Based Cloud Functions
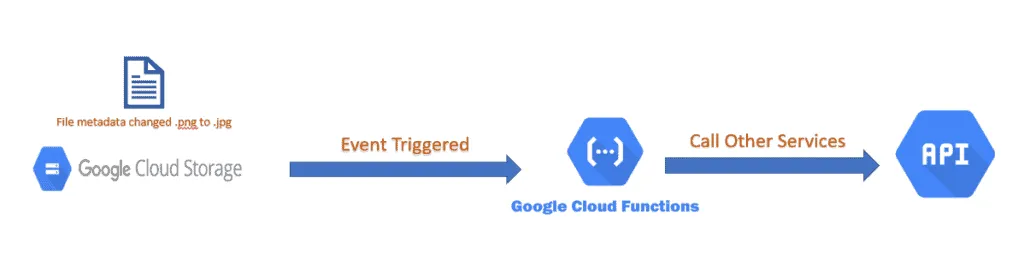
Event-based cloud functions are triggered by events, such as a change in a database or a new file being uploaded to a storage service, etc. To simplify the explanation, we take a use case where a user changes the metadata of an existing file in Google Cloud Storage. Eventually, this change of metadata triggers our simple cloud function. The below diagram also provides a visual representation of this.
Preparation
In Google Cloud Console, select the project you want to create a new cloud function. Afterward, click on the “Cloud Functions” menu in the left sidebar. Then, click the “Create function” button to begin creating a new function, as shown below.

This will open the “Create Cloud Functions” page as below:
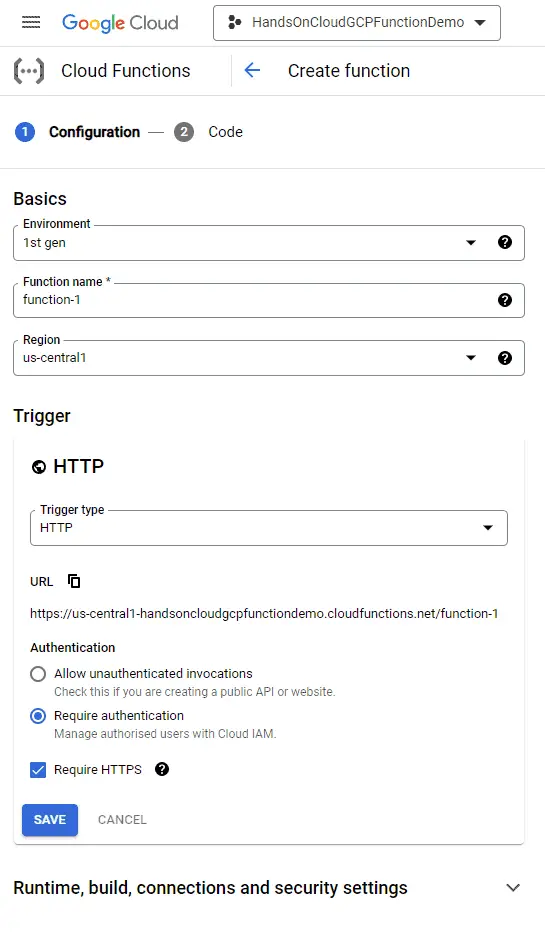
Fill in the details:
- Environment: Cloud Functions provides two runtimes, i.e., Legacy (1st Gen) and the latest (2nd Gen). Choose 2nd Gen as the runtime.
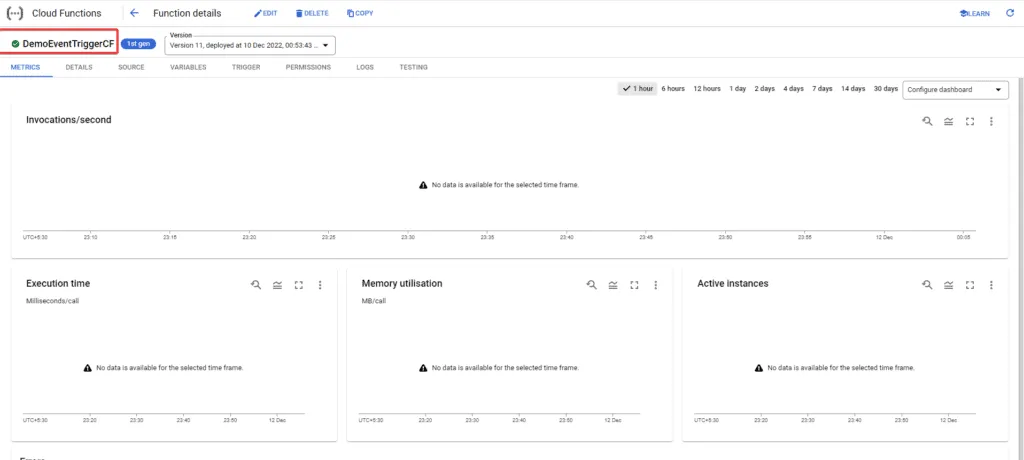
- Function Name: You can give any meaningful name to your cloud functions however, for this article name is “DemoEventTriggerCF“.
- Region: select a region close to you. In my case, it’s “us-central1“.
- Trigger: select “Cloud Storage” as we want to trigger our function whenever the metadata of the file changes, as shown below
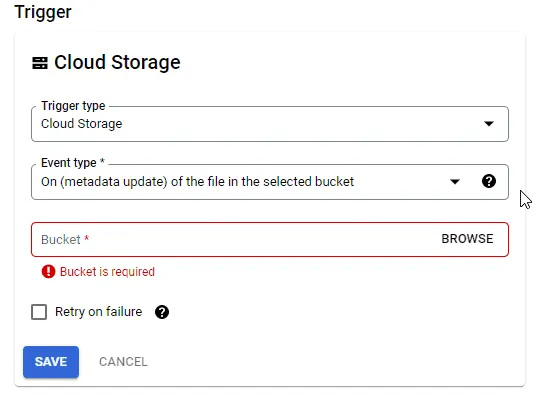
Next, we must select the existing bucket to which we want to connect our function. Click the “Browse” link to see a list of all our buckets:

We can either select the bucket or create a new bucket by clicking on the “+” icon on the top left of the “Select Bucket” window.
Now, let’s take a quick look at the build and runtime settings.
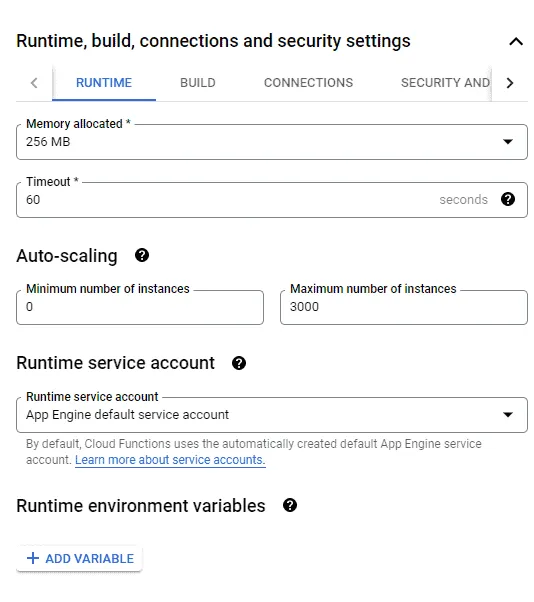
Here, we can specify memory, timeout, auto-scaling, limits, build environment variables, and connection information.
In this article, we will not change any of these settings, but I want to make you aware that these are available. So let’s go ahead, hit Save on the authentication, and click Next.
Now we have to pick the runtime for our Google Cloud Function – Python. In this example, we’ll choose Python 3.9 as the Python version and set the entry point (the first function to be executed from your code) to metadata_change.
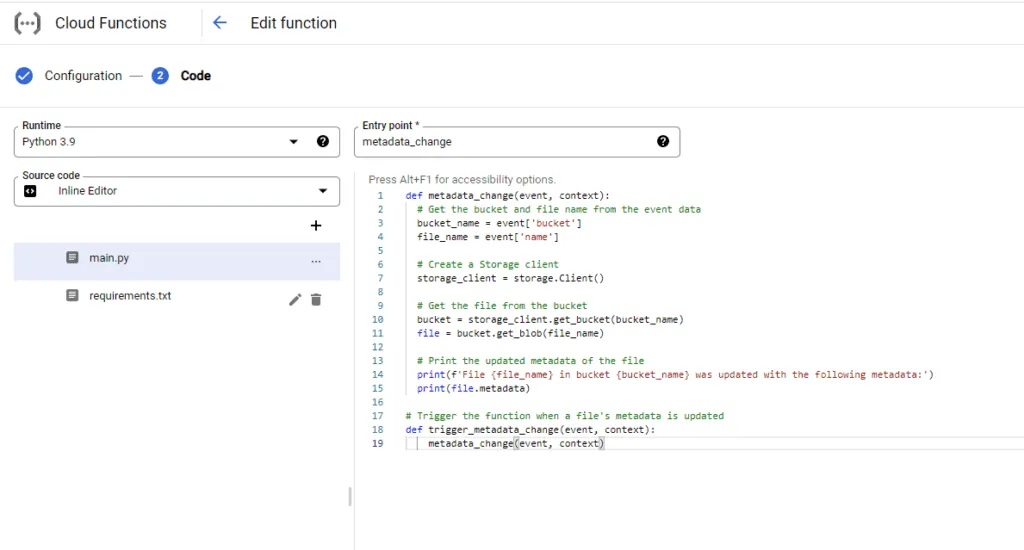
Function Source Code
Now for this article, we’ll do all of our coding in the browser. This is a simple way to do this. But in the real world, I would use the Google Cloud SDK to set up my development environment and write the code in my chosen IDE. Once the code is ready, I will upload it directly to the function. This will give me more flexibility and features than the default inline editor.
# Trigger the function when a file's metadata is updated
def metadata_change(event, context):
  # Get the bucket and file name from the event data
  bucket_name = event['bucket']
  file_name = event['name']
  # Create a Storage client
  storage_client = storage.Client()
  # Get the file from the bucket
  bucket = storage_client.get_bucket(bucket_name)
  file = bucket.get_blob(file_name)
  # Print the updated metadata of the file
  print(f'File {file_name} in bucket {bucket_name} was updated with the following metadata:')
  print(file.metadata)
We can see that Cloud Functions in Python are written as regular Python code. In the code above, we defined a simple function called metadata_change() that is triggered when a file’s changed. When this happens, the function retrieves the bucket and file names from the event object. It then creates a storage_client using storage module, which is used to retrieve the file from the bucket and print its updated metadata.
Requirements.txt
This file maintains the library versions that we are using in our main.py file.
google-cloud-storage==2.7.0Deploying the Function to Google Cloud
Now that we’ve written our code in the browser, it’s time for us to deploy it.
Click the “Deploy” button to deploy the function to Google Cloud. Internally, the GCP will package the code, deploy it to the cloud platform as a serverless function, and then prepare it for use.
After a cloud function is deployed, it may take a few minutes to be ready for use. Once it is ready, a green check mark will appear to show that the code has been successfully deployed and is ready to run.
Testing the Cloud Function
Files’ metadata changes on the Google Cloud Storage bucket trigger the cloud function is triggered.
To change the metadata of an image in a Google Cloud Storage bucket, we need to navigate to our bucket. First, we need to go to the Cloud Console dashboard. Then, click on the “Cloud Storage“-> “Buckets” option in the left-hand menu to open the Cloud Storage browser.
In the Cloud Storage browser, click on the name of the bucket that contains the file or image you want to edit. Click on the file to open the “Object details” page.
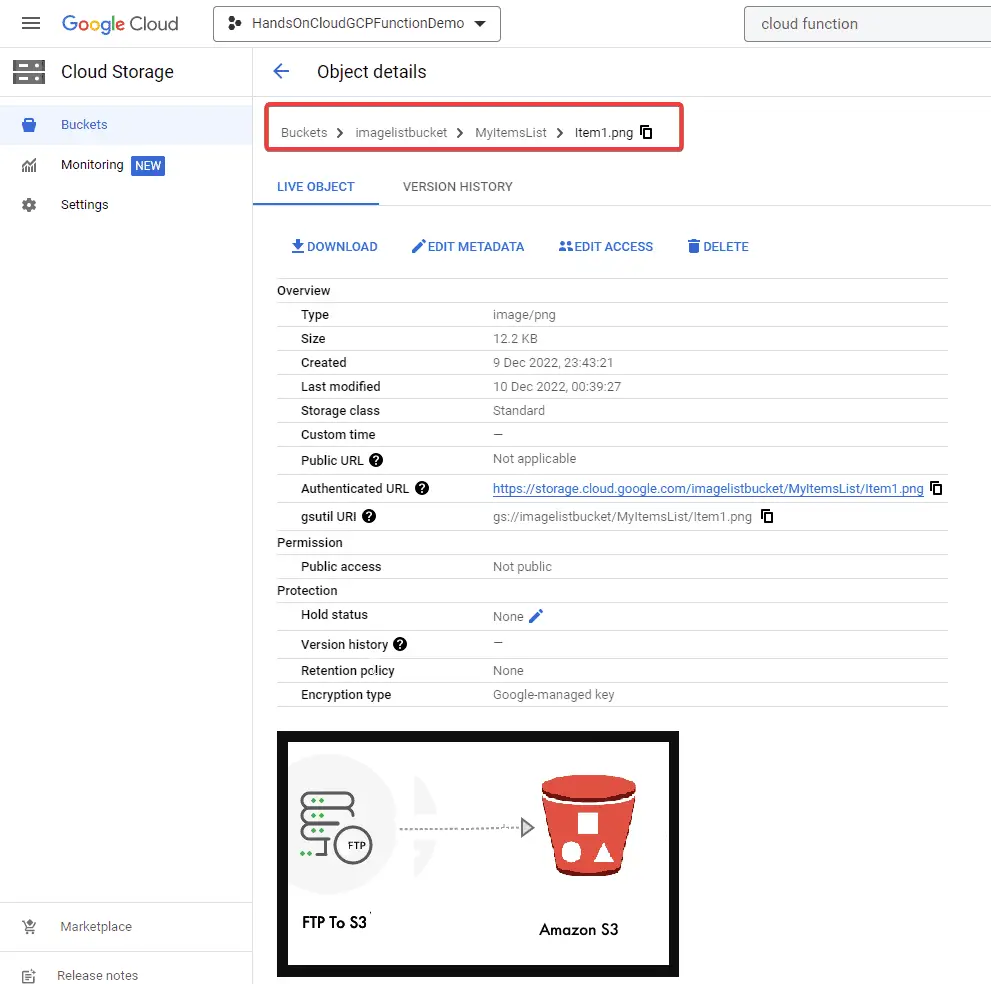
To edit the metadata of the image, click on the “Edit” button in the “Metadata” section to open the “Edit metadata” dialog. Here, we can change the metadata, such as the title, description, labels, etc. Next, click the “Save” button to apply the changes.
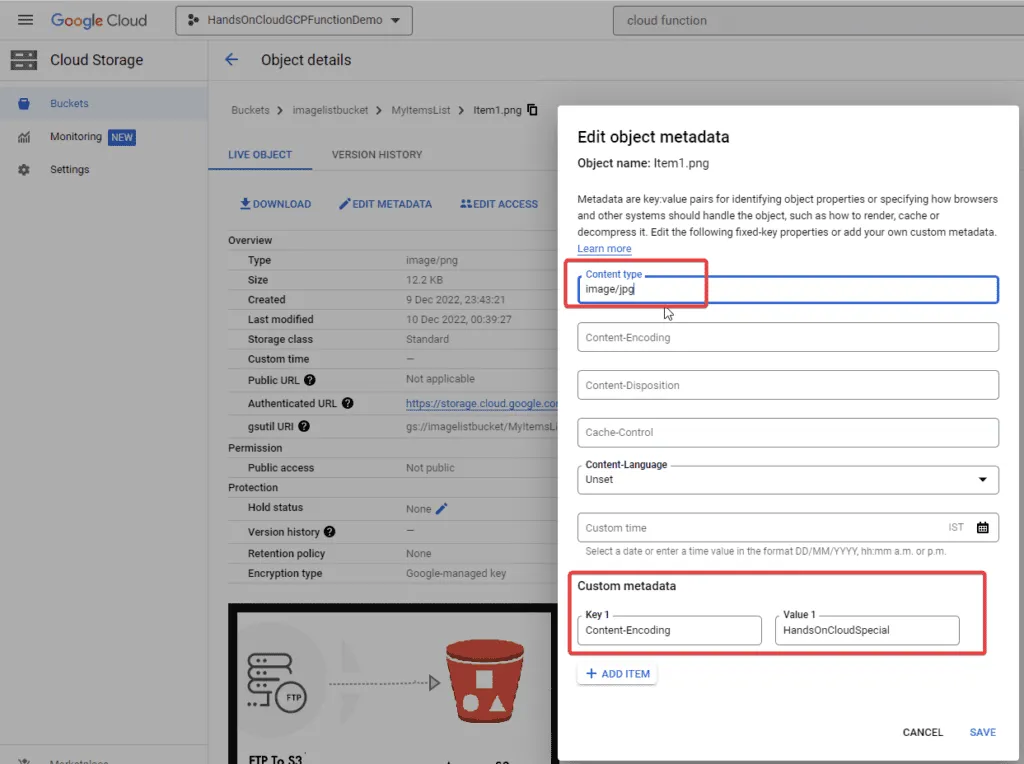
For this example, I have changed the content-type of an existing image from image/png to image/jpg. Additionally, I have introduced custom metadata in our file as Content-Encoding : "HandsOnCloudSpecial".
Viewing the Trigger Logs in the Cloud Function
To view the logs, we must navigate back to our cloud function. On the details page, click on the “Logs” tab. In the logs view, you can see a list of log entries for the trigger and the timestamp, severity, and message for each entry.
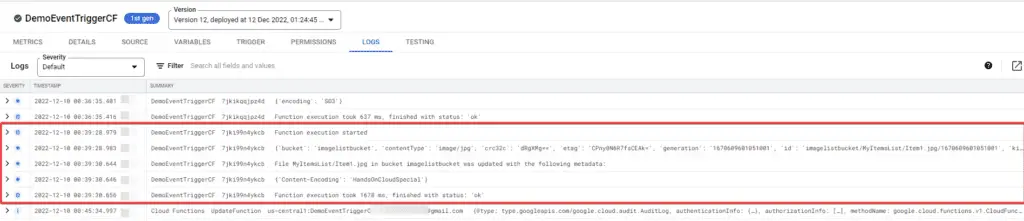
Now, we can review the logs to verify that the function is triggered as expected.
Creating HTTP Cloud Functions
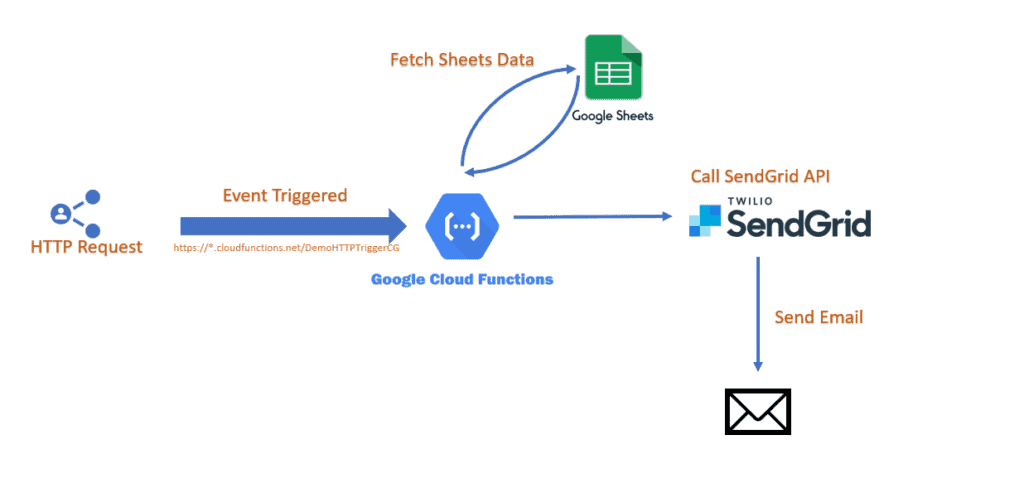
Next, we will see how to trigger cloud functions using an HTTP-based trigger. In this use case, the python function, once triggered, will fetch data from google sheets using the Google Sheets API and then send mail to the target recipient using the “SendGrid API“.
Preparation
Before working on our cloud function, the following pre-requisites are required:
Google Sheets Setup
We must enable all necessary APIs to use Google Sheets API in the cloud function. You can follow the article How to Use Python to Work With Google Sheets APIs for detailed steps.
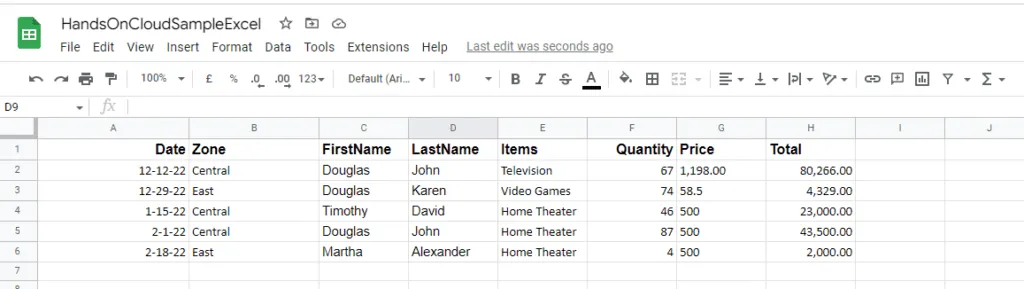
Next, we need to prepare a Google Sheet with some sample data. The Google Sheet that I will be using for this article contains the following dummy datasets:
SendGrid API
To enable the SendGrid API for emails on Google Cloud, we need to do the following:
- In the GCP Console, click on the “Marketplace” option in the main menu on the left side of the screen.
- Search for “SendGrid Email API” in the API library.
- Click the “Select” button from the individual pricing plans. SendGrid provides a free plan with a limited number of emails per month which is sufficient for our use case.
Once your SendGrid account is active, log in to your account and go to the “API Keys” section inside “Settings“. After that, click the “Create API Key” button and give your API key a name. Make sure to save the API keys in a safe place, as we will use this key in our function for authentication. We can also refer to the official documentation here.
Create Function
Finally, we will create our new function, but this time trigger type will be “HTTP“. Next, we need to select the authentication type for our function.

In the “Authentication” section, select “Allow unauthenticated invocations“. This will make it easier for us to test, but we often don’t want to do this in the real world unless it is truly a public function.
Click on Save and Next to create the function.
Function Source Code
Once we are at the code editor screen, we can start writing the code for our python function.
First, we must import the required libraries at the top of our script, as shown below:
from oauth2client.service_account import ServiceAccountCredentials
import google.auth
import gspread
import sendgrid
from sendgrid import SendGridAPIClient
from sendgrid.helpers.mail import *
import base64
import json
import traceback
Here, gspread is for interacting with Google Sheets, and SendGrid is for interacting with email API.
Next, we need to setup authentication with Google Sheets API from our cloud function as below:
# Define a function for authenticating with the Google Sheets API
def _authenticate_google_sheets():
    # Define the scope for the authentication
    scopes = ['https://spreadsheets.google.com/feeds',
             'https://www.googleapis.com/auth/spreadsheets',
             'https://www.googleapis.com/auth/drive.file',
             'https://www.googleapis.com/auth/drive']
    # Read the credentials from the service account keys file
    credentials, project_id = google.auth.default(scopes)
    # Initialize the authorization object
    google_sheets_client = gspread.authorize(credentials)
    return google_sheets_client
Afterward, we need to create an Entry point method for our cloud function. Here, we read the data from the google sheet and send this data as an attachment file to SendGrid API.
def http_controller(request):
    # Authenticate with the Google Sheets API
    google_sheets_client = _authenticate_google_sheets()
    # Open the Google Sheets file
    try:
        google_sheets_file = google_sheets_client.open('HandsOnCloudSampleExcel')
        # Get the first sheet in the file
        sheet_info = google_sheets_file.sheet1
        # Get and print all records
        _send_email(json.dumps(sheet_info.get_all_records()))
    except gspread.exceptions.SpreadsheetNotFound:
        print('Error: The specified Google Sheets file was not found')
    except:
        print(traceback.format_exc())
    return '202'
Ultimately, we create an email processor method that will interact with SendGrid API for sending the email.
def _send_email(data):
    # Set up the SendGrid client
    sg = SendGridAPIClient("YOUR API KEY HERE")

    # Set up the email message
    from_email = Email("Your From Email Address")
    to_email = To("Your Target Email Address")
    subject = "Urgent!! 2022 Sales - Ambirt Inc"
    content = Content("text/plain", "Hi Simon, \n Please find sales data in attached file as below. \n regards")
    mail = Mail(from_email, to_email, subject, content)

    # Create the data for the attachment from a variable
    attachment = Attachment()
    attachment.file_content = FileContent(base64.b64encode(data.encode("utf-8")).decode())
    attachment.file_type = FileType('application/txt')
    attachment.file_name = FileName('dataAttachment.txt')
    attachment.disposition = Disposition('attachment')
    mail.attachment = attachment


    # Send the email
    try:
     response = sg.client.mail.send.post(request_body=mail.get())
    except:
        print(traceback.format_exc())
The complete source code is as follows:
import gspread
from oauth2client.service_account import ServiceAccountCredentials
import google.auth
import sendgrid
import json
import traceback
from sendgrid import SendGridAPIClient
from sendgrid.helpers.mail import *
import base64
# Define a function for authenticating with the Google Sheets API
def _authenticate_google_sheets():
    # Define the scope for the authentication
    scopes = ['https://spreadsheets.google.com/feeds',
             'https://www.googleapis.com/auth/spreadsheets',
             'https://www.googleapis.com/auth/drive.file',
             'https://www.googleapis.com/auth/drive']
    # Read the credentials from the service account keys file
    credentials, project_id = google.auth.default(scopes)
    # Initialize the authorization object
    google_sheets_client = gspread.authorize(credentials)
    return google_sheets_client
def http_controller(request):
    # Authenticate with the Google Sheets API
    google_sheets_client = _authenticate_google_sheets()
    # Open the Google Sheets file
    try:
        google_sheets_file = google_sheets_client.open('HandsOnCloudSampleExcel')
        # Get the first sheet in the file
        sheet_info = google_sheets_file.sheet1
        # Get and print all records
        _send_email(json.dumps(sheet_info.get_all_records()))
    except gspread.exceptions.SpreadsheetNotFound:
        print('Error: The specified Google Sheets file was not found')
    except:
        print(traceback.format_exc())
    return '202'
def _send_email(data):
    # Set up the SendGrid client
    sg = SendGridAPIClient("<Your SendGrid API Key>")

    # Set up the email message
    from_email = Email("fromemail@test.com")
    to_email = To("toemail@test.com")
    subject = "Urgent!! 2022 Sales - Ambirt Inc"
    content = Content("text/plain", "Hi Simon, \n Please find sales data in attached file as below. \n regards")
    mail = Mail(from_email, to_email, subject, content)

    # Create the data for the attachment from a variable
    attachment = Attachment()
    attachment.file_content = FileContent(base64.b64encode(data.encode("utf-8")).decode())
    attachment.file_type = FileType('application/txt')
    attachment.file_name = FileName('dataAttachment.txt')
    attachment.disposition = Disposition('attachment')
    mail.attachment = attachment

    # Send the email
    try:
     response = sg.client.mail.send.post(request_body=mail.get())
    except:
        print(traceback.format_exc())
Requirement.txt
In the requirement.txt file, add the following dependencies.
sendgrid==6.9.5
gspread>=3.1.0
oauth2client>=4.1.3
Testing the Cloud Function
To test an HTTP function, we can use Postman or curl to send an HTTP request to the function’s URL. You can access the Trigger URL of a cloud function in the “Trigger” tab of the dashboard, as shown below.
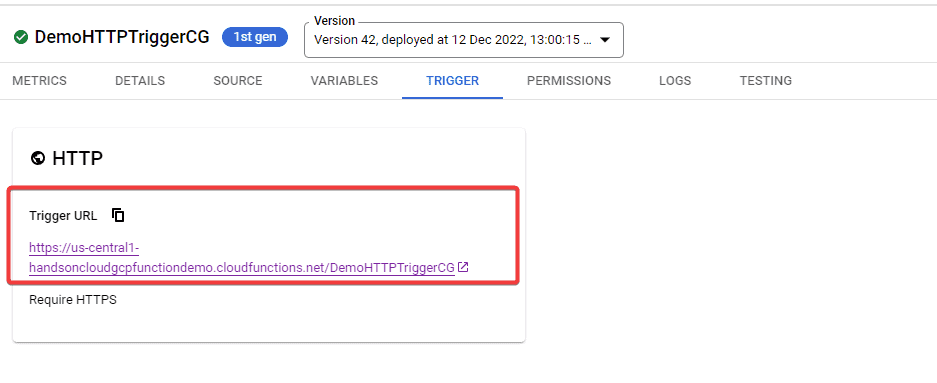
Next, we can send a POST request to the “Trigger URL” to invoke our function or execute the following command in our local machine terminal.
curl -m 70 -X POST https://us-central1-handsoncloudgcpfunctiondemo.cloudfunctions.net/DemoHTTPTriggerCGViewing the Trigger Logs in Cloud Function
Deployment and trigger logs can be accessed through the cloud provider’s console or dashboard, where the function is managed and configured. On successful execution, we should see the output logs below:
2022-12-12 22:14:34.428 IST
DemoHTTPTriggerCGp2cvuhdnt36p Function execution started
2022-12-12 22:14:35.879 IST
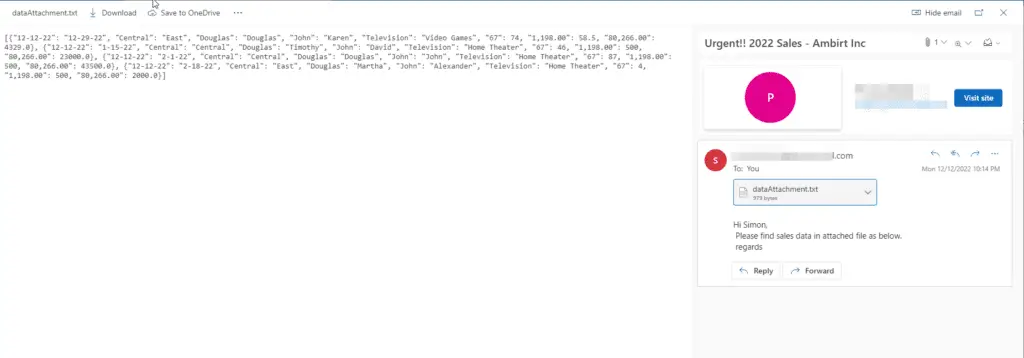
DemoHTTPTriggerCGp2cvuhdnt36p Function execution took 1450 ms. Finished with status code: 200Ultimately, we will also receive an email with an attachment via the SendGrid API to the receipt email address.
Conclusion
In summary, Google Cloud Functions provides a convenient way to run serverless code in the cloud. It makes it easy for developers to focus on writing code with zero server management, Additionally, it offers a great extent of integration with various third-party services. Onboarding Google Cloud Functions is straightforward, and with a little practice, it is possible to quickly become proficient in using this tool to build scalable and reliable applications.
