Terraform AWS VPC – Complete Tutorial
One of the essential tasks of your cloud infrastructure management is managing your AWS VPC networks. In Terraform AWS VPC tutorial, we’ll demonstrate how to declare and manage the most commonly used Terraform resources for managing VPC, private and public subnets.
Table of contents
Terraform AWS VPC – public subnet
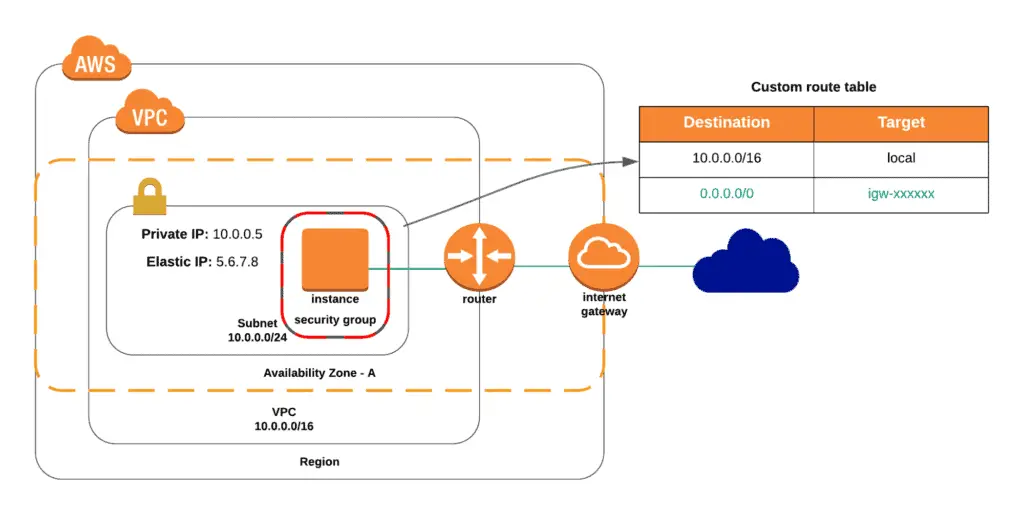
Configuration for this scenario includes a virtual private cloud (VPC) with a single public subnet, Internet Gateway, and Route Table to enable communication over the Internet. AWS recommends this configuration if you need to run a single-tier, public-facing web application, such as a blog or a simple website.
Here’s what the infrastructure looks like:

You may find complete sources in my GitHub repo.
Note: if you’re not familiar with basic networking concepts, we strongly recommend checking out “The Complete Networking Fundamentals Course” on Udemy before moving forward.
Creating VPC
First, you must create a new terraform file with any name and .tf extension. I’ll be using the vpc_with_single_public_subnet.tf.
Next, we need to declare the aws_vpc resource, which will represent a new VPC with 10.0.0.0/16 address space:
resource "aws_vpc" "my_vpc" {
  cidr_block       = "10.0.0.0/16"
  enable_dns_hostnames = true
  tags = {
    Name = "My VPC"
  }
}
We’re also enabling DNS support inside our VPC (enable_dns_hostnames) and setting the Name tag to My VPC, so we could easily find our VPC in the AWS console later need to.
Creating Public Subnet
As soon as the VPC resource is declared, we’re ready to declare the aws_subnet resource, which will describe our Public Subnet.
resource "aws_subnet" "public" {
  vpc_id     = aws_vpc.my_vpc.id
  cidr_block = "10.0.0.0/24"
  availability_zone = "us-east-1a"
  tags = {
    Name = "Public Subnet"
  }
}
Here we’re asking Terraform to create our Subnet in a VPC by referring the vpc_id value which is taken from aws_vpc resource declaration with name my_vpc by its id.
We’re also specifying the Subnet address space within VPC by setting up a cidr_block option to 10.0.0.0/24 value.
Each subnet in a VPC belongs to one of the available AWS Availability Zones within AWS Regions. So, we’re also specifying it by setting the availability_zone option to us-east-1a value.
Creating Internet Gateway
We call Subnets Public because they have an available route (0.0.0.0/0) in their Route Table attached to VPC Internet Gateway.
So, let’s create an Internet Gateway now by specifying the aws_internet_gateway resource:
resource "aws_internet_gateway" "my_vpc_igw" {
  vpc_id = aws_vpc.my_vpc.id
  tags = {
    Name = "My VPC - Internet Gateway"
  }
}
This entity attached to a VPC will allow Internet traffic flow to the Public Subnet.
Creating Route Table
As we already discussed, we also need to create a Route Table to route the outside world and map it to our Internet Gateway. Let’s do it by declaring aws_route_table and aws_route_table_association resources:
resource "aws_route_table" "my_vpc_us_east_1a_public" {
    vpc_id = aws_vpc.my_vpc.id
    route {
        cidr_block = "0.0.0.0/0"
        gateway_id = aws_internet_gateway.my_vpc_igw.id
    }
    tags = {
        Name = "Public Subnet Route Table."
    }
}
resource "aws_route_table_association" "my_vpc_us_east_1a_public" {
    subnet_id = aws_subnet.public.id
    route_table_id = aws_route_table.my_vpc_us_east_1a_public.id
}
Here we just declared Route Table for our Subnet and made an association between them.
Our Public Subnet is ready to launch new instances inside of it. Let’s do it now.
Creating Security Group
One of AWS’s security features is the Security Group – a stateful firewall rule allowing inbound traffic to the network object. In our case, we’ll use it to block any outside connections to our instance except SSH.
Let’s add Security Group by adding the aws_security_group resource to our .tf file:
resource "aws_security_group" "allow_ssh" {
  name        = "allow_ssh_sg"
  description = "Allow SSH inbound connections"
  vpc_id = aws_vpc.my_vpc.id
  ingress {
    from_port   = 22
    to_port     = 22
    protocol    = "tcp"
    cidr_blocks = ["0.0.0.0/0"]
  }
  egress {
    from_port       = 0
    to_port         = 0
    protocol        = "-1"
    cidr_blocks     = ["0.0.0.0/0"]
  }
  tags = {
    Name = "allow_ssh_sg"
  }
}
Here we’re allowing incoming SSH connections (22/tcp) from any addresses (0.0.0.0/0) inside the Security Group, and also, we’re allowing any connection initiation to the outside world from the Security Group. So, we’ll be able to SSH to the instance protected by this Security Group and make any connections.
Creating EC2 Instance
It’s time to create our instance to test everything. Let’s declare aws_instance resource:
resource "aws_instance" "my_instance" {
  ami           = "ami-0ac019f4fcb7cb7e6"
  instance_type = "t2.micro"
  key_name = "Lenovo T410"
  vpc_security_group_ids = [ aws_security_group.allow_ssh.id ]
  subnet_id = aws_subnet.public.id
  associate_public_ip_address = true
  tags = {
    Name = "My Instance"
  }
}
Here we’ve specified Ubuntu 18.04 AMI id in the us-east-1 region, set instance size to the smallest available – t2.micro, and set the SSH key name. If you don’t have it yet, please, create or upload one here: https://console.aws.amazon.com/ec2/v2/home?region=us-east-1#KeyPairs:sort=keyName.
We’ve also launched our instance in just created Public Subnet and protected it with our Security Group.
To allow connection from the outside world, we also asked AWS to attach a temporary Public IP address to our instance by setting the associate_public_ip_address option to true.
And the last thing we need to add to the .tf file is the output resource, which will print us our instance Public IP address:
output "instance_public_ip" {
  value = "${aws_instance.my_instance.public_ip}"
}
Terraform AWS VPC – NAT-ed Private Subnet
Instances launched in this subnet will be able to communicate with any services within VPC and go to the Internet using the special AWS service NAT Gateway.
AWS recommends using this type of network if you’re running, for example, a public-facing web application and don’t want to make your back-end servers accessible publicly. A typical example is a multi-tier website, with web servers in a public subnet and database servers in a private subnet. You can set up security and routing so that the web servers can communicate with the database servers.
Here’s what the infrastructure looks like:

To extend our VPC with this NAT-ed Private network, we need to create the following resources:
- VPC NAT Gateway.
- Subnet.
- Route Table with the route to VPC NAT Gateway.
- Association between Route Table and Subnet.
Let’s begin from Subnet by declaring an additional aws_subnet resource:
resource "aws_subnet" "nated" {
  vpc_id     = aws_vpc.my_vpc.id
  cidr_block = "10.0.1.0/24"
  availability_zone = "us-east-1a"
  tags = {
    Name = "NAT-ed Subnet"
  }
}
Now let’s create NAT Gateway in a public subnet by declaring aws_nat_gateway and aws_eip.
You can not launch NAT Gateway without an Elastic IP address associated with it, that’s why the aws_eip is required:
resource "aws_eip" "nat_gw_eip" {
  vpc = true
}
resource "aws_nat_gateway" "gw" {
  allocation_id = aws_eip.nat_gw_eip.id
  subnet_id     = aws_subnet.public.id
}
Now we need to create Main Route Table by declaring additional already known for you resources aws_route_table and associate it with our NAT-ed Subnet (aws_route_table_association):
resource "aws_route_table" "my_vpc_us_east_1a_nated" {
    vpc_id = aws_vpc.my_vpc.id
    route {
        cidr_block = "0.0.0.0/0"
        nat_gateway_id = aws_nat_gateway.gw.id
    }
    tags = {
        Name = "Main Route Table for NAT-ed subnet"
    }
}
resource "aws_route_table_association" "my_vpc_us_east_1a_nated" {
    subnet_id = aws_subnet.nated.id
    route_table_id = aws_route_table.my_vpc_us_east_1a_nated.id
}
Now we’re ready to create private servers in our Private NAT-ed Subnet, and they will have access to the Internet but will not be visible from the Internet.
I guess you may do it using the instructions from the previous article.
Terraform AWS VPC – Fully Isolated Private Subnet
Instances launched in this subnet will be able to communicate with instances within VPC but will not be able to go to the Internet.
This type of network is commonly used when you need to connect your organization network to the AWS cloud and want more strict control of network boundaries. Or, you do not want to give some of your servers access to the Internet.
Here’s what the infrastructure looks like:

To implement a fully isolated Private Subnet, we need to create the following resources:
- Subnet.
- Route Table.
- Association between Route Table and Subnet.
Let’s start from Subnet:
resource "aws_subnet" "private" {
  vpc_id     = aws_vpc.my_vpc.id
  cidr_block = "10.0.2.0/24"
  availability_zone = "us-east-1a"
  tags = {
    Name = "Isolated Private Subnet"
  }
}
Next, we need to create an additional Route Table with no routes declaration and associate it with our private Subnet:
resource "aws_route_table" "my_vpc_us_east_1a_private" {
    vpc_id = aws_vpc.my_vpc.id
    tags = {
        Name = "Local Route Table for Isolated Private Subnet"
    }
}
resource "aws_route_table_association" "my_vpc_us_east_1a_private" {
    subnet_id = aws_subnet.private.id
    route_table_id = aws_route_table.my_vpc_us_east_1a_private.id
}
Deploying infrastructure
To apply this configuration, all you need to do is to go to the project folder and run the following commands:
terraform init
terraform apply
Connect To EC2 Instance Using SSH
At the end of the infrastructure creation process, Terraform prints you a Public IP address of your instance. To SSH to it, you need to run the following command:
ssh ubuntu@public_host_ipTiering down infrastructure
To remove all created resources, all you need to do is to go to the project folder and run the following command:
terraform destroyOfficial Terraform AWS VPC module
The ability to build a custom Terraform VPC module from scratch is an essential skill for any cloud engineer because, in most cases, organizations prefer to build AWS infrastructure using their way and code. As soon as you understand how to build a VPC from scratch, you can start using the official Terraform AWS VPC module.
Summary
In this article, you’ve created a simple AWS infrastructure from scratch: separate VPC, Internet Gateway, Subnet, Route Table, Security Group, and the EC2 Instance.
We hope you found this article useful. If so, please, help us to spread it to the world!
