Terraform EFS Tutorial – Easy AWS automation
Amazon EFS is a reliable, scalable, low-cost file storage service for Amazon Web Services (AWS) users. This blog post will show you how to manage your Amazon EFS file systems using Terraform. We will also guide you on connecting your Amazon EFS storage to Amazon EC2, Amazon ECS Fargate, and Amazon Lambda. Let’s get started!
Table of contents
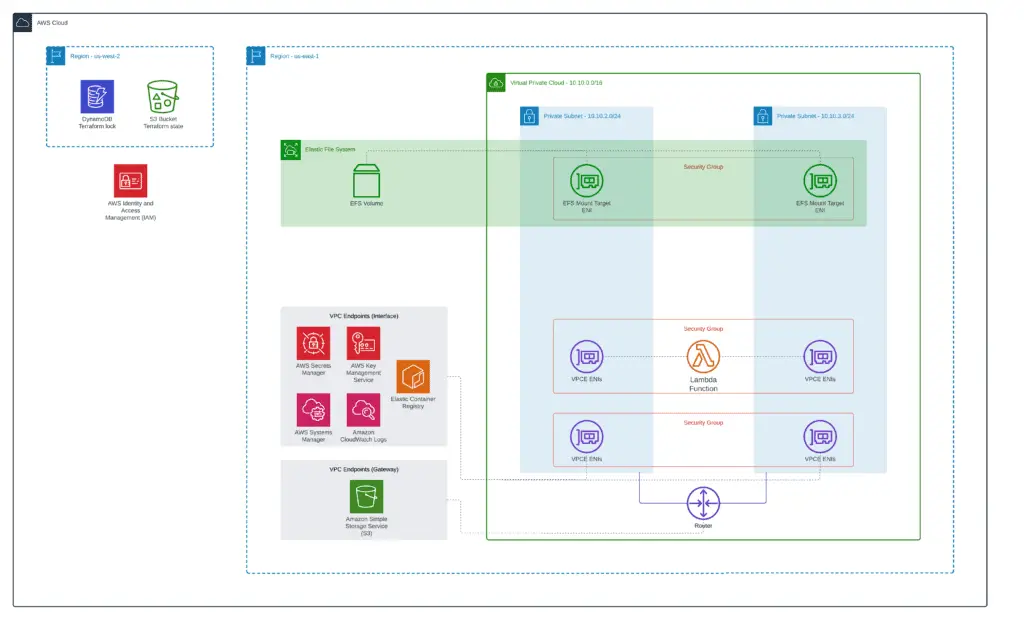
By the end of the article, you’ll get the following architecture deployed:
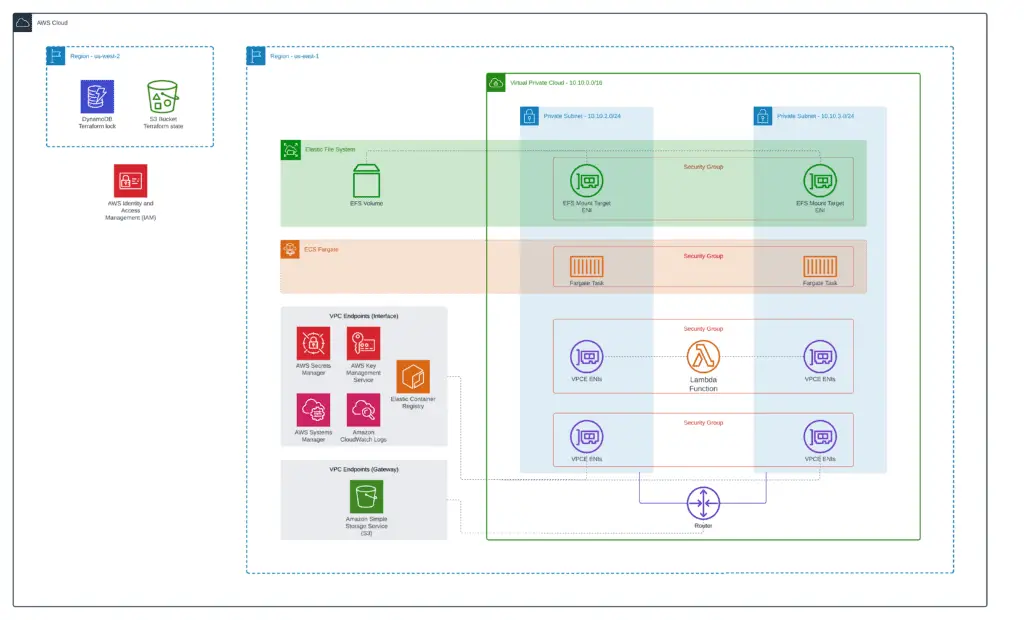
You can find a complete version of all examples in our GitHub repository: managing-amazon-efs-terraform.
As soon as you finish the EFS setup, don’t forget to configure AWS Backup to have the ability to restore accidentally modified or deleted files if needed.
What Is Amazon EFS?
Amazon Elastic File System (EFS) is a cloud-based file storage service designed to be scalable and highly available. EFS provides a simple interface consistent with traditional file systems, making it easy to migrate existing applications to the cloud. EFS is built on top of Amazon’s high-performance infrastructure and uses redundant storage across multiple Availability Zones (AZs) to provide durability and availability.
EFS supports POSIX-compliant file permissions and Access Control Lists (ACLs), making it ideal for many workloads, including web hosting, content management, and Big Data analytics. With EFS, you only pay for your storage, making it an economical solution for data growth. Plus, there are no upfront costs or minimum commitments required. Amazon EFS is a great option for a cost-effective, scalable, and highly available file storage solution.
EFS file system
Amazon EFS provides a file system compatible with the Network File System (NFS). NFS is a standard protocol that allows computers to access files over a network. Amazon EFS is designed to provide scalable, reliable, and low-latency file storage for applications that run on Amazon EC2 instances, ECS and Fargate, and AWS Lambda. EFS file system can be mounted and used like any other file system in Linux. EFS is highly available and durable, with multiple backups and disaster recovery capabilities.
Amazon EFS is available in all AWS regions. Check out the official Amazon Elastic File System User Guide for more information about EFS. Amazon EFS file system is managed by the aws_efs_file_system Terraform resource.
EFS mount targets
An AWS EFS mount target is an EFS file system’s endpoint, allowing the file system to be accessed from an EC2 instance. Each mount target has a unique IP address assigned by Amazon EFS. When you create a mount target, you specify an Amazon VPC subnet and an EC2 security group in which to create the mount target. The security group controls access to the mount target. You can create up to five mount targets per Availability Zone file system. You can associate each mount target with multiple EC2 instances via their security groups. Doing so allows concurrent access to the file system from multiple instances.
Mount targets are specific to an AWS Region and cannot be replicated across Regions. AWS EFS mount targets are managed by the aws_efs_mount_target Terraform resource.
EFS access points
EFS access points provide a single entry point into an Amazon EFS file system. Using an EFS access point, you can control how your applications access data in an Amazon EFS file system. With an EFS access point, you can enforce security policies, optimize performance for different workloads, and monitor data access using CloudTrail logging. You can create an EFS access point in your AWS account. Then, you can mount the file system using the access point through the mount target associated with the access point. The mount target provides the address (DNS name) and port number that Amazon EFS generates for the access point.
Your applications use this address to reach the data stored in the Amazon EFS file system. You can configure an EFS access point to use a custom DNS name or the default DNS name. You must create a Route 53 alias record to map your custom DNS name to the default DNS name for your EFS access point. Check out the Working with Amazon EFS access points documentation for more information about EFS access points.
Amazon EFS mount targets are managed by the aws_efs_access_point Terraform resource.
EFS mount target vs. EFS access point
An AWS EFS mount target is an Amazon Elastic File System resource you create in your VPC. It provides an endpoint (ENI and DNS name) to mount the entire EFS file system. An EFS access point is an Amazon Elastic File System feature that provides clients sub-directory level access to an EFS through the AWS EFS mount target. Clients can connect to an EFS access point and perform file operations in the specific sub-directory. If you need to share your data with multiple clients, we suggest you use an EFS access point.
Note that EFS access points are not working without the AWS EFS mount target, and EFS access points can’t be used to provide access to the root / of the EFS volume. To provide access to the root directory of your EFS volume, you have to use the AWS EFS mount target. You can use both resources to access AWS EFS share in the cloud and on-premises resources.
EFS file system policy
The Elastic File System (EFS) file system policy is a set of rules that govern how files are stored on an EFS file system. The policy defines how data is organized within the file system and what types of files can be stored on the file system. The policy also determines how files are replicated across multiple servers and how long files are retained on the file system. For more information about the EFS file system policies, check out the Using IAM to control file system data access documentation.
Amazon EFS file system policy is managed by the aws_efs_file_system_policy Terraform resource.
Prerequisites
- AWS Account
- AWS CLI, Docker & Terraform installed
Infrastructure setup
We’ll use a private (fully isolated) VPC with several subnets for high availability in our setup. We’ll launch Amazon Linux 2 EC2 instance, Amazon Lambda, and Fargate tasks in private subnets. Amazon VPC Endpoints allow ECS Fargate to launch its tasks in private subnets and help you access your EC2 instances using Systems Manager.
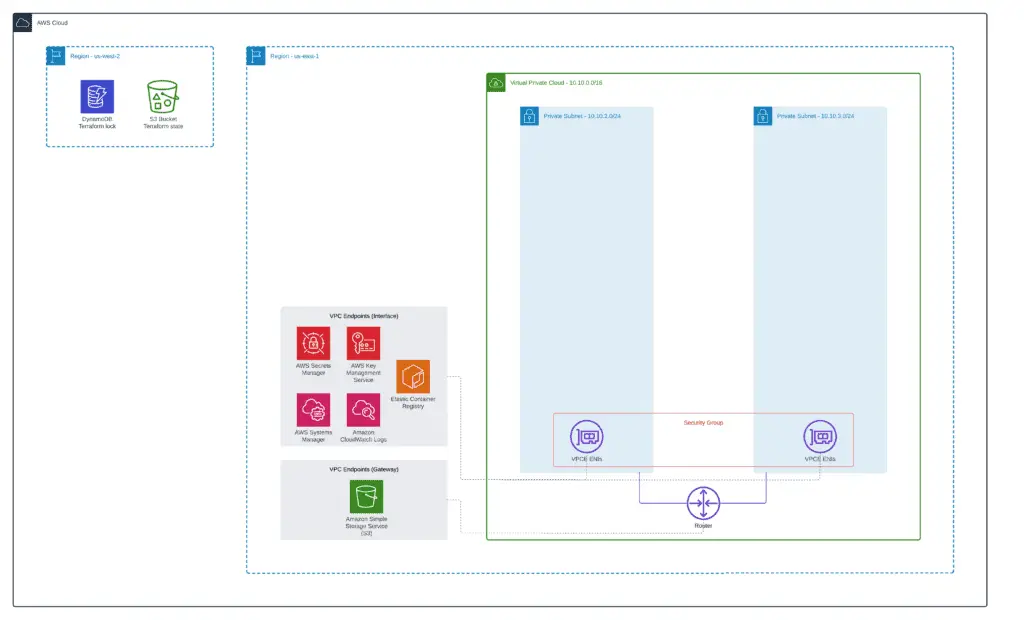
You can find a complete module example in our GitHub repository: 1_vpc.
Let’s start our infrastructure setup by defining the VPC in your AWS account. As usual, we’ll use an official AWS VPC module to simplify VPC deployment and put all our Terraform code in a separate folder (1_vpc):
module "vpc" {
  source = "terraform-aws-modules/vpc/aws"
  name = local.vpc_name
  cidr = local.vpc_cidr
  azs = ["${var.aws_region}a", "${var.aws_region}b"]
  private_subnets = [
    cidrsubnet(local.vpc_cidr, 8, 2),
    cidrsubnet(local.vpc_cidr, 8, 3)
  ]
  enable_nat_gateway   = false
  enable_dns_hostnames = true
  tags = merge(
    {
      Name = local.vpc_name
    },
    local.common_tags
  )
}
In addition to that, we need to define all required VPC Endpoints:
- AWS Systems Manager (
ssm,ec2messages,ssmmessages) - Amazon S3 (
s3) - AWS Key Management Service (
kms) - Amazon CloudWatch Logs (
logs) - Amazon Elastic Container Registry (
ecr.dkr,ecr.api) - AWS Secrets Manager (
secretsmanager)
# VPC Endpoints Security Group
resource "aws_security_group" "vpc_endpoint" {
  ingress {
    from_port   = 443
    to_port     = 443
    protocol    = "tcp"
    cidr_blocks = [local.vpc_cidr]
  }
  name      = "${local.prefix}-vpce-sg"
  vpc_id    = module.vpc.vpc_id
  tags      = merge(
    {
      Name = "${local.prefix}-vpce-sg"
    },
    local.common_tags
  )
}
# SSM VPC Endpoints
data "aws_vpc_endpoint_service" "ssm" {
  service      = "ssm"
  service_type = "Interface"
}
resource "aws_vpc_endpoint" "ssm" {
  vpc_id              = module.vpc.vpc_id
  private_dns_enabled = true
  service_name        = data.aws_vpc_endpoint_service.ssm.service_name
  vpc_endpoint_type   = "Interface"
  security_group_ids = [
    aws_security_group.vpc_endpoint.id,
  ]
  #subnet_ids = module.vpc.private_subnets
  tags = merge(
    {
      Name = "${local.prefix}-ssm-endpoint"
    },
    local.common_tags
  )
}
resource "aws_vpc_endpoint_subnet_association" "ssm" {
  count = length(module.vpc.private_subnets)
  vpc_endpoint_id = aws_vpc_endpoint.ssm.id
  subnet_id       = module.vpc.private_subnets[count.index]
}
data "aws_vpc_endpoint_service" "ec2messages" {
  service      = "ec2messages"
  service_type = "Interface"
}
resource "aws_vpc_endpoint" "ec2messages" {
  vpc_id            = module.vpc.vpc_id
  service_name      = data.aws_vpc_endpoint_service.ec2messages.service_name
  vpc_endpoint_type = "Interface"
  security_group_ids = [
    aws_security_group.vpc_endpoint.id,
  ]
  private_dns_enabled = true
  tags = merge(
    {
      Name = "${local.prefix}-ec2messages-endpoint"
    },
    local.common_tags
  )
}
resource "aws_vpc_endpoint_subnet_association" "ec2messages" {
  count = length(module.vpc.private_subnets)
  vpc_endpoint_id = aws_vpc_endpoint.ec2messages.id
  subnet_id       = module.vpc.private_subnets[count.index]
}
data "aws_vpc_endpoint_service" "ssmmessages" {
  service      = "ssmmessages"
  service_type = "Interface"
}
resource "aws_vpc_endpoint" "ssmmessages" {
  vpc_id            = module.vpc.vpc_id
  service_name      = data.aws_vpc_endpoint_service.ssmmessages.service_name
  vpc_endpoint_type = "Interface"
  security_group_ids = [
    aws_security_group.vpc_endpoint.id,
  ]
  private_dns_enabled = true
  tags = merge(
    {
      Name = "${local.prefix}-ssmmessages-endpoint"
    },
    local.common_tags
  )
}
resource "aws_vpc_endpoint_subnet_association" "ssmmessages" {
  count = length(module.vpc.private_subnets)
  vpc_endpoint_id = aws_vpc_endpoint.ssmmessages.id
  subnet_id       = module.vpc.private_subnets[count.index]
}
# S3 VPC Gateway Endpoint
data "aws_vpc_endpoint_service" "s3" {
  service      = "s3"
  service_type = "Gateway"
}
resource "aws_vpc_endpoint" "s3" {
  vpc_id            = module.vpc.vpc_id
  service_name      = data.aws_vpc_endpoint_service.s3.service_name
  vpc_endpoint_type = "Gateway"
  tags = merge(
    {
      Name = "${local.prefix}-s3-endpoint"
    },
    local.common_tags
  )
}
resource "aws_vpc_endpoint_route_table_association" "s3" {
  count = length(module.vpc.private_route_table_ids)
  route_table_id  = module.vpc.private_route_table_ids[count.index]
  vpc_endpoint_id = aws_vpc_endpoint.s3.id
}
# KMS VPC Endpoint
data "aws_vpc_endpoint_service" "kms" {
  service      = "kms"
  service_type = "Interface"
}
resource "aws_vpc_endpoint" "kms" {
  vpc_id            = module.vpc.vpc_id
  service_name      = data.aws_vpc_endpoint_service.kms.service_name
  vpc_endpoint_type = "Interface"
  security_group_ids = [
    aws_security_group.vpc_endpoint.id,
  ]
  private_dns_enabled = true
  tags = merge(
    {
      Name = "${local.prefix}-kms-endpoint"
    },
    local.common_tags
  )
}
resource "aws_vpc_endpoint_subnet_association" "kms" {
  count = length(module.vpc.private_subnets)
  vpc_endpoint_id = aws_vpc_endpoint.kms.id
  subnet_id       = module.vpc.private_subnets[count.index]
}
# CloudWatch Logs VPC Endpoint
data "aws_vpc_endpoint_service" "logs" {
  service      = "logs"
  service_type = "Interface"
}
resource "aws_vpc_endpoint" "logs" {
  vpc_id              = module.vpc.vpc_id
  private_dns_enabled = true
  service_name        = data.aws_vpc_endpoint_service.logs.service_name
  vpc_endpoint_type   = "Interface"
  security_group_ids = [
    aws_security_group.vpc_endpoint.id,
  ]
  tags = merge(
    {
      Name = "${local.prefix}-logs-endpoint"
    },
    local.common_tags
  )
}
resource "aws_vpc_endpoint_subnet_association" "logs" {
  count = length(module.vpc.private_subnets)
  vpc_endpoint_id = aws_vpc_endpoint.logs.id
  subnet_id       = module.vpc.private_subnets[count.index]
}
# ECR VPC Endpoints
data "aws_vpc_endpoint_service" "ecr_dkr" {
  service      = "ecr.dkr"
  service_type = "Interface"
}
resource "aws_vpc_endpoint" "ecr_dkr" {
  vpc_id              = module.vpc.vpc_id
  private_dns_enabled = true
  service_name        = data.aws_vpc_endpoint_service.ecr_dkr.service_name
  vpc_endpoint_type   = "Interface"
  security_group_ids = [
    aws_security_group.vpc_endpoint.id,
  ]
  #subnet_ids = local.private_subnets
  tags = merge(
    {
      Name = "${local.prefix}-ecr-dkr-endpoint"
    },
    local.common_tags
  )
}
resource "aws_vpc_endpoint_subnet_association" "ecr_dkr" {
  count = length(module.vpc.private_subnets)
  vpc_endpoint_id = aws_vpc_endpoint.ecr_dkr.id
  subnet_id       = module.vpc.private_subnets[count.index]
}
data "aws_vpc_endpoint_service" "ecr_api" {
  service      = "ecr.api"
  service_type = "Interface"
}
resource "aws_vpc_endpoint" "ecr_api" {
  vpc_id              = module.vpc.vpc_id
  private_dns_enabled = true
  service_name        = data.aws_vpc_endpoint_service.ecr_api.service_name
  vpc_endpoint_type   = "Interface"
  security_group_ids = [
    aws_security_group.vpc_endpoint.id,
  ]
  #subnet_ids = local.private_subnets
  tags = merge(
    {
      Name = "${local.prefix}-ecr-api-endpoint"
    },
    local.common_tags
  )
}
resource "aws_vpc_endpoint_subnet_association" "ecr_api" {
  count = length(module.vpc.private_subnets)
  vpc_endpoint_id = aws_vpc_endpoint.ecr_api.id
  subnet_id       = module.vpc.private_subnets[count.index]
}
# SecretsManager VPC Endpoint
data "aws_vpc_endpoint_service" "secretsmanager" {
  service      = "secretsmanager"
  service_type = "Interface"
}
resource "aws_vpc_endpoint" "secretsmanager" {
  vpc_id              = module.vpc.vpc_id
  private_dns_enabled = true
  service_name        = data.aws_vpc_endpoint_service.secretsmanager.service_name
  vpc_endpoint_type   = "Interface"
  security_group_ids = [
    aws_security_group.vpc_endpoint.id,
  ]
  #subnet_ids = local.private_subnets
  tags = merge(
    {
      Name = "${local.prefix}-secretsmanager-endpoint"
    },
    local.common_tags
  )
}
resource "aws_vpc_endpoint_subnet_association" "secretsmanager" {
  count = length(module.vpc.private_subnets)
  vpc_endpoint_id = aws_vpc_endpoint.secretsmanager.id
  subnet_id       = module.vpc.private_subnets[count.index]
}
Both files use some local variables:
locals {
  prefix        = "amazon-efs-terraform"
  vpc_name      = "${local.prefix}-vpc"
  vpc_cidr      = var.vpc_cidr
  common_tags   = {
    Environment = "dev"
    Project     = "hands-on.cloud"
  }
}
You need to define the AWS Terraform provider and optionally ping its version:
# Set up Terraform provider version (if required)
terraform {
  required_providers {
    aws = {
      source  = "hashicorp/aws"
      version = "~> 4.9"
    }
  }
}
# Defining AWS provider
provider "aws" {
  region = var.aws_region
}
Exposed VPC module variables in our case are:
variable "prefix" {
  default     = "managing-eks-terraform"
  description = "Common prefix for AWS resources names"
}
variable "aws_region" {
  default     = "us-east-1"
  description = "AWS Region to deploy VPC"
}
variable "vpc_cidr" {
  default     = "10.10.0.0/16"
  description = "AWS VPC CIDR range"
}
We’re using Terraform remote S3 backend storing state files and DynamoDB for Terraform execution locking. You can use our Terraform module (0_remote_state) to set them up if you need to quickly.
terraform {
  backend "s3" {
    bucket  = "hands-on-cloud-terraform-remote-state-s3"
    key     = "amazon-efs-terraform-vpc.tfstate"
    region  = "us-west-2"
    encrypt = "true"
    dynamodb_table = "hands-on-cloud-terraform-remote-state-dynamodb"
  }
}
Finally, we’re exposing the common prefix, tags, VPC ID, VPC CIDR, and VPCs public and private subnets IDs values to have the ability to use them in other purpose-built Terraform modules:
output "prefix" {
  value       = local.prefix
  description = "Exported common resources prefix"
}
output "common_tags" {
  value       = local.common_tags
  description = "Exported common resources tags"
}
output "vpc_id" {
  value       = module.vpc.vpc_id
  description = "VPC ID"
}
output "vpc_cidr" {
  value       = module.vpc.vpc_cidr_block
  description = "VPC CIDR block"
}
output "public_subnets" {
  value       = module.vpc.public_subnets
  description = "VPC public subnets' IDs list"
}
output "private_subnets" {
  value       = module.vpc.private_subnets
  description = "VPC private subnets' IDs list"
}
To apply this module, you need to execute the following Terraform commands within the 1_vpc folder:
terraform init
terraform apply -auto-approve
How to create an EFS volume?
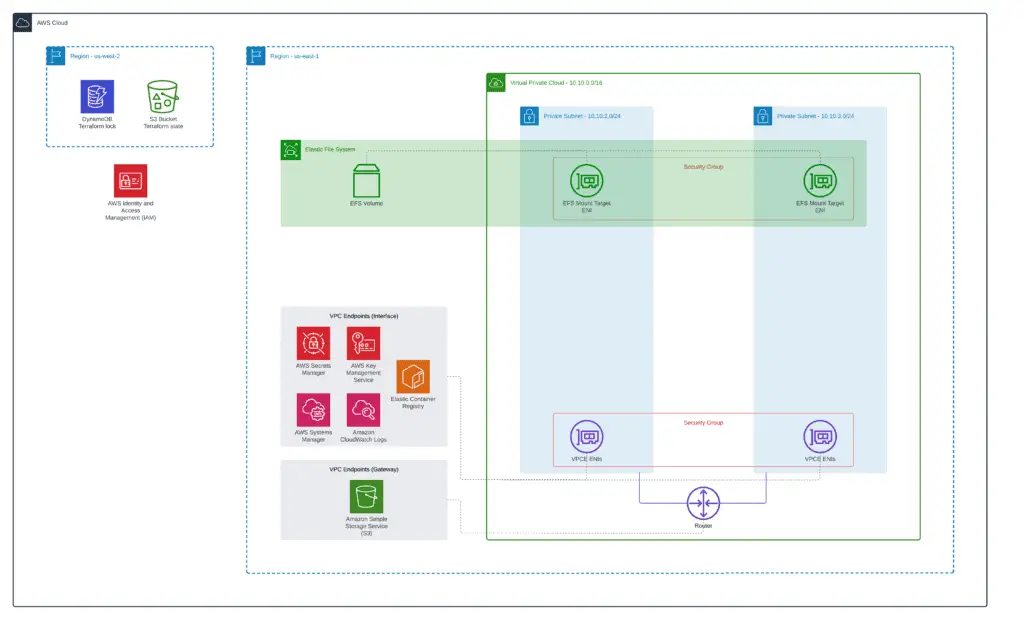
To create an AWS EFS volume in your AWS account, you need to use the aws_efs_file_system Terraform resource. In addition to the EFS volume, you must create an AWS EFS mount target and an EFS file system policy. To organize multi-user / service access to the volume, you must create EFS access points. Down below, we’ll create all these required resources to organize access to the EFS volume:
- EC2 instance – full access to the entire volume
- Fargate task – isolated access to individual subfolders
- AWS Lambda – isolated access to individual subfolders
In addition, we’ll create blank IAM roles for the EC2 instance, Fargate task, and AWS Lambda to simplify EFS files system policy management. We’ll attach the required IAM policies to these roles in separate purpose-built Terraform modules.
Check the “Managing AWS IAM using Terraform” article for more information about the topic.
You can find a complete module example in our GitHub repository: 2_efs.
Let’s create a separate Terraform code subfolder (2_efs) in the project root folder for this module and define the Terraform backend configuration for the module:
terraform {
  backend "s3" {
    bucket  = "hands-on-cloud-terraform-remote-state-s3"
    key     = "amazon-efs-terraform.tfstate"
    region  = "us-west-2"
    encrypt = "true"
    dynamodb_table = "hands-on-cloud-terraform-remote-state-dynamodb"
  }
}
Now, we can define local variables to gather and store information about VPC resources (this information is required to deploy the EFS volume):
locals {
  remote_state_bucket_region    = "us-west-2"
  remote_state_bucket           = "hands-on-cloud-terraform-remote-state-s3"
  infrastructure_state_file     = "amazon-efs-terraform-vpc.tfstate"
  prefix                        = data.terraform_remote_state.vpc.outputs.prefix
  common_tags                   = data.terraform_remote_state.vpc.outputs.common_tags
  vpc_id                        = data.terraform_remote_state.vpc.outputs.vpc_id
  vpc_cidr                      = data.terraform_remote_state.vpc.outputs.vpc_cidr
  public_subnets                = data.terraform_remote_state.vpc.outputs.public_subnets
  private_subnets               = data.terraform_remote_state.vpc.outputs.private_subnets
}
data "terraform_remote_state" "vpc" {
  backend = "s3"
  config = {
    bucket = local.remote_state_bucket
    region = local.remote_state_bucket_region
    key    = local.infrastructure_state_file
  }
}
Terraform AWS provider configuration will be similar to the previous module:
# Set up Terraform provider version (if required)
terraform {
  required_providers {
    aws = {
      source  = "hashicorp/aws"
      version = "~> 4.9"
    }
  }
}
# Defining AWS provider
provider "aws" {
  region = var.aws_region
}
We’ll use only one external variable for this module – AWS Region:
variable "aws_region" {
  default     = "us-east-1"
  description = "AWS Region to deploy VPC"
}
Now, we’re ready to define EFS-specific resources:
locals {
  resource_name = "${local.prefix}-efs"
}
# EFS file system
resource "aws_efs_file_system" "shared_efs" {
  creation_token = local.resource_name
  lifecycle_policy {
    transition_to_ia = "AFTER_7_DAYS"
  }
  tags = merge(
    {
      Name = local.resource_name
    },
    local.common_tags
  )
}
# EFS file system policy
resource "aws_efs_file_system_policy" "shared_efs" {
  file_system_id = aws_efs_file_system.shared_efs.id
  bypass_policy_lockout_safety_check = true
  policy = <<POLICY
{
    "Version": "2012-10-17",
    "Statement": [
        {
            "Sid": "AccessThroughMountTarget",
            "Effect": "Allow",
            "Principal": {
                "AWS": "*"
            },
            "Action": [
                "elasticfilesystem:ClientRootAccess",
                "elasticfilesystem:ClientWrite",
                "elasticfilesystem:ClientMount"
            ],
            "Resource": "${aws_efs_mount_target.shared_fs[0].file_system_arn}",
            "Condition": {
                "Bool": {
                    "aws:SecureTransport": "true"
                },
                "Bool": {
                    "elasticfilesystem:AccessedViaMountTarget": "true"
                }
            }
        },
        {
            "Sid": "FargateAccess",
            "Effect": "Allow",
            "Principal": { "AWS": "${aws_iam_role.fargate_role.arn}" },
            "Action": [
                "elasticfilesystem:ClientMount",
                "elasticfilesystem:ClientWrite"
            ],
            "Condition": {
                "Bool": {
                    "aws:SecureTransport": "true"
                },
                "StringEquals": {
                    "elasticfilesystem:AccessPointArn" : "${aws_efs_access_point.fargate.arn}"
                }
            }
        },
        {
            "Sid": "LambdaAccess",
            "Effect": "Allow",
            "Principal": { "AWS": "${aws_iam_role.lambda_role.arn}" },
            "Action": [
                "elasticfilesystem:ClientMount",
                "elasticfilesystem:ClientWrite"
            ],
            "Condition": {
                "Bool": {
                    "aws:SecureTransport": "true"
                },
                "StringEquals": {
                    "elasticfilesystem:AccessPointArn" : "${aws_efs_access_point.lambda.arn}"
                }
            }
        }
    ]
}
POLICY
}
# AWS EFS mount target
# EFS Security Group / EFS SG
resource "aws_security_group" "shared_efs" {
  name        = "${local.prefix}-sg"
  description = "Allow EFS inbound traffic from VPC"
  vpc_id      = local.vpc_id
  ingress {
    description      = "NFS traffic from VPC"
    from_port        = 2049
    to_port          = 2049
    protocol         = "tcp"
    cidr_blocks      = [local.vpc_cidr]
  }
  tags = merge(
    {
      Name = local.resource_name
    },
    local.common_tags
  )
}
resource "aws_efs_mount_target" "shared_fs" {
  count = length(local.private_subnets)
  file_system_id = aws_efs_file_system.shared_efs.id
  subnet_id      = local.private_subnets[count.index]
  security_groups = [ aws_security_group.shared_efs.id ]
}
# EFS access points
resource "aws_efs_access_point" "lambda" {
  file_system_id = aws_efs_file_system.shared_efs.id
  posix_user {
    gid = 1000
    uid = 1000
  }
  root_directory {
    path = "/lambda"
    creation_info {
      owner_gid   = 1000
      owner_uid   = 1000
      permissions = 755
    }
  }
  tags = merge(
    {
      Name = local.resource_name
    },
    local.common_tags
  )
}
resource "aws_efs_access_point" "fargate" {
  file_system_id = aws_efs_file_system.shared_efs.id
  posix_user {
    gid = 1000
    uid = 1000
  }
  root_directory {
    path = "/fargate"
    creation_info {
      owner_gid   = 1000
      owner_uid   = 1000
      permissions = 755
    }
  }
  tags = merge(
    {
      Name = local.resource_name
    },
    local.common_tags
  )
}
The aws_efs_file_system Terraform resource defines an EFS volume. Use this Terraform resource for creating AWS Elastic FileSystems as often as you need.
One of the great features of Amazon EFS is that it can automatically transition files to lower-cost storage tiers as they age. This storage lifecycle policy helps you reduce overall storage costs by automatically moving files that haven’t been accessed to cheaper storage tiers. You can set up the transition policy so it happens automatically or manually initiate the transition process when you want. transition files no longer needed to lower-cost storage tiers will help you save money on your overall AWS storage bill.
You can configure the AWS EFS storage lifecycle policy using the lifecycle_policy resource that specifies how long it takes to transition files to the IA storage class when nobody accesses them. Valid values for the transition_to_ia parameter are:
AFTER_7_DAYSAFTER_14_DAYSAFTER_30_DAYSAFTER_60_DAYSAFTER_90_DAYS
The aws_efs_file_system_policy resource contains EFS policy to enforce access of EC2 instance, Fargate task, and AWS Lambda through mount target and access points (access is restricted by resources IAM roles). In addition to that, we’re enforcing users to use an encrypted connection (the aws:SecureTransport condition).
The aws_efs_mount_target is the Terraform resource that allows you to expose the AWS EFS to the VPC subnets by creating ENIs in the VPC subnets and adding the required records to your .2 DNS resolver. EFS mount point uses ENI to connect to EFS subnet, and the ENI has to have an EFS SG (Security Group) associated with it to allow NFS (2049/TCP) traffic from trusted sources. A default Security Group will be created if no EFS Security Group is provided. We recommend always creating a Security Group directly and associating it with the required AWS resource to avoid access misconfiguration. Finally, the AWS EFS mount target should be attached to every VPC (EFS) subnet where you plan to use AWS EFS volume.
Two additional aws_efs_access_point resources allow us to provide fine-granular access to the AWS EFS and isolate clients connected through the lambda EFS access point to the /lambda subfolder and clients connected through the fargate access point to the /fargate folder.
The EFS file systems can be imported using the AWS EFS mount target or EFS access point ID.
Blank IAM roles, which we fulfill with required permissions from separate Terraform modules, are defined in a separate file:
# EC2 instance IAM role
data "aws_iam_policy_document" "ec2_role" {
  statement {
    actions = ["sts:AssumeRole"]
    principals {
      identifiers = ["ec2.amazonaws.com"]
      type        = "Service"
    }
  }
}
resource "aws_iam_role" "ec2_role" {
  name = "${local.prefix}-ec2"
  path = "/"
  assume_role_policy = data.aws_iam_policy_document.ec2_role.json
}
# Fargate task IAM role
data "aws_iam_policy_document" "fargate_role" {
  statement {
    actions = ["sts:AssumeRole"]
    principals {
      identifiers = ["ecs-tasks.amazonaws.com"]
      type        = "Service"
    }
  }
}
resource "aws_iam_role" "fargate_role" {
  name = "${local.prefix}-fargate"
  path = "/"
  assume_role_policy = data.aws_iam_policy_document.fargate_role.json
}
# Lambda IAM role
data "aws_iam_policy_document" "lambda_role" {
  statement {
    actions = ["sts:AssumeRole"]
    principals {
      identifiers = ["lambda.amazonaws.com"]
      type        = "Service"
    }
  }
}
resource "aws_iam_role" "lambda_role" {
  name = "${local.prefix}-lambda"
  path = "/"
  assume_role_policy = data.aws_iam_policy_document.lambda_role.json
}
To apply this module, you need to execute the following Terraform commands within the 2_efs folder:
terraform init
terraform apply -auto-approve
How to mount an AWS EFS volume?
Depending on the AWS resource where you’re mounting an EFS volume, you need to use either an EFS mount point or an EFS access point. Amazon EC2, AWS Lambda, and AWS Fargate support all of them. Down below, we’ll show how to automate this process using Terraform.
Amazon EC2 instance
To mount an EFS volume to an EC2 instance using Terraform, you can use instance user data to automate this process. Let’s create a separate subfolder (3_ec2_instance) in the root folder of our project for the demo Terraform module code. We’ll use Amazon Linux 2 AMI as a base image for our EC2 instance. If you’d like to do something similar for other operating systems or custom AMIs, we suggest you build your custom AMIs and manually pre-install the Amazon EFS client.
You can find a complete module example in our GitHub repository: 3_ec2_instance.

Let’s start our module from the traditional Terraform backend configuration in the 3_ec2_instance Terraform code subfolder:
terraform {
  backend "s3" {
    bucket  = "hands-on-cloud-terraform-remote-state-s3"
    key     = "amazon-efs-terraform-ec2-instances.tfstate"
    region  = "us-west-2"
    encrypt = "true"
    dynamodb_table = "hands-on-cloud-terraform-remote-state-dynamodb"
  }
}
As usual, we need to define Terraform provider:
# Set up Terraform provider version (if required)
terraform {
  required_providers {
    aws = {
      source  = "hashicorp/aws"
      version = "~> 4.9"
    }
  }
}
# Defining AWS provider
provider "aws" {
  region = var.aws_region
}
The provider Terraform resource requires AWS Region as a parameter, which we’re getting from the regular Terraform variable:
variable "aws_region" {
  default     = "us-east-1"
  description = "AWS Region to deploy VPC"
}
In this module we’ll use information from both VPC and EFS Terraform modules, so we need to query this information from remote states of already deployed modules and store it in Terraform local variables:
locals {
  remote_state_bucket_region    = "us-west-2"
  remote_state_bucket           = "hands-on-cloud-terraform-remote-state-s3"
  vpc_state_file                = "amazon-efs-terraform-vpc.tfstate"
  efs_state_file                = "amazon-efs-terraform.tfstate"
  aws_region        = var.aws_region
  prefix            = data.terraform_remote_state.vpc.outputs.prefix
  common_tags       = data.terraform_remote_state.vpc.outputs.common_tags
  vpc_id            = data.terraform_remote_state.vpc.outputs.vpc_id
  vpc_cidr          = data.terraform_remote_state.vpc.outputs.vpc_cidr
  public_subnets    = data.terraform_remote_state.vpc.outputs.public_subnets
  private_subnets   = data.terraform_remote_state.vpc.outputs.private_subnets
  ec2_instance_type = "t3.micro"
  iam_ec2_role_name = data.terraform_remote_state.efs.outputs.iam_ec2_role_name
  efs_id            = data.terraform_remote_state.efs.outputs.efs_id
}
data "terraform_remote_state" "vpc" {
  backend = "s3"
  config = {
    bucket = local.remote_state_bucket
    region = local.remote_state_bucket_region
    key    = local.vpc_state_file
  }
}
data "terraform_remote_state" "efs" {
  backend = "s3"
  config = {
    bucket = local.remote_state_bucket
    region = local.remote_state_bucket_region
    key    = local.efs_state_file
  }
}
Now, we’re ready to define the EC2 instance and populate an instance user data with the required automation:
# Latest Amazon Linux 2 AMI
locals {
  ec2_file_system_local_mount_path = "/mnt/efs"
}
data "aws_ami" "amazon_linux_2_latest" {
  most_recent = true
  filter {
    name = "name"
    values = ["amzn2-ami-hvm-*-x86_64-ebs"]
  }
  owners = ["amazon"]
}
# EC2 demo instance
resource "aws_iam_policy_attachment" "ec2_role" {
  name       = "${local.prefix}-ec2-role"
  roles      = [ local.iam_ec2_role_name ]
  policy_arn = "arn:aws:iam::aws:policy/AmazonSSMManagedInstanceCore"
}
resource "aws_iam_instance_profile" "amazon_linux_2" {
  name = "${local.prefix}-amazon-linux-2"
  role = local.iam_ec2_role_name
}
resource "aws_security_group" "amazon_linux_2" {
  name        = "${local.prefix}-amazon-linux-2"
  description = "Amazon Linux 2 SG"
  vpc_id      = local.vpc_id
  egress = [
    {
      description      = "ALL Traffic"
      from_port        = 0
      to_port          = 0
      protocol         = "-1"
      cidr_blocks      = ["0.0.0.0/0"]
      ipv6_cidr_blocks = []
      prefix_list_ids = []
      security_groups = []
      self = false
    }
  ]
  tags = merge(
    {
      Name = "${local.prefix}-amazon-linux-2"
    },
    local.common_tags
  )
}
resource "aws_network_interface" "amazon_linux_2" {
  subnet_id       = local.private_subnets[1]
  security_groups = [aws_security_group.amazon_linux_2.id]
}
resource "aws_instance" "amazon_linux_2" {
  ami                  = data.aws_ami.amazon_linux_2_latest.id
  instance_type        = local.ec2_instance_type
  availability_zone    = "${local.aws_region}b"
  iam_instance_profile = aws_iam_instance_profile.amazon_linux_2.name
  network_interface {
    network_interface_id = aws_network_interface.amazon_linux_2.id
    device_index         = 0
  }
  user_data = <<EOF
#!/bin/bash
mkdir -p ${local.ec2_file_system_local_mount_path}
yum install -y amazon-efs-utils
mount -t efs -o iam,tls ${local.efs_id} ${local.ec2_file_system_local_mount_path}
echo "${local.efs_id} ${local.ec2_file_system_local_mount_path} efs _netdev,tls,iam 0 0" >> /etc/fstab
# Creating demo content for other services
mkdir -p ${local.ec2_file_system_local_mount_path}/fargate
mkdir -p ${local.ec2_file_system_local_mount_path}/lambda
df -h > ${local.ec2_file_system_local_mount_path}/fargate/demo.txt
df -h > ${local.ec2_file_system_local_mount_path}/lambda/demo.txt
chown ec2-user:ec2-user -R ${local.ec2_file_system_local_mount_path}
  EOF
  user_data_replace_on_change = true
  tags = merge(
    {
      Name = "${local.prefix}-amazon-linux-2"
    },
    local.common_tags
  )
}
The ec2_file_system_local_mount_path local variable stores the mount point location at the EC2 instance (where we’re mounting the EFS volume).
The aws_ami Terraform data resource allows us to query information about the latest Amazon Linux 2 AMI.
We’re using the aws_iam_policy_attachment resource to attach the AmazonSSMManagedInstanceCore policy to the EC2 instance IAM role we’ve defined at 2_efs Terraform module.
The AmazonSSMManagedInstanceCore policy is a built-in policy that provides permissions for Systems Manager to perform basic actions on your instances. This includes actions such as remote management instances using AWS Web console or AWS CLI, run commands, and get instance information. To use Systems Manager you must use AmazonSSMManagedInstanceCore policy permissions. If you attempt to manage EC2 instance using Systems Manager without this policy, you will receive an error.
Introduction to AWS Systems Manager
The aws_iam_instance_profile resource is required to create an IAM instance profile, an IAM instance profile is a launch configuration that you can use to launch instances with an IAM role.
Then we’re using the aws_network_interface resource to specify a subnet we want to connect our EC2 instance and the aws_security_group Security Group resource to allow required traffic. In our case, we’re allowing all types of outbound (egress) traffic from the EC2 instance and preventing all inbound traffic.
Finally, we’re defining the aws_instance Terraform resource and using a simple Bash script in user_data to create a mount point, install/update Amazon EFS utils, mount the EFS mount point to the required directory on the file system, and update the /etc/fstab file so that the instance can automatically mount the EFS volume after reboot. In addition, we’re creating some test files on the EFS volume to test deployed Fargate service and AWS Lambda later.
To apply this module, you need to execute the following Terraform commands within the 3_ec2_instance folder:
terraform init
terraform apply -auto-approve
At this stage, you should have an EC2 instance created successfully. Use AWS Systems Manager to connect to test your ability to create, update, and remove files and directories at the mounted filesystem.
AWS Fargate
To connect an EFS volume to an AWS Fargate task, you must create a task definition that includes the efsVolumeConfiguration container setting. This setting defines the file system and mount point for the EFS volume within the task’s container. Please see the Amazon ECS documentation for more information on creating task definitions.
At the end of this module, you’ll get the following setup:
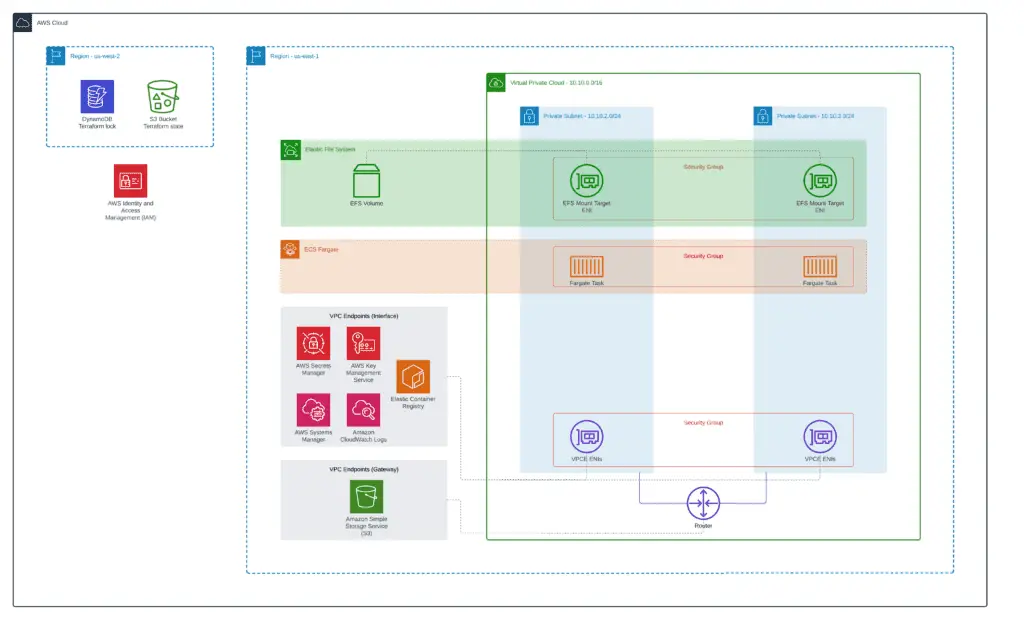
To build such a setup, we’ll create three separate purpose-built Terraform modules deploying:
- AWS Fargate cluster
- ECR registry and Docker image with the demo application
- Simple AWS Fargate service
Cluster
As soon as our modules follow the same structure, we’ll publish only the most important parts of the Terraform configuration. If you need a complete example, check out our GitHub repository: 4_fargate_cluster.
Let’s create a separate subfolder (4_fargate_cluster) in our project root folder and define the Fargate cluster:
locals {
  remote_state_bucket_region    = "us-west-2"
  remote_state_bucket           = "hands-on-cloud-terraform-remote-state-s3"
  vpc_state_file                = "amazon-efs-terraform-vpc.tfstate"
  aws_region        = var.aws_region
  prefix            = data.terraform_remote_state.vpc.outputs.prefix
  common_tags       = data.terraform_remote_state.vpc.outputs.common_tags
  vpc_id            = data.terraform_remote_state.vpc.outputs.vpc_id
  vpc_cidr          = data.terraform_remote_state.vpc.outputs.vpc_cidr
  public_subnets    = data.terraform_remote_state.vpc.outputs.public_subnets
  private_subnets   = data.terraform_remote_state.vpc.outputs.private_subnets
}
data "terraform_remote_state" "vpc" {
  backend = "s3"
  config = {
    bucket = local.remote_state_bucket
    region = local.remote_state_bucket_region
    key    = local.vpc_state_file
  }
}
# Fargate cluster
resource "aws_ecs_cluster" "main" {
  name = "${local.prefix}-fargate-cluster"
  tags = local.common_tags
}
resource "aws_ecs_cluster_capacity_providers" "cluster" {
  cluster_name = aws_ecs_cluster.main.name
  capacity_providers = ["FARGATE_SPOT", "FARGATE"]
  default_capacity_provider_strategy {
    capacity_provider = "FARGATE_SPOT"
  }
}
This is a very simple configuration that contains only the aws_ecs_cluster and aws_ecs_cluster_capacity_providers resources.
ECS cluster capacity providers are a type of container orchestration that helps to manage and scale containerized applications. They provide a way to dynamically adjust the number of containers in a cluster based on demand, and they offer features such as autoscaling, instance health checking, and resource monitoring. Capacity providers can be used with both Amazon ECS and AWS Fargate. When used with ECS, capacity providers allow you to create an elastic cluster that can automatically scale up or down as needed. This can help to improve your application’s availability and performance while reducing costs. With AWS Fargate, you can use capacity providers to launch containers without needing to worry about managing server instances.
To apply this module, you need to execute the following Terraform commands within the 3_fargate_cluster folder:
terraform init
terraform apply -auto-approve
Docker container image
Next, we need to create a separate module for managing Docker images with our demo application. We’ll use a popular tiangolo/uwsgi-nginx-flask image as a base and add a simple Flask application there, which will read the content of the test file from the EFS and return it to the user in response to the HTTP GET request.
A complete source code of all Terraform files is located in our GitHub repository: 5_fargate_container.
Here’s the module structure:
.
├── backend.tf
├── flask-demo-app
│   ├── Dockerfile
│   └── app
│       └── main.py
├── main.tf
├── outputs.tf
├── provider.tf
└── variables.tf
2 directories, 7 files
The flask-demo-app folder contains a Dockerfile, application source, and potential configuration file in the app subfolder.
The Dockerfile is very simple:
FROM tiangolo/uwsgi-nginx-flask:python3.8
COPY ./app /app
The Dockerfile tells Docker to use uwsgi-nginx-flask:python3.8 as a base Docker image and copy all project files (Python sources and configuration files) to the /app folder in the container.
The Python code of the application is very simple. We’re getting the mount point information from the environment variable, reading the file content, and sending it back to the user in response to the GET request:
import os
import traceback
from flask import Flask
app = Flask(__name__)
EFS_MOUNT_POINT = os.environ.get('EFS_MOUNT_POINT')
def demo_file_content():
    print(f'EFS_MOUNT_POINT: {EFS_MOUNT_POINT}')
    content = None
    try:
        READ_FILENAME = os.path.join(EFS_MOUNT_POINT, 'demo.txt')
        with open(READ_FILENAME, 'r') as f:
            content = ''.join(f.readlines())
    except Exception as e:
        print(f'Exception: {traceback.format_exc()}')
        content = 'An error has been occurred. Check out logs.'
        pass
    return content
@app.route("/")
def hello():
    return demo_file_content()
if __name__ == "__main__":
    # Only for debugging while developing
    app.run(host='0.0.0.0', debug=True, port=80)
To build a Docker image using Terraform, you need to use the following configuration:
locals {
  remote_state_bucket_region    = "us-west-2"
  remote_state_bucket           = "hands-on-cloud-terraform-remote-state-s3"
  vpc_state_file                = "amazon-efs-terraform-vpc.tfstate"
  aws_region        = var.aws_region
  prefix            = data.terraform_remote_state.vpc.outputs.prefix
  common_tags       = data.terraform_remote_state.vpc.outputs.common_tags
  vpc_id            = data.terraform_remote_state.vpc.outputs.vpc_id
  vpc_cidr          = data.terraform_remote_state.vpc.outputs.vpc_cidr
  public_subnets    = data.terraform_remote_state.vpc.outputs.public_subnets
  private_subnets   = data.terraform_remote_state.vpc.outputs.private_subnets
  container_name    = "flask-demo-app"
}
data "terraform_remote_state" "vpc" {
  backend = "s3"
  config = {
    bucket = local.remote_state_bucket
    region = local.remote_state_bucket_region
    key    = local.vpc_state_file
  }
}
locals {
  aws_account_id = data.aws_caller_identity.local.account_id
}
data "aws_caller_identity" "local" {}
data "archive_file" "flask_demo_app" {
  type        = "zip"
  source_dir = "${path.module}/${local.container_name}"
  output_path = "${path.module}/${local.container_name}.zip"
}
resource "aws_ecr_repository" "flask_demo_app" {
  name                 = "${local.prefix}-${local.container_name}"
  image_tag_mutability = "MUTABLE"
  image_scanning_configuration {
    scan_on_push = true
  }
  tags = merge(
    {
      Name = "${local.prefix}-${local.container_name}"
    },
    local.common_tags
  )
}
resource "null_resource" "build_image" {
  triggers = {
    policy_sha1 = data.archive_file.flask_demo_app.output_sha
  }
  provisioner "local-exec" {
    command = <<EOF
      cd ${local.container_name}
      docker build -t ${local.prefix}-${local.container_name} -f Dockerfile .
    EOF
  }
}
resource "null_resource" "push_image" {
  depends_on = [null_resource.build_image]
  triggers = {
    policy_sha1 = data.archive_file.flask_demo_app.output_sha
  }
  provisioner "local-exec" {
    command = <<EOF
      aws ecr get-login-password --region ${local.aws_region} | docker login --username AWS --password-stdin ${local.aws_account_id}.dkr.ecr.${local.aws_region}.amazonaws.com && \
      docker tag ${local.prefix}-${local.container_name}:latest ${aws_ecr_repository.flask_demo_app.repository_url}:latest && \
      docker push ${aws_ecr_repository.flask_demo_app.repository_url}:latest
    EOF
  }
}
We’re using archive_file Terraform data resource to track changes in the application source code folder and trigger the Docker image rebuild process if something changes.
The aws_ecr_repository resource is responsible for creating an ECR registry where we’ll store our Docker image.
Finally, we’re using two null_resources to build a Docker image and push it to the created registry.
To apply this module, you need to execute the following Terraform commands within the 5_fargate_container folder:
terraform init
terraform apply -auto-approve
Service
To finish our AWS Fargate example, let’s create another subfolder (6_fargate_service) in the project root folder to define Terraform configuration for the Fargate service. Fargate service is responsible for launching Fargate tasks (Docker containers), keeping them in desired RUNNING state.
A complete source code of all Terraform files is located in our GitHub repository: 6_fargate_service.
locals {
  service_name = "amazon-efs-terraform-flask-demo-app"
  task_image = "${local.container_repository_url}:latest"
  service_port = 80
  container_definition = [{
    cpu         = 512
    image       = local.task_image
    memory      = 1024
    name        = local.service_name
    networkMode = "awsvpc"
    environment = [
      {
        "name": "EFS_MOUNT_POINT", "value": local.container_file_system_local_mount_path
      }
    ]
    portMappings = [
      {
        protocol      = "tcp"
        containerPort = local.service_port
        hostPort      = local.service_port
      }
    ]
    logConfiguration = {
      logdriver = "awslogs"
      options = {
        "awslogs-group"         = local.cw_log_group
        "awslogs-region"        = local.aws_region
        "awslogs-stream-prefix" = "stdout"
      }
    }
    mountPoints = [
      {
        "sourceVolume"  = "efs_volume",
        "containerPath" = local.container_file_system_local_mount_path,
        "readOnly"      = false
      }
    ]
  }]
  cw_log_group = "/ecs/${local.service_name}"
}
# Fargate Service
resource "aws_security_group" "fargate_task" {
  name   = "${local.service_name}-fargate-task"
  vpc_id = local.vpc_id
  ingress {
    from_port   = local.service_port
    to_port     = local.service_port
    protocol    = "tcp"
    cidr_blocks = [local.vpc_cidr]
  }
  egress {
    from_port   = 0
    to_port     = 0
    protocol    = "-1"
    cidr_blocks = ["0.0.0.0/0"]
  }
  tags = merge(
    local.common_tags,
    {
      Name = local.service_name
    }
  )
}
data "aws_iam_policy_document" "fargate-role-policy" {
  statement {
    actions = ["sts:AssumeRole"]
    principals {
      type        = "Service"
      identifiers = ["ecs.amazonaws.com", "ecs-tasks.amazonaws.com"]
    }
  }
}
resource "aws_iam_policy" "fargate_execution" {
  name   = "${local.prefix}-fargate-execution-policy"
  policy = <<EOF
{
  "Version": "2012-10-17",
  "Statement": [
    {
        "Effect": "Allow",
        "Action": [
            "ecr:GetDownloadUrlForLayer",
            "ecr:BatchGetImage",
            "ecr:BatchCheckLayerAvailability",
            "ecr:GetAuthorizationToken",
            "logs:CreateLogGroup",
            "logs:CreateLogStream",
            "logs:PutLogEvents"
        ],
        "Resource": "*"
    },
    {
      "Effect": "Allow",
      "Action": [
        "ssm:GetParameters",
        "secretsmanager:GetSecretValue",
        "kms:Decrypt"
      ],
      "Resource": [
        "*"
      ]
    }
  ]
}
EOF
}
resource "aws_iam_policy" "fargate_task" {
  name   = "${local.prefix}-fargate-task-policy"
  policy = <<EOF
{
  "Version": "2012-10-17",
  "Statement": [
    {
        "Effect": "Allow",
        "Action": [
            "logs:CreateLogGroup",
            "logs:CreateLogStream",
            "logs:PutLogEvents"
        ],
        "Resource": "*"
    }
  ]
}
EOF
}
resource "aws_iam_role" "fargate_execution" {
  name               = "${local.prefix}-fargate-execution-role"
  assume_role_policy = data.aws_iam_policy_document.fargate-role-policy.json
}
resource "aws_iam_role_policy_attachment" "fargate_execution" {
  role       = aws_iam_role.fargate_execution.name
  policy_arn = aws_iam_policy.fargate_execution.arn
}
resource "aws_iam_role_policy_attachment" "fargate_task" {
  role       = local.iam_fargate_role_name
  policy_arn = aws_iam_policy.fargate_task.arn
}
# Fargate Container
resource "aws_cloudwatch_log_group" "fargate_task" {
  name = local.cw_log_group
  tags = merge(
    local.common_tags,
    {
      Name = local.service_name
    }
  )
}
resource "aws_ecs_task_definition" "fargate_task" {
  family                   = local.service_name
  network_mode             = "awsvpc"
  cpu                      = local.container_definition.0.cpu
  memory                   = local.container_definition.0.memory
  requires_compatibilities = ["FARGATE"]
  container_definitions    = jsonencode(local.container_definition)
  execution_role_arn       = aws_iam_role.fargate_execution.arn
  task_role_arn            = local.iam_fargate_role_arn
  volume {
    name = "efs_volume"
    efs_volume_configuration {
      file_system_id = local.efs_id
      # https://docs.aws.amazon.com/AmazonECS/latest/userguide/efs-volumes.html
      root_directory = "/"
      transit_encryption  = "ENABLED"
      authorization_config {
        access_point_id = local.efs_ap_fargate_id
        iam             = "ENABLED"
      }
    }
  }
  tags = merge(
    local.common_tags,
    {
      Name = local.service_name
    }
  )
}
resource "aws_ecs_service" "haproxy_egress" {
  name            = local.service_name
  cluster         = local.fargate_cluster_name
  task_definition = aws_ecs_task_definition.fargate_task.arn
  desired_count   = "1"
  launch_type     = "FARGATE"
  network_configuration {
    security_groups = [aws_security_group.fargate_task.id]
    subnets         = local.private_subnets
  }
}
The most important parts of this configuration are:
- the
container_definitionvariable that contains Docker container runtime configuration, including themountPointssection, which defines which EFS volume (sourceVolume) mount to which location (containerPath) inside the container. - the
aws_ecs_task_definitionTerraform resource contains EFS volume attachment configuration. We’re using the EFS access point configuration to connect to an isolated folder within the EFS volume. - the
aws_security_groupSecurity Group resource allows ingress traffic only to a service-specific port and all outbound traffic (egress)
As soon as this configuration has been defined and deployed, AWS Fargate tasks can use the mounted EFS volume as the primary storage for any files required for their operations.
To apply this module, you need to execute the following Terraform commands within the 6_fargate_service folder:
terraform init
terraform apply -auto-approve
After running terraform apply you’ll get a deployed Fargate demo application connected to the AWS EFS storage.
AWS Lambda
Lambda is a serverless computing platform that enables you to run code without provisioning or managing servers. You can use EFS with Lambda to provide a shared file storage location for your Lambda functions. By mounting an EFS volume in Lambda, you can provide your Lambda functions with access to a common set of data files. This can be useful if you need to share data between multiple Lambda functions or between different users. In addition, mounting an EFS volume in Lambda can improve your Lambda functions’ performance by reducing the time required to read and write data files.
Let’s dive deep to the example and demonstrate how to mount Amazon EFS volume in AWS Lambda.
A complete source code of the module is located in our GitHub repository: 7_lambda.
Here’s our Terraform module (7_lambda) structure:
.
├── README.md
├── backend.tf
├── lambdas
│   └── vpc_lambda
│       ├── demo_event.json
│       └── index.py
├── main.tf
├── outputs.tf
├── providers.tf
├── usage.md
├── variables.tf
└── vpc_lambda.tf
2 directories, 10 files
Every Terraform .tf file is located in the root folder of the module.
The lambdas folder contains the source code of one or more AWS Lambda functions. In our case, we’ve defined a simple Lambda function that writes and reads files located at the EFS volume. The vpc_lambda folder may contain third-party dependencies and configuration files for your Lambda function.
import os
EFS_MOUNT_POINT = os.environ.get('EFS_MOUNT_POINT')
def lambda_handler(event, context):
    WRITE_FILENAME = os.path.join(EFS_MOUNT_POINT, 'lambda_created.txt')
    with open(WRITE_FILENAME, 'w') as f:
        lines = [
            'I am writing first line. This is still first line.\n',
            'Now, I am on second line.\n',
            'This is 3rd\n'
        ]
        f.writelines(lines)
    READ_FILENAME = os.path.join(EFS_MOUNT_POINT, 'demo.txt')
    content = None
    with open(READ_FILENAME, 'r') as f:
        content = f.readlines()
    return {
        'statusCode': 200,
        'content': ' '.join(content)
    }
Similarly to the Fargate example, we’re passing information about the EFS mount point to the Lambda using the EFS_MOUNT_POINT environment variable.
Now, let’s define several Terraform resources required to create a Lambda source code folder zip archive and deploy it to the service:
locals {
  resource_name_prefix                = "${local.prefix}-lambda"
  lambda_code_path                    = "${path.module}/lambdas/vpc_lambda"
  lambda_archive_path                 = "${path.module}/lambdas/vpc_lambda.zip"
  lambda_handler                      = "index.lambda_handler"
  lambda_description                  = "This is VPC Lambda function"
  lambda_runtime                      = "python3.9"
  lambda_timeout                      = 5
  lambda_concurrent_executions        = -1
  lambda_cw_log_group_name            = "/aws/lambda/${aws_lambda_function.vpc_lambda.function_name}"
  lambda_log_retention_in_days        = 1
  lambda_managed_policy_arns          = [
    "arn:aws:iam::aws:policy/service-role/AWSLambdaVPCAccessExecutionRole",
    "arn:aws:iam::aws:policy/service-role/AWSLambdaBasicExecutionRole"
  ]
  lambda_file_system_local_mount_path = "/mnt/efs"
}
data "archive_file" "vpc_lambda_zip" {
  source_dir = local.lambda_code_path
  output_path = local.lambda_archive_path
  type = "zip"
}
data "aws_iam_policy_document" "vpc_lambda_assume_role_policy" {
  statement {
    actions = ["sts:AssumeRole"]
    principals {
      identifiers = ["lambda.amazonaws.com"]
      type        = "Service"
    }
  }
}
data "aws_iam_policy_document" "vpc_lambda_list_s3_buckets" {
  statement {
    actions = [
      "s3:ListAllMyBuckets",
      "s3:ListBucket"
    ]
    resources = [
      "*"
    ]
  }
}
resource "aws_iam_policy" "vpc_lambda_custom_policy" {
  policy = data.aws_iam_policy_document.vpc_lambda_list_s3_buckets.json
}
data "aws_iam_policy" "vpc_lambda" {
  for_each = toset(local.lambda_managed_policy_arns)
  arn = each.value
}
resource "aws_iam_role_policy_attachment" "vpc_lambda" {
  for_each = data.aws_iam_policy.vpc_lambda
  role       = local.iam_lambda_role_name
  policy_arn = each.value.arn
}
resource "aws_iam_role_policy_attachment" "vpc_lambda_custom_policy" {
  role       = local.iam_lambda_role_name
  policy_arn = aws_iam_policy.vpc_lambda_custom_policy.arn
}
data "aws_iam_role" "vpc_lambda" {
  name = local.iam_lambda_role_name
}
resource "aws_security_group" "vpc_lambda" {
  name        = "${local.resource_name_prefix}-sg"
  description = "Allow outbound traffic (egress) for ${local.resource_name_prefix}-lambda"
  vpc_id      = local.vpc_id
  egress {
    from_port        = 0
    to_port          = 0
    protocol         = "-1"
    cidr_blocks      = ["0.0.0.0/0"]
    ipv6_cidr_blocks = ["::/0"]
  }
  tags = merge(
    {
      Name = local.resource_name_prefix
    },
    local.common_tags
  )
}
resource "aws_lambda_function" "vpc_lambda" {
  function_name     = local.resource_name_prefix
  source_code_hash  = data.archive_file.vpc_lambda_zip.output_base64sha256
  filename          = data.archive_file.vpc_lambda_zip.output_path
  description       = local.lambda_description
  role              = data.aws_iam_role.vpc_lambda.arn
  handler           = local.lambda_handler
  runtime           = local.lambda_runtime
  timeout           = local.lambda_timeout
  vpc_config {
    security_group_ids = [aws_security_group.vpc_lambda.id]
    subnet_ids         = local.private_subnets
  }
  file_system_config {
    arn               = local.efs_ap_lambda_arn
    local_mount_path  = local.lambda_file_system_local_mount_path
  }
  environment {
    variables = {
      EFS_MOUNT_POINT = local.lambda_file_system_local_mount_path
    }
  }
  tags = merge(
    {
      Name = local.resource_name_prefix
    },
    local.common_tags
  )
  reserved_concurrent_executions = local.lambda_concurrent_executions
}
# CloudWatch Log Group for the Lambda function
resource "aws_cloudwatch_log_group" "vpc_lambda" {
  name = local.lambda_cw_log_group_name
  retention_in_days = local.lambda_log_retention_in_days
}
Our Terraform Lambda Tutorial – Easy Function Deployment article explains almost all of the resources from this Terraform configuration.
The most important part of this Terraform configuration is the file_system_config configuration inside the aws_lambda_function resource where we’re providing the ARN of the Lambda-related EFS access point and local mount location (must be a subfolder inside the /mnt folder of the Lambda function). And, of course, we’re providing the information about this mount point location to the Lambda function code using the EFS_MOUNT_POINT environment variable.
As soon as this configuration has been defined and deployed, AWS Lambda can use the mounted EFS volume as the primary storage for any files required for its operations.
To apply this module, you need to execute the following Terraform commands within the 7_lambda folder:
terraform init
terraform apply -auto-approve
Terraform EFS module
If you don’t want to define the EFS configuration in Terraform, you may use any already existing modules. For example, the Cloud Posse Terraform EFS module is designed to provide a simple and efficient way to create and manage Amazon Elastic File System (EFS) resources. The module makes it easy to provision storage volumes and mount points and configure security and access control settings. Additionally, the module allows users to specify parameters such as storage class, performance mode, and encryption at rest. The Cloud Posse Terraform EFS module allows you to provision and manage Amazon Elastic File System resources easily.
Summary
Amazon EFS (AWS Elastic FileSystems) is a reliable, scalable, and low-cost file storage service for Amazon Web Services (AWS) users. Amazon EFS is a great option if you are looking for a cost-effective way to store files in the cloud. This blog post showed you how to manage your Amazon EFS file systems using Terraform. We also guided connecting your Amazon EFS storage to Amazon EC2, Amazon ECS Fargate, and Amazon Lambda.
