Terraform Kubernetes Provider – Easy deployment to K8s
This article continues Linux, Kubernetes, and Terraform topics and will help you learn how to deploy applications to the Kubernetes cluster using Terraform. We will cover two approaches: Terraform Kubernetes provider and Terraform Helm provider. For this purpose, you don’t need a Kubernetes cluster, as we will use Minikube, which you can install on your laptop.
You will also learn how to deploy functional n-tier applications at Kubernetes using Terraform in 10 minutes.
Table of contents
What is Minikube

The best way to learn Kubernetes and its concepts are by using Minikube. With Minikube, you don’t need to go through the hassle of managing virtual machines or deploying a fully functional Kubernetes cluster.
This open-source tool supports Windows, macOS, and Linux, allowing you to launch a single-node Kubernetes cluster on your local machine. This virtual machine can run on top of Virtualbox, KVM, Hyper-V, or Docker.
Minikube Installation
Installing Minikube is a straightforward process. However, there is only one dependency that you need to install upfront – a command-line tool called kubectl.
kubectl allows you to manage Kubernetes clusters. You can use kubectl to deploy applications, view logs, and manage cluster resources.
Installing kubectl
Below is an example of the installation process of kubectl for Linux and macOS:
$ curl -LO "https://storage.googleapis.com/kubernetes-release/release/$(curl -s https://storage.googleapis.com/kubernetes-release/release/stable.txt)/bin/linux/amd64/kubectl"
$ chmod +x ./kubectl
$ sudo mv ./kubectl /usr/local/bin/kubectl
To install kubectl on Windows, you can use Chocolatey package manager:
choco install kubernetes-cliAlternatively, you can also install kubectl on Windows by clicking here.
Now that you have installed kubectl, the next step is to install Minikube.
Install Minikube
Here are the standard commands you will need to install Minikube on Ubuntu, CentOS, and macOS:
$ curl -LO https://storage.googleapis.com/minikube/releases/latest/minikube-linux-amd64
$ sudo install minikube-linux-amd64 /usr/local/bin/minikube
If you’re relying on brew to manage your macOS, it’s better to use the following command:
$ brew install minikubeIf you are installing minikube on Windows, it is better to use Chocolatey:
choco install minikubeIf minikube did not start during the installation, you could do so by using the following command:
$ minikube startTerraform Providers For Kubernetes Deployment
Currently, there are two providers available for managing Kubernetes applications using Terraform:
Kubernetes Terraform Provider
For example, in this section, we will cover WordPress deployment using the Kubernetes Terraform Provider.
For more information on creating Helm packages, check out the Kubernetes Helm Charts Tutorial: A Comprehensive Guide article.
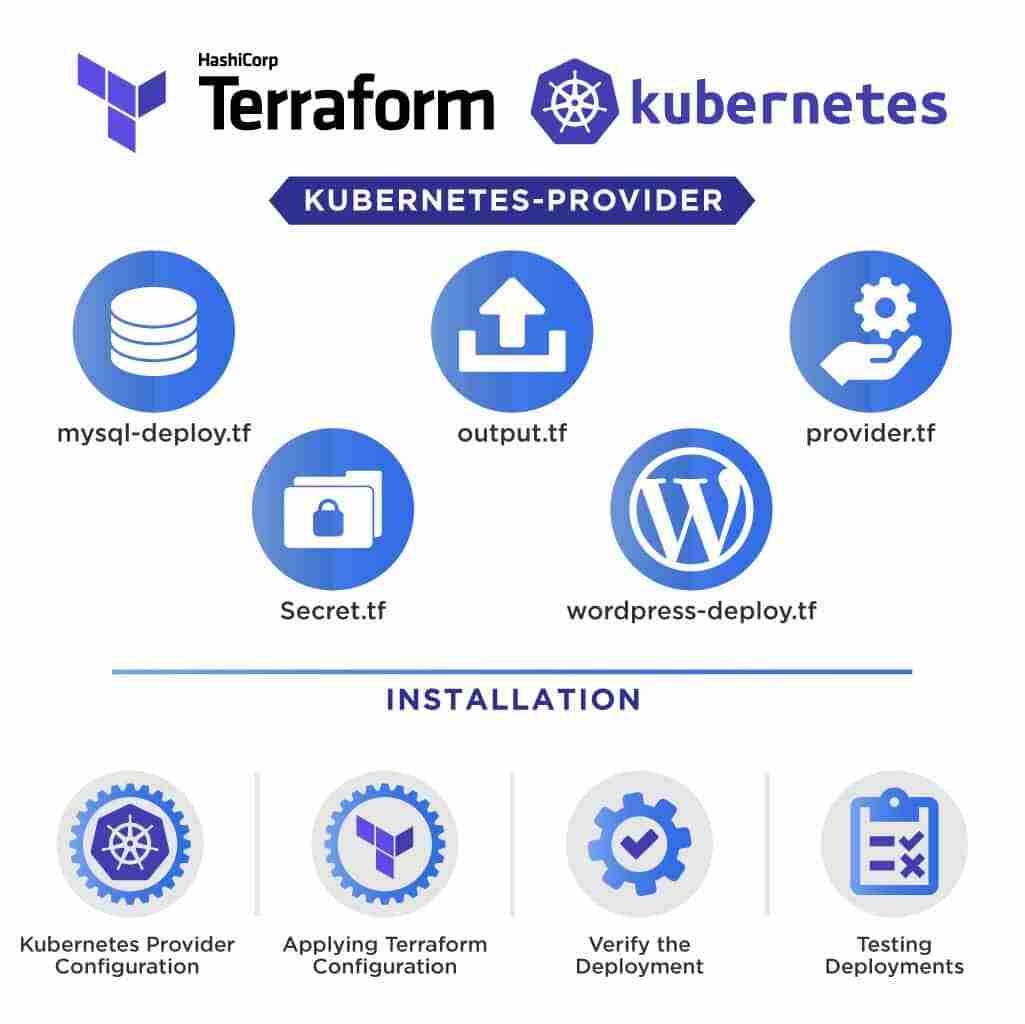
Define WordPress Deployment Using Kubernetes Provider
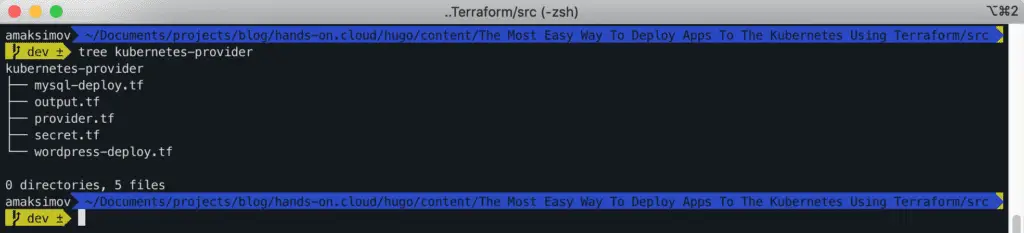
Here’s the final structure of the project:
We will use wordpress Docker image for the frontend-tier and mysql Docker image for DB-tier in our deployment.
Let’s define kubernetes provider in provider.tf file:
provider "kubernetes" {
 config_context = "minikube"
}
Next, let’s create a couple of local variables for labeling kubernetes_deployment and kubernetes_service:
locals {
 wordpress_labels = {
   App = "wordpress"
   Tier = "frontend"
 }
 mysql_labels = {
   App = "wordpress"
   Tier = "mysql"
 }
}
You may create additional labels if you’d like, of course. The purpose of labels in Kubernetes is to provide you the ability to select Pods, Services, Deployment, and any other Kubernetes entities.
There’re many different ways not to hardcode passwords in your Terraform configuration. Using Terraform parameters is one of them. We’ll continue with a hardcoded password to simplify the demo.
Let’s declare a secret for MYSQL_ROOT_PASSWORD environment variable, which we are going to use in kubernetes_deployment.
resource "kubernetes_secret" "mysql-pass" {
 metadata {
   name = "mysql-pass"
 }
 data = {
   password = "root"
 }
}
Now, we’re ready to define kubernetes_deployment resource for WordPress deployment:
resource "kubernetes_deployment" "wordpress" {
 metadata {
   name = "wordpress"
   labels = local.wordpress_labels
 }
 spec {
   replicas = 1
   selector {
     match_labels = local.wordpress_labels
   }
   template {
     metadata {
       labels = local.wordpress_labels
     }
     spec {
       container {
         image = "wordpress:4.8-apache"
         name  = "wordpress"
         port {
           container_port = 80
         }
         env {
           name = "WORDPRESS_DB_HOST"
           value = "mysql-service"
         }
         env {
           name = "WORDPRESS_DB_PASSWORD"
           value_from {
             secret_key_ref {
               name = "mysql-pass"
               key = "password"
             }
           }
         }
       }
     }
   }
 }
}
The whole Terraform configuration reflects the Kubernetes Deployment specification. We need to expose the WordPress Deployment to the external cluster networks using Kubernetes Service as soon as we declare it.
Let’s define kubernetes_service Terraform resource for that purpose:
resource "kubernetes_service" "wordpress-service" {
 metadata {
   name = "wordpress-service"
 }
 spec {
   selector = local.wordpress_labels
   port {
     port        = 80
     target_port = 80
     node_port = 32000
   }
   type = "NodePort"
 }
}
Here, we’re telling Kubernetes to make WordPress Pod available for communication using Service.
For the Minikube development environment, we’ll be exposing WordPress on port 32000.
Now, let’s do the same thing for MySQL deployment:
resource "kubernetes_deployment" "mysql" {
 metadata {
   name = "mysql"
   labels = local.mysql_labels
 }
 spec {
   replicas = 1
   selector {
     match_labels = local.mysql_labels
   }
   template {
     metadata {
       labels = local.mysql_labels
     }
     spec {
       container {
         image = "mysql:5.6"
         name  = "mysql"
         port {
           container_port = 3306
         }
         env {
           name = "MYSQL_ROOT_PASSWORD"
           value_from {
             secret_key_ref {
               name = "mysql-pass"
               key = "password"
             }
           }
         }
       }
     }
   }
 }
}
As in the previous example, we’re making MySQL DB Deployment accessible for WordPress deployment using Kubernetes Service configured through kubernetes_service resource:
resource "kubernetes_service" "mysql-service" {
 metadata {
   name = "mysql-service"
 }
 spec {
   selector = local.mysql_labels
   port {
     port        = 3306
     target_port = 3306
   }
   type = "NodePort"
 }
}
Deploy WordPress Kubernetes Terraform Configuration
We can deploy our demo example as soon as we create the Terraform configuration.
Initialize Terraform project and apply the configuration:
$ terraform init
$ terraform apply
After applying the configurations, you will see the plan for the resources and permission to perform the activities planned.
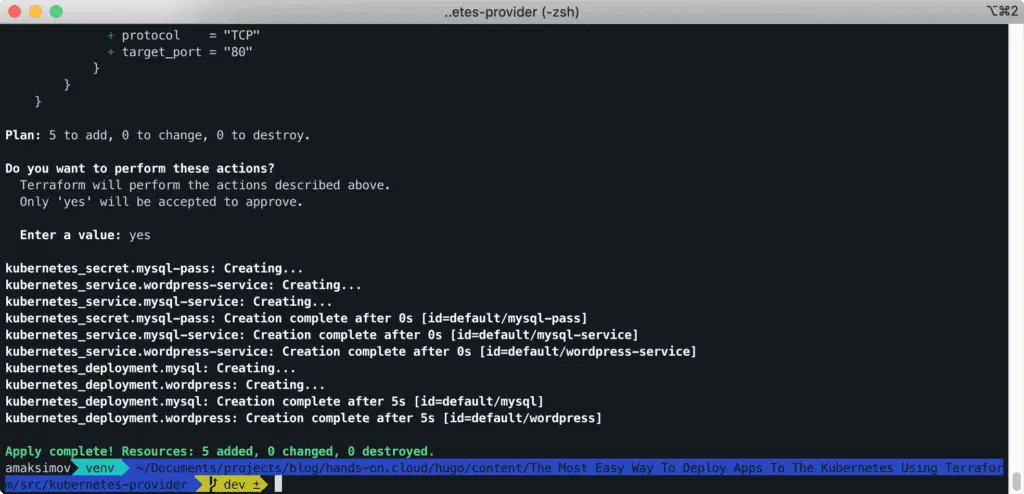
Approve the plan by answering yes.
After the deployment of resources, we can get access to the application.
Verify The Deployment
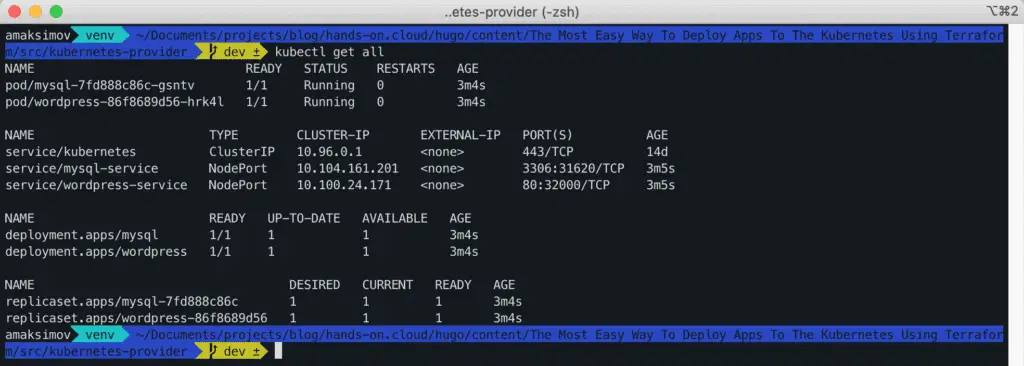
Let’s validate our deployment to the cluster using kubectl.
$ kubectl get allWe want to make sure that all created by Terraform resources are available.
Testing The Deployment
After verifying the deployment of WordPress and MySQL resources, we can test the access to the app.
To get access to our deployed application, we will need to run the following Minikube command:
$ minikube service wordpress-service --urlThis command will show you the WordPress service URL exposed by Minikube.
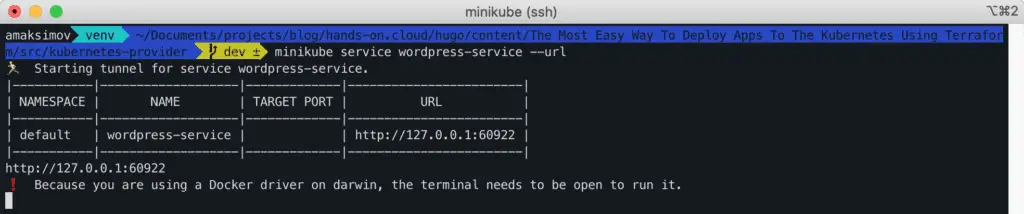
Congratulations! Our WordPress application has been successfully deployed.
Helm Terraform Provider
This part of the article will use the Terraform helm provider to deploy the same WordPress application to the Kubernetes cluster, using Helm charts differently.
We must install Helm on the machine for deployment through the Helm provider, where the Terraform script is executed.
To learn more about Helm and the process of creating Helm charts, I’d recommend your article Quick And Simple Introduction to [Kubernetes] [Helm] Charts in 10 minutes.
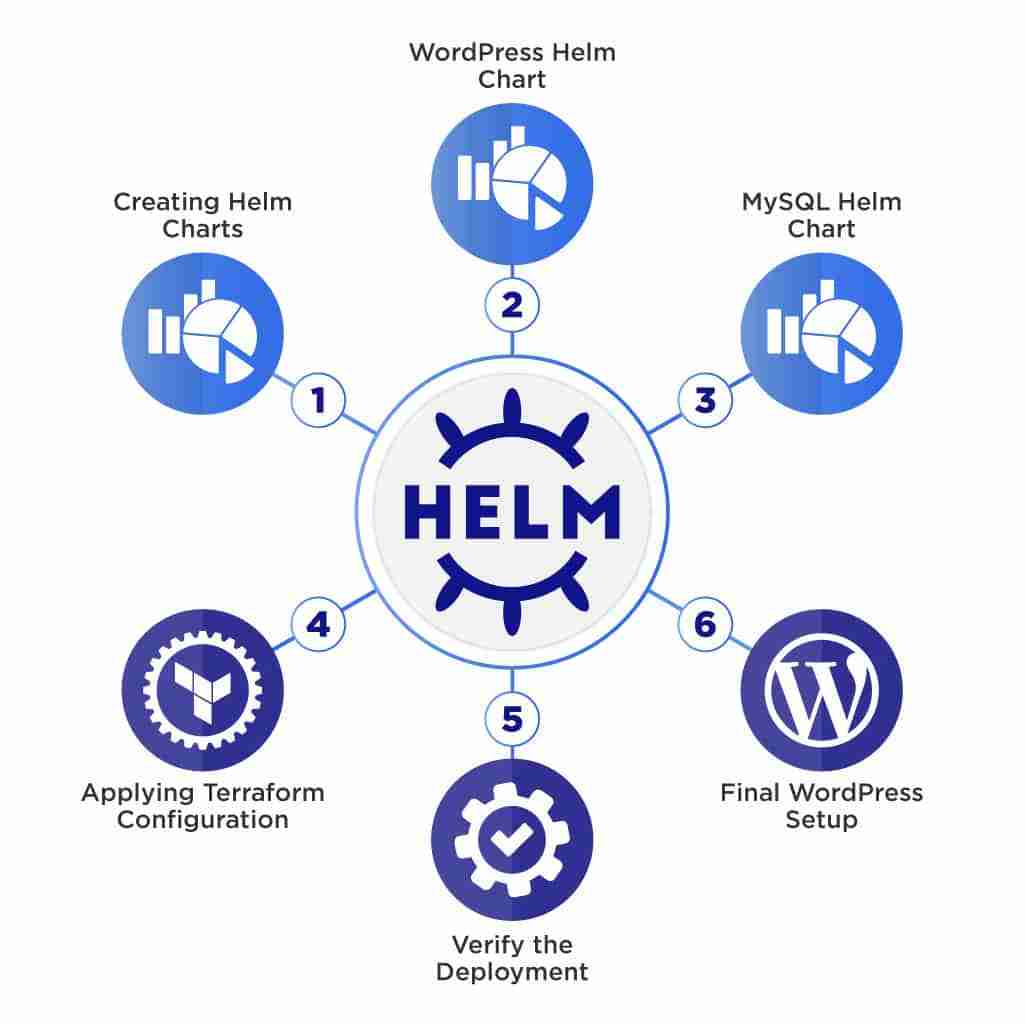
Creating Helm Charts
This module will create Helm charts for MySQL and WordPress deployments.
Helm can generate a basic template that we can adjust to our needs. For more information about creating Helm charts, look at the Quick And Simple Introduction to Kubernetes Helm Charts in 10 minutes article.
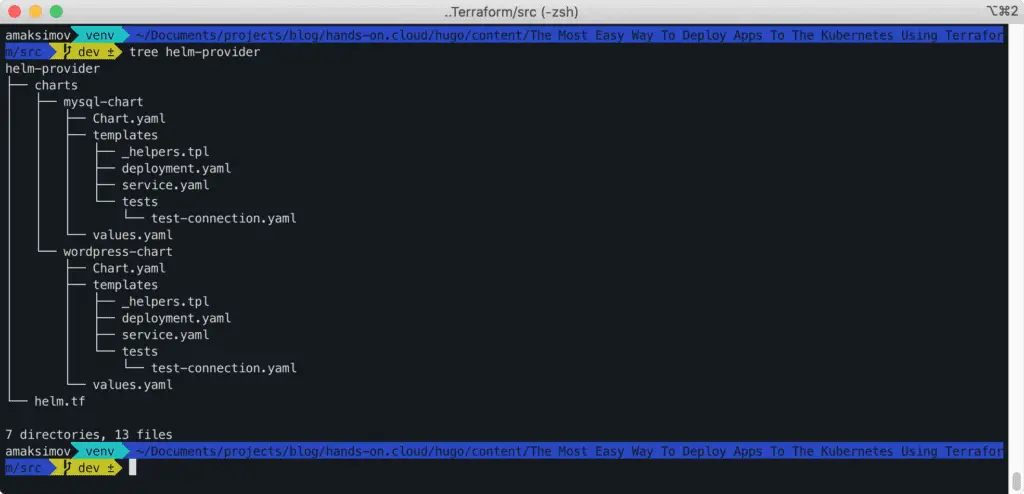
Here’s our final project structure:
Let’s a directory for the charts:
$ mkdir charts
$ cd charts
MySQL Helm Chart
First, we create the helm chart for MySQL.
$ helm create mysql-chartThe above command will create a chart with default configurations.

View the contents of the mysql-chart:
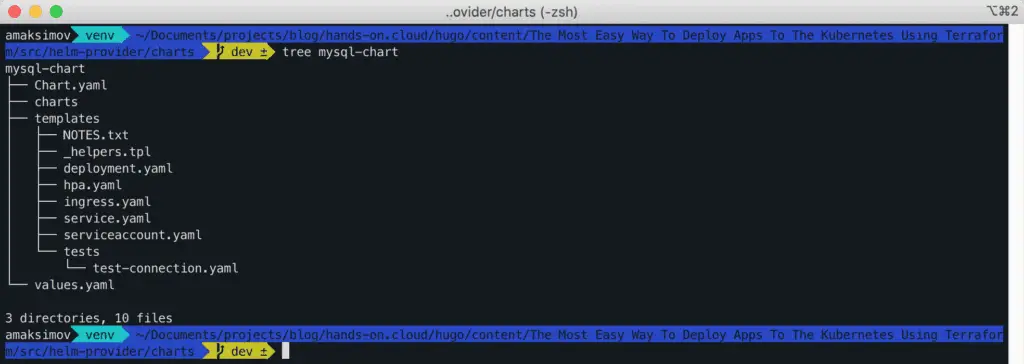
Delete the NOTES.txt, hpa.yaml, ingress.yaml, and serviceaccount.yaml files from the templates directory.
Override the contents of the MySQL deployment.yaml file with the following:
apiVersion: apps/v1
kind: Deployment
metadata:
 name: {{ .Values.deployment.name }}
 labels:
   {{- include "mysql-chart.labels" . | nindent 4 }}
spec:
 replicas: {{ .Values.replicaCount }}
 selector:
   matchLabels:
     {{- include "mysql-chart.selectorLabels" . | nindent 6 }}
 template:
   metadata:
     labels:
       {{- include "mysql-chart.selectorLabels" . | nindent 8 }}
   spec:
     containers:
       - name: {{ .Chart.Name }}
         image: "{{ .Values.image.repository }}"
         imagePullPolicy: {{ .Values.image.pullPolicy }}
         ports:
           - name: http
             containerPort: {{ .Values.service.port }}
             protocol: TCP
         env:
           - name: MYSQL_ROOT_PASSWORD
             value: 'admin'
Here are the contents for service.yaml for MySQL.
apiVersion: v1
kind: Service
metadata:
 name: {{ .Values.service.name }}
 labels:
   {{- include "mysql-chart.labels" . | nindent 4 }}
spec:
 type: {{ .Values.service.type }}
 ports:
   - port: {{ .Values.service.port }}
     targetPort: {{ .Values.service.port }}
     protocol: TCP
     name: http
 selector:
   {{- include "mysql-chart.selectorLabels" . | nindent 4 }}
Replace the contents of values.yaml for MySQL configuration.
replicaCount: 1
image:
 repository: mysql:5.6
 pullPolicy: IfNotPresent
deployment:
 name: mysql-deployment
service:
 name: mysql-service
 type: ClusterIP
 port: 3306
WordPress Helm Chart
Create a Helm chart for WordPress.
$ helm create wordpress-chartDelete the NOTES.txt, hpa.yaml, ingress.yaml, and serviceaccount.yaml files from the templates directory.
The contents for deployment.yaml for WordPress are as follows:
apiVersion: apps/v1
kind: Deployment
metadata:
 name: {{ .Values.deployment.name }}
 labels:
   {{- include "wordpress-chart.labels" . | nindent 4 }}
spec:
 replicas: {{ .Values.replicaCount }}
 selector:
   matchLabels:
     {{- include "wordpress-chart.selectorLabels" . | nindent 6 }}
 template:
   metadata:
     labels:
       {{- include "wordpress-chart.selectorLabels" . | nindent 8 }}
   spec:
     containers:
       - name: {{ .Chart.Name }}
         image: {{ .Values.image.repository }}
         imagePullPolicy: {{ .Values.image.pullPolicy }}
         ports:
           - name: http
             containerPort: {{ .Values.service.port }}
             protocol: TCP
         env:
           - name: WORDPRESS_DB_HOST
             value: 'mysql-service'
           - name: WORDPRESS_DB_PASSWORD
             value: 'admin'
The contents for the service.yaml of WordPress chart are as follows:
apiVersion: v1
kind: Service
metadata:
 name: {{ .Values.service.name }}
 labels:
   {{- include "wordpress-chart.labels" . | nindent 4 }}
spec:
 type: {{ .Values.service.type }}
 ports:
   - port: {{ .Values.service.port }}
     targetPort: {{ .Values.service.port }}
     protocol: TCP
     name: http
     nodePort: {{ .Values.service.nodePort }}
 selector:
   {{- include "wordpress-chart.selectorLabels" . | nindent 4 }}
The contents of values.yaml for WordPress are as follows:
replicaCount: 1
image:
 repository: wordpress:4.8-apache
 pullPolicy: IfNotPresent
deployment:
 name: wordpress-deployment
service:
 name: wordpress-service
 type: NodePort
 port: 80
 nodePort: 32000
Terraform Configuration
Once we have Helm charts, we need to create a Terraform configuration file to deploy our application to Kubernetes.
Let’s come back to the base directory and define helm.tf Terraform configuration file with the following content:
provider "helm" {
kubernetes {
config_context = "minikube"
}
}
resource "helm_release" "mysql" {
name = "mysql"
chart = "${abspath(path.root)}/charts/mysql-chart"
}
resource "helm_release" "wordpress" {
name = "wordpress"
chart = "${abspath(path.root)}/charts/wordpress-chart"
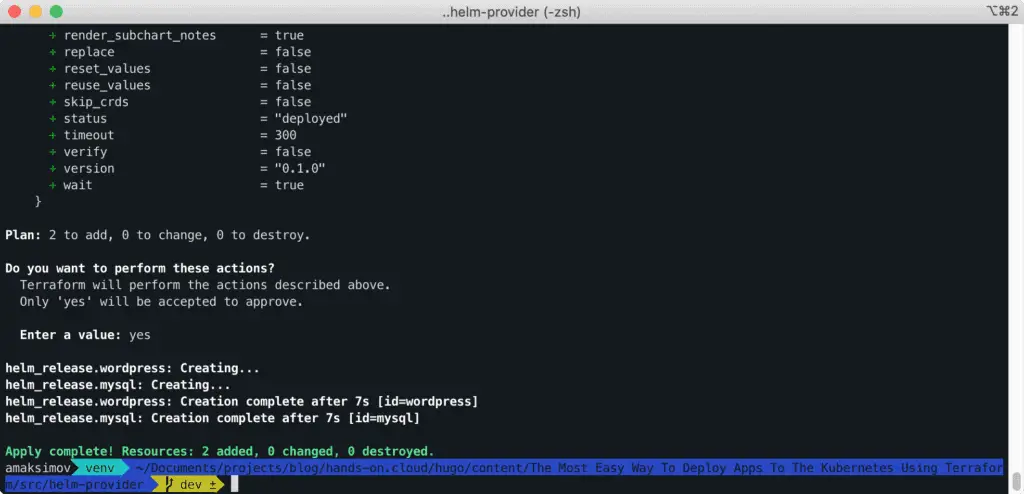
}Applying Terraform Configuration
The final step is to deploy our application to the Kubernetes cluster using already-known commands:
$ terraform init
$ terraform apply
Approve the plan to deploy the configuration.
Verify Application Deployment
You can verify the deployment by using the helm command.
$ helm ls
Alternatively, you can also verify it by using kubectl command.
$ kubectl get all
To access our deployed application, we will need to run the following Minikube command:
$ minikube service wordpress-service --urlThis command will show you the WordPress service URL exposed by Minikube.

Congratulations! Our WordPress application has been successfully deployed using Helm charts and Terraform.
Cleaning Up
To clean up Terraform deployment, use the usual Terraform destroy command in helm-provider or kubernetes-provider folders:
$ terraform destroyFAQ
terraform vs. kubernetes
Summary
This article showed how to deploy applications to the Kubernetes cluster using Terraform. We have covered two different approaches by using Kubernetes and Helm Terraform providers. For this demo, we used Minikube as a local Kubernetes cluster.
We hope you find this article useful! If yes, please, help us to spread it to the world! Please, let us know in the comments section below if you have any questions.
