AWS Network Load Balancer – The Ultimate Guide
Introduction to AWS Network Load Balancer
Delve into the intricate world of the AWS Network Load Balancer with this detailed guide. Learn how to effectively manage network traffic using AWS Elastic Load Balancing, ensuring efficient use of resources with just a few clicks. With a focus on setting up target groups, registering targets, configuring the load balancer and listener, and testing the load balancer, this guide is an essential companion in your journey to streamline your cloud operations. Buckle up and prepare for an informative exploration into enhancing your AWS experience, bringing simplicity and efficiency to your fingertips.
Key Takeaways
- AWS Network Load Balancer is a powerful service that provides high availability and scalability for applications across multiple availability zones.
- It offers advanced features like cross-zone load balancing, connection idle timeout, and deletion protection for seamless application deployment and management.
- Transitioning from Classic Load Balancer to Network Load Balancer can be done by understanding key differences, evaluating the current setup, planning the transition strategy, implementing target groups, configuring listeners and backend instances, registering targets, testing the new setup, and decommissioning old load balancers.
- Cost implications of using Network Load Balancer include data transfer costs, load balancer capacity units (LCUs), and resource usage charges. Monitoring network statistics with Amazon CloudWatch metrics helps optimize costs based on demand patterns.
Understanding Network Load Balancer
The Network Load Balancer is a key component of AWS Elastic Load Balancing, providing high availability and scalability for applications across multiple availability zones. It offers advanced features such as cross-zone load balancing, connection idle timeout, and deletion protection for seamless application deployment and management.
Components of Network Load Balancer
Let’s dive into the essential parts of the Network Load Balancer.
- Listener: A listener is a process that checks for connection requests using the protocol and port you have configured. It establishes a connection when a request is received from a client.
- Target Groups: Each target group routes requests to one or more registered targets, such as EC2 instances, using the protocol and port number specified. Healthy targets are selected by performing health checks.
- Health Checks: Health checks are used to assess the health of the registered targets so that traffic can be routed only to healthy targets.
- Load Balancer Nodes: Every enabled Availability Zone has a load balancer node, which distributes traffic across the registered targets in its zone.
- Traffic Routing: The sophisticated flow hash algorithm utilized by Network Load Balancers determines how incoming connection requests are distributed to its registered targets.
- Fault Tolerance: If all targets in an Availability Zone are unhealthy, Network Load Balancers automatically reroutes traffic to healthy targets in other zones.
Overview and Benefits of Network Load Balancer
Diving deep into the AWS Network Load Balancer reveals a powerhouse of benefits. As cloud engineers, we appreciate its ability to handle millions of requests per second while maintaining ultra-low latencies.
It is designed for volatile workloads and can scale instantly without any prior warming up. It provides stable IP support by ensuring that each load balancer node has a static IP address, proving essential when whitelisting IP addresses in security groups and firewall rules are necessary.
Thanks to its capability for preserving the client-side source IP addresses, it allows applications running in a VPC to achieve full transparency with regular logging practices. On top of this, you’re given fault tolerance built into your infrastructure due to even distribution across Availability Zones within the specified region—safeguarding application availability and offering peace of mind round-the-clock.
Transitioning from Classic to Network Load Balancer
Transitioning from the Classic Load Balancer to the modern Network Load Balancer might seem daunting. However, it is necessary for optimal cloud operations, and AWS has made this process relatively straightforward. Here’s how to approach it:
- Understand the key differences between Classic Load Balancers and Network Load Balancers: Network Load Balancers offer features such as static IP addresses for Elastic IP address applications, zoning-independent architecture for higher availability, and client IP preservation, which are absent in Classic Load Balancers.
- Evaluate your current setup with the Classic Load Balancer. Note your existing configurations, including listener configuration, backend instances, health check parameters, and stickiness policies.
- Plan your transition strategy. This typically involves creating a new Network Load Balancer and reconfiguring settings to match your earlier setup.
- Implement target groups for routing traffic to EC2 Instances or other registered targets within an Availability Zone.
- Choose an internal or internet-facing load balancer based on your needs while setting up the new Network Load Balancer.
- Configure listeners to check connections from clients using TCP protocol or UDP traffic to ensure effective monitoring of incoming requests.
- Reconfigure backend instances using an instance ID or IP address based on the network mode used in the task definition.
- Register your targets and AWS resources like EC2 Instances with the new load balancer.
- Test your newly configured Network Load balancer by verifying it sends traffic to your EC2 instances successfully.
- Finally, decommission old Classic Load Balancers only after successful migration and thorough testing of new setups.
Cost Implications of Using Network Load Balancer
Using the AWS Network Load Balancer can have cost implications for cloud engineers. The pricing for Network Load Balancer is calculated based on the cost of the deployed NLB and data transfer measured in Network Load Balancer Capacity Units (NLCUs) required for handling active connections and new connections per second.
Data transfer costs apply when traffic flows through your load balancer.
When considering the cost impact, it is important to understand that NLCUs are billed per hour. Each NLCU provides 800 new TCP connections, 100,000 active TCP connections, and 1 GB of traffic to the target groups.
Optimizing your Network Load Balancer’s cost in AWS involves various strategies, from selecting the appropriate type and size to streamlining your configurations. Here are a few best practices:
- Right-Sizing: Choose the right type of Load Balancer based on your use case. AWS provides three types of load balancers: Application Load Balancer (ALB), Network Load Balancer (NLB), and Classic Load Balancer (CLB). If you need to load balance TCP/UDP traffic or higher performance with low latency, use NLB. But if you are balancing HTTP/HTTPS traffic, consider using ALB, which might be more cost-effective.
- Hourly Costs and Data Processing Costs: NLB charges are based on two dimensions – hourly cost and data processed. Be sure to understand your usage pattern and optimize accordingly. For example, reduce the data transferred through request/response optimizations in scenarios where data processing costs become significant. This might involve compression, response caching, etc.
- Cross-Zone Load Balancing: By default, cross-zone load balancing is enabled for NLB, which might lead to additional data transfer costs. If your applications do not require distributing traffic across Availability Zones, consider disabling them.
- Use Load Balancer for Necessary Traffic Only: Avoid using a Load Balancer for non-essential or non-production traffic. You can use EC2 instances directly for development or testing environments.
- Idle Load Balancers: Regularly review and remove unused or idle load balancers. Each load balancer you create costs money, even if it’s not directing any traffic.
- Health Check Optimization: Customize your health check intervals and thresholds to avoid unnecessary health checks. This will reduce the number of requests and, thereby, reduce costs.
- Utilize AWS Cost Explorer: AWS Cost Explorer allows you to visualize, understand, and manage your AWS costs and usage over time. This tool can be particularly useful in understanding the cost patterns of your load balancers and pinpointing any potential issues.
- Monitoring and Alerts: Ensure you have CloudWatch alarms to alert you when certain thresholds are met. This can help prevent unexpected charges.
Cost optimization is a continuous process and should be part of your regular operational routines. Regularly monitor your usage, cost patterns, and adapt your strategy accordingly.
By following the above and optimizing your load-balancing strategies accordingly, you can effectively manage the cost implications of using the AWS Network Load Balancer while ensuring optimal application performance.
Key Features of Network Load Balancer
The Network Load Balancer (NLB) is part of AWS’s Elastic Load Balancing (ELB) service. It is designed to handle tens of millions of requests per second while maintaining high throughput at ultra-low latency. The key features of the NLB are:
- High Performance and Scalability: The NLB is designed to handle sudden and volatile traffic patterns using a static IP address per Availability Zone. It can scale up within a few minutes to handle traffic spikes.
- Support for TCP, UDP, and TLS traffic: The NLB operates at the transport layer (Layer 4), which can handle both TCP and UDP traffic. It also supports TLS termination, which offloads the work of encrypting and decrypting traffic from the backend servers.
- Long-Lived TCP Connections: The NLB is well suited for handling long-lived TCP connections, which is useful for WebSocket applications or applications that use the MQTT protocol for IoT.
- Zonal Isolation and Failover: Each NLB node in the Availability Zone functions independently. This architecture isolates the scope of failure to the Availability Zone level, reducing the blast radius of potential issues.
- Preserving Source IP: The NLB preserves the source IP of the clients, making it suitable for applications that need the client’s IP address for processing.
- Load Balancing to Multiple Ports on the Same Instance: With NLB, you can route traffic to multiple ports on the same EC2 instance, which is useful for containerized applications.
- Health Checks: Network Load Balancer offers robust and customizable health check options to ensure your traffic is routed to healthy targets.
- Integration with Other AWS Services: The NLB can be integrated with AWS services such as AWS Auto Scaling, Amazon EC2 Container Service (ECS), and Amazon EC2 systems manager.
- Security: NLB works with AWS security groups, allowing you to define access rules. In addition, with TLS termination, it also supports AWS-managed SSL certificates, making it easier to implement secure communications.
These features make NLB a powerful choice for workloads that require high performance, robust health checks, and support for multiple protocols at the transport layer.
Load balancer state and attributes
An AWS Network Load Balancer can be in one of the following states:
- Provisioning: The load balancer is being set up.
- Active: The load balancer is fully set up and ready to route traffic.
- Failed: The load balancer could not be set up.
The key attributes associated with a Network Load Balancer are the following:
- LoadBalancerArn: The Amazon Resource Name (ARN) of the load balancer.
- DNSName: The public DNS name of the load balancer.
- CanonicalHostedZoneId: The ID of the Amazon Route 53 hosted zone associated with the load balancer.
- CreatedTime: The date and time the load balancer was created.
- Scheme: The scheme for the load balancer. This can be
internet-facingfor a load balancer that routes requests from clients over the internet to targets or internal for a load balancer that routes client requests to targets using private IP addresses. - VpcId: The ID of the Virtual Private Cloud (VPC) for the load balancer.
- Type: The type of load balancer. For Network Load Balancer, the type is
network. - IpAddressType: The types of IP addresses associated with your load balancer. This can be either
ipv4for IPv4 addresses ordualstackfor IPv4 and IPv6 addresses. - AvailabilityZones: The subnets and Availability Zones from which the load balancer routes traffic.
- SecurityGroups: The IDs of the security groups for the load balancer.
- LoadBalancerAttributes: Additional attributes for the load balancer. This includes settings for cross-zone load balancing, deletion protection, and access logs.
- State: The state of the load balancer (
provisioning,active, orfailed).
Remember, the current load balancer’s states and attributes may be subject to changes as AWS continuously updates and introduces new features to its services. Always refer to the official AWS documentation for the most accurate and up-to-date information.
Understanding these different states and attributes of Network Load Balancers is crucial for cloud engineers as they manage and maintain a reliable infrastructure for their applications.
IP address type
The IP address type is an important aspect of the AWS Network Load Balancer that cloud engineers should be familiar with. With Network Load Balancers, you can choose between IPv4 addresses, IPv6 addresses, or dual-stack load balancers that support IPv4 and IPv6 traffic.
This flexibility accommodates different network setups and ensures seamless connectivity for your applications. The Network Load Balancer can handle it all, whether you’re working with traditional IP addressing or transitioning to the newer IPv6 protocol.
Understanding the IP address type options will enable you to configure your load balancer appropriately and optimize your application’s performance.
Availability Zones and Cross-zone load balancing
Availability Zones are a critical component of AWS Network Load Balancer. They refer to multiple regional data centers, providing high availability and application fault tolerance.
With the help of cross-zone load balancing, traffic is distributed evenly across targets in different Availability Zones, improving application performance and preventing overload on specific targets.
This ensures your application runs smoothly even if one Availability Zone goes down. These features allow the creation of a robust and reliable network architecture for your cloud-based applications.
Deletion protection and Connection idle timeout
Deletion protection and connection idle timeout are two crucial features of AWS Network Load Balancer that play a vital role in maintaining the reliability and performance of your cloud infrastructure.
Deletion protection safeguards against accidental deletion, minimizing the risk of service disruptions and ensuring the continuity of your applications. On the other hand, connection idle timeout allows you to specify the duration after which idle connections will be terminated, freeing up resources and optimizing efficiency.
These features work together to enhance the overall stability, security, and responsiveness of your network load balancer setup on AWS.
DNS name
The DNS name associated with the AWS Network Load Balancer is crucial for effectively routing requests. It follows a specific format that includes the availability zone, name ID, and AWS region.
This unique DNS name plays a significant role in handling client connection requests, allowing them to connect to the load balancer and route their requests to the appropriate targets.
To configure and register targets for your load balancer, you must access the DNS name provided during setup. It is important to note that JavaScript must be enabled to access this information through the Amazon Web Services Documentation.
Security Considerations in AWS Network Load Balancer
The security of your applications and data is paramount in any networking setup. When using AWS Network Load Balancer, certain best practices can enhance your security posture and protect your infrastructure from potential threats. Let’s delve into the key aspects you need to consider:
Managing Security Groups
AWS’s first line of defense is often the Security Group — a virtual firewall for controlling inbound and outbound traffic. When you create a Network Load Balancer, you need to specify security groups for your targets only, not for your load balancer. The rule of thumb here is to apply the principle of least privilege. Only permit necessary traffic, and review and update your security groups regularly to accommodate changes in your networking requirements.
SSL/TLS Certificates
To secure data in transit, SSL/TLS encryption is crucial. Network Load Balancer supports SSL termination at the load balancer level, thereby offloading the CPU-intensive work of managing SSL/TLS connections from your servers. AWS Certificate Manager (ACM) can provision, manage, and deploy public and private SSL/TLS certificates.
If you’re terminating SSL/TLS connections at the load balancer, you must consider your cipher suites and protocols. Always adhere to best practices for SSL/TLS configurations to ensure robust security.
Cross-Zone Load Balancing
Cross-zone load balancing in Network Load Balancer distributes traffic evenly across all registered instances in all enabled Availability Zones. This can provide better fault tolerance for your applications. However, from a security standpoint, ensuring all zones have equivalent security controls in place is important.
VPC Flow Logs
VPC Flow Logs provide visibility into the traffic moving in and out of your Network Load Balancer and its associated instances. They can help detect anomalies and troubleshoot security issues such as unexpected traffic patterns or rule misconfigurations.
AWS Shield
You can use AWS Shield, a managed DDoS protection service to protect your Network Load Balancer from Distributed Denial of Service (DDoS) attacks. AWS Shield provides automatic protections that minimize application downtime and latency.
By incorporating these security best practices, you can maximize the security of your Network Load Balancer and ensure that your applications and data remain protected. Remember, security is a continuous process that requires regular review and adjustments in line with changing needs and evolving threat landscapes.
Understanding Different Types of AWS Load Balancers
AWS provides several types of load balancers, each designed to meet different operational needs and use cases. To make the right decision for your applications, it’s essential to understand the differences and similarities among the three main types: Classic Load Balancer (CLB), Application Load Balancer (ALB), and Network Load Balancer (NLB).
The table below provides a comparative view of these load balancers based on various key parameters:
| Parameter | Classic Load Balancer | Application Load Balancer | Network Load Balancer |
|---|---|---|---|
| Layer | Layer 4 and Layer 7 | Layer 7 | Layer 4 |
| Protocols Supported | HTTP, HTTPS, TCP, SSL | HTTP, HTTPS | TCP, TLS, UDP, TCP_UDP |
| Health Checks | TCP and HTTP based | Advanced health check options, including HTTP, HTTPS, and path-based | TCP based |
| Traffic Distribution | Even distribution across instances in all availability zones | Rule-based traffic routing, including path-based, and host-based routing | Even distribution across instances in all availability zones or IP-based |
| Performance | Lower performance compared to ALB and NLB | Higher performance than CLB, lower than NLB | High performance and low latency |
| SSL Offloading | Supported | Supported | Supported |
| Sticky Sessions | Supported | Supported | Not Supported |
| IPv6 Support | Supported | Not Supported | Not Supported |
| WebSocket Support | Not Supported | Supported | Not Supported |
Let’s dive a bit deeper into the specifics of each load balancer:
Classic Load Balancer
The Classic Load Balancer is the oldest of the three, operating at both Layer 4 and Layer 7. It supports HTTP/HTTPS protocols and also uses TCP for load balancing. CLB is well-suited for applications that were built within the EC2-Classic network.
Application Load Balancer
Application Load Balancer is designed for advanced routing capabilities at the application layer (Layer 7). It offers features like content-based routing, host-based routing, and supports containerized applications, making it ideal for microservices and container-based architectures.
Network Load Balancer
Network Load Balancer, designed to handle millions of requests per second, operates at the transport layer (Layer 4). It excels in performance, offering high throughput and low latency. This makes NLB the best choice for TCP, UDP, and TLS traffic patterns that are highly performance-sensitive.
Choosing the right load balancer depends on the specific needs of your applications and traffic patterns. While some may benefit from the advanced routing capabilities of ALB, others might require the raw performance of NLB. And in certain scenarios, the CLB might be the perfect fit for your application’s demands.
Getting Started with Network Load Balancer
To start with Network Load Balancer, follow these simple steps: configure the target group, register targets, set up the load balancer and listener, and test the load balancer.
Learn how to efficiently manage your network traffic with AWS Elastic Load Balancing in just a few clicks.
Step 1: Configuring the Target Group
To configure the target group for your Network Load Balancer, follow these essential steps to ensure a successful setup. First, create a target group to register the targets you want to associate with the load balancer, such as EC2 instances.
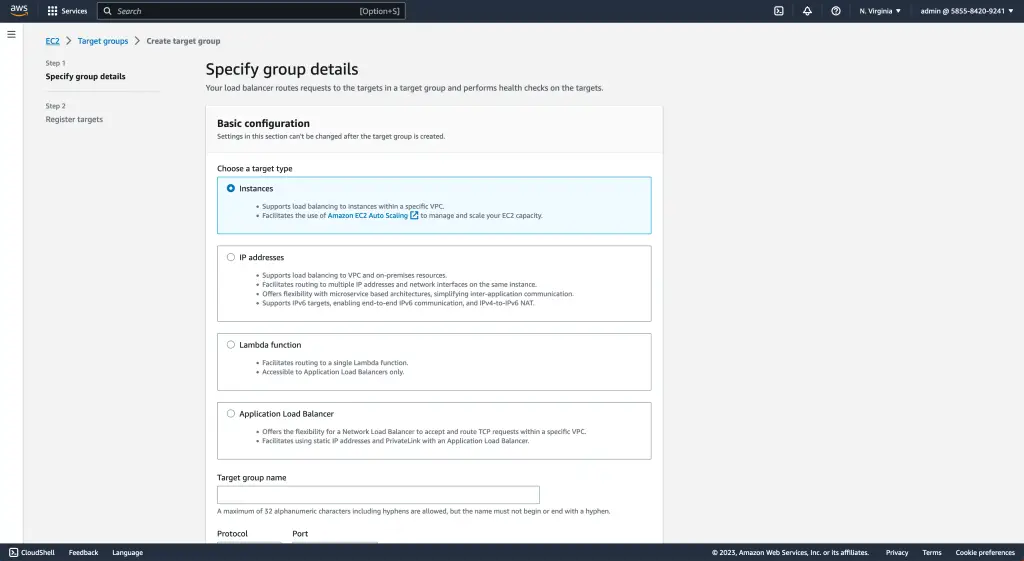
This target group is a repository for all the resources receiving incoming clients’ requests. By properly configuring this target group, you can guarantee efficient routing of requests and seamless load balancing across your infrastructure.
Remember that creating a target group is just the beginning of setting up your Network Load Balancer. It is a critical foundation for subsequent steps in configuring and managing your load balancer effectively.
Step 2: Registering Targets
To ensure effective routing of requests, Step 2 in setting up the AWS Network Load Balancer involves registering targets associated with the load balancer. Target groups are created to register various resources, such as EC2 instances, which will handle incoming requests.
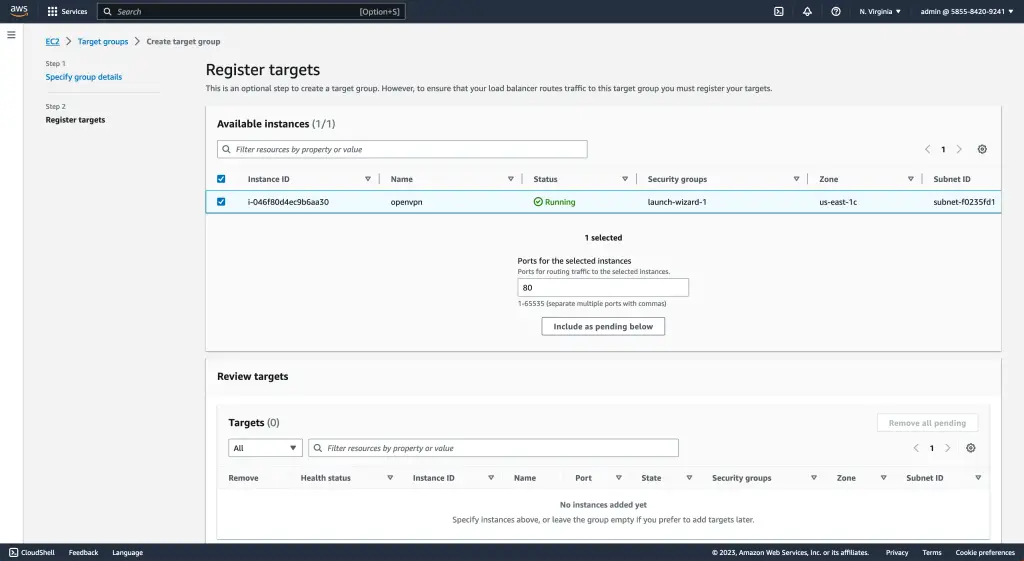
This allows the load balancer to distribute traffic efficiently across these registered targets. By defining the target group and providing information like instance IDs or IP addresses for registration, cloud engineers can easily configure their load balancers to optimize performance and handle increased traffic demands.
The webpage also provides documentation on how to set up health check criteria. For registered targets, manage them accordingly to maintain the smooth operation of the load-balancing infrastructure.
Step 3: Setting Up the Load Balancer and Listener
Next, let’s dive into step 3 of setting up the AWS Network Load Balancer: configuring the load balancer and listener. Once you have created your target group and registered your targets, it’s time to configure the load balancer.
First, choose whether you want an internet-facing or internal load balancer. An internet-facing load balancer is accessible online, while an internal load balancer can only be accessed within your Virtual Private Cloud (VPC).
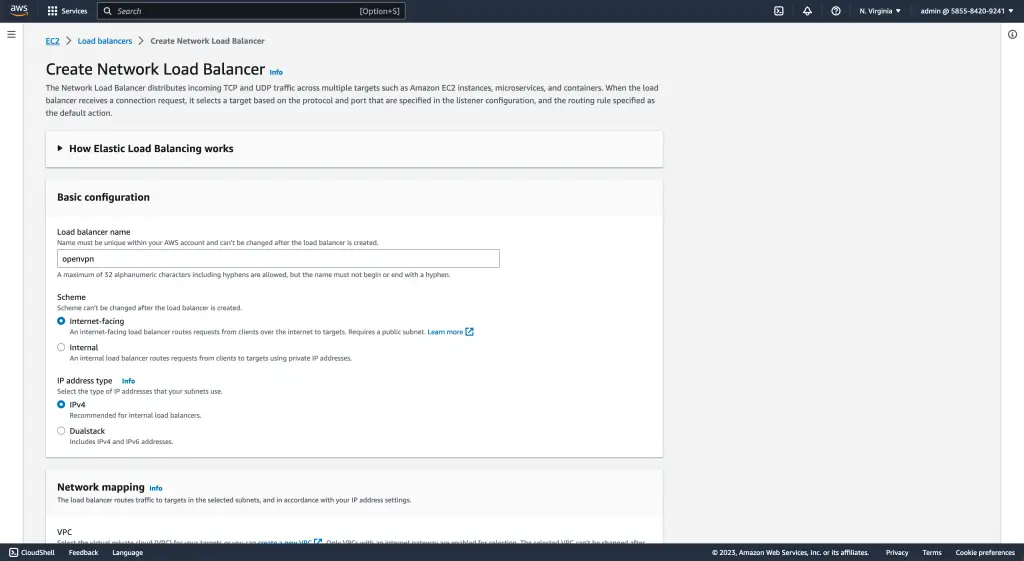
This decision will depend on your specific use case and requirements.
After choosing the type of load balancer, you will need to configure a listener. A listener is responsible for receiving incoming traffic on a specific port (or ports) and forwarding that traffic to the appropriate target group.
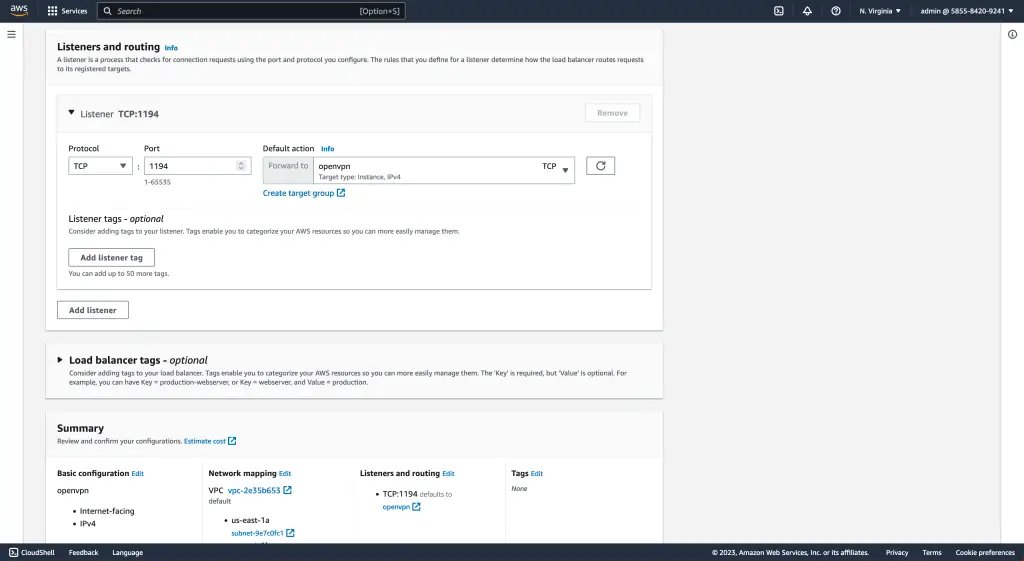
If necessary, you can specify a protocol (such as TCP or UDP), port number(s), and any SSL certificates.
Step 4: Testing the Load Balancer
To ensure the successful implementation of your AWS Network Load Balancer, it is crucial to test its functionality. In step 4 of the setup process, you will conduct tests to validate that the load balancer is working effectively and routing traffic as intended.
By sending requests to your load balancer’s DNS name and monitoring the responses from different targets, you can assess whether requests are evenly distributed across registered resources.
This testing phase allows you to gain confidence in the performance and reliability of your load balancer before deploying it in a production environment. Remember to check the important facts mentioned earlier for further instructions on executing these tests efficiently.
FAQ
What is a Network Load Balancer in AWS?
What is the difference between NLB and ALB?
What is the difference between NLB and ALB in AWS?
What is the difference between NLB and GWLB?
Conclusion: The Impact of Network Load Balancer on Cloud Operations
In conclusion, the AWS Network Load Balancer is a game-changer for cloud operations. Its advanced features and efficient traffic routing capabilities ensure high availability and application fault tolerance.
Whether transitioning from Classic to Network Load Balancer or leveraging it with Amazon ECS, this powerful service will optimize your cloud infrastructure and enhance overall performance.
With its cost-effective pricing model, easy setup process, and seamless integration with other AWS services, the Network Load Balancer is a must-have for any cloud engineer looking to streamline their operations.
