AWS Systems Manager – Simple And Easy Introduction
AWS Systems Manager (AWS SSM) is the operations hub for AWS that provides a unified user interface where you can track and resolve operational issues across your AWS or on-premises applications and resources from a central place. For that purpose, AWS Systems Manager has many services for you, such as OpsCenter, Change Manager, Fleet Manager, and many others. Additionally, AWS Systems Manager provides a unified interface to view operational data from multiple AWS services and on-premises servers.
In this article, we’ll introduce you to the AWS Systems Manager Parameter Store, Session Manager, and Patch Manager and show you how to set them up.
Table of contents
AWS Systems Manager Parameter Store
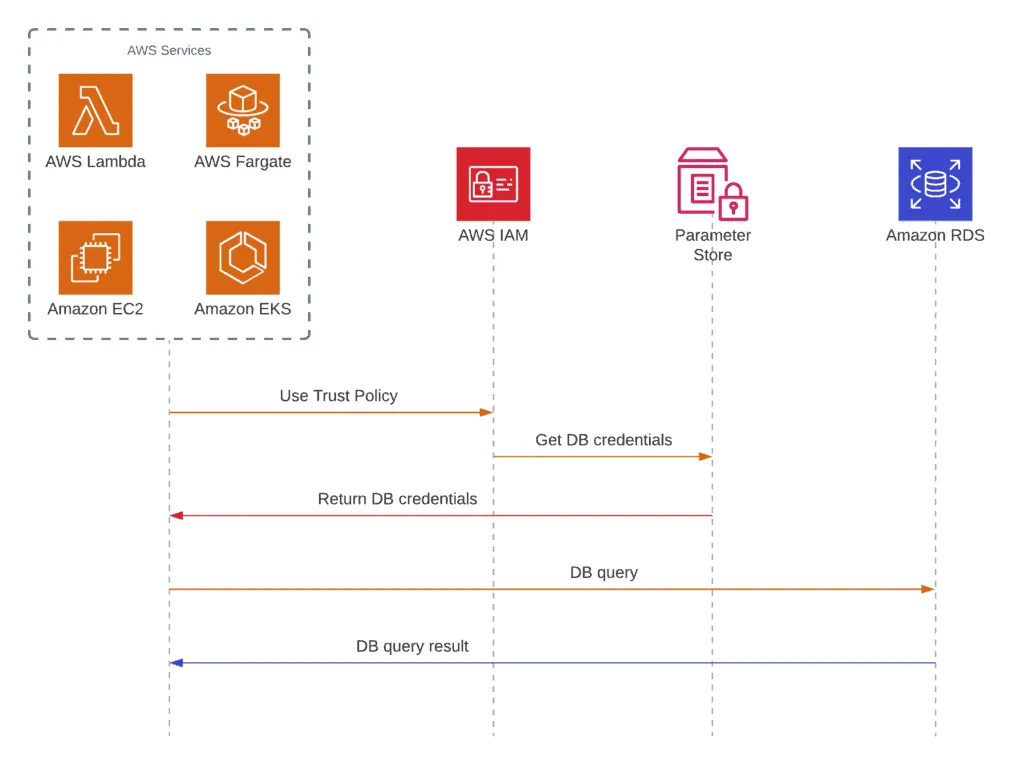
AWS Systems Manager Parameter Store is a service that allows you to store and securely manage your application configuration and secret data. It provides centralized storage to store plain-text data such as integration service URLs or secrets such as passwords or application licenses. Using Parameter Store, you can separate your secrets and configuration data from the application code. All stored parameters can be tagged and organized into hierarchies to help you manage parameters easily and systematically. For example, you can declare the same parameter as db-pasword withing different hierarchical paths dev/db-name/db-password and prod/db-name/db-password to store different access credentials for development and production environments.
Here’s a typical example of using Parameter Store:
Purpose of AWS Systems Manager Parameter Store
Managing the security of the application’s data and configuration is critical for every organization. It becomes especially true when you deploy your infrastructure on the cloud. A challenging topic of every application’s security is storing parameters like environmental variables, API keys, and product keys, whether in plain text or an encrypted format. Many organizations still use plain text configuration files, but it is way more secure to store sensitive application configuration data in an encrypted form and import this information at application runtime.
Since managing your parameter store is difficult, AWS came out with the AWS Systems Manager Parameter Store to solve this problem. Now you can store and securely manage all sorts of application data such as passwords, database strings, Amazon Machine Image IDs, licenses, and many other possible parameters.
Features of AWS Systems Parameter Store
TheAWS Systems Parameter Store provides you with the following features:
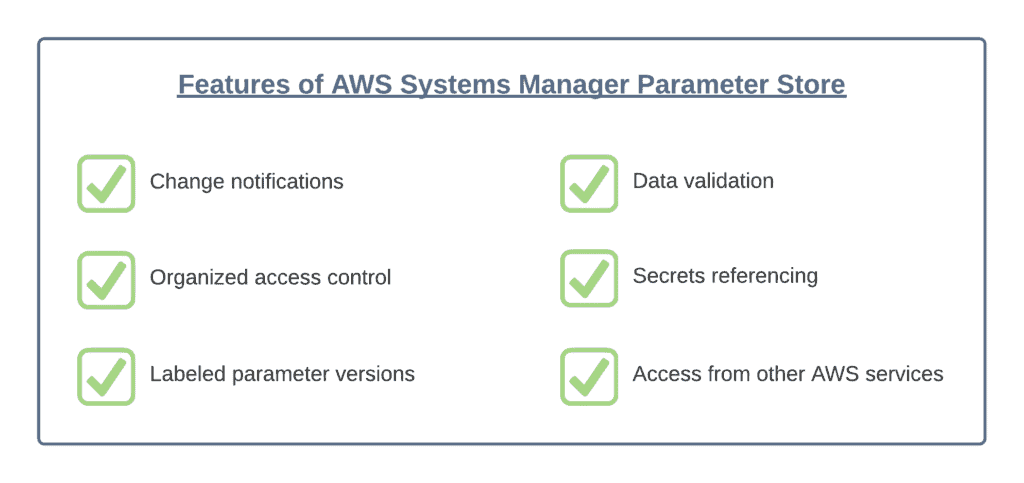
- Change notification – Parameter Store allows you to react to parameter’s change events to apply required automated action. For example, you can change the database password in Parameter Store and configure AWS Lambda to update it in your database automatically.
- Organized access control – You can individually tag your parameters to group multiple parameters based on specified tags. For instance, you can give multiple tags for parameters like departments, specific environments, users, groups, etc. Furthermore, you also can restrict access to parameters using Identity and Access Management policies.
- Labeled parameter versions – Labeled versions or aliases help you easily identify a parameter version when multiple versions exist.
- Data validation – This feature allows you to create parameters pointing to an AWS cloud resource instance (for example, AMI) to ensure that the referencing resource type exists and the resource customer has permission to use the resource.
- Secrets referencing – This integration with Systems Manager helps applications retrieve any secrets from the Secrets Manager if they already using parameters from the Parameter Store.
- Access from other AWS services – You can access Parameter Store data from other AWS services to retrieve secrets and configure data from the central location. The common use cases include such services as AWS Lambda, AWS Cloud Formation, AWS Code Build, and many others.
Parameter Store vs. Secrets Manager
AWS Systems Manager Parameter Store is a service that allows you to store and securely manage your application configuration and secret data.
AWS Secrets Manager is a service similar to the AWS SSM Parameter Store. It not only stores secrets but also automates the rotation process of those secrets. Automatic secret rotation by schedule helps you increase your secrets’ security even more.
Choosing between services is tough as soon as they are very similar. Let’s look at the key differences and similarities between the two services so you can choose which suits your needs better.
Similarities
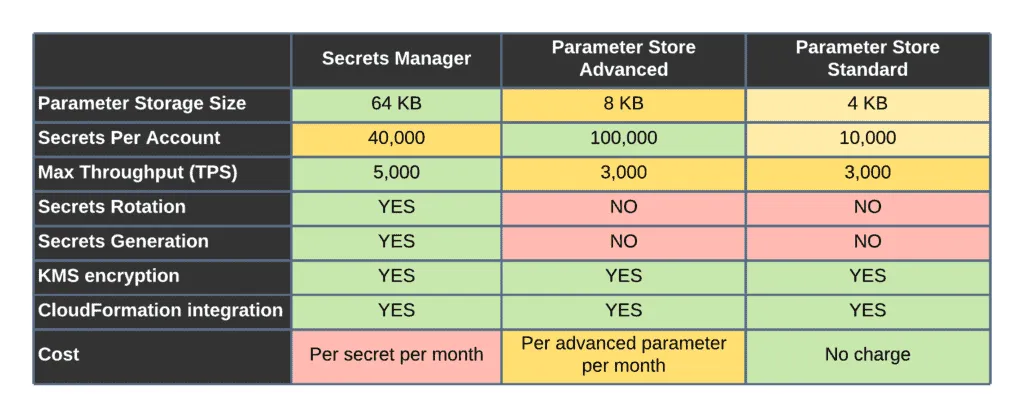
- Managed data store – Both these services offer a solution for managing and storing key-value pairs.
- Encryption – Both services integrate with AWS Key Management Service (KMS) for data encryption. The Parameter store can store plain text and KMS to encrypt values. On the other hand, AWS Secrets Manager stores only encrypted data.
- Cloud Formation integration – Values from both services are referenceable in CloudFormation templates. This permits you to not hardcode secrets and other dynamic values for security purposes.
Differences
- Cost – The Parameter Store has two offerings – Standard and Advanced. The Standard version is provided to you at no additional charges for storing plain-text parameters (KMS usage charges are applied for encrypted parameters). On the other hand, the Advanced Parameter Store and AWS Secrets Manager will cost you AWS rates per parameter per month.
- Secrets Rotation – The AWS Secrets Manager provides secrets rotation with full RDS integration. The Secrets Manager can rotate keys and generate new passwords in RDS. You must implement this process for the AWS SSM Parameter Store by using change notification events.
- Cross-Account Access – Another feature that differentiates the AWS Secrets Manager from the SSM Parameter Store is cross-account access. You can share secrets across multiple accounts using the AWS Secrets Manager. For instance, the IAM users or roles can access secrets stored in a completely different AWS account. The cross-account feature is beneficial when sharing secrets with your partners. You must implement this process for the AWS SSM Parameter Store by using cross-account roles.
- Storage Limits – The Standard SSM Parameter Store has a limit of 4 KB per parameter, while the Advanced version can store up to 8 KB. Side by side, the Secrets Manager allows you to store values up to 64 KB.
Managing AWS SSM Parameter Store parameters
Parameter Store is a feature of AWS System Manager used to store and manage your configuration data, such as database strings or secrets. It can be integrated with AWS KMS for encryption and control user and AWS services access to the encryption key.
Creating plain-text parameter
This section will walk you through creating and accessing a parameter in the Parameter Store.
To create a parameter store, follow the below steps:
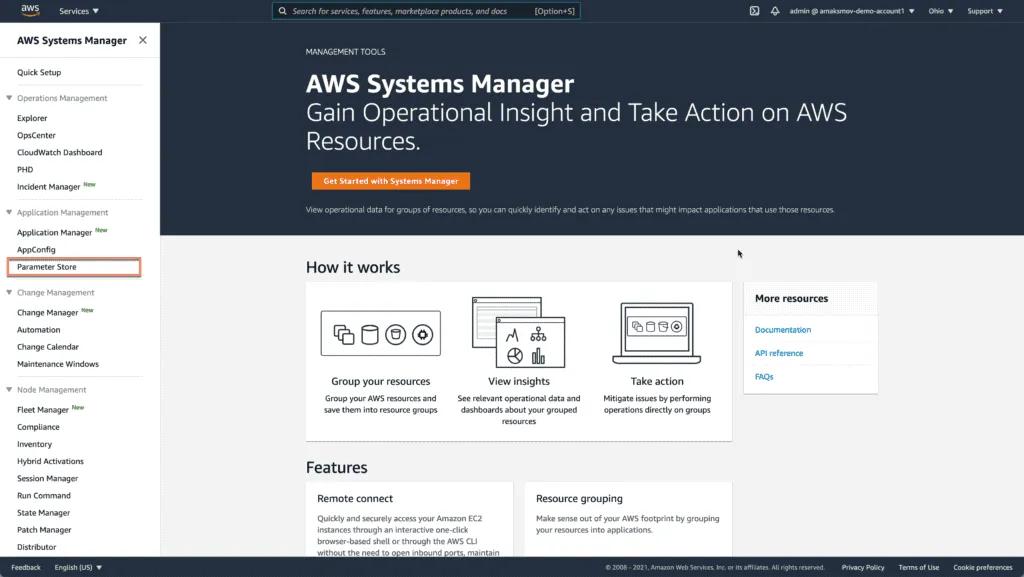
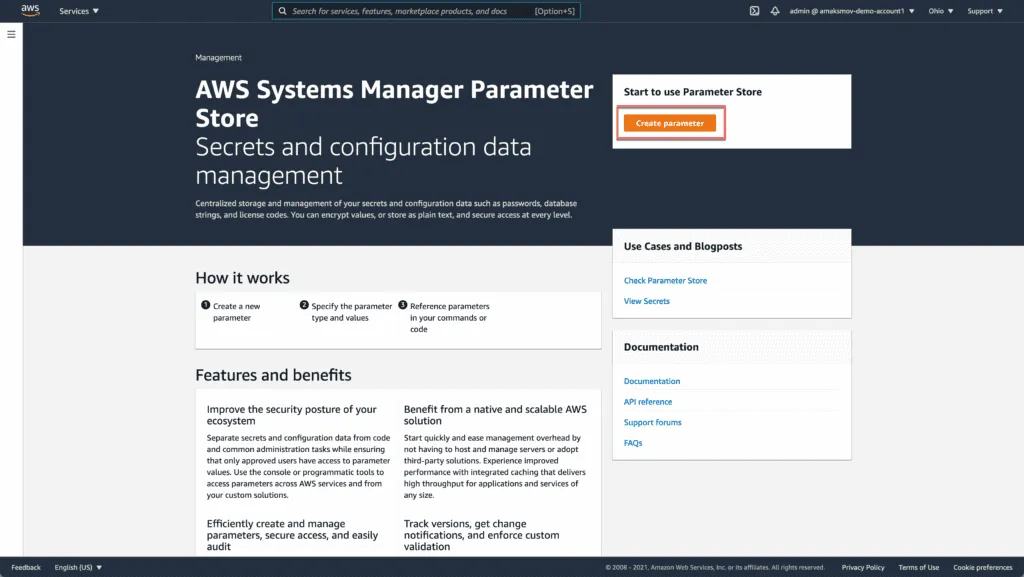
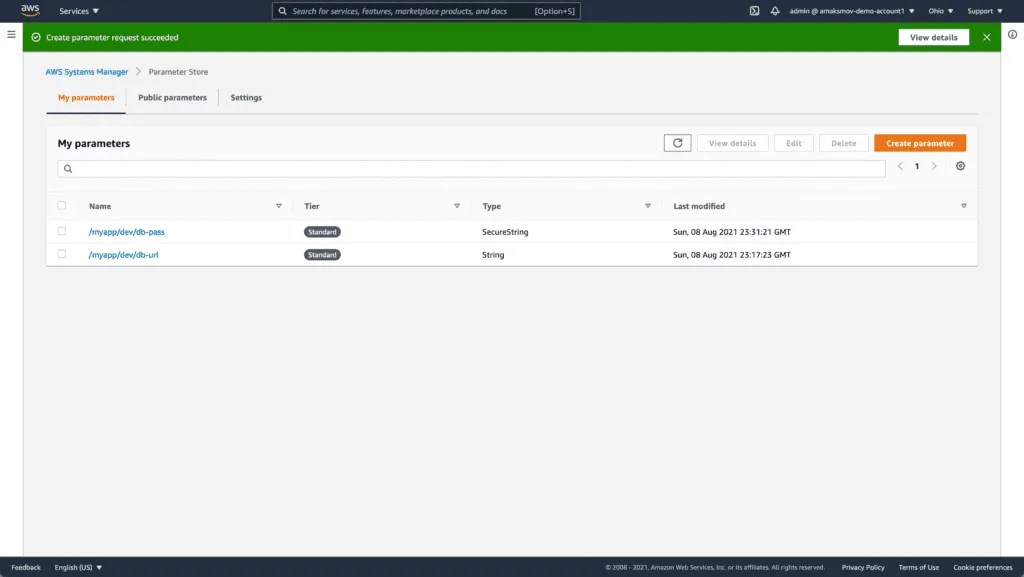
Access the AWS System Manager at AWS Management Console and click on Parameter Store as shown below:
Click on Create parameter to create a parameter to store the database URL. You should see the following screen:
Fill out the form with the following information:
- Name:
/myapp/dev/db-url - Description:
Database URL for Application - Value:
db.example.com:3306
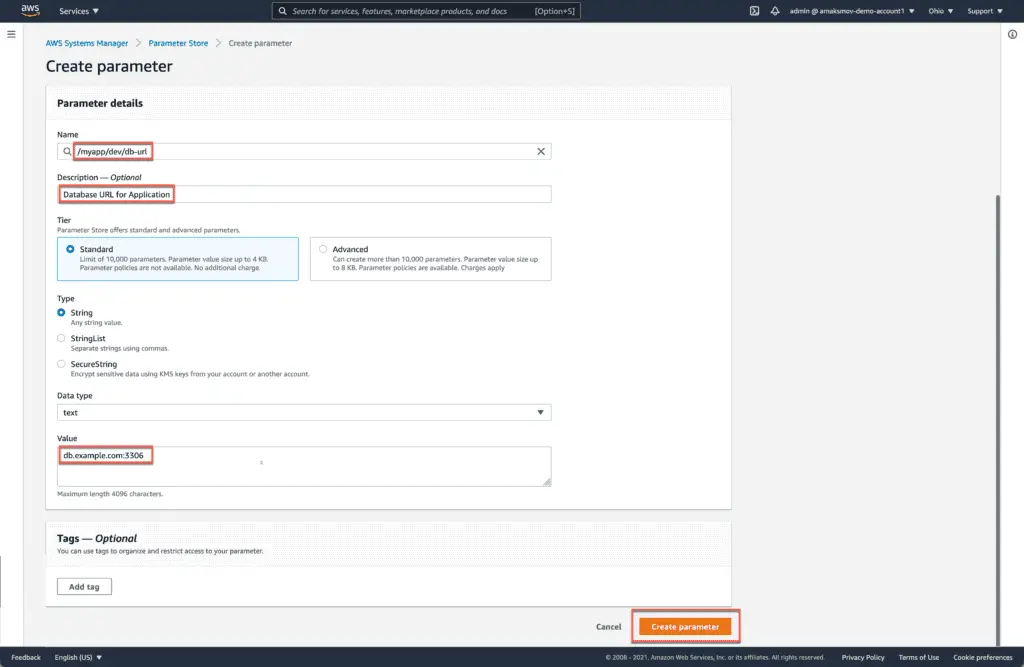
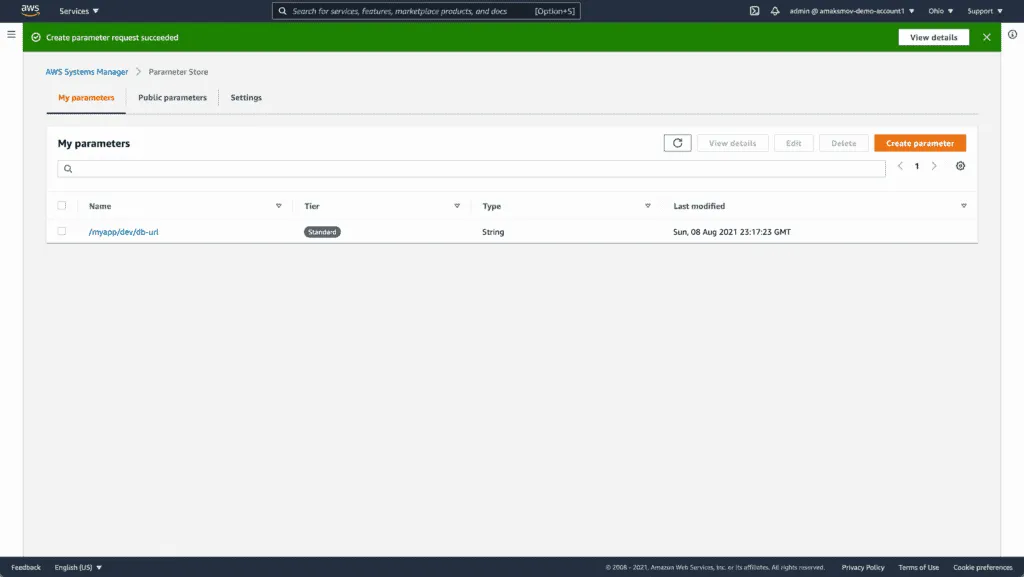
Next, click on the Create parameter to create a parameter. You should see the following screen:
Creating encrypted parameter
Click on Create a parameter again to store the database password.
Fill in the following information:
- Name:
/myapp/dev/db-pass - Description:
Database Password for Application - Value:
secure-password - Type:
SecureString - KMS key source:
My current account
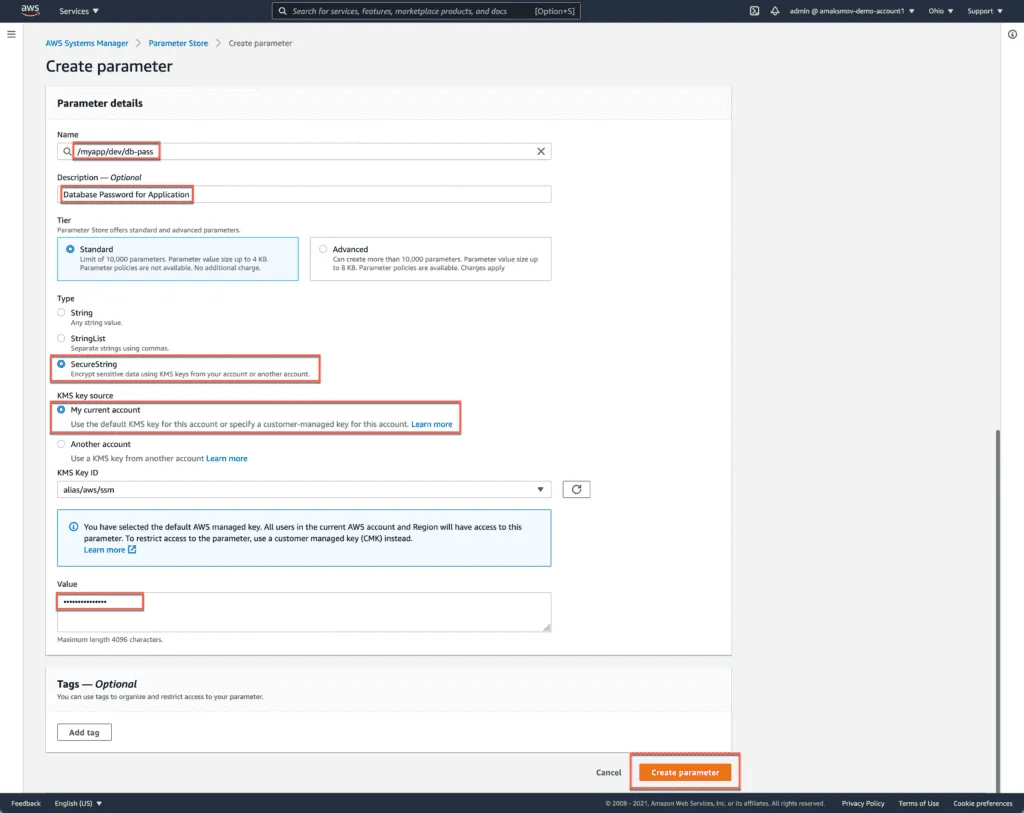
Next, Click on Create parameter to create a parameter. You should see the following screen:
Accessing parameters
To access the AWS SSM parameters, you must install AWS CLI tools and configure your AWS environment.
You may also run Cloud9 IDE, which has all the required tools installed and the environment configured for you.
As soon as tools and environment are configured, run the following command to access your parameter:
aws ssm get-parameters --names /myapp/dev/db-url /myapp/dev/db-passHere’s an example output:
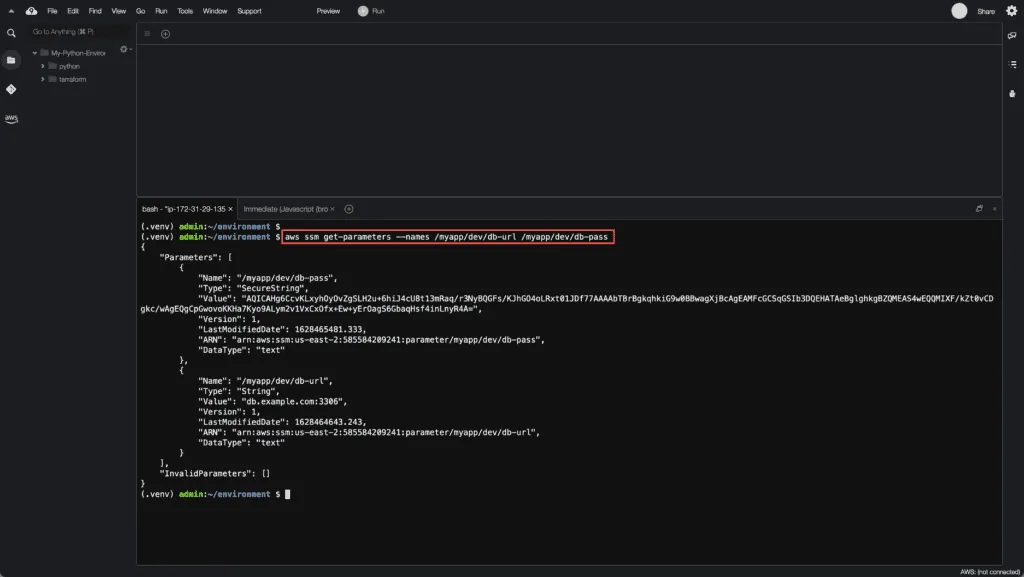
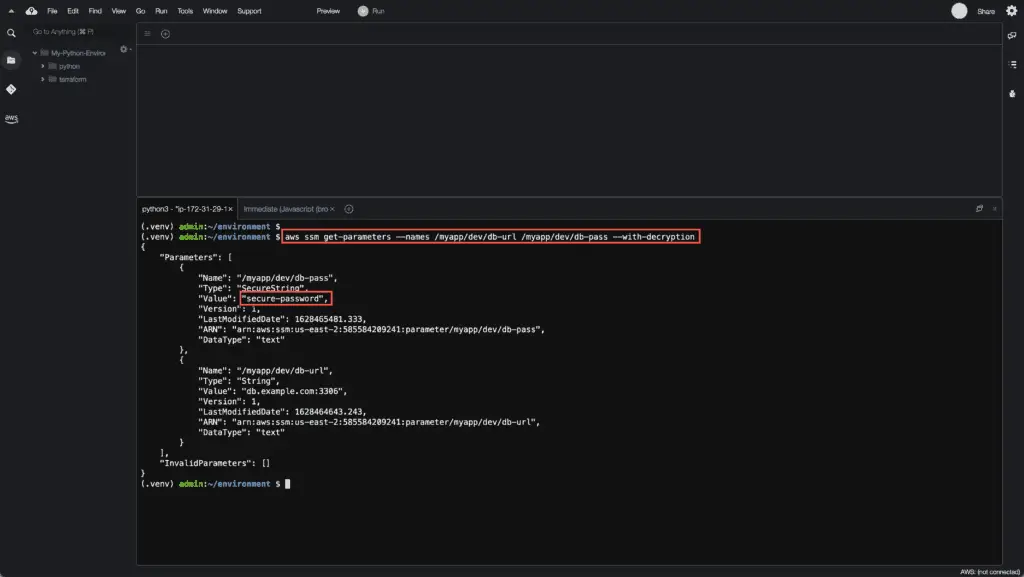
As you can see, one of your parameters is encrypted. You can decrypt your saved parameters using the following command:
aws ssm get-parameters --names /myapp/dev/db-url /myapp/dev/db-pass --with-decryptionHere’s an example output:
If you’re interested in examples of working with the AWS Systems Manager Parameter Store using Boto3, we’ll cover them in a separate article soon.
AWS Parameter Store Limits
AWS Parameter Store allows you to increase the default throughput limit to the maximum number of transactions per second. When writing this tutorial, AWS Systems Manager Parameter Store supports up to 3,000 requests per second. Increased throughput will allow you to run applications requiring higher concurrent access to many parameters.
AWS Parameter Store Limit Increase
To increase the Parameter Store limits, use the following steps:
Go to the AWS Systems Manager console at https://console.aws.amazon.com/systems-manager/
Click on the Parameter Store in the left pane and choose the Setting tab.
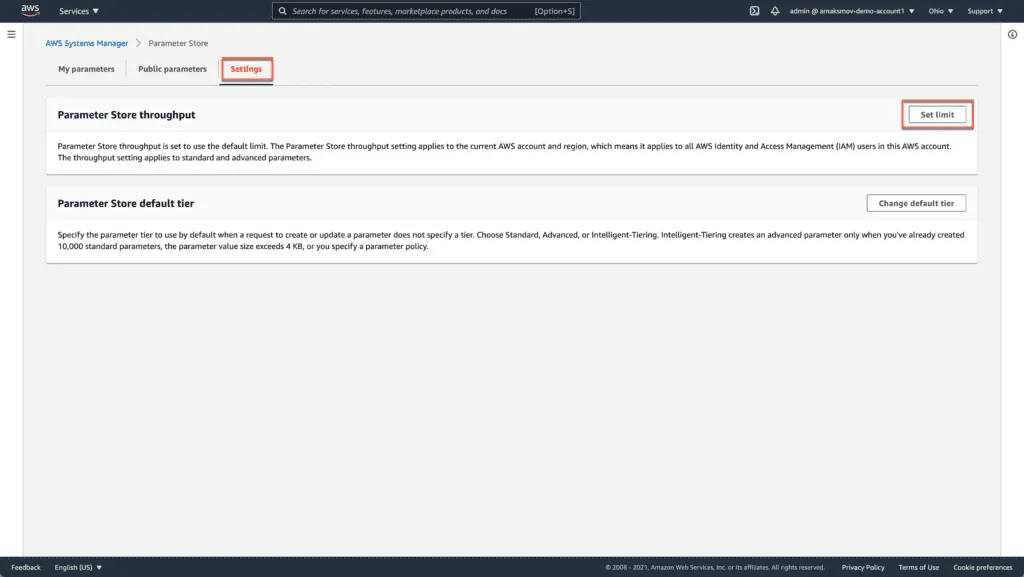
Click on the Set limit. You should see the following screen:
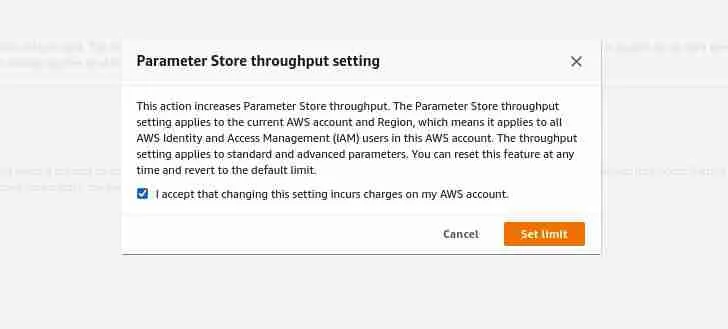
Review the message and click on the Set limit button to set the limit.
AWS Systems Manager Session Manager
AWS Systems Manager Session Manager is a service that allows you to manage your workloads in the cloud. It’s not a single-use tool but a bundle of utilities used independently to secure access to your workloads and systems. Additionally, it allows you to comply with corporate policies requiring controlled access instances and strict security practices while providing all users with a one-click solution for accessing managed instances.
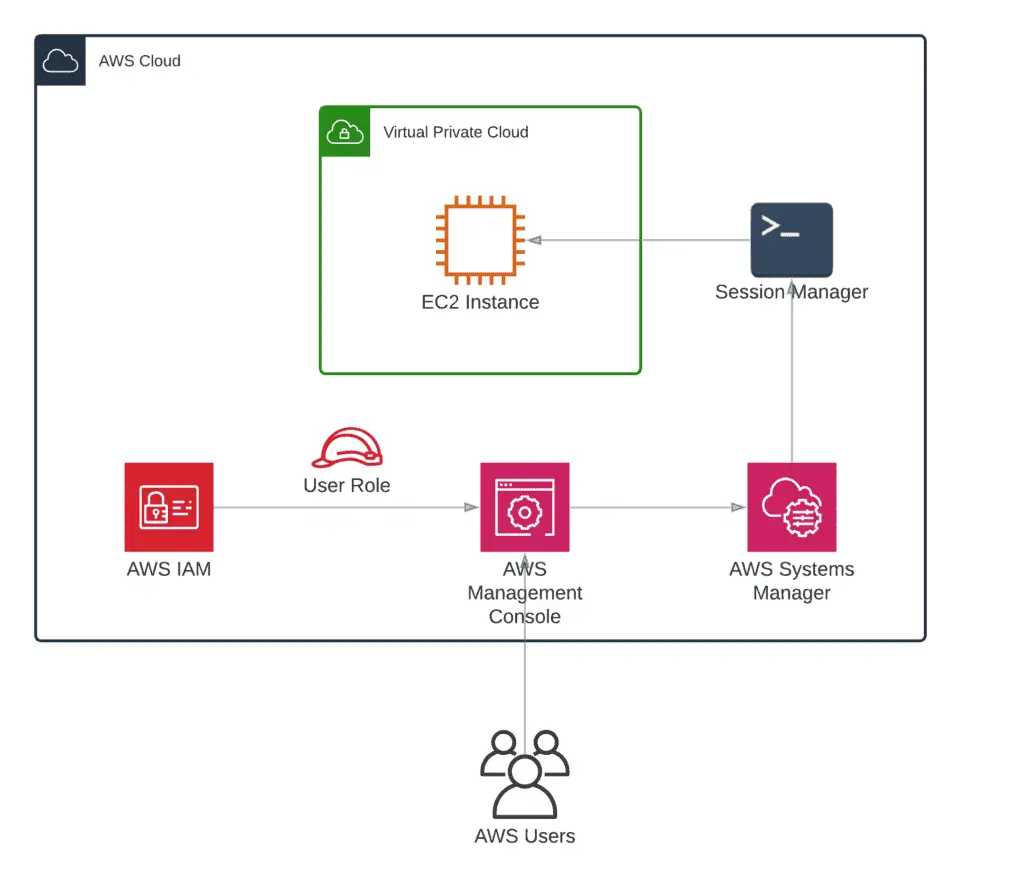
In technical terminology, AWS SSM Session Manager is a capability within the AWS cloud platform that allows you to connect your EC2 instances with temporary credentials and administrate your servers without SSH key pairs.
AWS Systems Manager Session Manager also allows you to access the EC2 instances in the same way in multiple different accounts.
Purpose of the AWS Session Manager
You can use AWS Session Manager for a variety of management tasks. Some of the common management tasks are given as follows:
- Manage hybrid cloud systems – The AWS Session Manager helps you manage multiple systems running on Amazon Web Services and your on-premise data center with a single platform. It uses a lightweight AWS Systems Manager agent installed on the EC2 instances and on-premise servers to communicate and flawlessly execute tasks. This, in turn, helps you manage AWS resources, such as Windows and Linux operating systems running on Amazon EC2 and in data center infrastructure like Microsoft Hyper-V, etc.
- Improve visibility and control – AWS Session Manager helps you improve the visibility and control of your EC2 instances and OS configurations. Not only this, it collects software inventory and configuration information about your fleet of instances and software installed on them. The AWS Session Manager is a great tool to handle and check your data and other deployment details.
- Maintain security and compliance – The AWS Session Manager maintains your systems and keeps them up-to-date by complying with all configuration policies. In short, it helps you keep everything in a security posture.
- Secure role-based management – With the integration of AWS Session Manager with Amazon Identity and Access Management, you can apply granular permissions to control the actions of the users. The Amazon CloudTrail records the actions taken by the AWS Session Manager and lets you audit changes throughout your environment.
- Port forwarding – AWS Session Manager enables you to redirect the port inside your instance to a local port on a client. This can help you gain all the information running inside the instance.
Features of AWS Session Manager
Here’s a list of the most important features of AWS Systems Manager Session Manager:
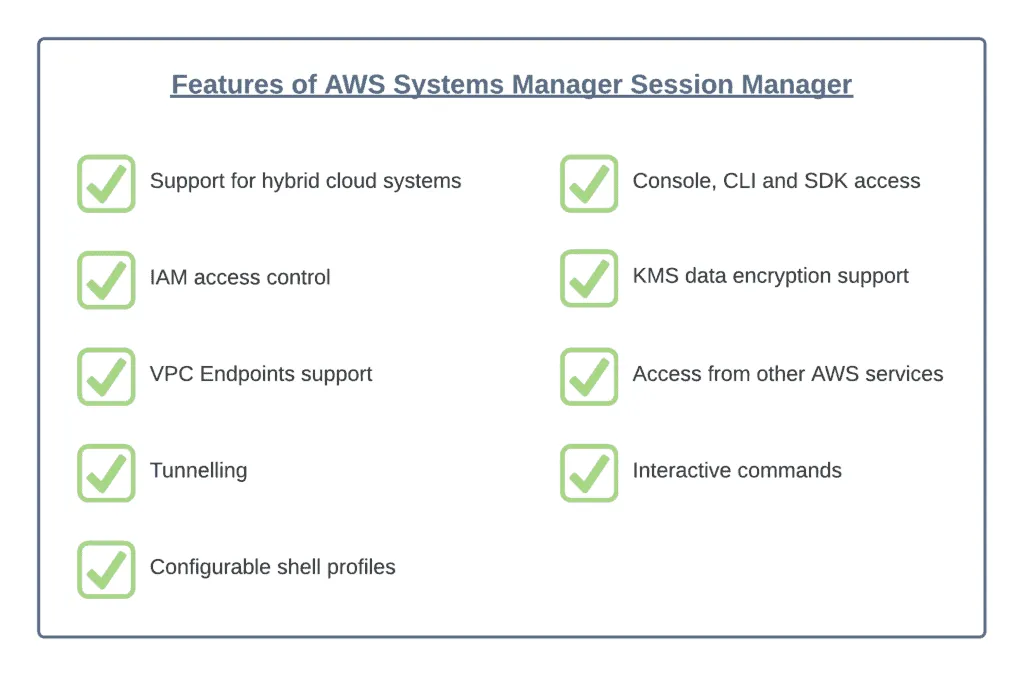
- Support for hybrid cloud systems – The AWS Session Manager enables you to support various hybrid cloud systems, such as Windows, Linux, macOS, etc., by establishing secure connections with Amazon Elastic Compute Cloud Instances, on-premise instances, and virtual machines.
- Console, CLI, and SDK access to Session Manager capabilities – You can use these features in three ways. First, you can use the AWS Systems Manager Console to access all the Session Manager capabilities for administrators and end-users. With the Systems Manager Console, you can accomplish almost every task related to your server’s administration in a hassle-free manner. The Amazon EC2 console allows end-users to connect to the EC2 instances for which they have been granted session permissions. Second, the AWS CLI gives the end-users access to the Manager’s Session Capabilities with which they can easily start, view, and end a session. Third, the SDK session manager consists of all the libraries and sample codes that allow application developers to create front-end applications like custom shells and self-service portals. This feature also enables users to build custom solutions.
- IAM access control – With IAM access control, you can check and control the members who can access and initiate sessions to instances and which instances they can access. Also, with this IAM access control feature, you can allow temporary access to your instances. For instance, you can immediately give temporary access to an on-call engineer to access production servers only for their rotation period.
- Logging and auditing capability support – AWS Session Manager gives you options to audit and log session histories stored in your AWS account. This takes place through the integration of various other AWS services.
- Configurable shell profiles – The AWS Session Manager allows you to configure preferences within sessions. The customizable profiles then allow you to define preferences like shell preferences, environment variables, and working directories whenever a session starts.
- KMS data encryption support – You can configure Session Manager to use KMS keys. So, you can encrypt the data logs you’re sending to the AmazonS3 bucket or CloudWatch. Furthermore, the data transferred between the client machines and managed instances during sessions is also encrypted.
- VPC Endpoints support – You can set VPC Endpoints for Systems Manager for your private VPC networks. This can help you manage workloads within isolated environments in a secure way.
- Tunnelling – You can use the AWS Session Manager to tunnel traffic, like HTTP or any other custom protocol, between a local port on a client machine and a remote port on an instance.
- Interactive commands – This feature allows you to create a session-type SSM document that uses a single session to run a single command interactively.
Using Session Manager to control EC2 instances
This section will show you how to launch an EC2 instance with Session Manager support. We also explain how to connect to AWS EC2 instances using Session Manager without SSH.
Create EC2 instance IAM Profile Role
First, you must create an IAM Profile Role for the EC2 instance. This will allow you to connect to the EC2 instance and start managing it using AWS Session Manager:
Log in to the AWS console at https://console.aws.amazon.com/.
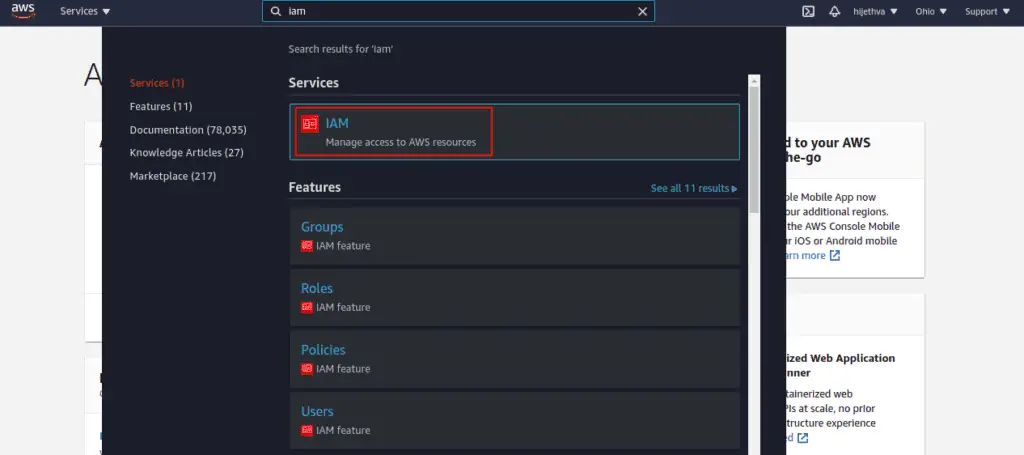
Search for IAM (Identity and Access Management) in the search bar.
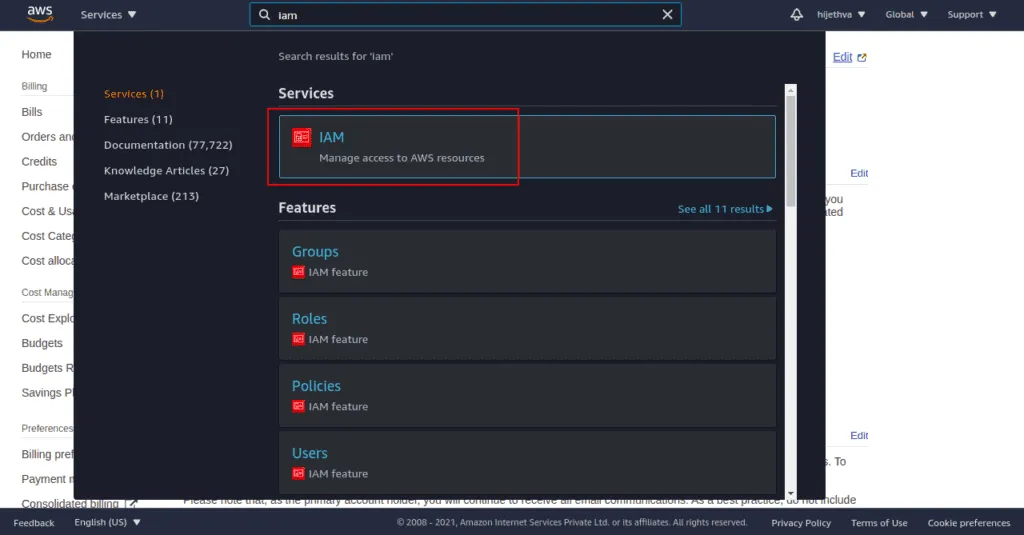
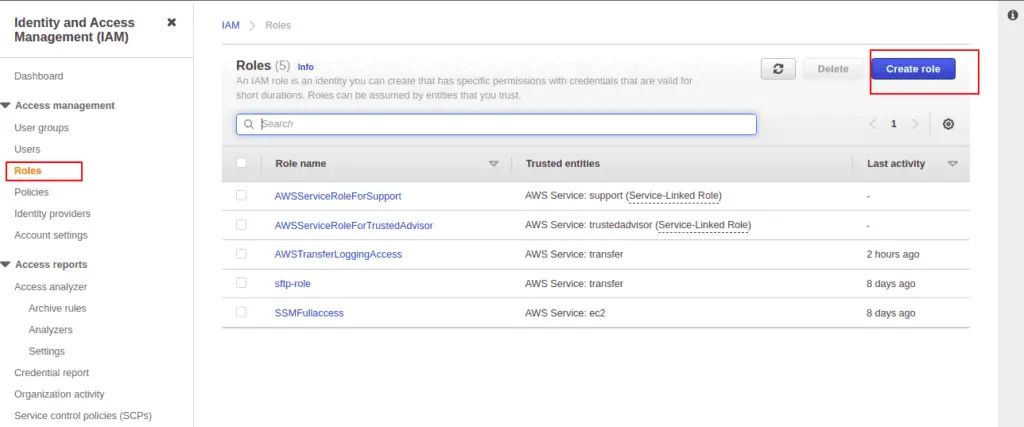
Click on IAM.
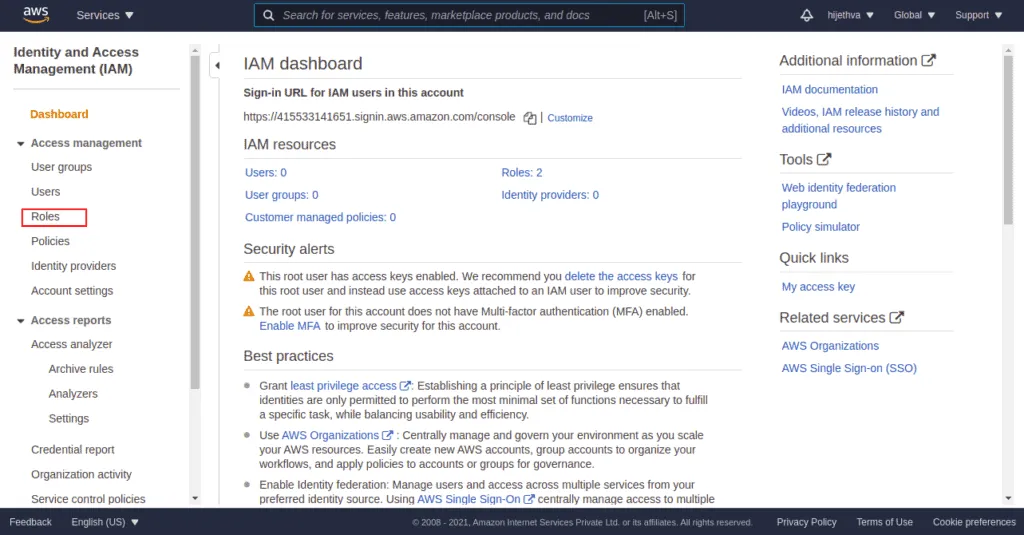
In the left pane, click on Roles.
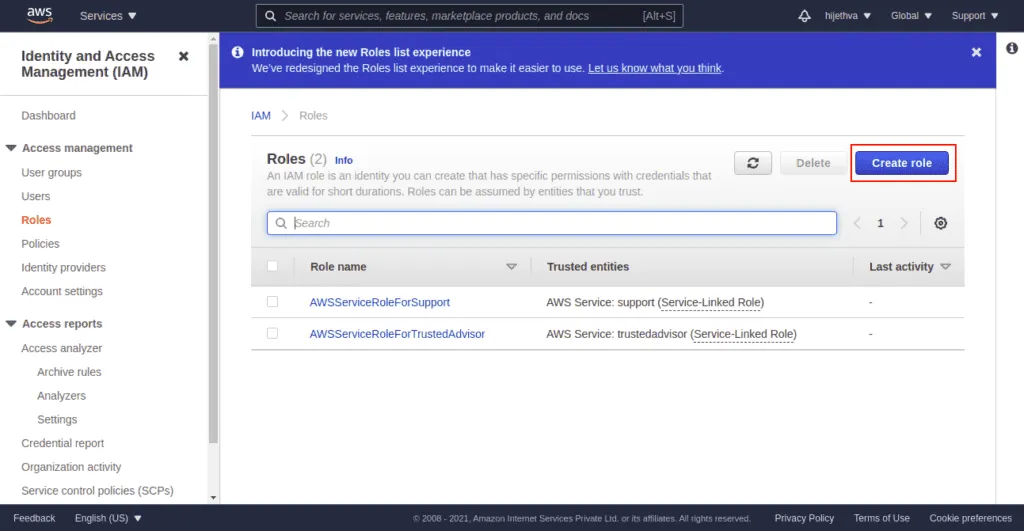
Click on Create role.
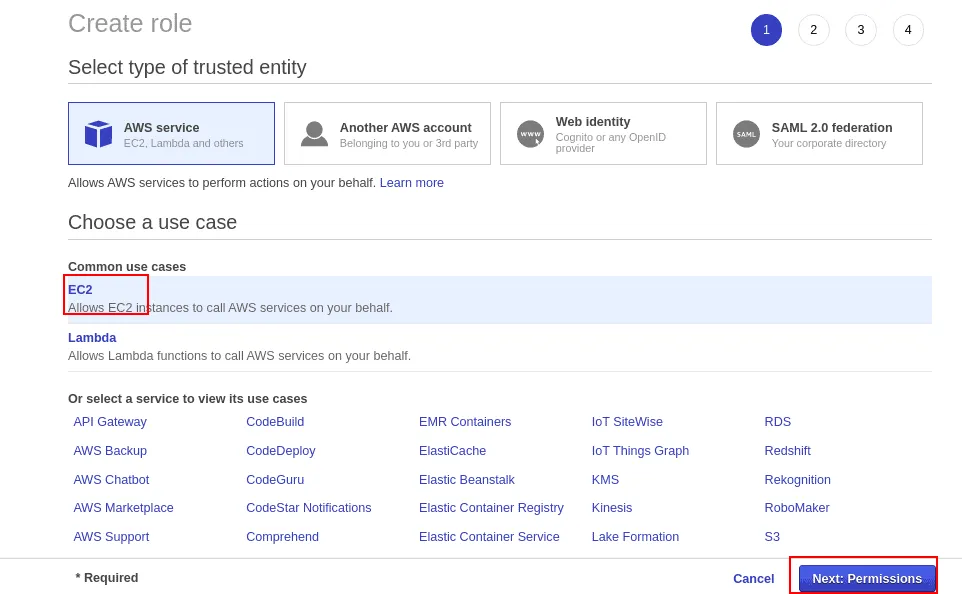
Select EC2 service and click on Next.
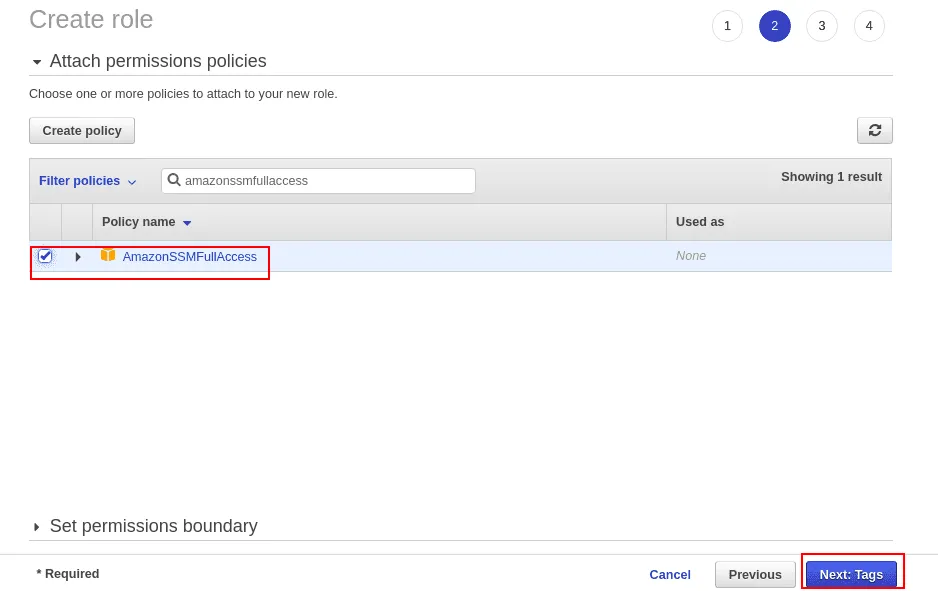
Search for AmazonaSSMFullAccess in the Filter policies, select the AmazonSSMFullAccess policy and click on the Next button.

Define your Tag name and value, then click on the Next button.
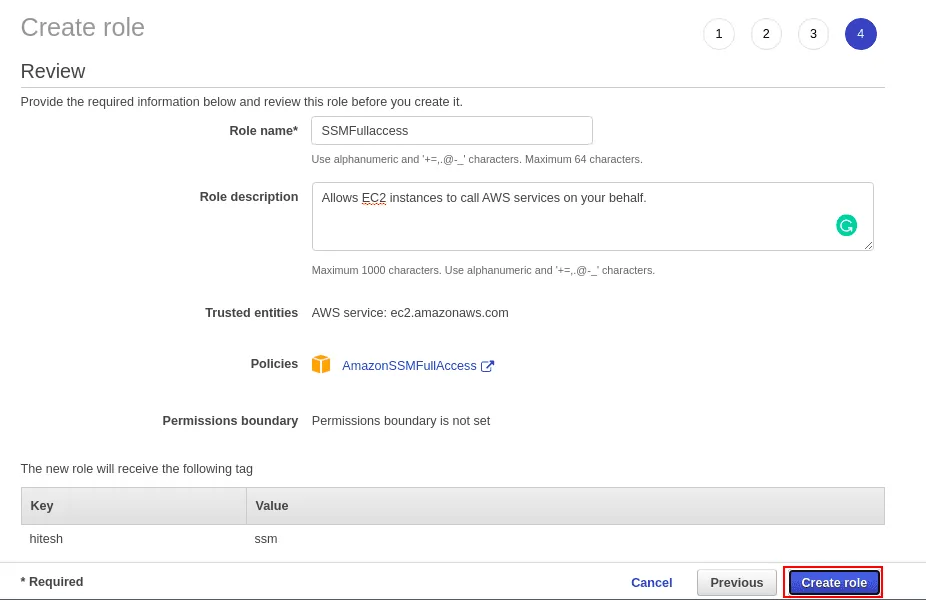
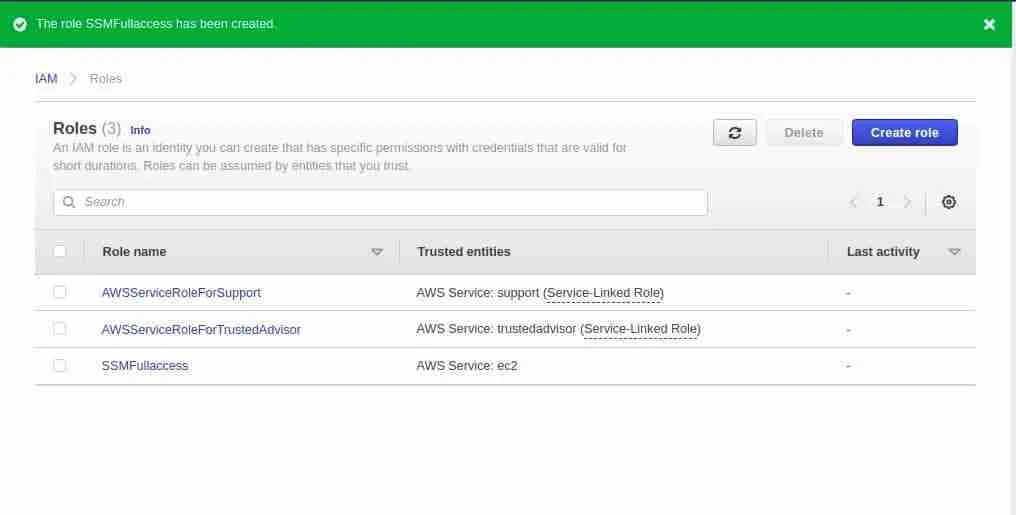
Define your Role name, and description and click on the Create role button.
Launch an EC2 instance
At this point, the IAM Instance Profile Role for Session Manager is created. Now, we will launch an EC2 instance with this role.
On the AWS console, search for EC2.
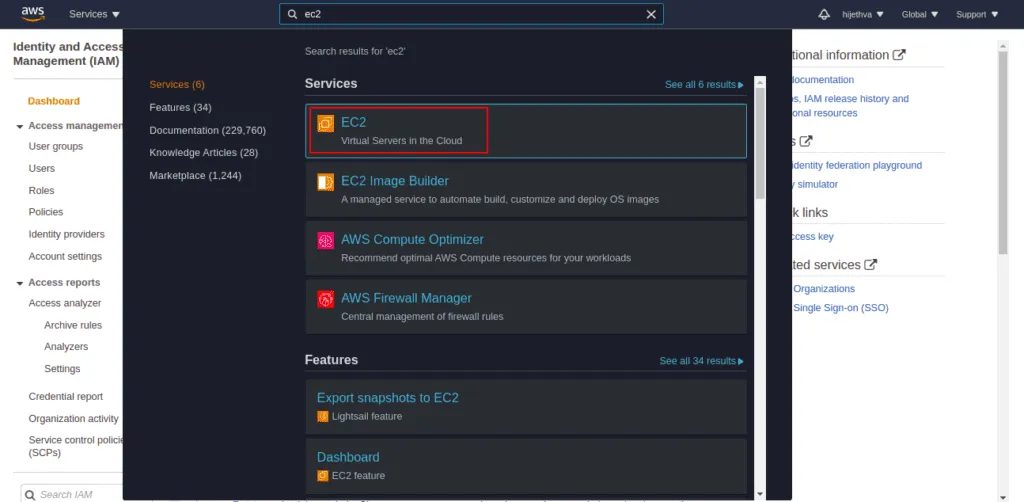
Click on the EC2.
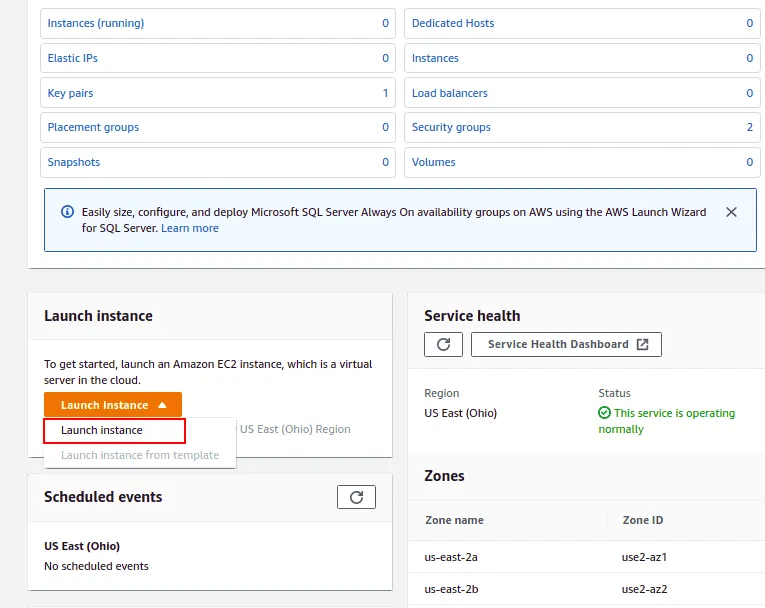
Click on Launch Instance.
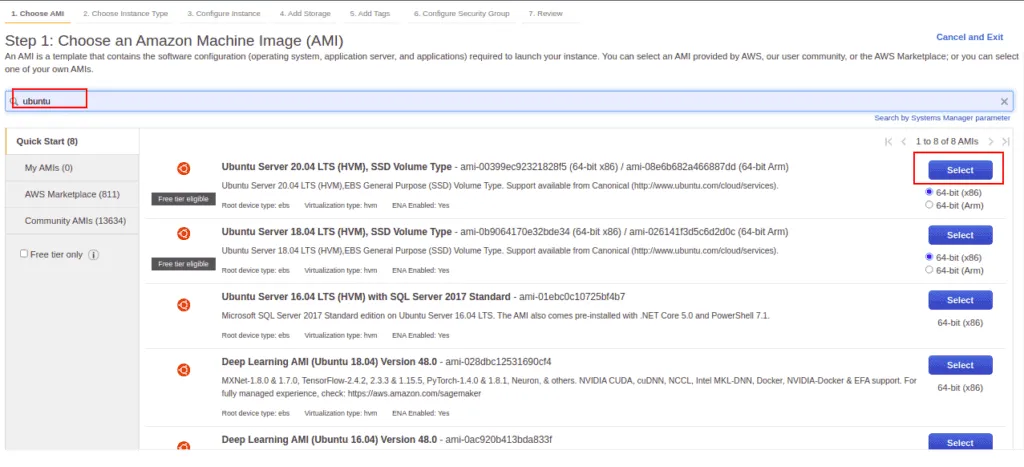
Search for Ubuntu AMI, select the first image.
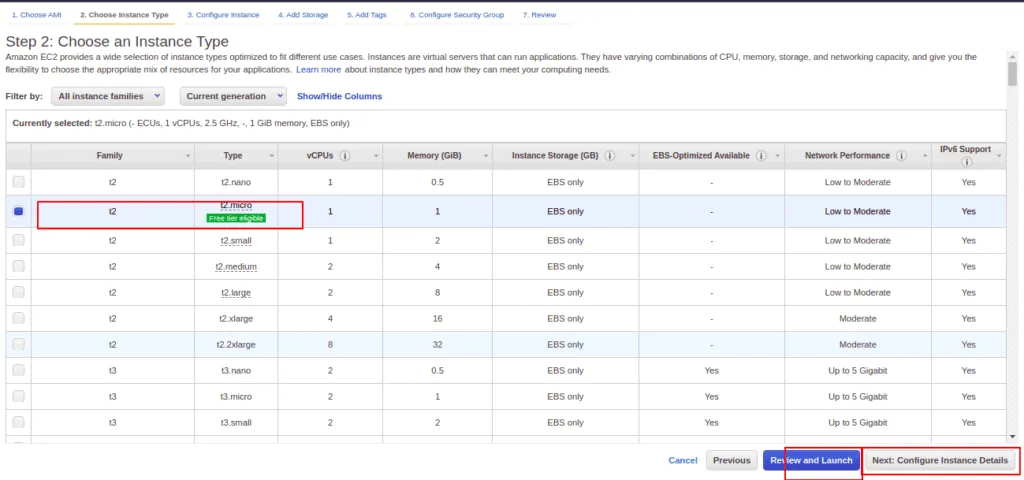
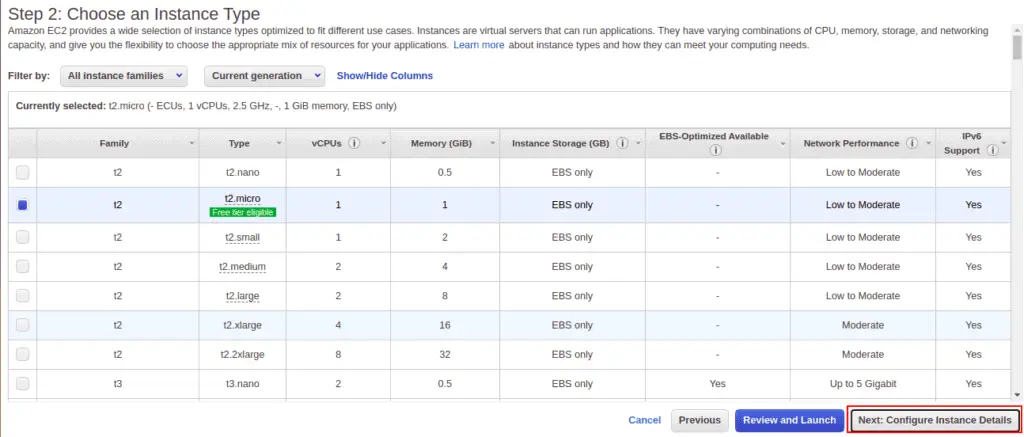
Select the second instance and click on Next: Configure Instance Details.
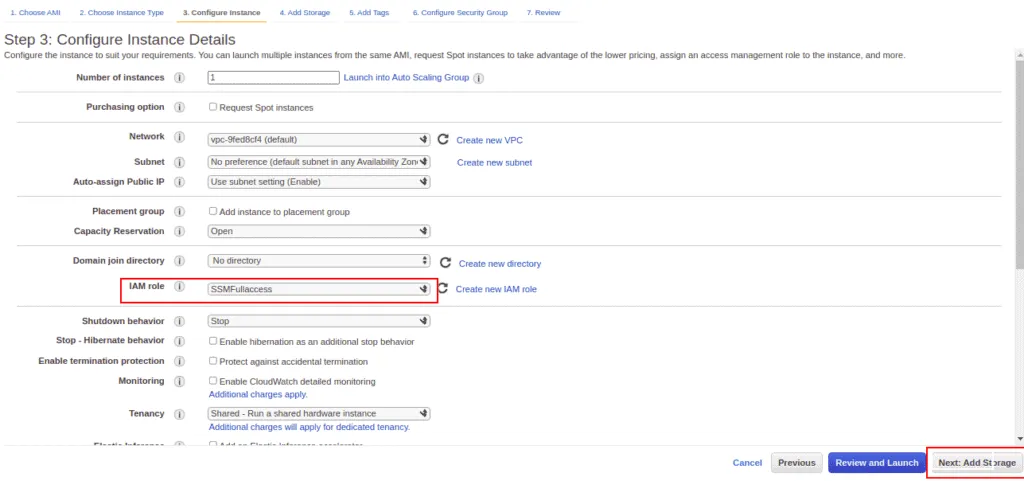
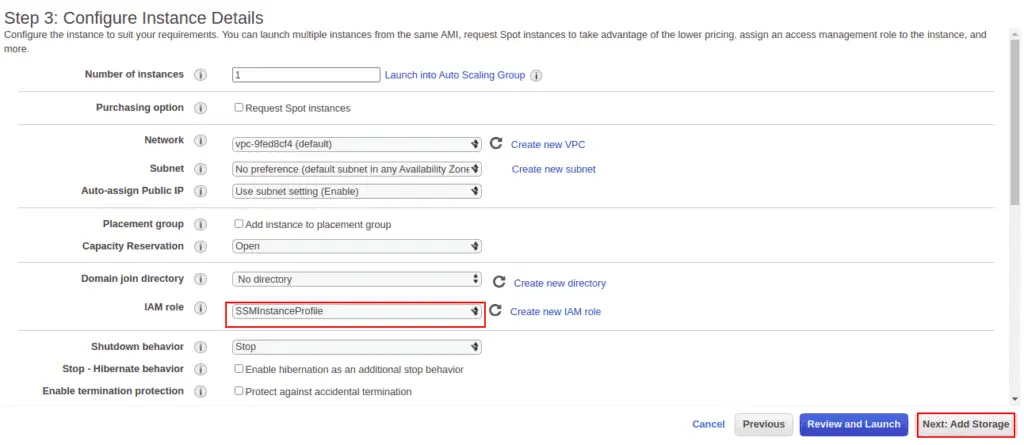
Attach your SSMFullAccess Role and click on the Next: Add Storage.
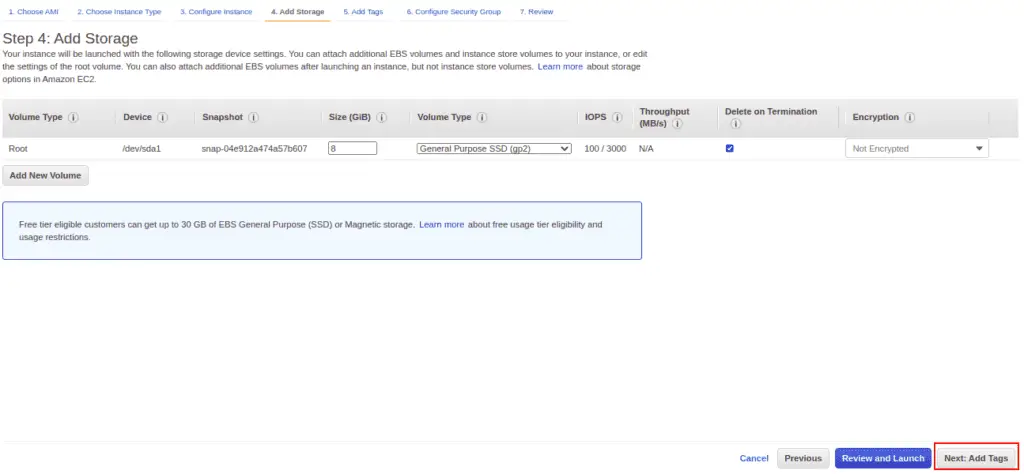
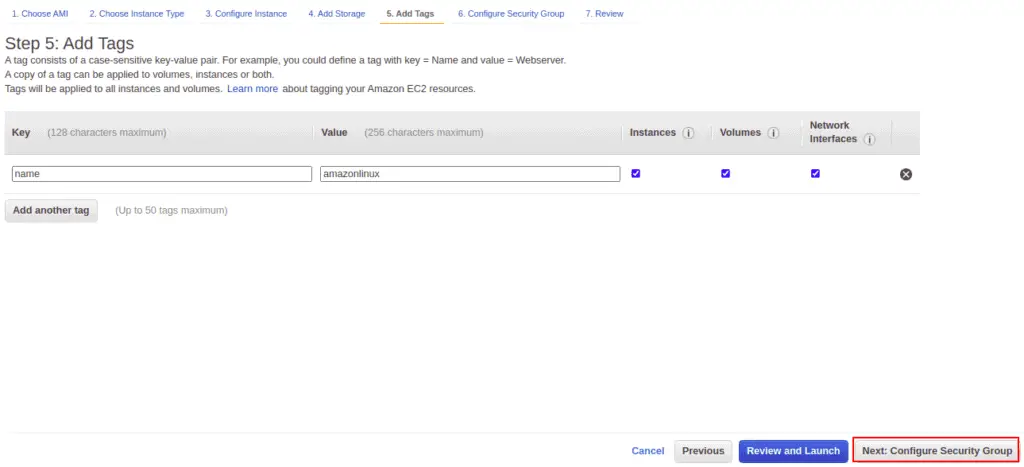
Click on Next: Add Tag.
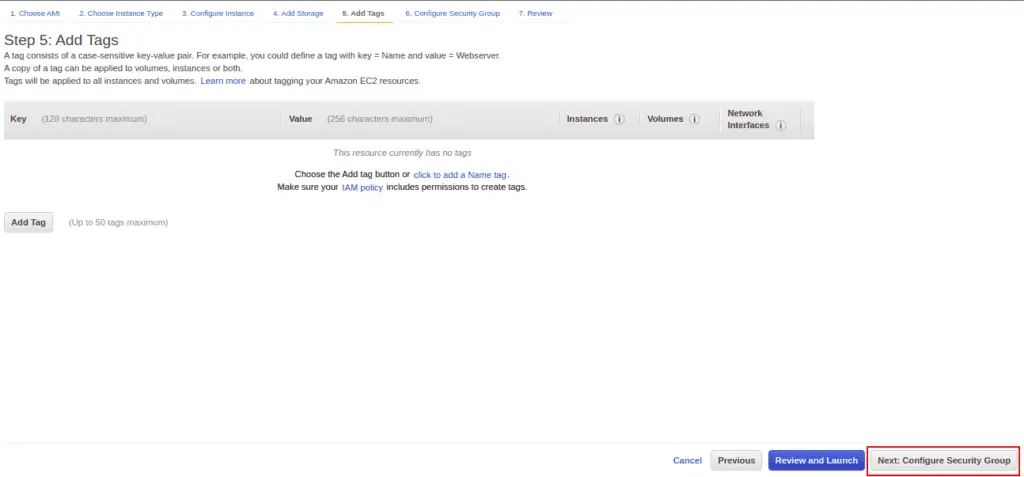
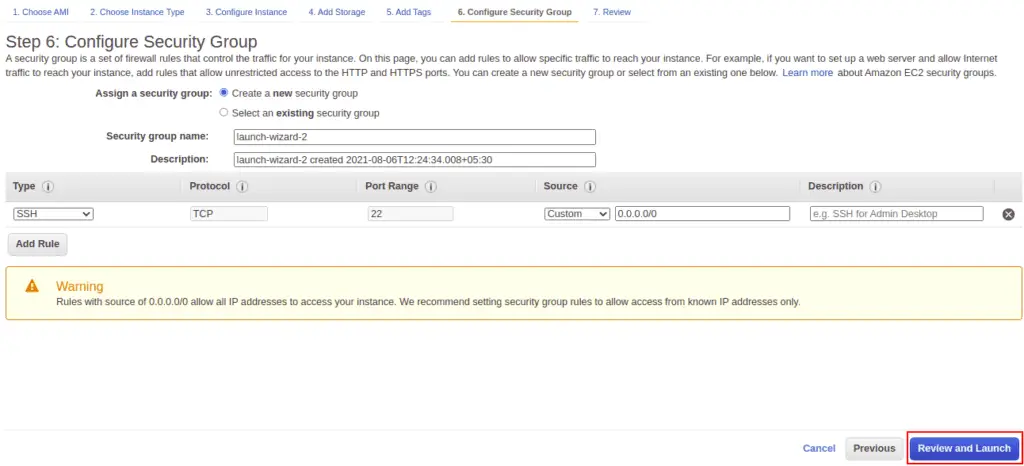
Click on Next: Configure Security Group.
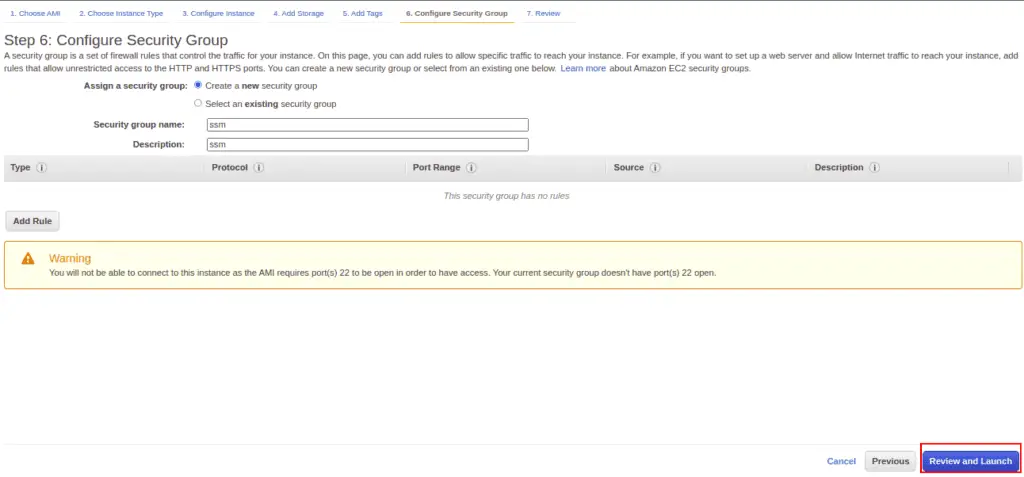
Select “Create a new security group,” provide the name and description of the security group, remove the SSH rule and click on the Review and Launch button.
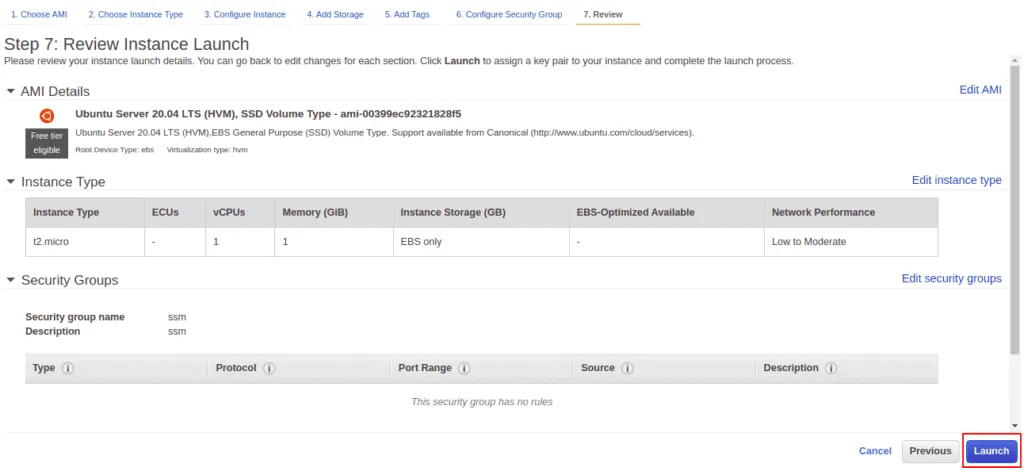
Review your instance details and click on the Launch button.
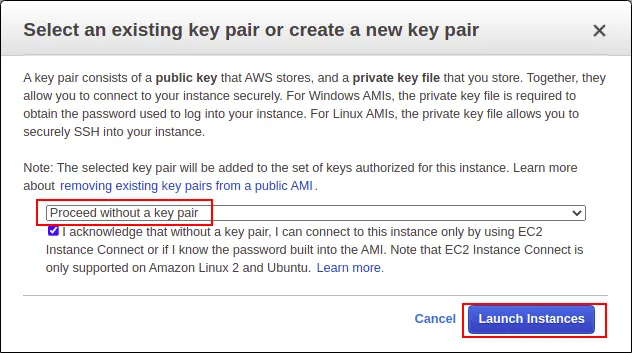
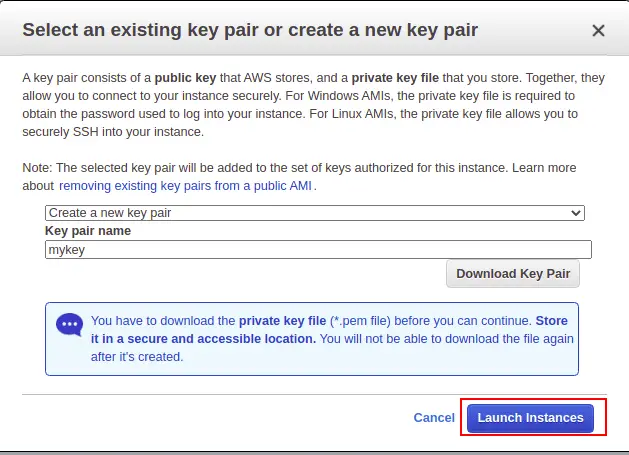
Select “Proceed without a key pair” and click on Launch Instances.
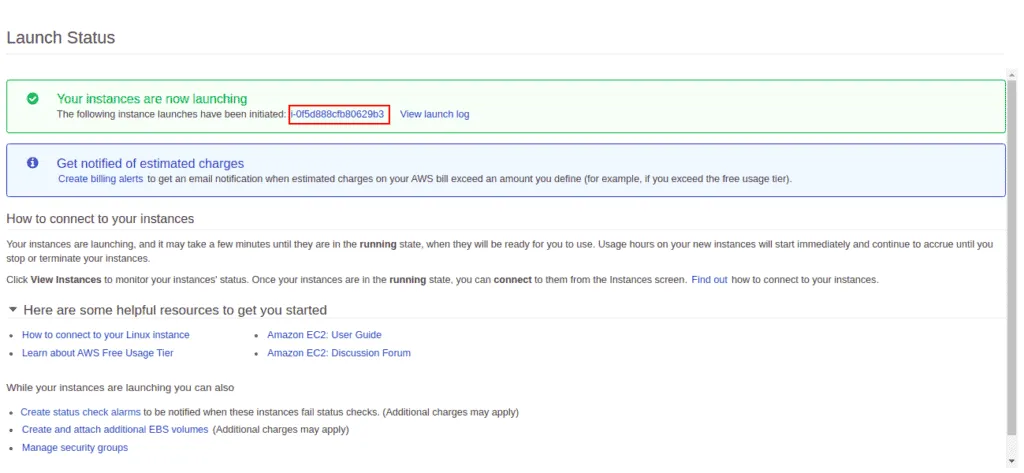
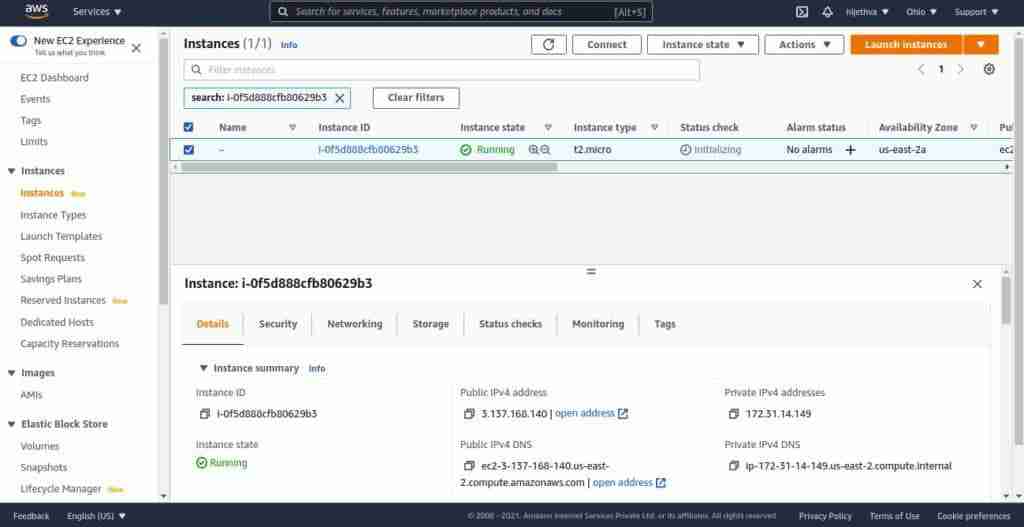
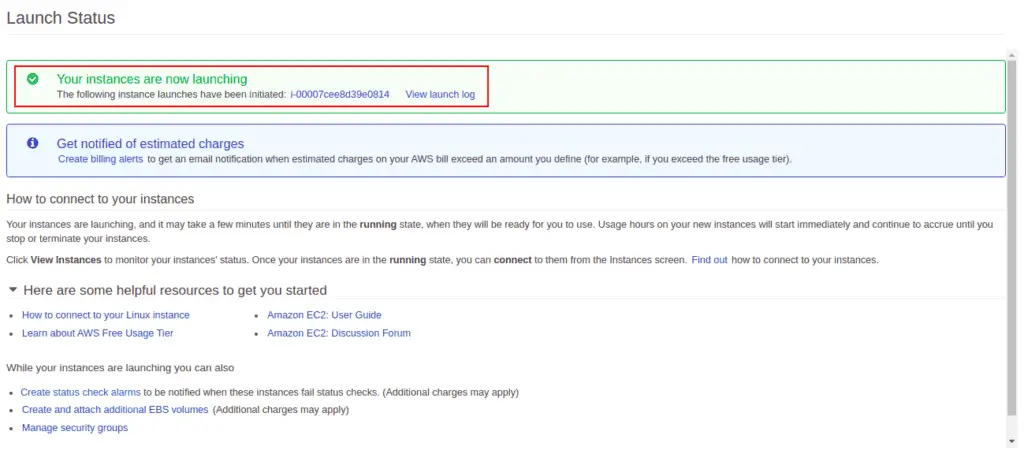
Click on instance id. You should see your newly launched instance on the following screen:
Accessing EC2 instance through Session Manager
At this point, your EC2 instance is ready. You can now connect it through Session Manager.
On the AWS console, search for System Manager.
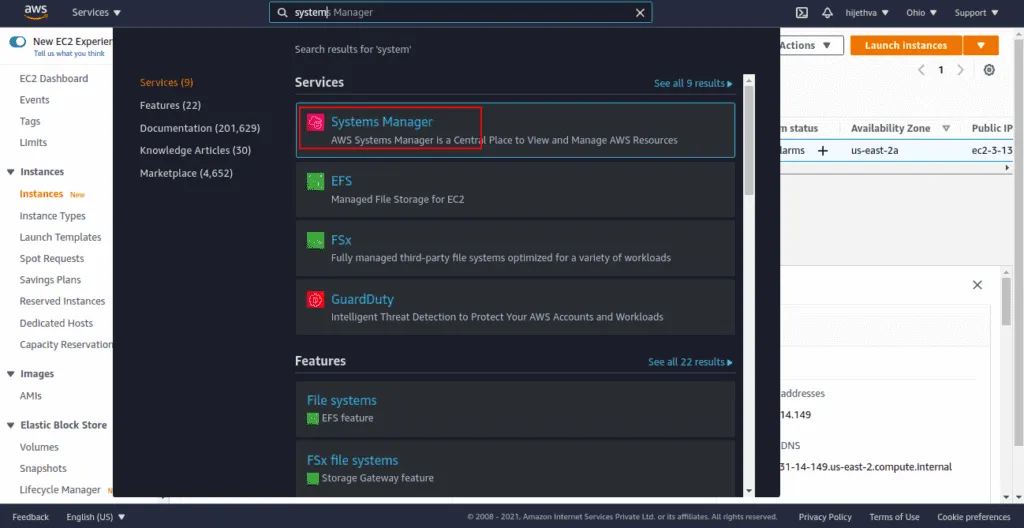
Click on System Manager.
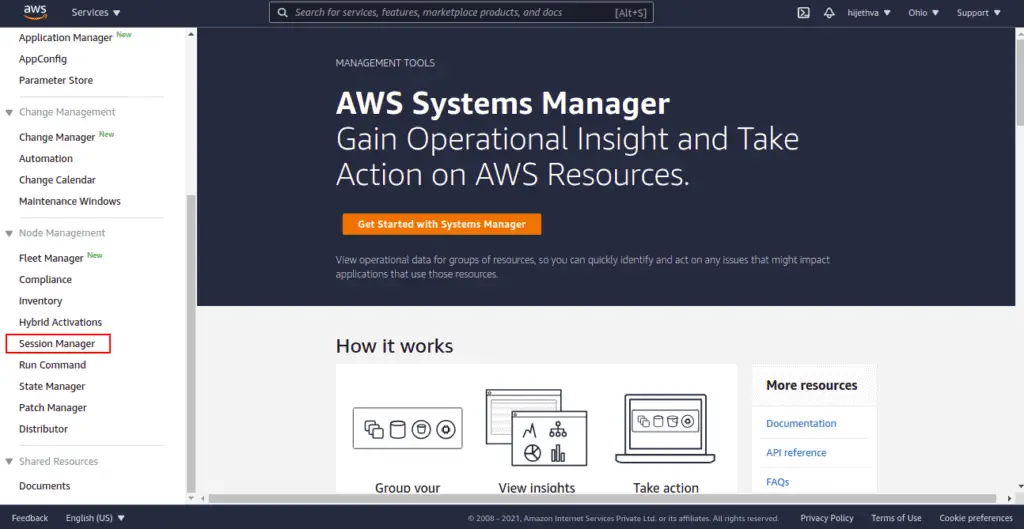
In the left pane, scroll down and click on the Session Manager.
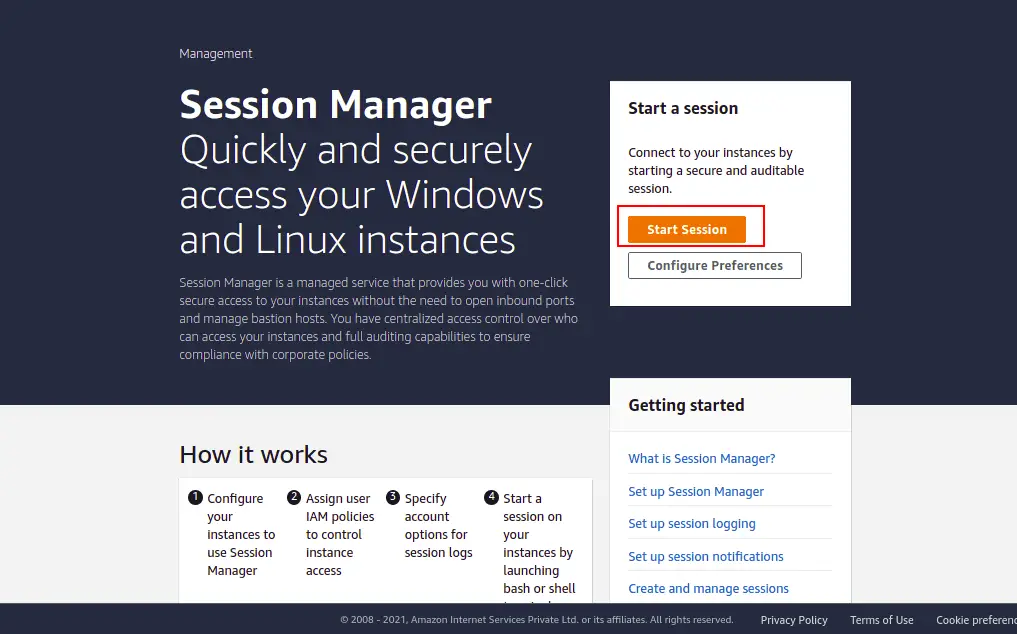
Click on Start a session.
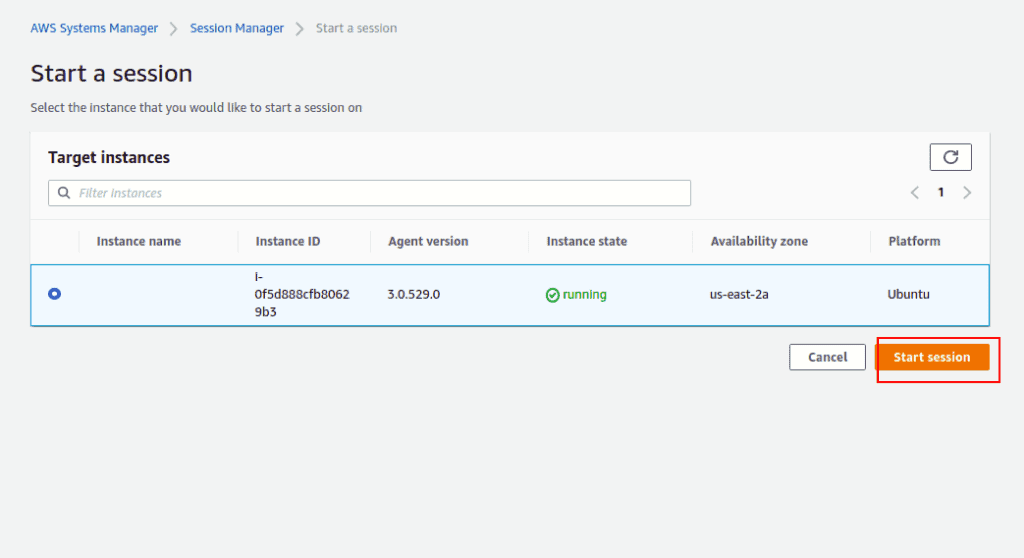
Select your running instance and click on Start session.

From here, you can run any command in the Ubuntu instance.
Logging AWS Session Manager sessions to CloudWatch
Amazon CloudWatch Logs allow you to monitor, store and access your logs from EC2 instances. In this section, we will configure CloudWatch Logs to collect AWS Session Manager session logs.
On the AWS console, search for CloudWatch.

Click on CloudWatch.
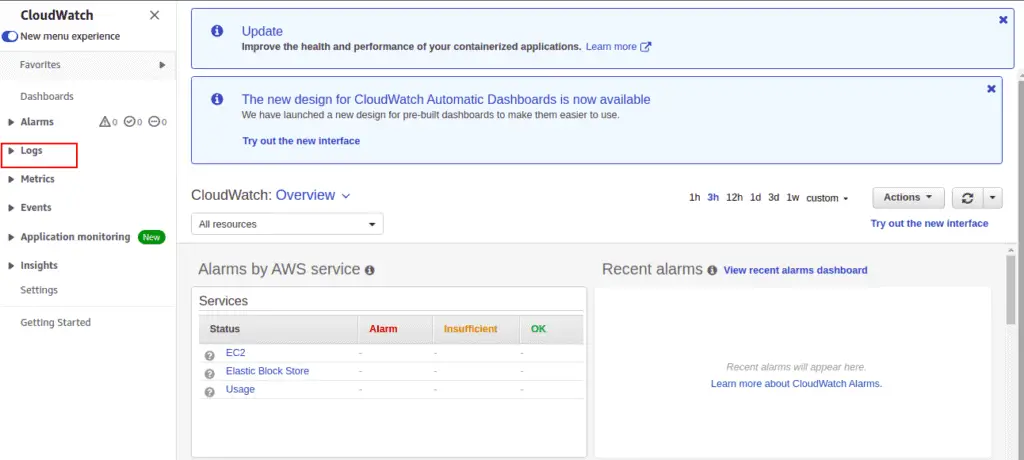
In the left pane, click on Logs => Logs groups.

Click on Create log group.
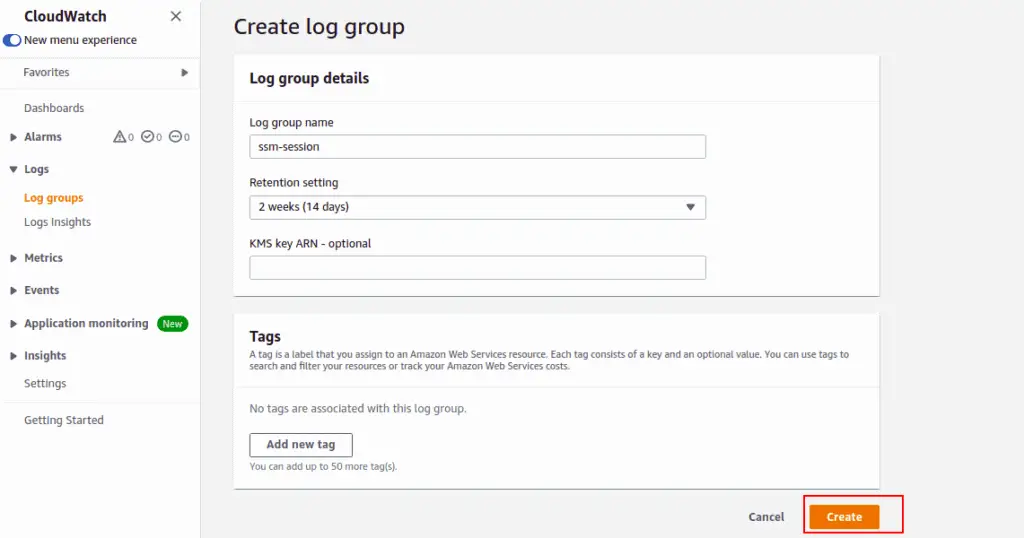
Provide your log group details and click on Create button.

Now, search for Session Manager.

Click on Session Manager.

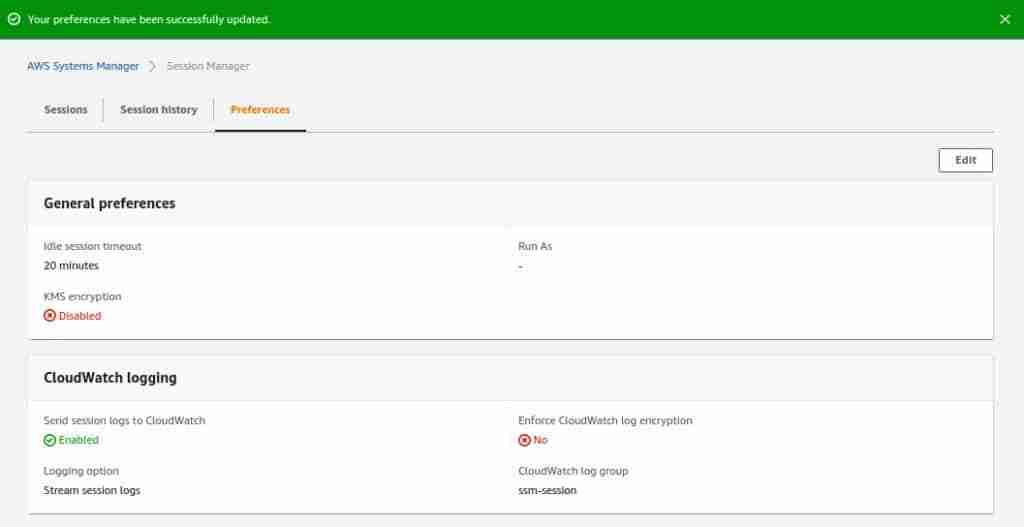
In the Preferences tab, click on the Edit button.

Enable the CloudWatch logging, select log groups, and click the Save button.
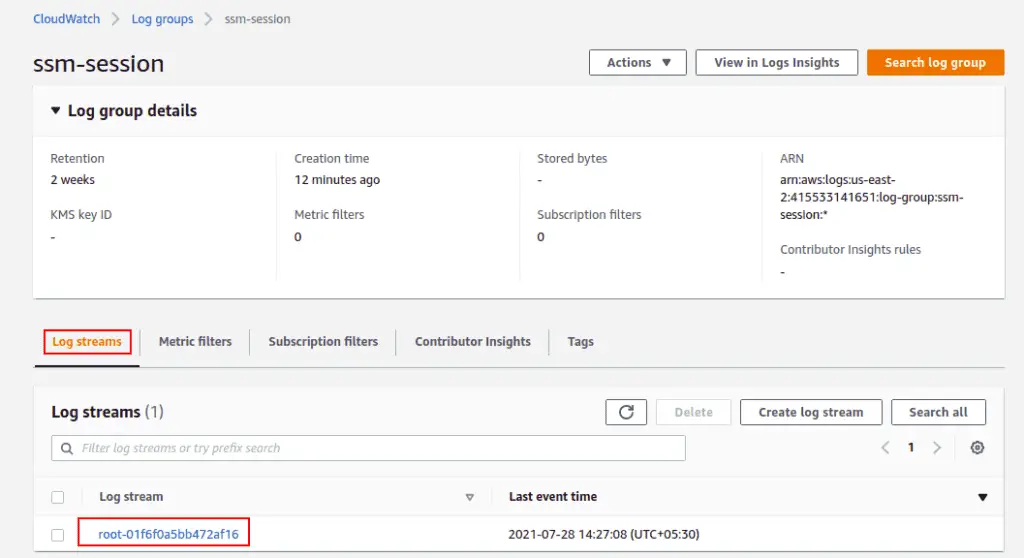
Now, open the CloudWatch => Logs => Log groups as shown below:

Click on your log group.
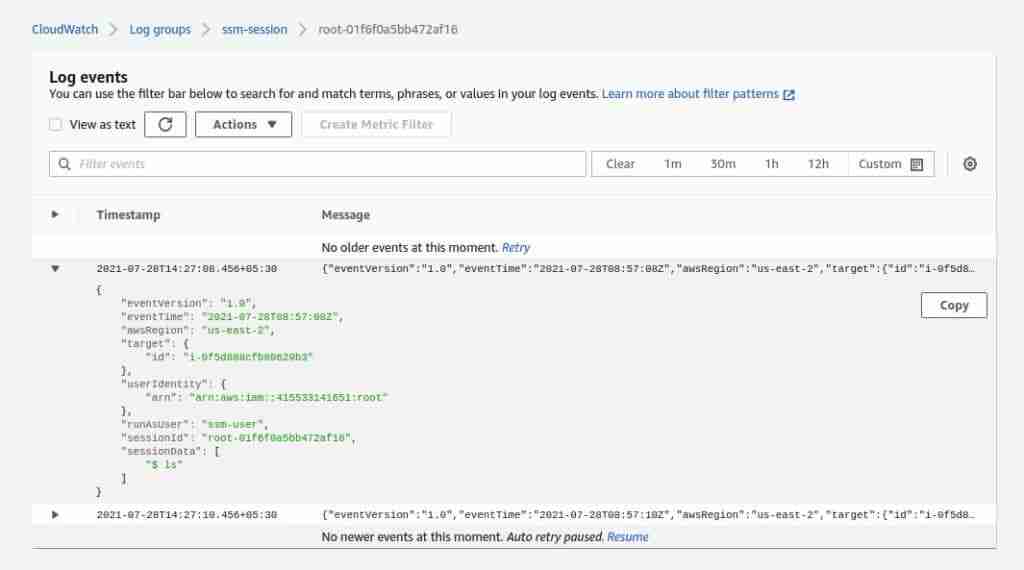
Double-click on your Log streams. You should see your Ubuntu session log in the following screen:
AWS Systems Manager Patch Manager
AWS Systems Manager Patch Manager is an AWS service that automates patching managed instances with security and other software updates and helps maintain the compliance status of your organization. You can use the AWS Systems Manager Patch Manager for your operating systems and applications.
Regarding the patch management process, we must mention that the AWS Patch Manager uses “patch baselines” configured by the rules for auto-approving patches within a few days after release. Patch baseline also includes a list of approved and rejected patches.
Purpose of AWS Systems Manager Patch Manager
Some of the main areas where AWS Systems Manager Patch Manager flaunts its importance and purpose are:
- Security – Patch management helps fix the vulnerabilities in your software and applications. AWS Systems Patch Manager helps your organization sail through susceptible security risks by integrating with AWS Identity and Access Management (IAM), AWS CloudTrail, and Amazon EventBridge.
- System Uptime – AWS Systems Manager Patch Manager ensures that all your software and applications are kept up-to-date with the introduced changes, thereby supporting system uptime.
- Compliance status – You can use AWS Systems Patch Manager to fulfill the compliance and regulatory requirements.
- Feature Improvements – AWS SSM Patch Manager can accurately do the job for you as it is not only there to fix software bugs. It can also help ensure you have the latest and greatest features/plans a product has to offer its audience.
- Enhance productivity – The AWS SSM Patch Manager runs automatically. Additionally, it comes with performance improvements for the products it applies to fix crashes. This, in turn, leads to increased productivity levels in the organization. The employees do not have to spend hours on their systems to eliminate all the issues. This eventually results in better performance and reduced downtime.
Create IAM Role for AWS Patch Manager
First, you will need to create/add an IAM role for the Patch Manager to the Instance Profile. Follow the below steps to create/modify the IAM Role for the EC2 instance:
On the AWS console, search for IAM in the search bar.
Click on IAM. You should see the IAM dashboard on the following screen:
In the left pane, click on the Roles and click on the Create role.
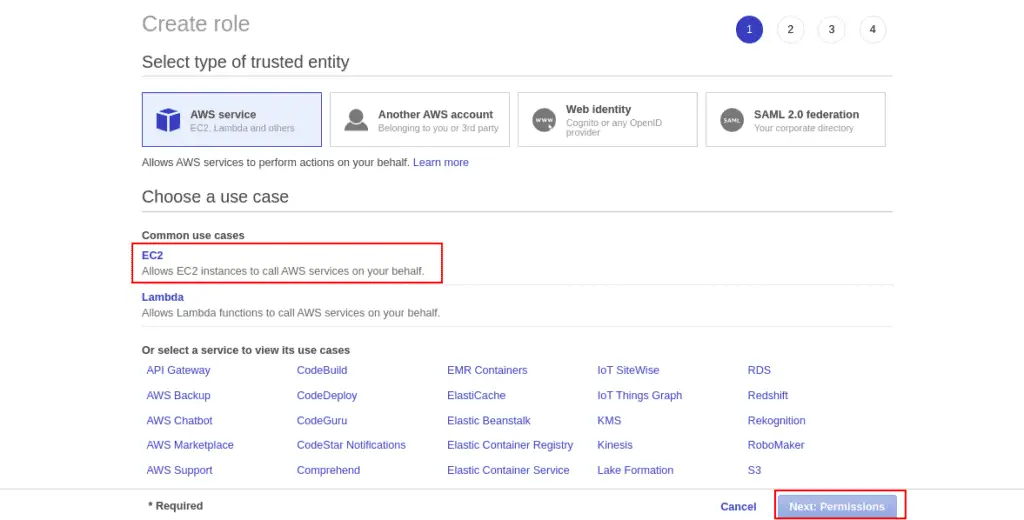
Select EC2 service and click on Next.
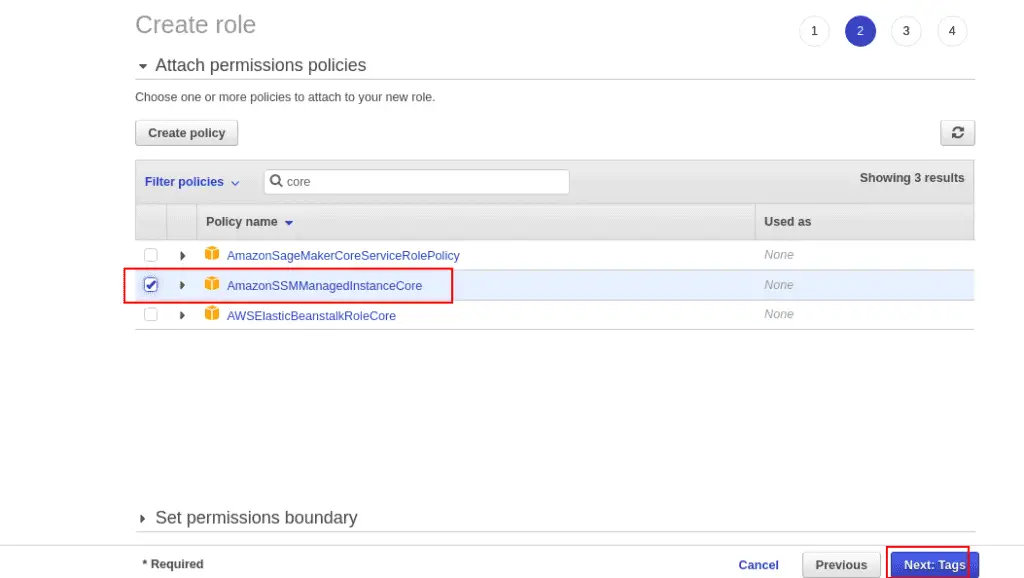
Search for core in the Filter policies, select the AmazonSSMManagedInstanceCore policy and click on the Next button.
Note: The AmazonSSMManagedInstanceCore policy contains required permissions attached to Amazon EC2 Instance Profile Role to enable AWS Systems Manager service core functionality.
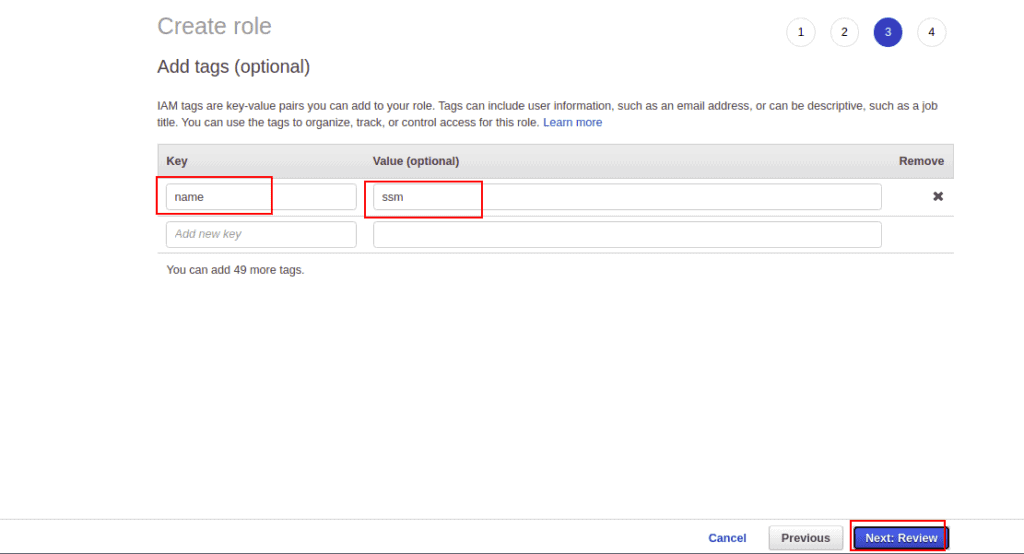
Define your Tag name and value, then click on the Next button.
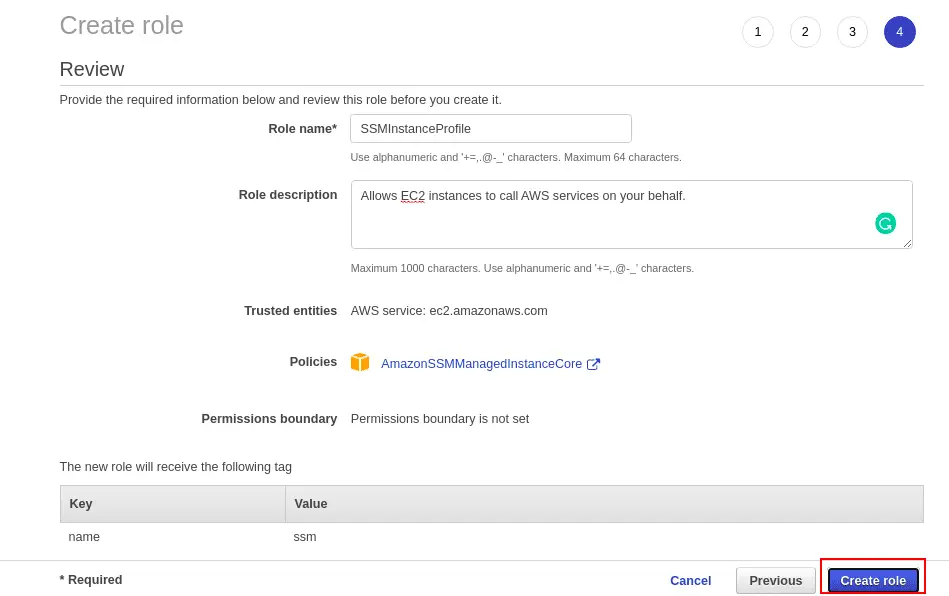
Define your Role name, and description and click on the Create role button.
Launch an EC2 Instance with IAM Role
Next, you will need to create a new EC2 instance and attach the SSM role you created in the previous section.
On the AWS console, search for EC2.
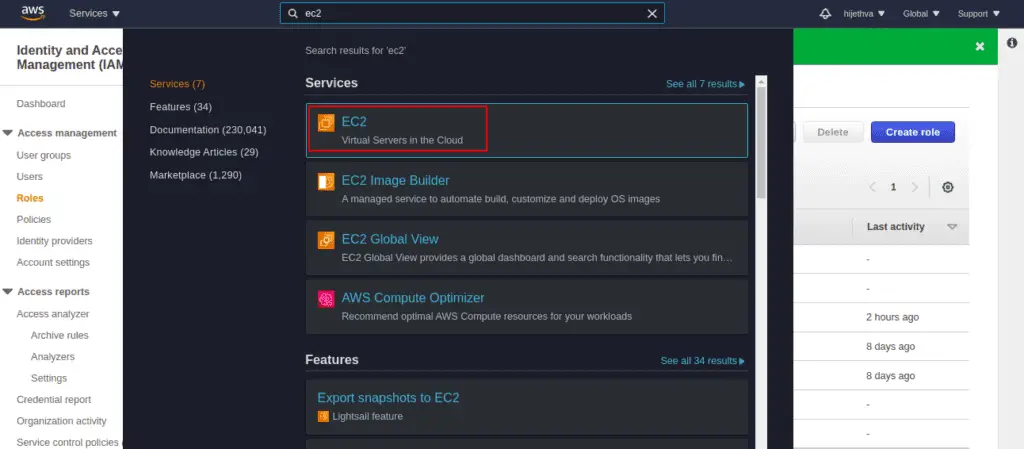
Click on EC2.
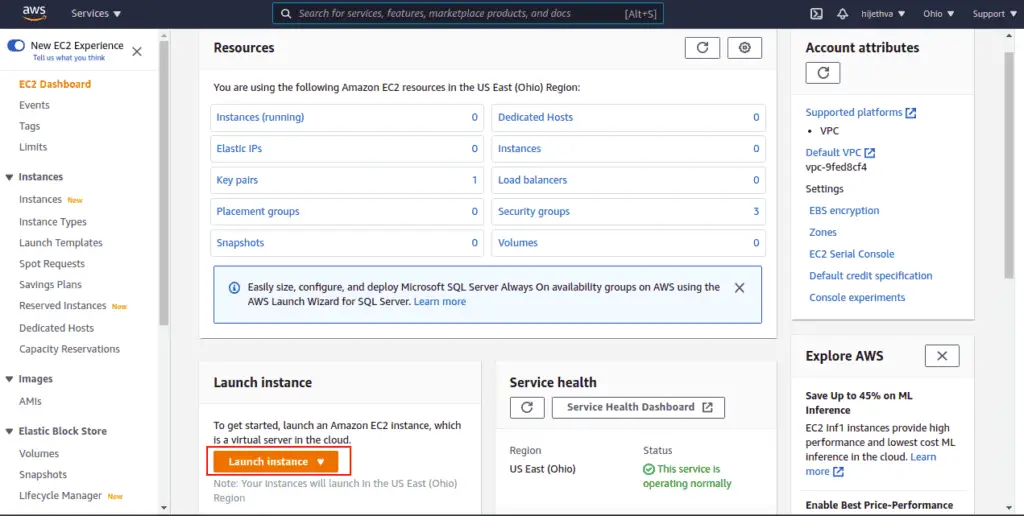
Click on Launch instance.
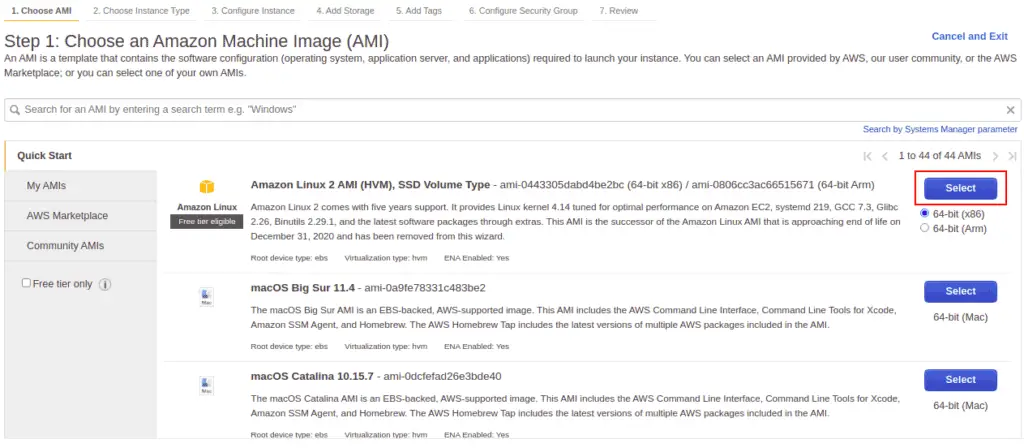
Select an Amazon Machine Image.
Select instance type and click on the Next button.
Provide your instance details, define the SSM role, and click the Next button.

Add storage and click on the Next button.
Define the Tag name and click on the Next button.
Create a new security group and click on the Next button.
Create a new SSH key pair and click on the Launch instance button.
Now, search for the Managed instances.
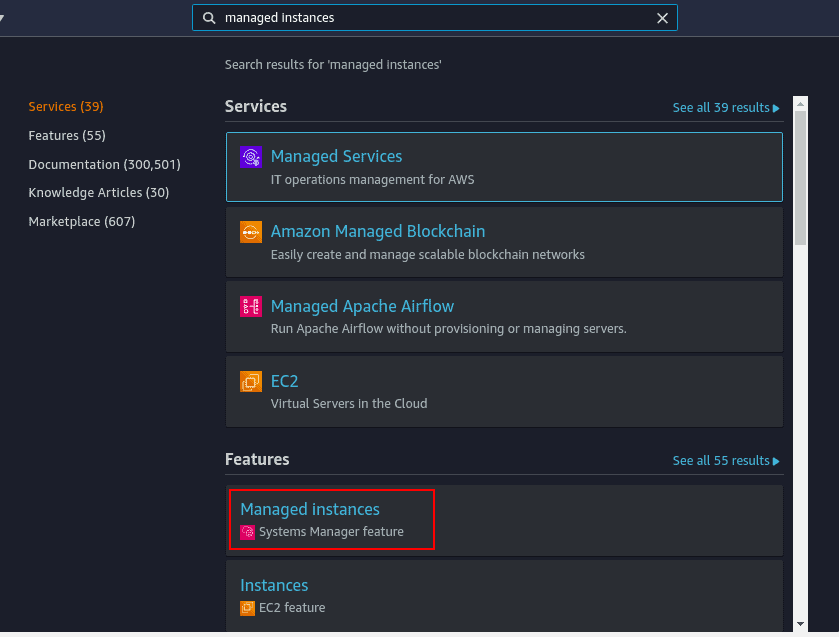
Click on the Managed Instances. You should see the status of your instance on the following screen:

Install SSM Agent on Linux and Windows Instances
By default, SSM Agent is installed on Amazon Machine Images and the following EC2 instances:
- Amazon Linux 1/2
- Amazon Linux 2 ECS-Optimized Base AMIs
- Ubuntu Server 16.04, 18.04, and 20.04
So you don’t need to install the SSM agent of the above instances.
Install SSM Agent on Linux
To install SSM Agent on CentOS 8 instance, run the following command:
sudo dnf install -y https://s3.cn-north-1.amazonaws.com.cn/amazon-ssm-cn-north-1/latest/linux_amd64/amazon-ssm-agent.rpmAfter installing the SSM agent, start the service using the following command:
sudo systemctl start amazon-ssm-agentTo install SSM Agent on Debian 9 and Debian 10 instances, run the following command:
wget https://s3.cn-north-1.amazonaws.com.cn/amazon-ssm-cn-north-1/latest/debian_amd64/amazon-ssm-agent.deb
sudo dpkg -i amazon-ssm-agent.deb
Next, start the service using the following command:
sudo systemctl status amazon-ssm-agentInstall SSM Agent on Windows
By default, the SSM agent comes pre-installed in the following Amazon Machine Images (AMIs):
- Windows Server 2008-2012 R2 AMIs published in November 2016 or later
- Windows Server 2016 and 2019
You can also download and install the latest version of the SSM agent on the Windows system. Follow the below steps to install the SSM agent to the Windows instance:
Log in to your Windows instance by using Remote Desktop.
Open the PowerShell Windows and run the following command:
Invoke-WebRequest `
    https://s3.amazonaws.com/ec2-downloads-windows/SSMAgent/latest/windows_amd64/AmazonSSMAgentSetup.exe `
    -OutFile $env:USERPROFILE\Desktop\SSMAgent_latest.exe
Start the SSM service using the following command:
Start-Process `
    -FilePath $env:USERPROFILE\Desktop\SSMAgent_latest.exe `
    -ArgumentList "/S"
Create a Patch Baseline
AWS SSM Patch Manager uses patch baselines to control what patches are installed on the instances based on the specified configuration. It also provides a set of predefined patch baselines for all operating systems. You can either use the predefined baseline or create your custom baseline. In this section, we will create a custom patch baseline.
Search for Patch Manager.
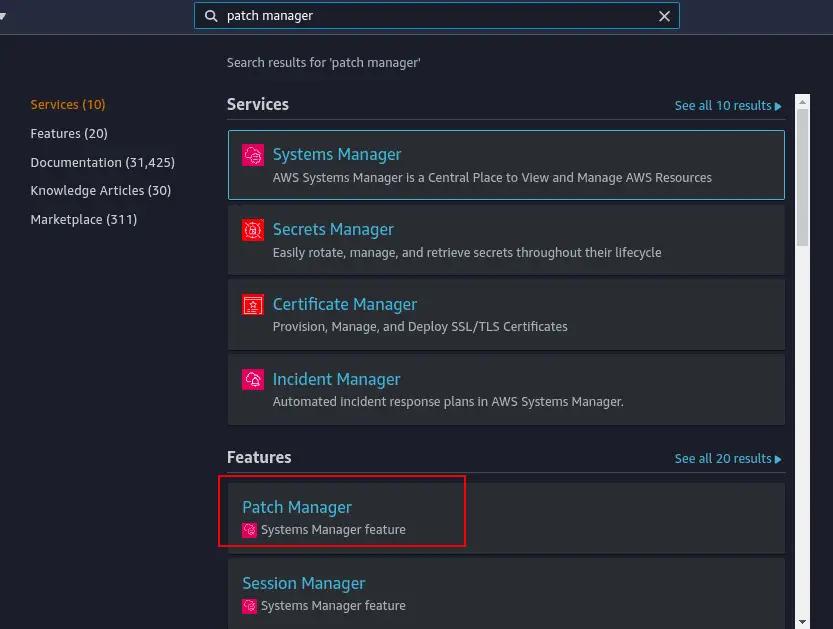
Select the Patch Manager from the menu.
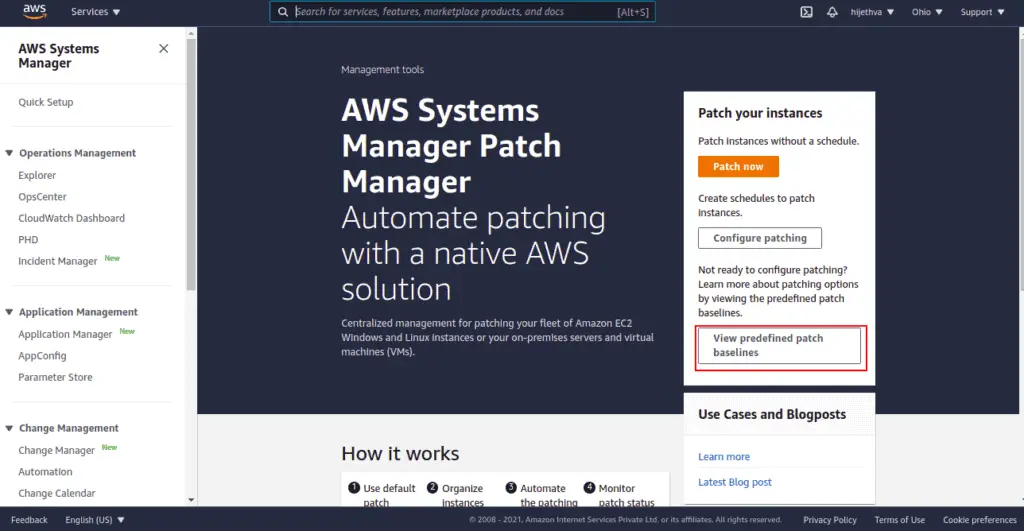
Go to the View predefined patch baselines.
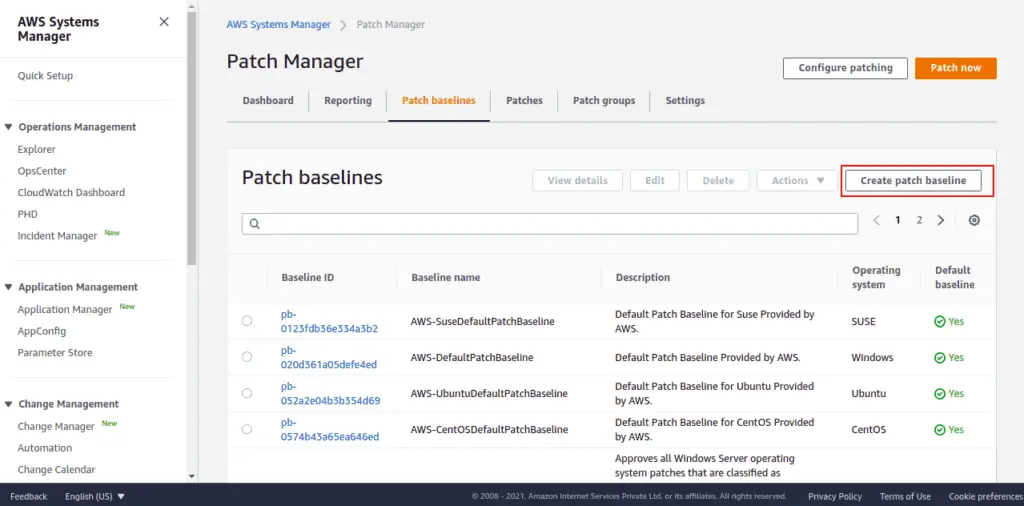
Click Create patch baseline button.
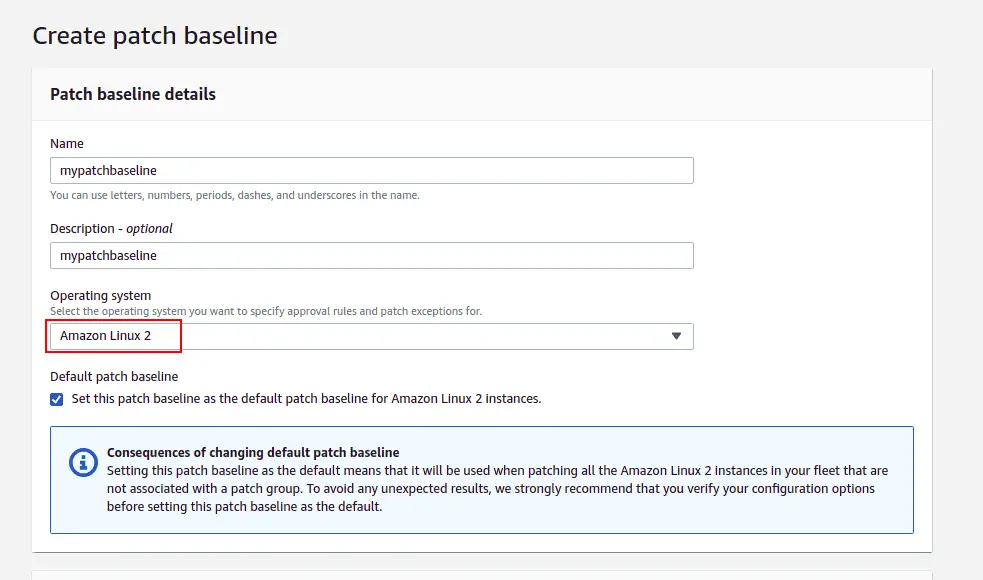

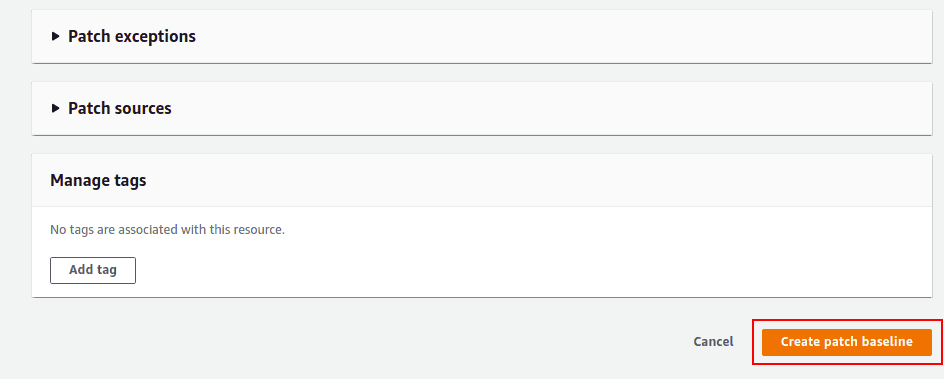
Provide your patch baseline details and rules for the operating system, and click on the Create patch baseline.

Install Patch on EC2 Instance
At this point, your patch baseline is ready to apply on your EC2 instance. Follow the below steps to install Patch on the EC2 instance.
Open the Patch Manager.
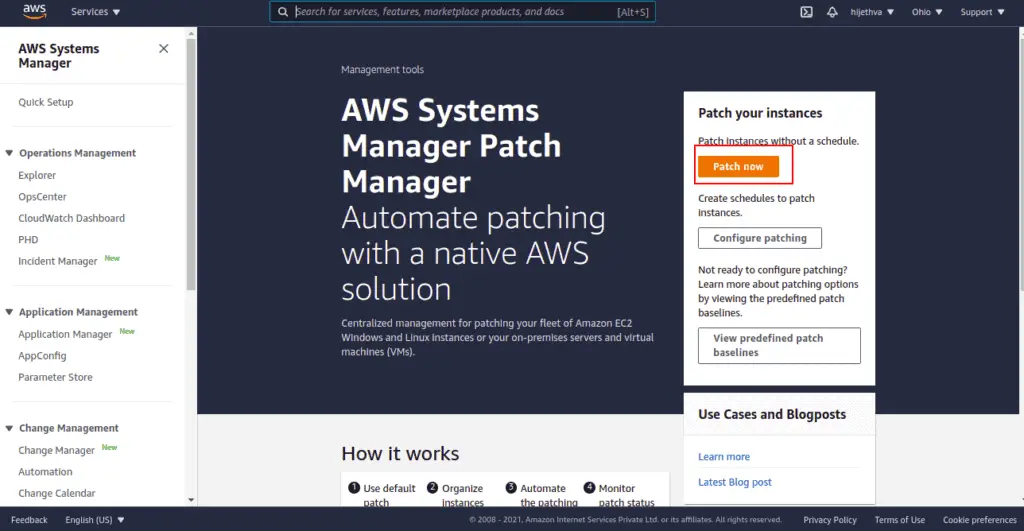
Click on Patch now button.
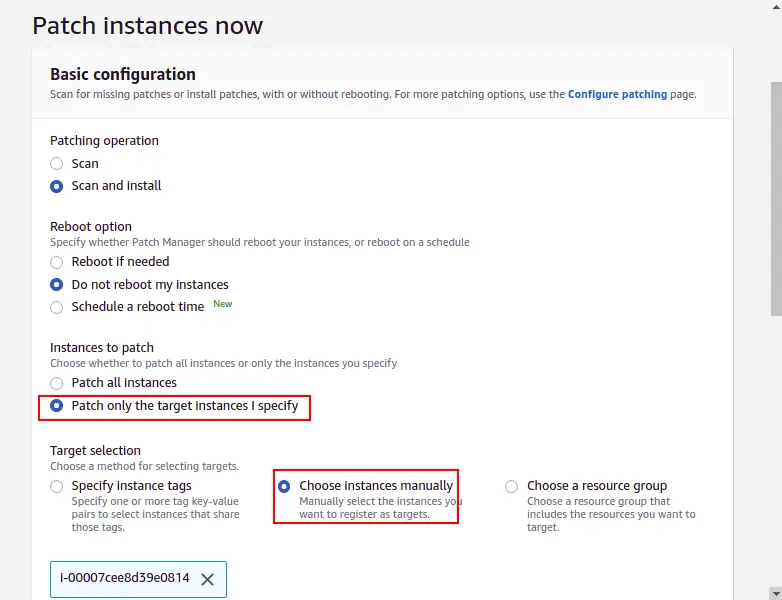

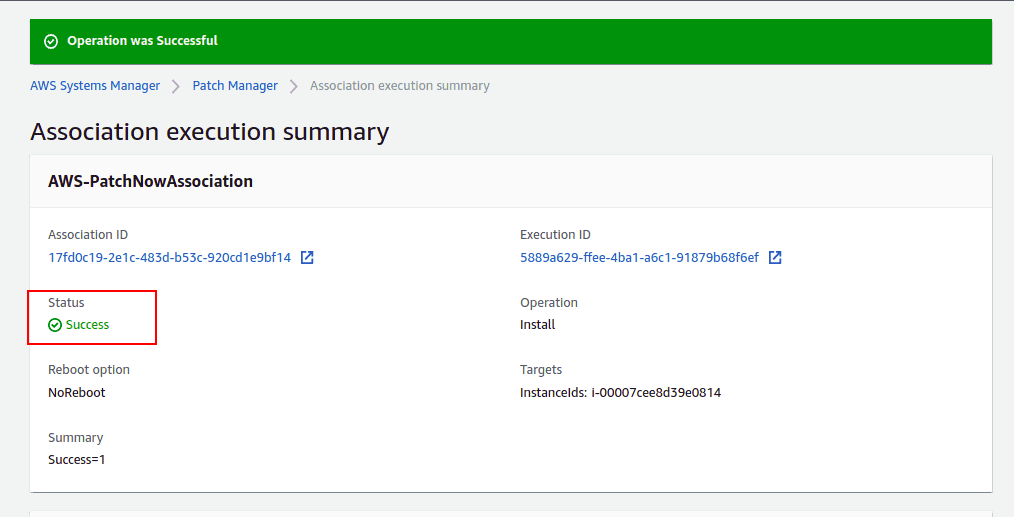
Select basic patching configuration, patch on target instances, manually choose your running instance and click the Patch now button. Once all patches are installed, you should see the following screen:
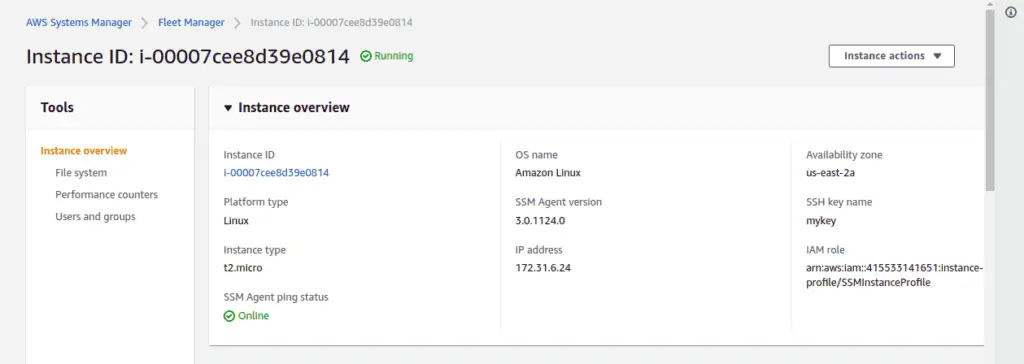
Next, open the Managed Instances as shown below:

Click on your instance id and search for State installed in the filter bar. You should see all installed patches on the following screen:

Summary
In this article, we’ve covered the AWS Systems Manager Parameter Store, Session Manager, and Patch Manager services that allow you to manage your AWS resources at scale and described how to set up and start using them.
