How to setup Cloud9 IDE for Python for cloud automation
Many integrated development environments (IDEs) available today allow you to develop code in any programming language on your local machine. The most well-known examples of such IDEs are Microsoft Visual Studio Code, PyCharm, and IntelliJ IDEA. But this article aims to cover another solution – AWS Cloud9 IDE, a cloud-based IDE that allows you to write, run, test, and debug your code with just a browser. It includes a code editor, debugger, and terminal and supports popular programming languages, including Python, JavaScript, PHP, and many others. This article will cover how to set up Cloud9 IDE to start the Python cloud automation journey.
Table of contents
Benefits of using Cloud9 IDE
There are a lot of valuable features at Cloud9 IDE, that you might be interested in. Below, I listed the most important benefits for me, but I encourage you to use the link and check all of them.
Browser based IDE
As I’ve already mentioned, Cloud9 is a cloud-based IDE used in your browser. That means the actual code is stored on an EC2 instance in the AWS cloud, and you can write, run, and debug applications with a browser without needing to install or maintain a local IDE.
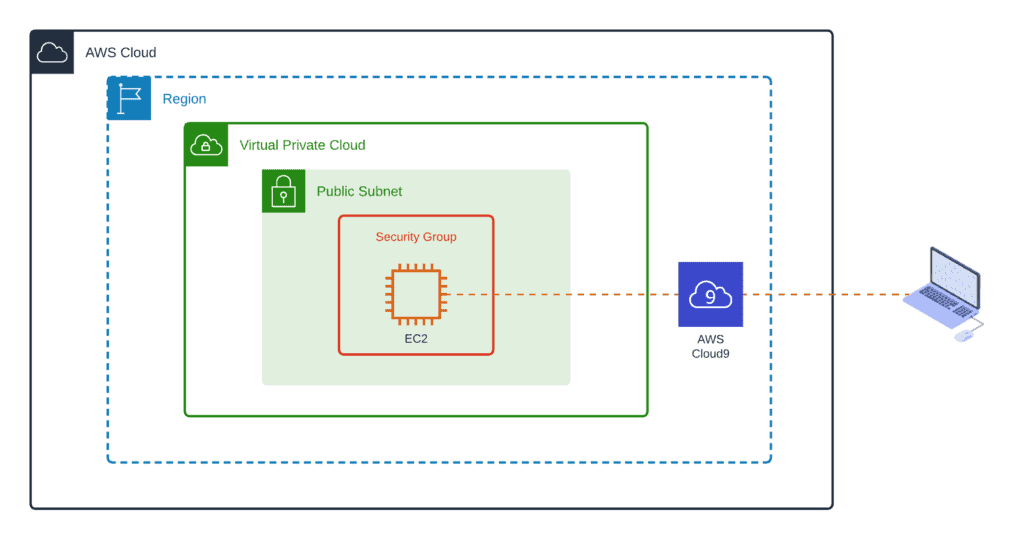
Cloud9 IDE EC2 instance can be accessed in various ways.
The direct access option will launch an Amazon EC2 instance to which the AWS Cloud9 service can connect directly over SSH. This is the most popular setup for beginners.
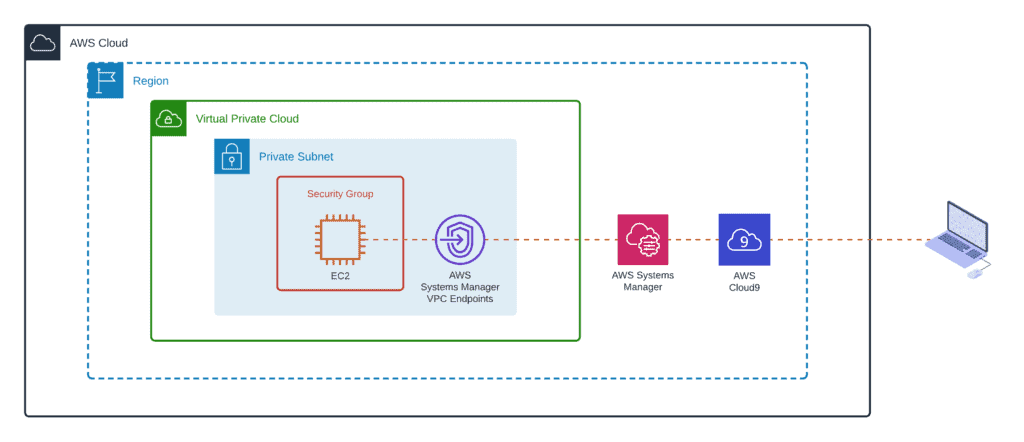
Access via Systems Manager allows to launch of an EC2 instance that doesn’t require any open inbound ports; AWS Cloud9 connects to the instance through AWS Systems Manager. This is a little bit complex but a more secure setup.
The SSH connection option allows you to use Cloud9 IDE on an existing server. This setup requires some requirements to be satisfied before you can start using this option.
For all the following Python tutorials in this blog, I recommend you move forward with the first Cloud9 IDE deployment option as the most uncomplicated and most straightforward to set up.
Development environment sharing
You can share your development environment with your team and start a pair programming session. While collaborating, your team members can see each other type in real-time and instantly chat with one another from within the IDE. This feature is convenient when I need to help others to resolve code issues.
Seamless integration with AWS
You do not have to configure any additional permissions to access cloud resources within your AWS account and services as, by default, your user account permissions are inherited. That means you can run any command from the terminal or make API calls from your code, which will be executed with your permission.
Out of the box, you’re getting the following benefits:
- You don’t need to store the permanent AWS access credentials of an AWS entities
- You don’t need to manually set up, manage, or attach an instance profile to the Amazon EC2 instance that connects to the environment.
- AWS Cloud9 continually renews its temporary credentials, so a single set of credentials can be used only for a limited time. This is an AWS security best practice.
- AWS Cloud9 restricts how its temporary credentials can access AWS actions and resources from the environment. This is also an AWS security best practice.
Of course, there are many other ways to configure Cloud9 IDE permissions, but this topic is out of the scope of this article.
Creating a Cloud9 IDE environment
In this section, I’ll show you how easy it is to launch Cloud9 IDE and start using it.
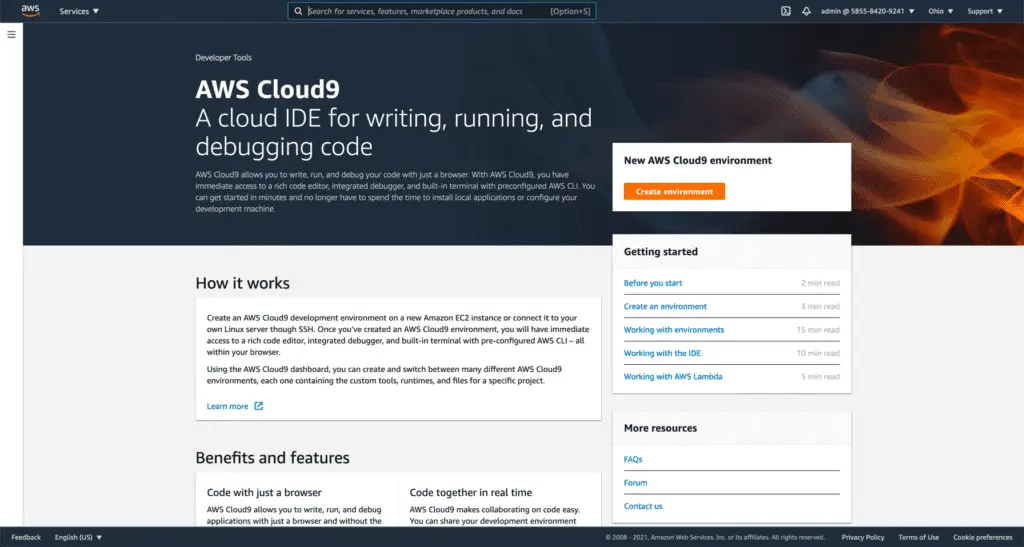
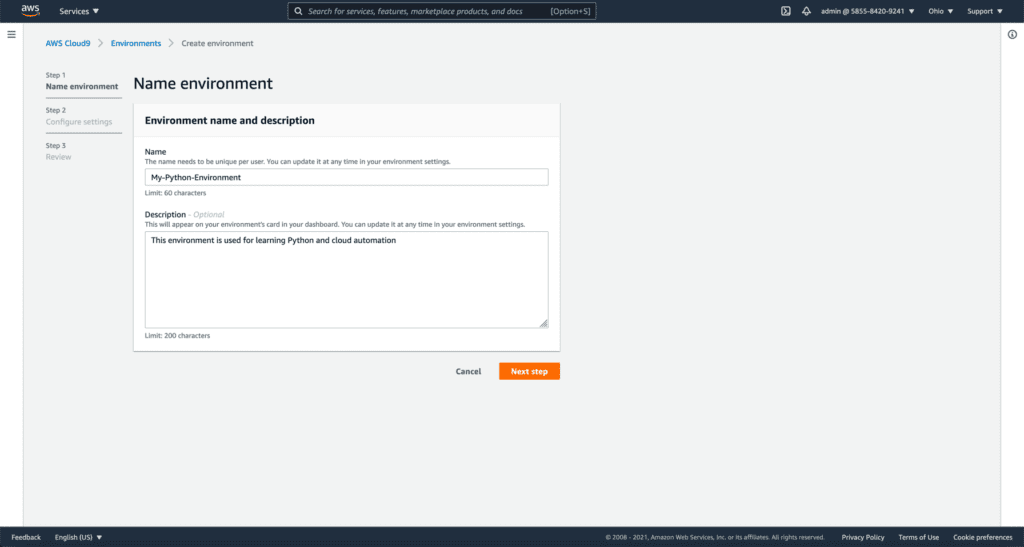
First, navigate to the Cloud9 IDE console: https://us-east-2.console.aws.amazon.com/cloud9/ and click the Create environment button.
Provide the environment Name (Description is optional) and click the Next step button.
At the next step, you may change the environment type, EC2 instance type, hibernation, networking, and other settings.

If you’re experienced using it, feel free to adjust the settings according to your needs.
For beginners, I recommend proceeding with default settings.
Click the “Next step” button as soon as you’re ready.
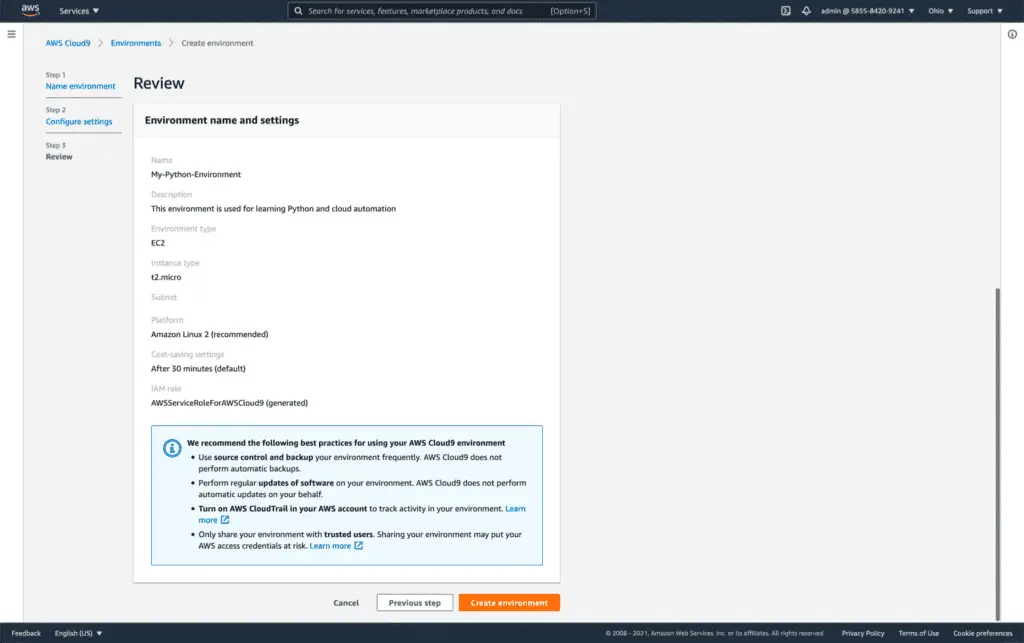
Finally, review your settings and click Create environment button.
The launching process will take a couple of minutes, and finally, you’ll see your IDE up and running.
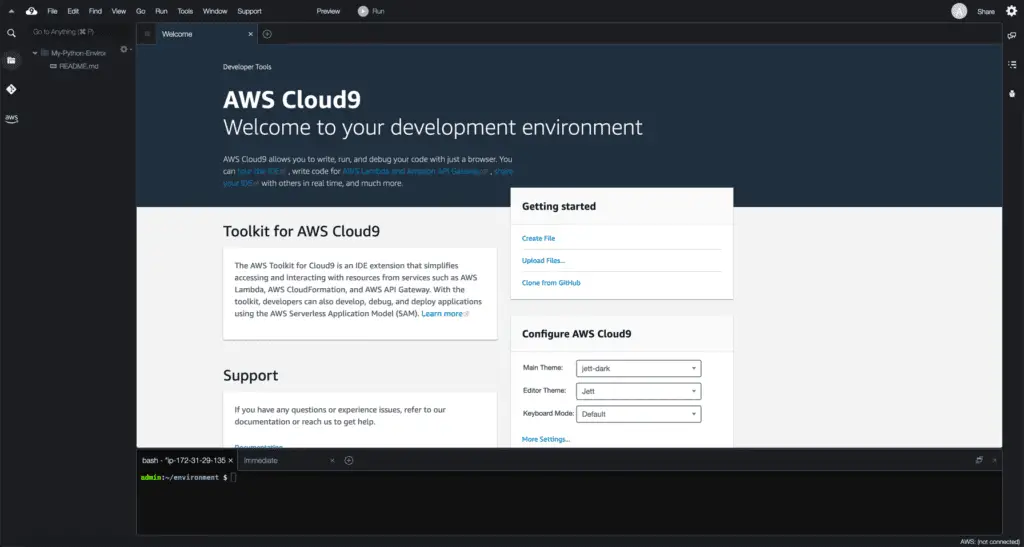
Now, you’re ready to start your Python cloud automation journey.
How much does the Cloud9 IDE cost?
Every unused Cloud9 IDE will be automatically paused when you’re not active and then started when you decide to resume your work. That allows you to pay only for what you use at the normal AWS rates for consumed resources.
AWS pricing is subject to change, but to the moment of writing this article, the pricing example illustrates that if you’re willing to use the default settings running an IDE for 4 hours per day for 20 days in a month with a 30-minute auto-hibernation setting your monthly charges for a 90 hours usage roughly would be a couple of dollars a month.
Hello World example
Let’s create a simple “Hello AWS World” Python program to print messages to the standard output.
To create this simple program:
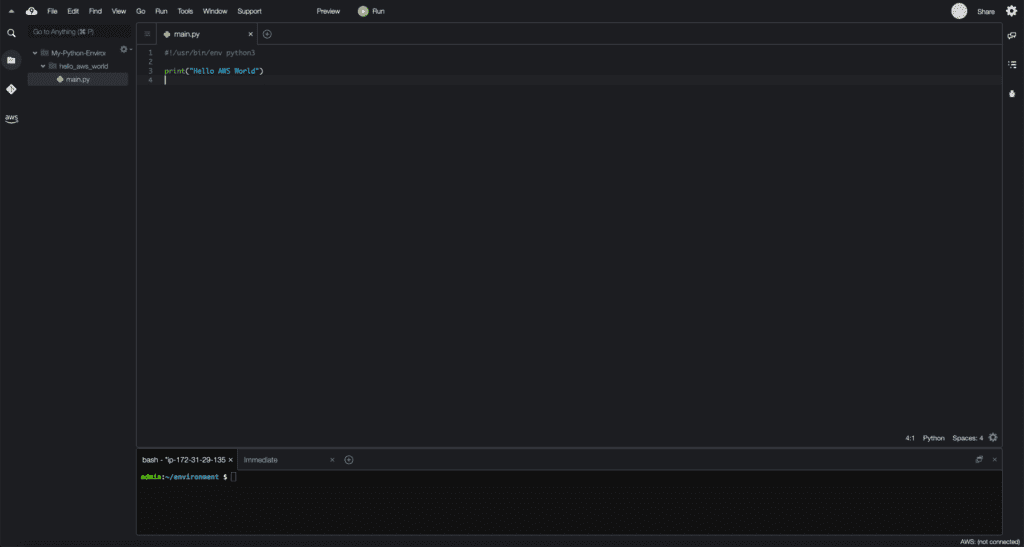
- Delete the README.md file
- Create the hello_aws_world folder inside your project structure
- Create an empty main.py file inside the hello_aws_world folder

Now open the main.py file and type the following code there:
#!/usr/bin/env python3
print("Hello AWS World")
Here’s what the final result should look like:
Here is what we just wrote:
#!/usr/bin/env python– this is a required string only if you’re willing to make this program executable from the console as a regular program; this string allows the shell to use the env utility to find a path to the Python3 interpreter, which will be used to run your programprint("Hello AWS World")– is a regular Python 3 print function that allows you to print something to the standard output (usually a terminal); in our case, it will print the “Hello AWS World” message.
Running the example
To run your program, you have two options:
- Run it directly from the Cloud9 IDE
- Run it from the terminal
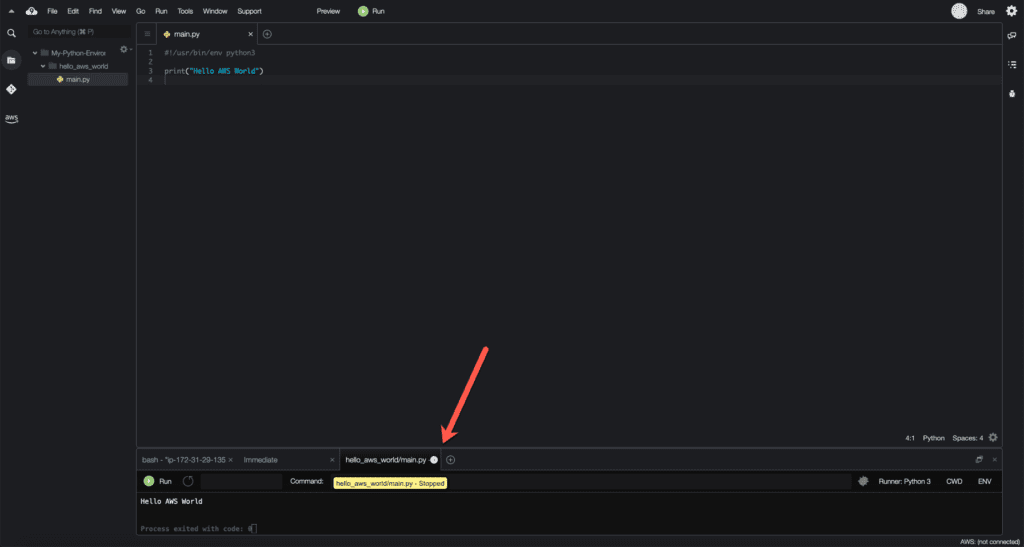
To run the program from the IDE, click the Run button. You should see a “Hello AWS World” message if you do not have any typos.

Now close the program execution output tab.
Now, let’s run the same program from the terminal.
There are two ways of doing this:
- Run the program using
python3command - Make the program executable and run it as a regular executable
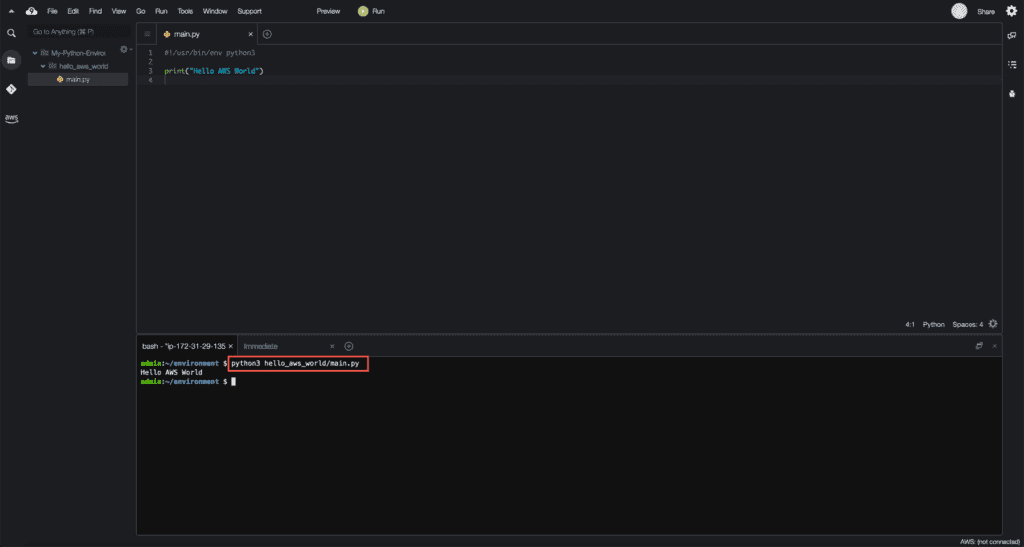
To run the program using the python3 command, execute the following command in the terminal:
python3 hello_aws_world/main.pyYou should see the same result:
And finally, let’s make the program executable and run it as a regular executable.
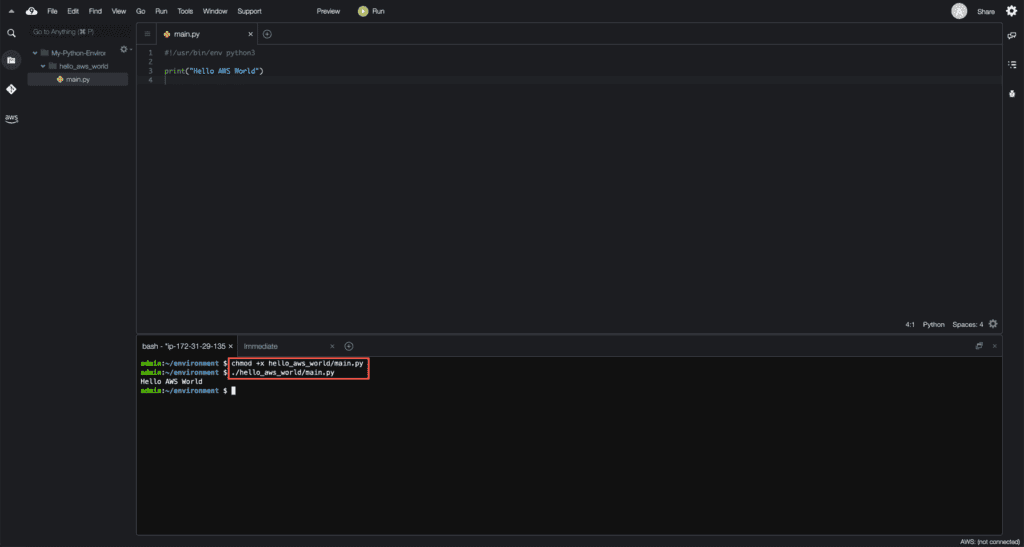
Use chmod command to make the program executable (-x argument):
chmod +x hello_aws_world/main.pyNow, you can run it as a regular executable command in Linux:
./hello_aws_world/main.pyThe expected result is down below:
Summary
In this article, we’ve covered how to set up Cloud9 IDE for Python for cloud automation. AWS Cloud9 IDE – a cloud-based IDE that allows you to write, run, test, and debug your code with a browser. Cloud9 IDE includes a code editor, debugger, and terminal and supports popular programming languages, including Python, JavaScript, PHP, and many others.
