AWS Batch enables developers, scientists, and engineers to quickly and efficiently run hundreds of thousands of batch computing jobs on AWS. AWS Batch dynamically provisions the optimal quantity and type of computing resources (e.g., CPU or memory-optimized instances) based on the volume and specific resource requirements of the batch jobs submitted.
This Boto3 Batch tutorial covers how to work with AWS Batch in Python using the Boto3 library by implementing a job that imports records into the DynamoDB table from a file uploaded into the S3 bucket.
Table of contents
If you’re new to the Boto3 library, we encourage you to check out the Introduction to Boto3 library article.
Prerequisites
Let’s create a Docker container and IAM role for AWS Batch job execution, DynamoDB table, and S3 bucket.
Docker container
You can skip this section and use an already existing Docker image from Docker Hub: luckytuvshee/importuser:latest.
First, we must create a Docker image responsible for the computing task we’ll run as an AWS Batch job.
Here’s a working folder structure:
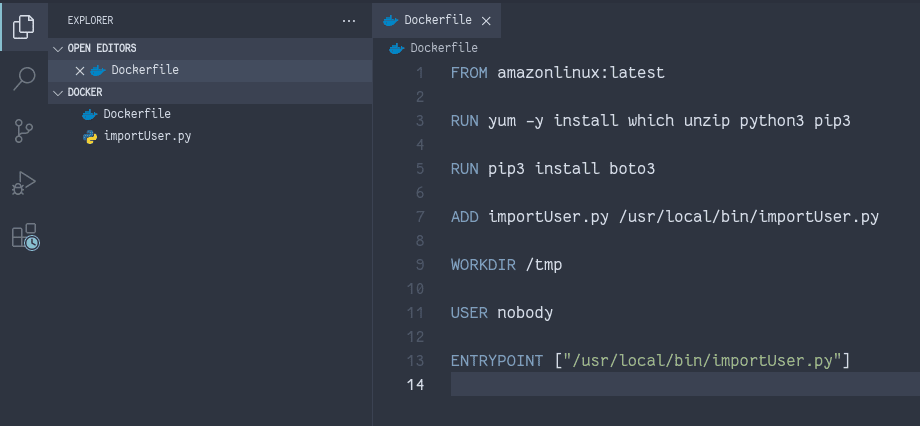
The content of the Dockerfile:
FROM amazonlinux:latest
RUN yum -y install which unzip python3 pip3
RUN pip3 install boto3
ADD importUser.py /usr/local/bin/importUser.py
WORKDIR /tmp
USER nobody
ENTRYPOINT ["/usr/local/bin/importUser.py"]
Now, let’s create the importUser.py Python script that imports data from a CSV file uploaded to the S3 bucket into the DynamoDB table:
#!/usr/bin/python3
import os
import boto3
import csv
from datetime import datetime, timezone

s3_resource = boto3.resource('s3')
print('os environ:', os.environ)
table_name = os.environ['table_name']
bucket_name = os.environ['bucket_name']
key = os.environ['key']
table = boto3.resource('dynamodb').Table(table_name)
csv_file = s3_resource.Object(bucket_name, key)
items = csv_file.get()['Body'].read().decode('utf-8').splitlines()
reader = csv.reader(items)
header = next(reader)
current_date = datetime.now(timezone.utc).isoformat()[:-6] + 'Z'
for row in reader:
    table.put_item(
        Item={
            'id': row[header.index('id')],
            'number': row[header.index('number')],
            'createdAt': current_date,
        }
    )
print('records imported successfully')
Additional information:
Let’s build a Docker image:
docker build -f Dockerfile -t luckytuvshee/importuser .As soon as the image has been built, you can push it to the Docker registry:
docker push luckytuvshee/importuserDynamoDB table
Let’s create a DynamoDB table that stores records imported by the AWS Batch job.
Additional information: Boto3 DynamoDB – Complete Tutorial
import boto3
dynamodb = boto3.resource('dynamodb')
response = dynamodb.create_table(
    TableName='batch-test-table',
    KeySchema=[
        {
            'AttributeName': 'id',
            'KeyType': 'HASH'
        }
    ],
    AttributeDefinitions = [
        {
            'AttributeName': 'id',
            'AttributeType': 'S'
        },
    ],
    ProvisionedThroughput={
        'ReadCapacityUnits':1,
        'WriteCapacityUnits':1
    }
)
print(response)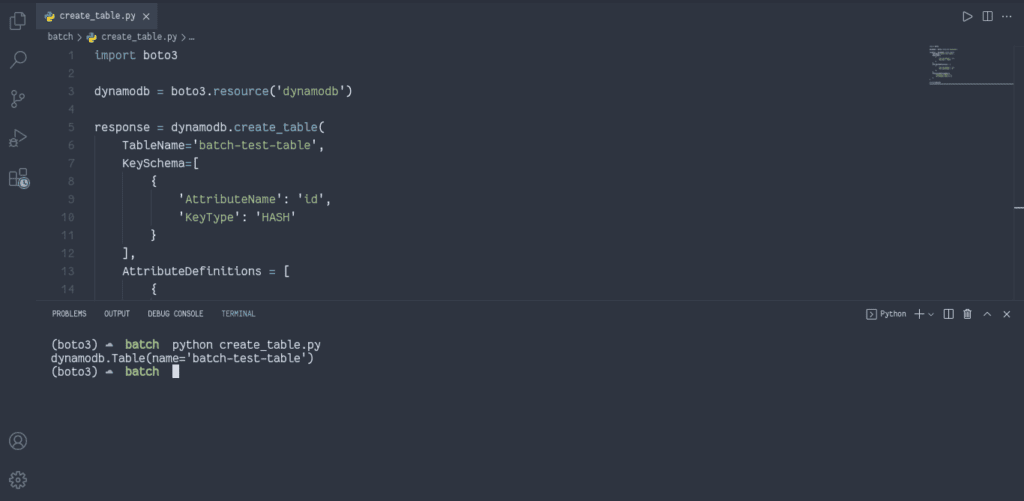
S3 bucket
Now, we need to create an S3 bucket, which will store uploaded CSV files. The AWS Batch job will process these files.
Additional information: Boto3 S3 – Complete Tutorial
import boto3
s3 = boto3.resource('s3')
response = s3.create_bucket(
    Bucket='batch-test-bucket-ap-1',
    CreateBucketConfiguration={
        'LocationConstraint': 'ap-northeast-1'
    }
)
print(response)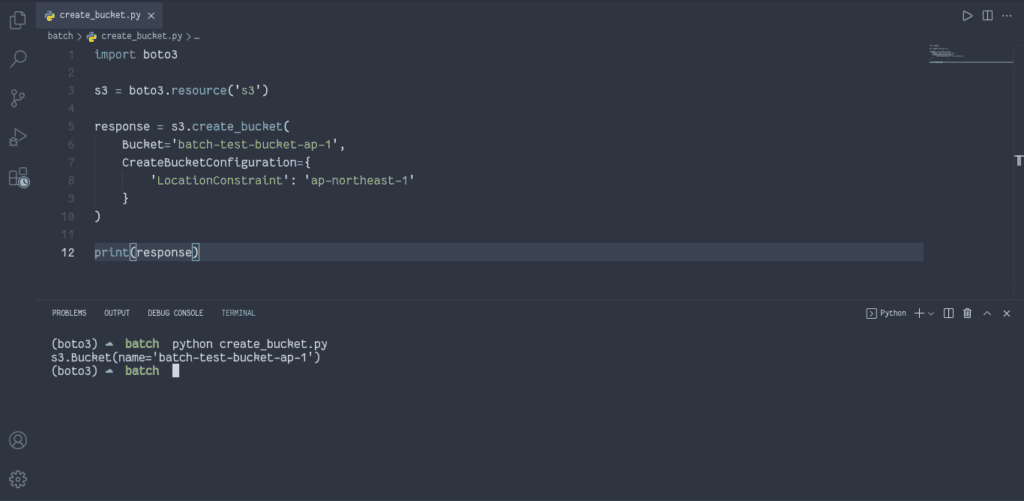
CSV file example
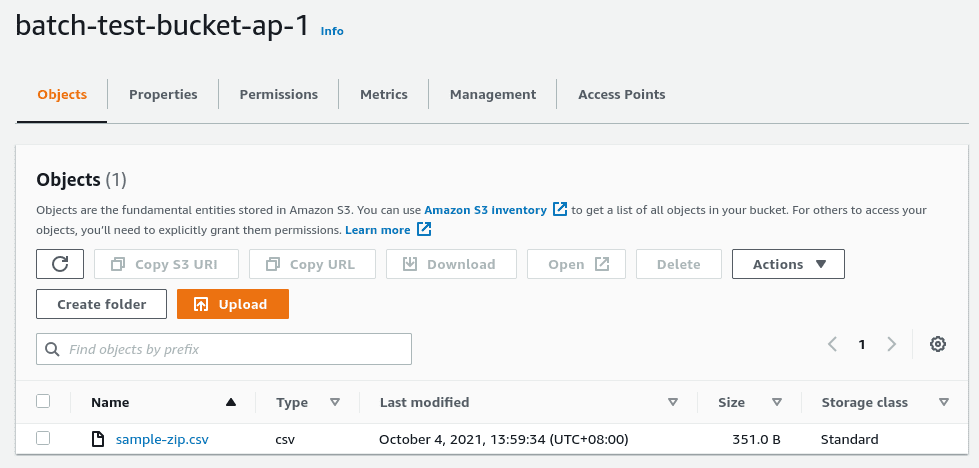
Here’s an example of the CSV file data, which we’ll upload to the S3 bucket:
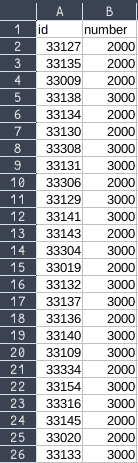
We’ll name this file sample-zip.csv. Let’s put it into the S3 bucket:
AWS Batch job’s IAM role
Now, let’s create the IAM role for the Docker Container to run the Python Boto3 script.
This role requires access to the DynamoDB, S3, and CloudWatch services. For simplicity, we’ll use theAmazonDynamoDBFullAccess,AmazonS3FullAccess, andCloudWatchFullAccess managed policies, but we strongly encourage you to make a custom role with only the necessary permissions.
Additional information: Boto3 IAM – Complete Tutorial
import boto3
import json
client = boto3.client('iam')
assume_role_policy = {
    "Version": "2012-10-17",
    "Statement": [
        {
            "Effect": "Allow",
            "Principal": {
                "Service": "ecs-tasks.amazonaws.com"
            },
            "Action": "sts:AssumeRole"
        }
    ]
}
response = client.create_role(
    RoleName='dynamodbImportRole',
    AssumeRolePolicyDocument=json.dumps(assume_role_policy)
)
client.attach_role_policy(
    RoleName=response['Role']['RoleName'],
    PolicyArn='arn:aws:iam::aws:policy/AmazonDynamoDBFullAccess'
)
client.attach_role_policy(
    RoleName=response['Role']['RoleName'],
    PolicyArn='arn:aws:iam::aws:policy/AmazonS3FullAccess'
)
client.attach_role_policy(
    RoleName=response['Role']['RoleName'],
    PolicyArn='arn:aws:iam::aws:policy/CloudWatchFullAccess'
)
print(response)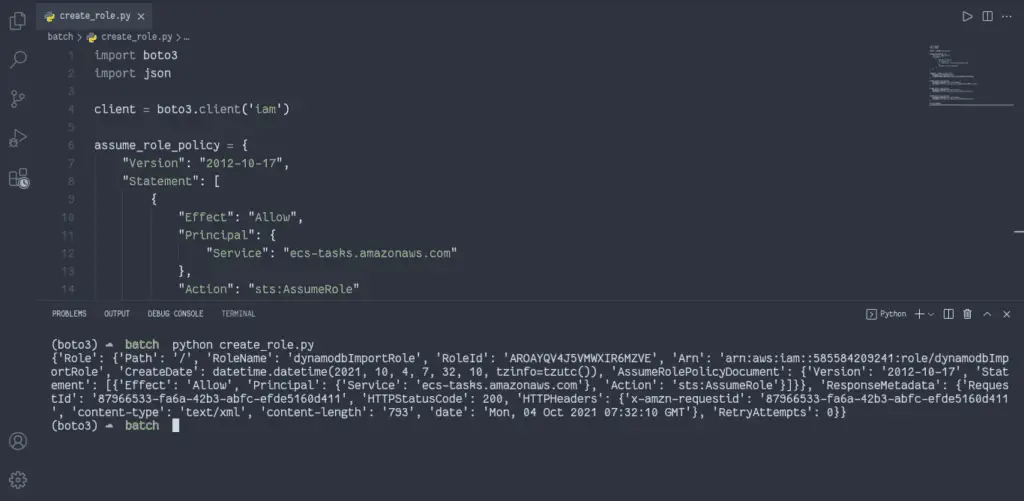
Boto3 Batch – Creating compute environment
This article section will cover how to manage the AWS Batch service and create and run the AWS Batch job.
Create AWS Batch compute environment
To create a computing environment for AWS Batch, you need to use thecreate_compute_environment() method of the AWS Batch Boto3 client.
AWS Batch job queues are mapped to one or more compute environments:
MANAGED– the managed compute environments launch Amazon ECS container instances into the VPC and subnets you specify when creating the compute environment. Amazon ECS container instances need external network access to communicate with the Amazon ECS service endpoint.UNMANAGED– In an unmanaged compute environment, you manage your own compute resources. You must verify that the AMI you use for your compute resources meets the Amazon ECS container instance AMI specification.
You can also set the instance type to optimal, which means AWS will evaluate the job and look at what kind of job is a CPU requirement job, is it memory dependent job, or is it a combination of different other requirements and will select the correct instance for the job to be executed.
import boto3
client = boto3.client('batch')
response = client.create_compute_environment(
    computeEnvironmentName='dynamodb_import_environment',
    type='MANAGED',
    state='ENABLED',
    computeResources={
        'type': 'EC2',
        'allocationStrategy': 'BEST_FIT',
        'minvCpus': 0,
        'maxvCpus': 256,
        'subnets': [
            'subnet-0be50d51',
            'subnet-3fd16f77',
            'subnet-0092132b',
        ],
        'instanceRole': 'ecsInstanceRole',
        'securityGroupIds': [
            'sg-851667c7',
        ],
        'instanceTypes': [
            'optimal',
        ]
    }
)
print(response)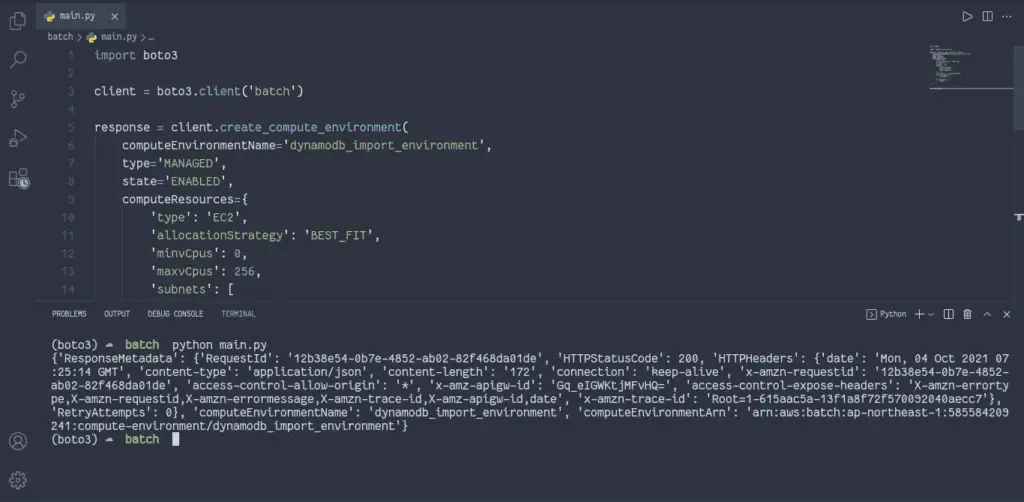
Create AWS Batch job queue
To create a job queue for AWS Batch, you need to use thecreate_job_queue() method of the AWS Batch Boto3 client.
Jobs are submitted to a job queue, where they reside until they can be scheduled to a compute resource. Information related to completed jobs persists in the queue for 24 hours.
When you’re creating a queue, you have to define the queue state (ENABLED or DISABLED).
You can have different types of queues with varying kinds of priorities.
import boto3
client = boto3.client('batch')
response = client.create_job_queue(
    jobQueueName='dynamodb_import_queue',
    state='ENABLED',
    priority=1,
    computeEnvironmentOrder=[
        {
            'order': 100,
            'computeEnvironment': 'dynamodb_import_environment'
        },
    ],
)
print(response)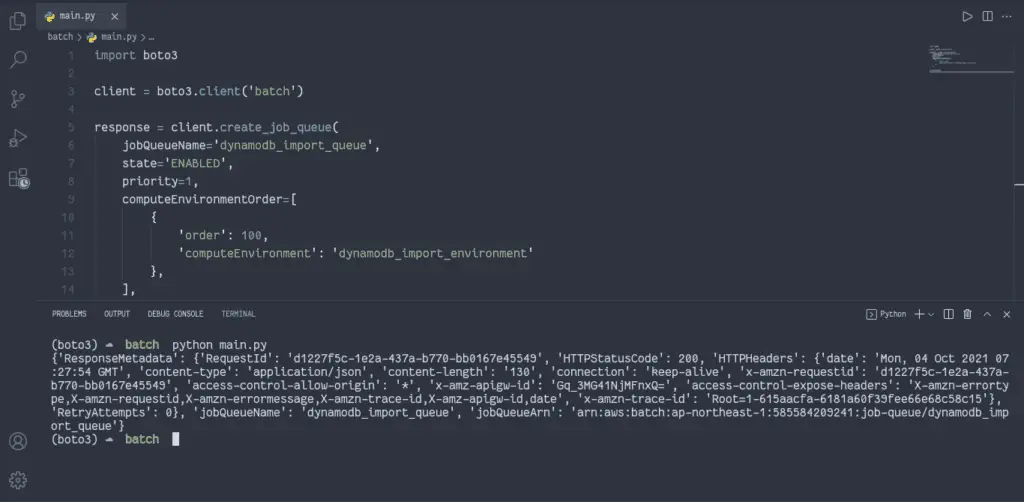
Register AWS Batch job definition
To register a job definition in AWS Batch, you need to use theregister_job_definition() method of the AWS Batch Boto3 client.
AWS Batch job definitions specify how batch jobs need to be run.
Here are some of the attributes that you can specify in a job definition:
- IAM role associated with the job
- vCPU and memory requirements
- Container properties
- Environment variables
- Retry strategy
import boto3
iam = boto3.client('iam')
client = boto3.client('batch')
dynamodbImportRole = iam.get_role(RoleName='dynamodbImportRole')
response = client.register_job_definition(
    jobDefinitionName='dynamodb_import_job_definition',
    type='container',
    containerProperties={
        'image': 'luckytuvshee/importuser:latest',
        'memory': 256,
        'vcpus': 16,
        'jobRoleArn': dynamodbImportRole['Role']['Arn'],
        'executionRoleArn': dynamodbImportRole['Role']['Arn'],
        'environment': [
            {
                'name': 'AWS_DEFAULT_REGION',
                'value': 'ap-northeast-1',
            }
        ]
    },
)
print(response)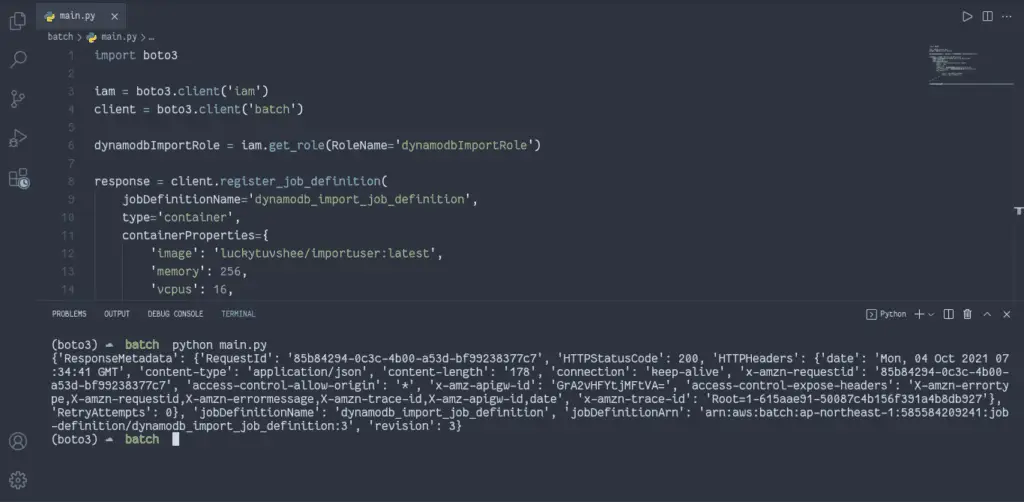
Submit AWS Batch job for execution
Jobs are the unit of work executed by AWS Batch as containerized applications running on Amazon EC2 or ECS Fargate.
Containerized jobs can reference a container image, command, and parameters.
With containerOverrides parameter, you can override some parameters defined in the container at job submission. You make a general-purpose container, and then you can pass some extra override configurations at initialization.
You can also specify the retryStrategy, which allows you to define how often you want the job to be restarted before it fails.
import boto3
client = boto3.client('batch')
response = client.submit_job(
    jobDefinition='dynamodb_import_job_definition',
    jobName='dynamodb_import_job1',
    jobQueue='dynamodb_import_queue',
    containerOverrides={
        'environment': [
            {
                'name': 'table_name',
                'value': 'batch-test-table',
            },
            {
                'name': 'bucket_name',
                'value': 'batch-test-bucket-ap-1',
            },
            {
                'name': 'key',
                'value': 'sample-zip.csv',
            }
        ]
    },
)
print(response)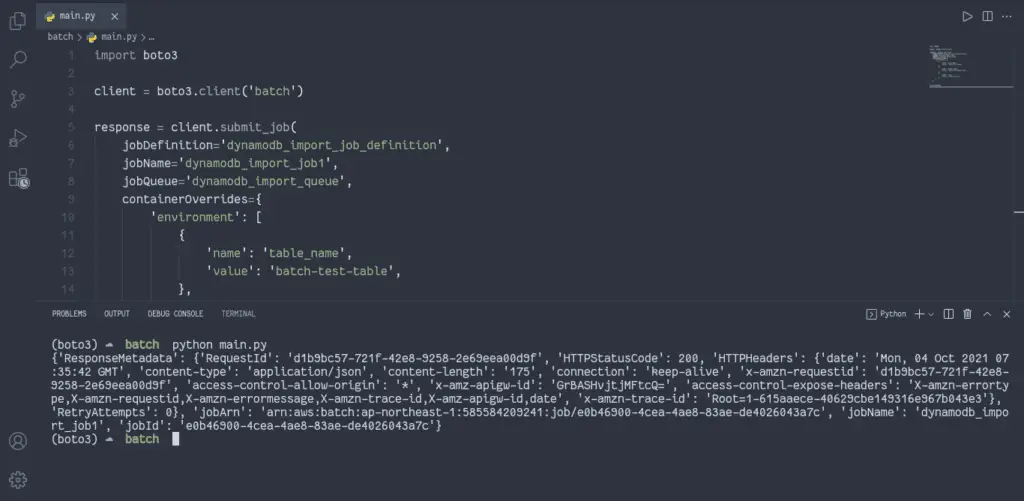
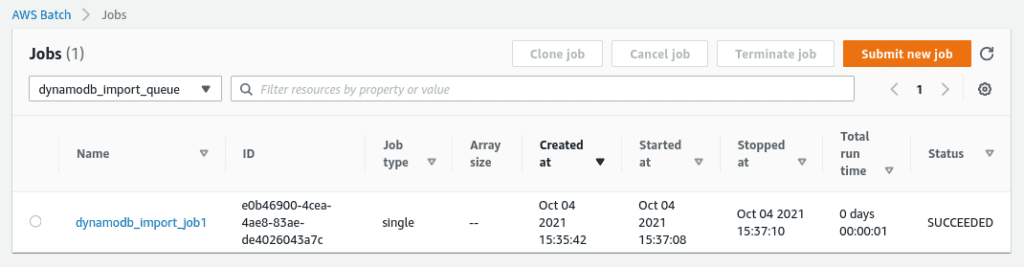
You can check the AWS Batch job status in the AWS console:
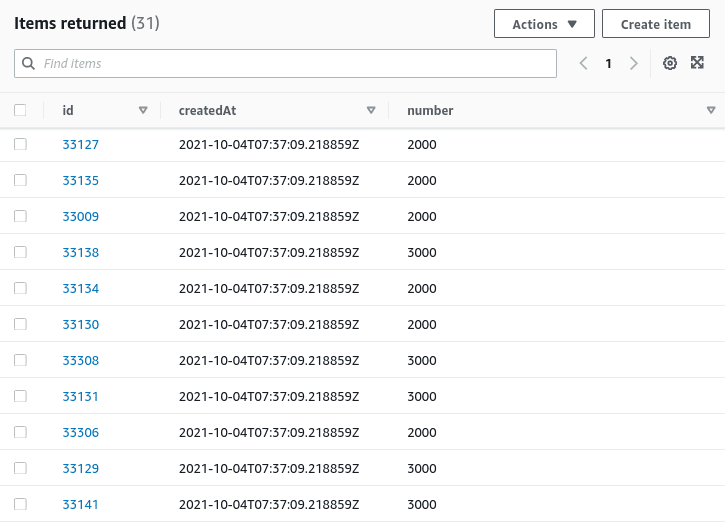
As soon as the AWS Batch job finishes its execution, you may check the imported data in the DynamoDB table.
Summary
This article covered the fundamentals of AWS Batch and how to use Python and the Boto3 library to manage AWS Batch Jobs. We’ve created a Demo Job that imports a CSV file from the S3 bucket to the DynamoDB table.
