Amazon Route 53 is a Domain Name System (DNS) service in AWS that is designed to give developers and businesses an extremely reliable and cost-effective way to route end users to Internet applications by translating names like www.example.com into the numeric IP addresses like 192.0.2.1 that computers use to connect. Route 53 reduces the complexity and operational overhead of DNS management and allows you to focus on building your applications instead of managing a complex DNS infrastructure yourself. This Boto3 Route53 tutorial covers how you can automate the management of your DNS infrastructure in Route 53 using Python and the Boto3 library.
Table of contents
Prerequisites
To get started with Amazon Route 53 using Boto3, you need to set up your Python environment on your laptop.
As a short summary, you need to install:
- Python 3
- Boto3
- AWS CLI Tools
Alternatively, you can set up and launch a Cloud9 IDE Instance.
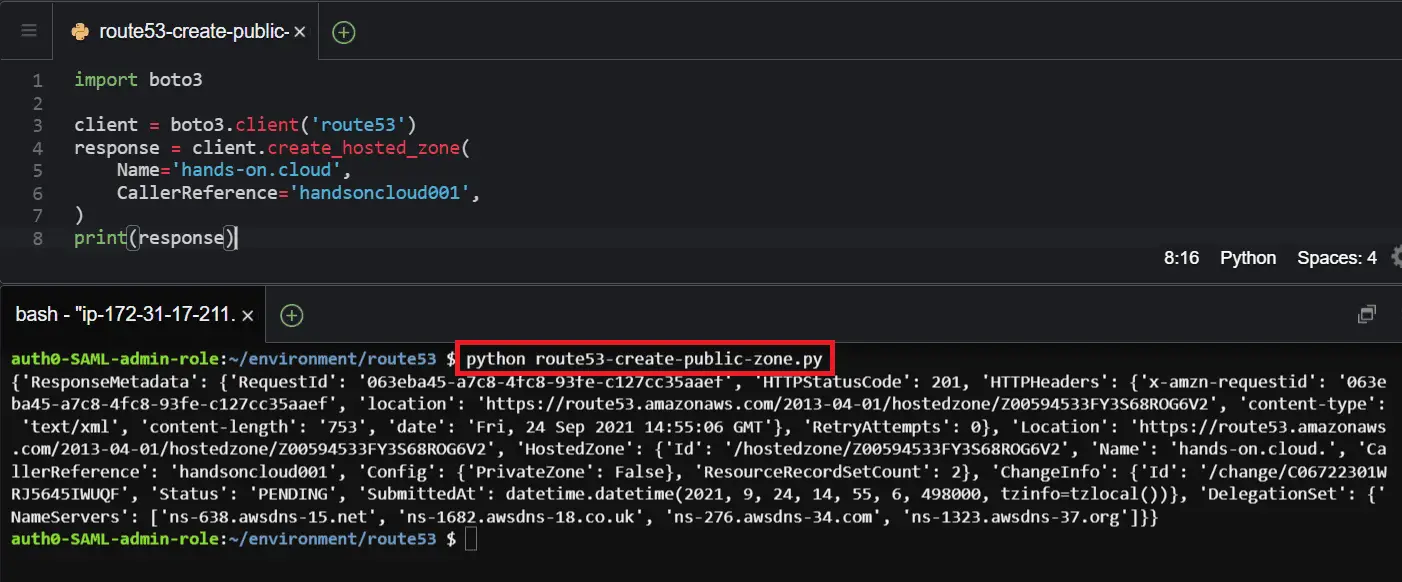
Create a public hosted DNS zone using Boto3
To create a public hosted DNS zone, you need to use the create_hosted_zone() method of the Boto3 Route53 client.
DNS public hosted zone holds a list of authoritative DNS name servers and other DNS records responsible for host resolution for the created zone. The domain name can either be an existing or a new domain.
import boto3
client = boto3.client('route53')
response = client.create_hosted_zone(
    Name='hands-on.cloud',
    CallerReference='handsoncloud001',
)
print(response)
Here is the execution output.
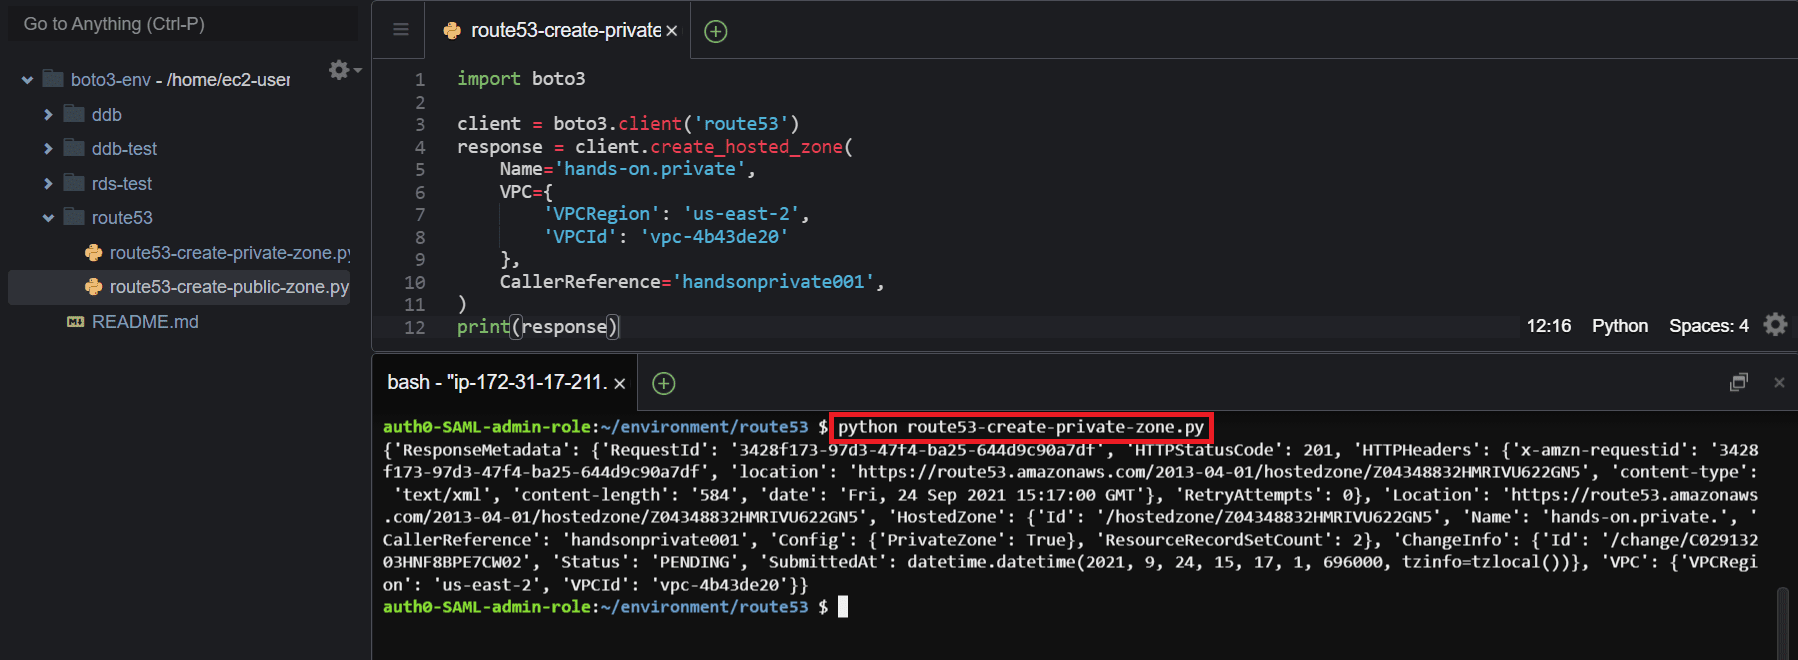
Create a private hosted DNS zone using Boto3
To create a private hosted DNS zone, you need to use the create_hosted_zone() method of the Boto3 Route53 client and pass the required parameters (VPC ID and AWS Region) for a private zone.
A private DNS hosted zone in Amazon Route 53 holds name server information and DNS records that enable querying a domain and its subdomains within one or more VPCs.
import boto3
client = boto3.client('route53')
response = client.create_hosted_zone(
    Name='hands-on.private',
    VPC={
        'VPCRegion': 'us-east-2',
        'VPCId': 'vpc-4b43de20'
    },
    CallerReference='handsonprivate001',
)
print(response)
Here is the execution output.
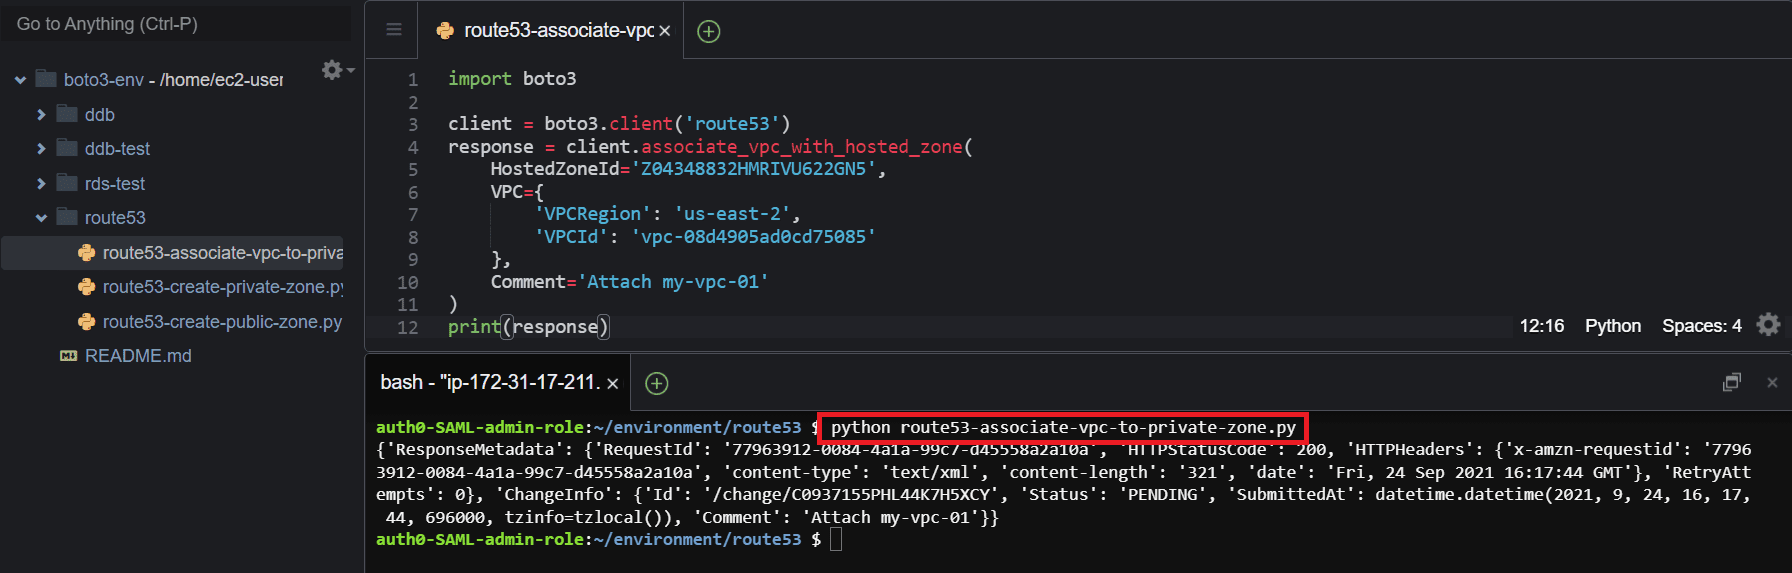
Attach a VPC to a private hosted DNS zone
To associate a private hosted DNS zone to a VPC, you need to use the associate_vpc_with_hosted_zone() method of the Boto3 Route53 client and pass required (HostedZoneId and VPC) parameters.
import boto3
client = boto3.client('route53')
response = client.associate_vpc_with_hosted_zone(
    HostedZoneId='Z04348832HMRIVU622GN5',
    VPC={
        'VPCRegion': 'us-east-2',
        'VPCId': 'vpc-08d4905ad0cd75085'
    },
    Comment='Attach my-vpc-01'
)
print(response)
Here is the execution output.
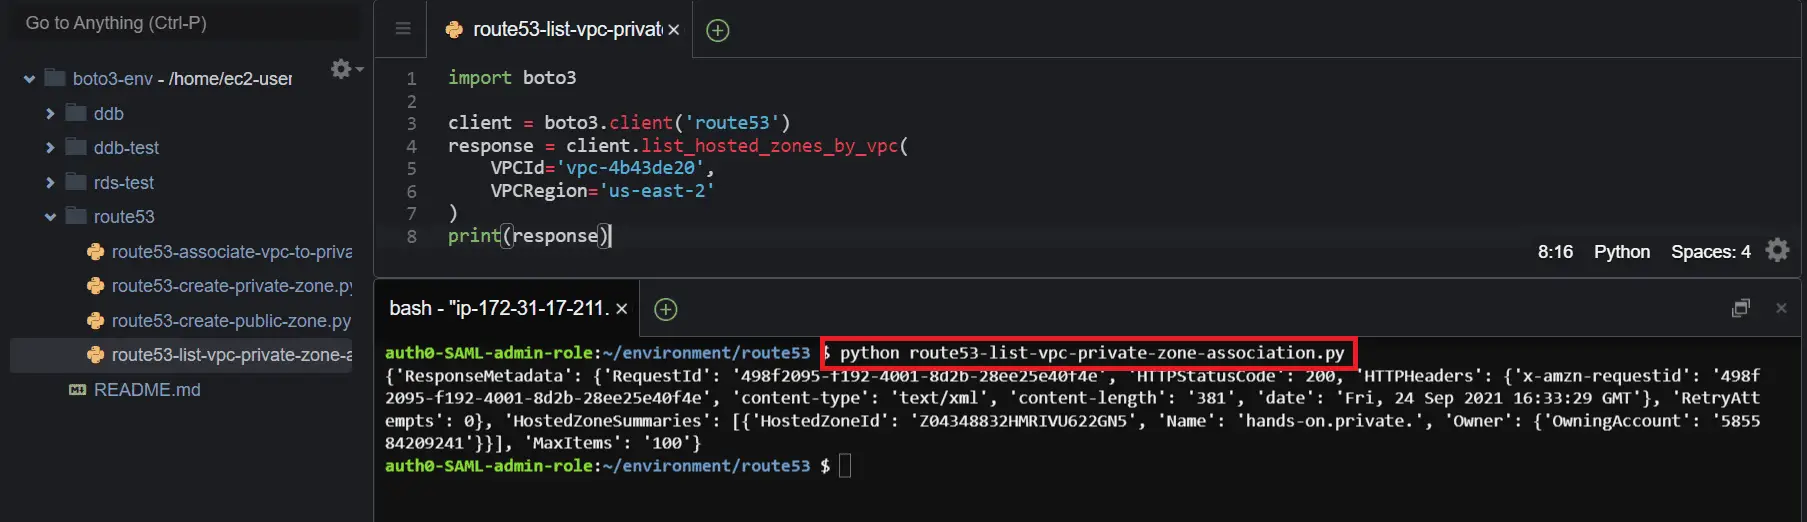
List private hosted DNS zones attached to a VPC
To return a list of all private hosted DNS zones associated with a specific VPC, you need to use the list_hosted_zones_by_vpc() methodof the Boto3 Route53 client and pass the required parameters, such as VPCId and VPCRegion.
import boto3
client = boto3.client('route53')
response = client.list_hosted_zones_by_vpc(
    VPCId='vpc-4b43de20',
    VPCRegion='us-east-2'
)
print(response)
Here is the execution output.
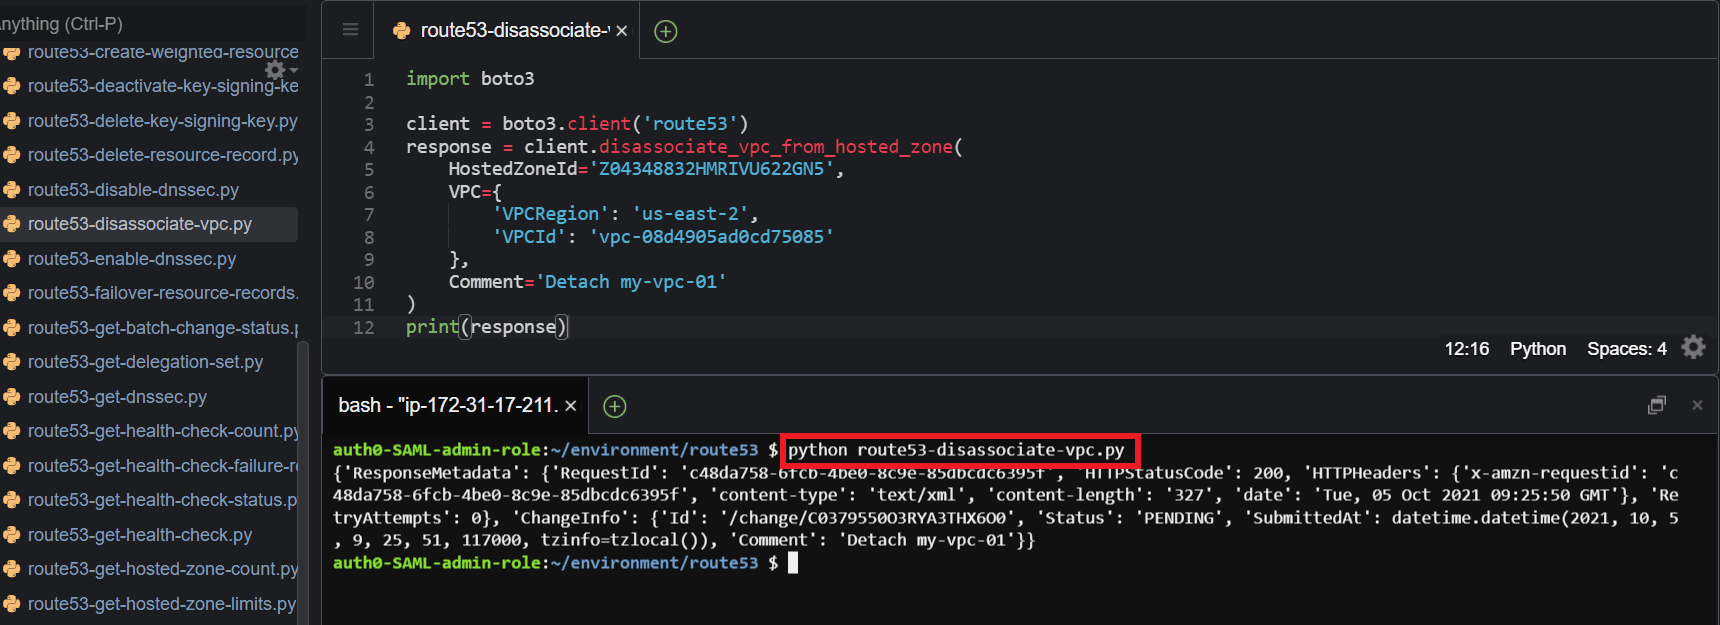
Detach a VPC from a private hosted DNS zone
To detach a VPC from a private hosted DNS zone, you need to use the disassociate_vpc_from_hosted_zone() method of the Boto3 Route53 client and pass the required parameters, such as HostedZoneId and VPC.
import boto3
client = boto3.client('route53')
response = client.disassociate_vpc_from_hosted_zone(
    HostedZoneId='Z04348832HMRIVU622GN5',
    VPC={
        'VPCRegion': 'us-east-2',
        'VPCId': 'vpc-08d4905ad0cd75085'
    },
    Comment='Detach my-vpc-01'
)
print(response)
Here is the execution output.
Retrieve public and private hosted DNS zones information using Boto3
The following section will describe the various methods you can use to retrieve information about your public and private hosted zones in your AWS account using the Boto3 library.
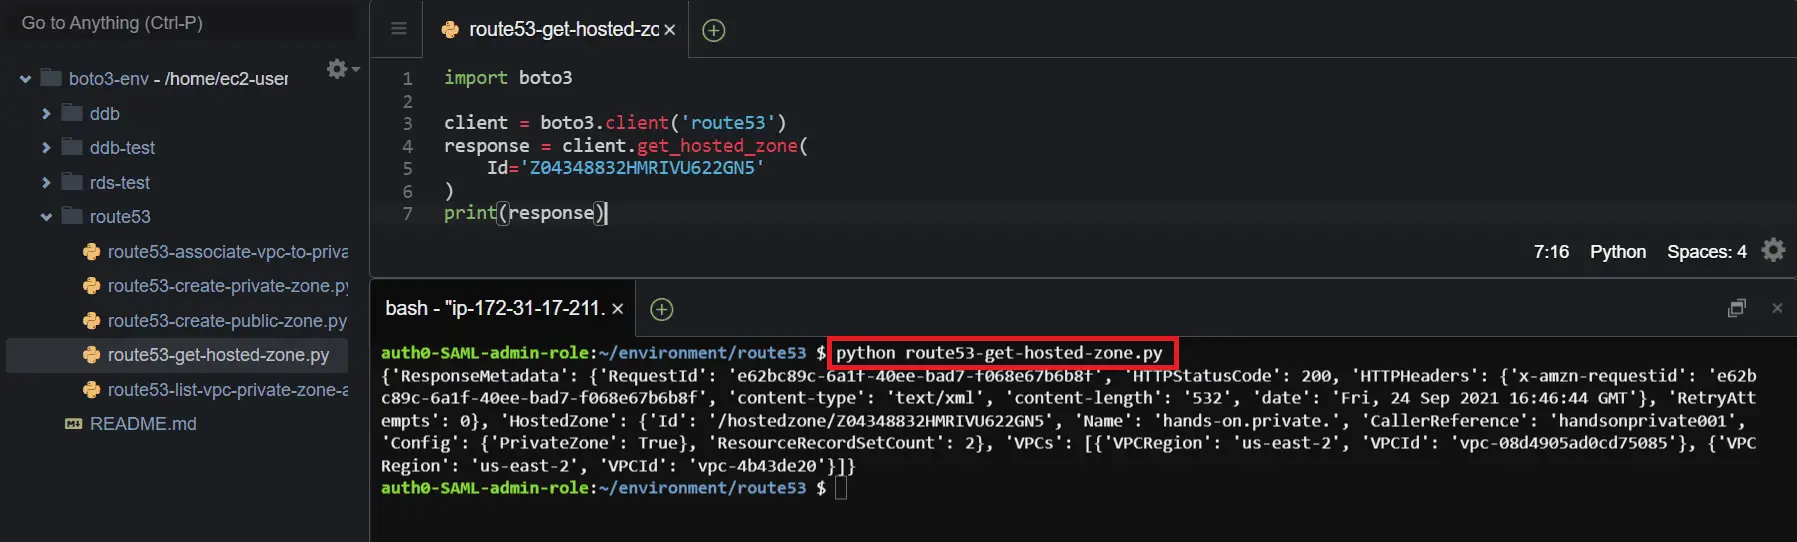
Get specific hosted zone information
To retrieve information about the specific private or public hosted zone, you can use the get_hosted_zone() method of the Boto3 Route53 client and pass the required parameter (Id), which identifies the specific hosted zone.
import boto3
client = boto3.client('route53')
response = client.get_hosted_zone(
    Id='Z04348832HMRIVU622GN5'
)
print(response)
Here is the execution output.
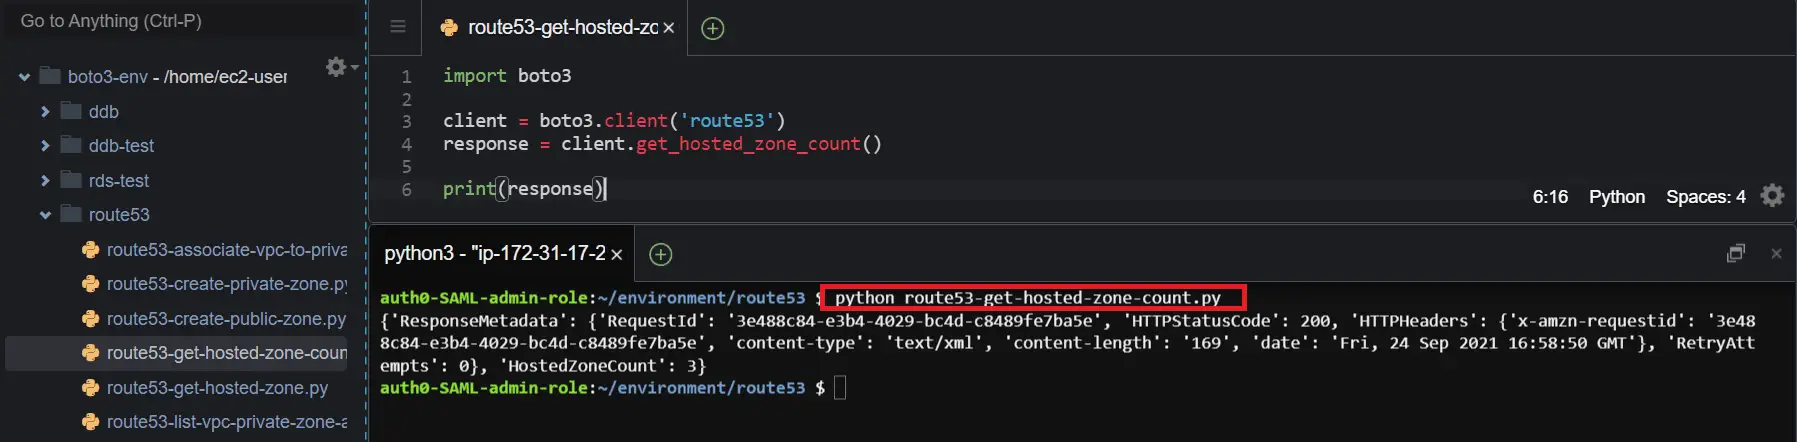
Get total number of hosted zones
To retrieve the number of hosted zones within your Amazon Web Services (AWS) account, use the get_hosted_zone_count() method of the Boto3 Route53 client, which will return the total number of public and private hosted zones.
import boto3
client = boto3.client('route53')
response = client.get_hosted_zone_count()
print(response)
Here is the execution output.
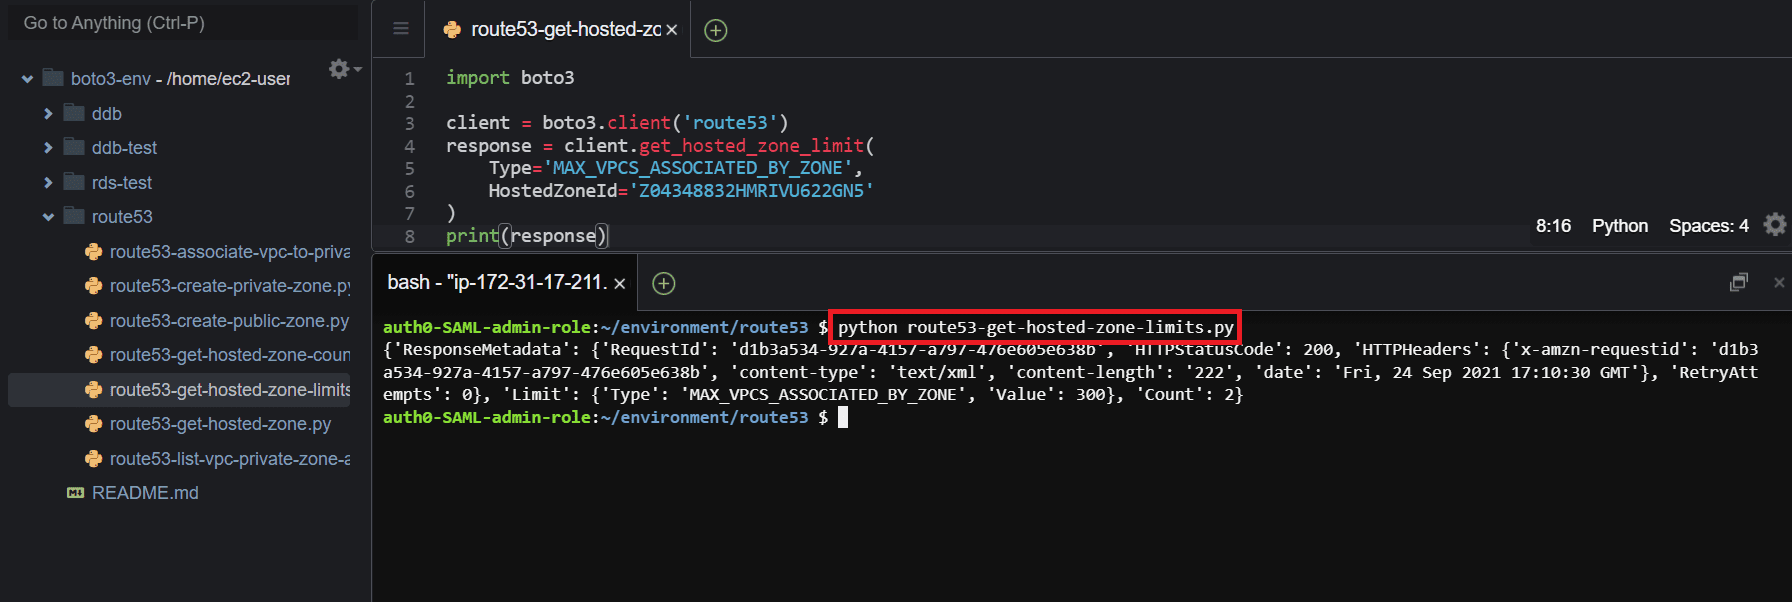
Get hosted zone limits
To get the limits associated with a specific hosted zone, use the get_hosted_zone_limit() methodof the Boto3 Route53 client and pass the required parameters, such as Type and HostedZoneId.
Some of the limit types that you can use are:
MAX_RRSETS_BY_ZONE– gets the maximum number of records that you can create in the specified hosted zoneMAX_VPCS_ASSOCIATED_BY_ZONE– returns the maximum number of VPCs that you can associate with the specified private hosted zone.
import boto3
client = boto3.client('route53')
response = client.get_hosted_zone_limit(
    Type='MAX_VPCS_ASSOCIATED_BY_ZONE',
    HostedZoneId='Z04348832HMRIVU622GN5'
)
print(response)
Here is the execution output.
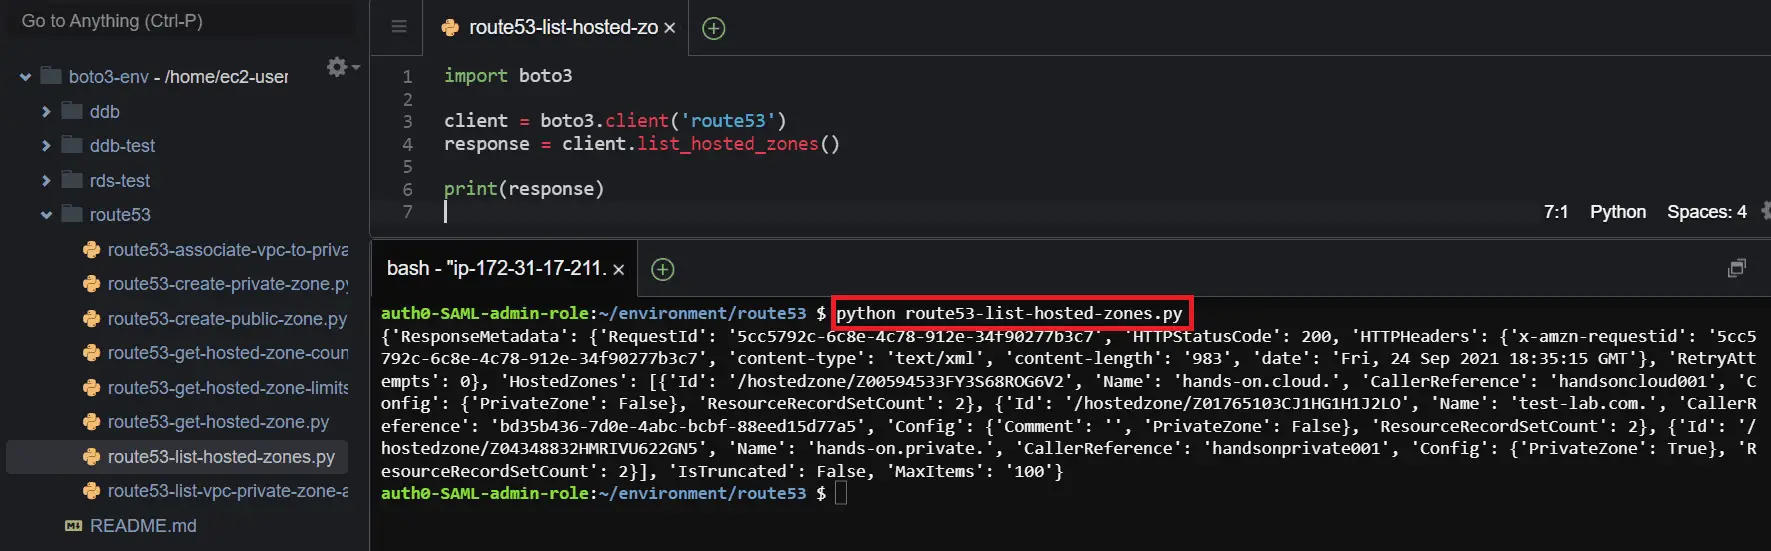
List all hosted zones
To list all public or private hosted zones in your AWS account, use the list_hosted_zones() methodof the Boto3 Route53 client.
import boto3
client = boto3.client('route53')
response = client.list_hosted_zones()
print(response)
Here is the execution output.
Delete a hosted zone
To delete public or private hosted zones in Amazon Route 53, use the delete_hosted_zone() methodof the Boto3 Route53 client and pass the required parameter (ID) of the hosted zone.
import boto3
client = boto3.client('route53')
response = client.delete_hosted_zone(
    Id='Z104108719AYS9LM7Z6DV'
)
print(response)
Here is the execution output.

Manage DNS zones reusable delegation sets using Boto3
Amazon Route 53 allows reusing of the same name servers for multiple hosted zones within’ your Amazon Web Services account by utilizing reusable delegation sets. In the following section, we will describe the different ways that you can manage them.
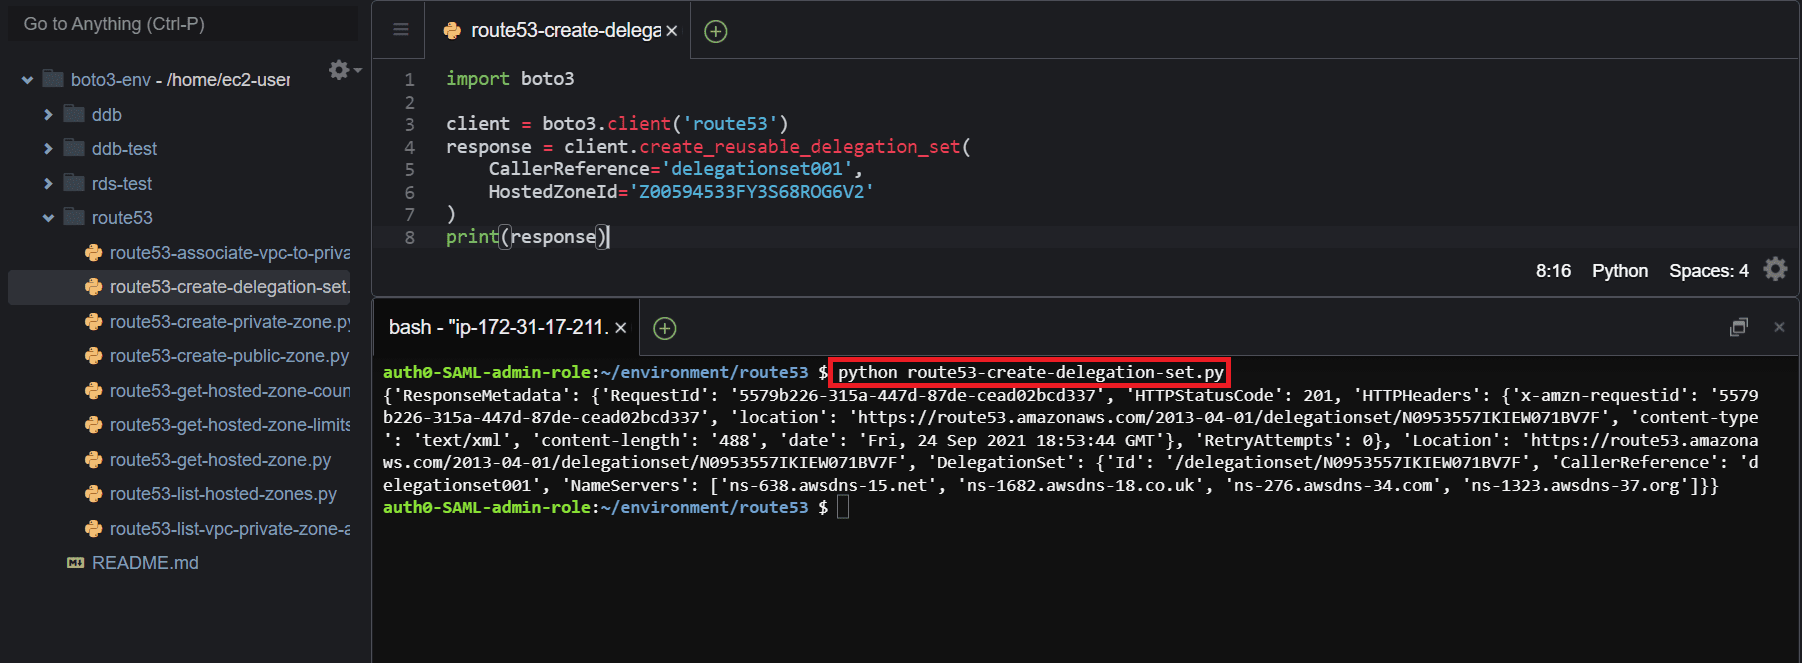
Create a resuable delegation set
To create a reusable delegation set, use the create_resuable_delegation_set() methodof the Boto3 Route53 client and pass the CallerReference parameter for the delegation. Optionally, you can use the HostedZoneId parameter to create a delegation set that reuses the name servers of an existing hosted zone.
A reusable delegation set can then be associated with a specific hosted DNS zone when creating a new hosted zone using the DelegationSetId parameter with the create_hosted_zone() method.
import boto3
client = boto3.client('route53')
response = client.create_reusable_delegation_set(
    CallerReference='delegationset001',
    HostedZoneId='Z00594533FY3S68ROG6V2'
)
print(response)
Here is the execution output.
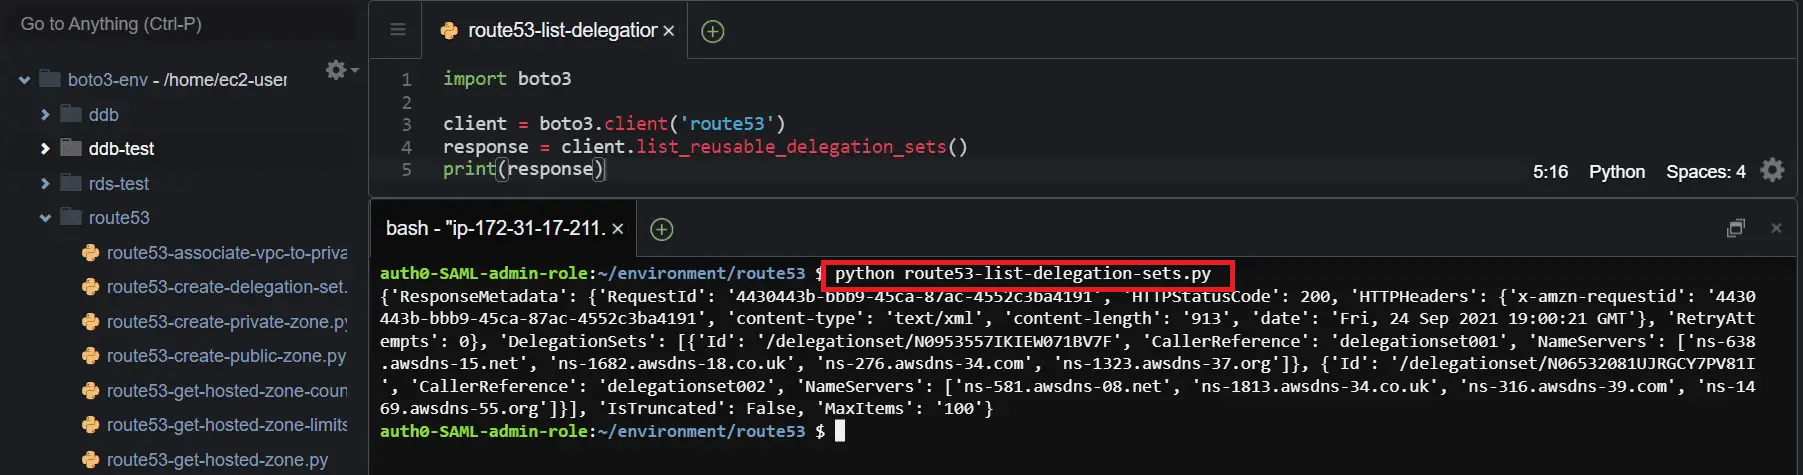
List reusable delegation sets
To retrieve all the delegation sets within’ Route 53, use the list_resuable_delegation_sets() methodof the Boto3 Route53 client.
import boto3
client = boto3.client('route53')
response = client.list_reusable_delegation_sets()
print(response)
Here is the execution output.
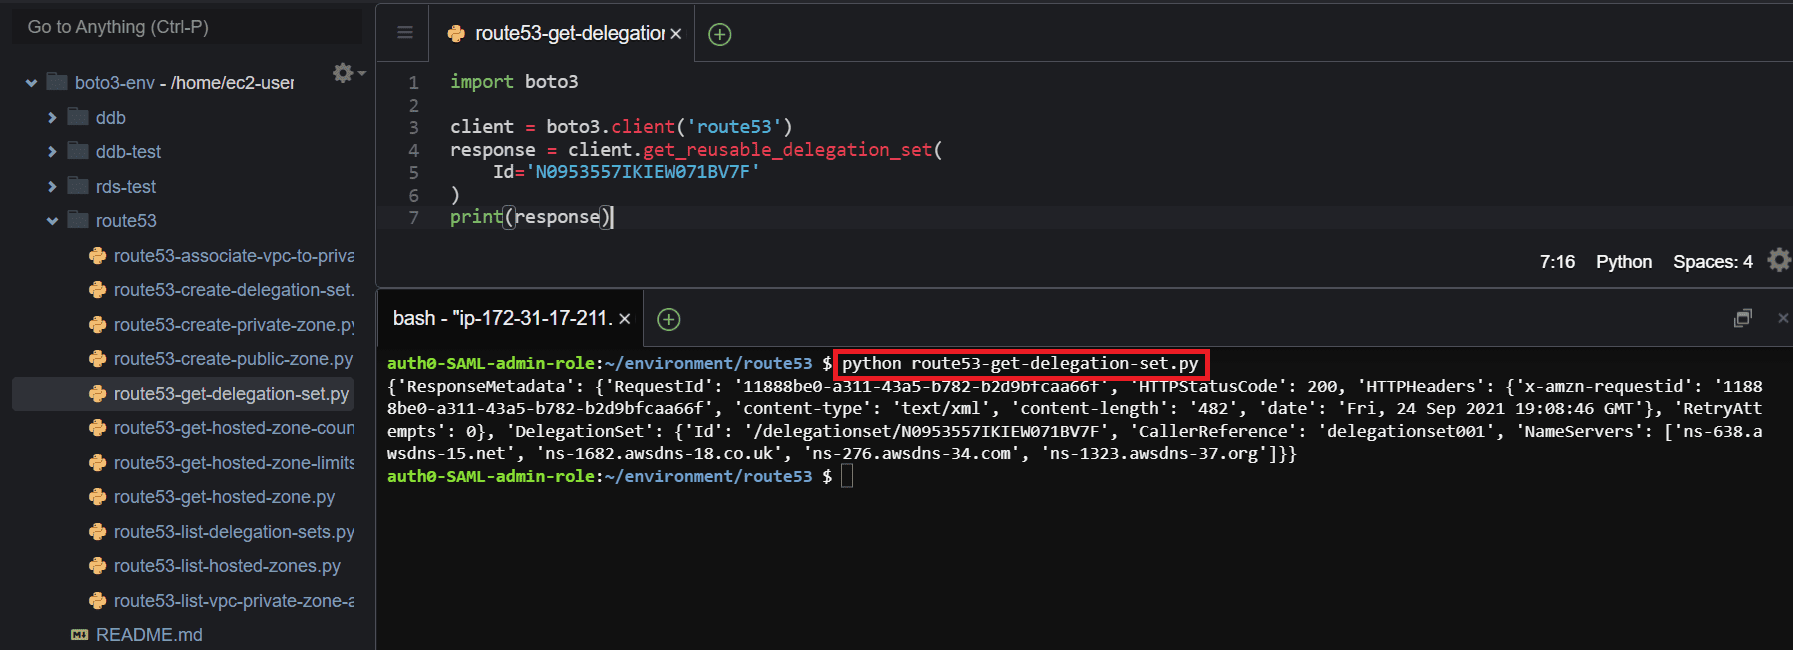
Get a reusable delegation set
To get the details about a specific delegation set, use the get_resuable_delegation_set() methodof the Boto3 Route53 client and pass the required parameter (Id), the identifier for the specific reusable delegation set.
import boto3
client = boto3.client('route53')
response = client.get_reusable_delegation_set(
    Id='N0953557IKIEW071BV7F'
)
print(response)
Here is the execution output.
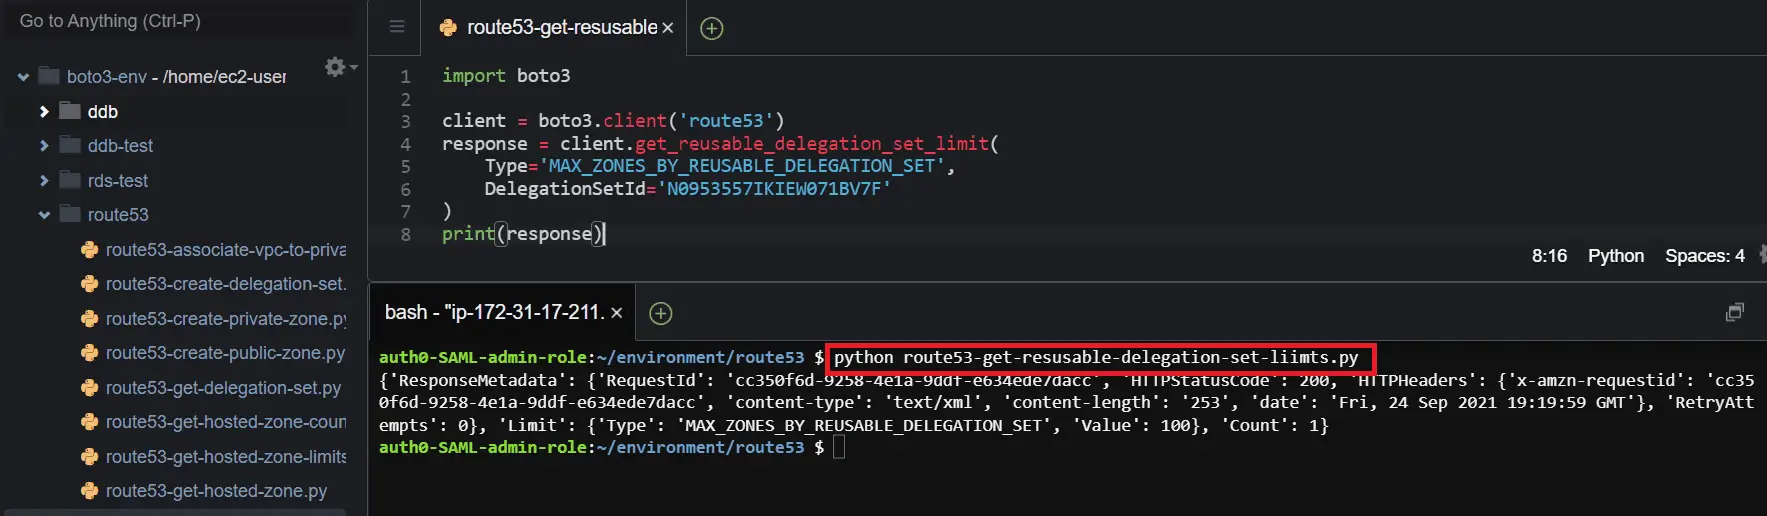
Get a reusable delegation set limits
To get the maximum number of hosted zones that you can associate with a specific delegation set, use the get_resuable_delegation_set_limit() methodof the Boto3 Route53 client and pass the required parameters (Type and DelegationSetId).
import boto3
client = boto3.client('route53')
response = client.get_reusable_delegation_set_limit(
    Type='MAX_ZONES_BY_REUSABLE_DELEGATION_SET',
    DelegationSetId='N0953557IKIEW071BV7F'
)
print(response)
Here is the execution output.
Manage DNS zone resource records using Boto3
Amazon Route 53 allows managing DNS resource records such as A, AAA, CNAME, MX, TXT, PTR, and other DNS record types through the API. You can also configure a Routing policy for your DNS records choosing from a range of available options such as Simple, Weighted, Geolocation, Latency, Failover, and Multianswer value routing. In the following section, we are going to look at how to create the resource records and how to configure the routing policy for records in Route 53 using Boto3.
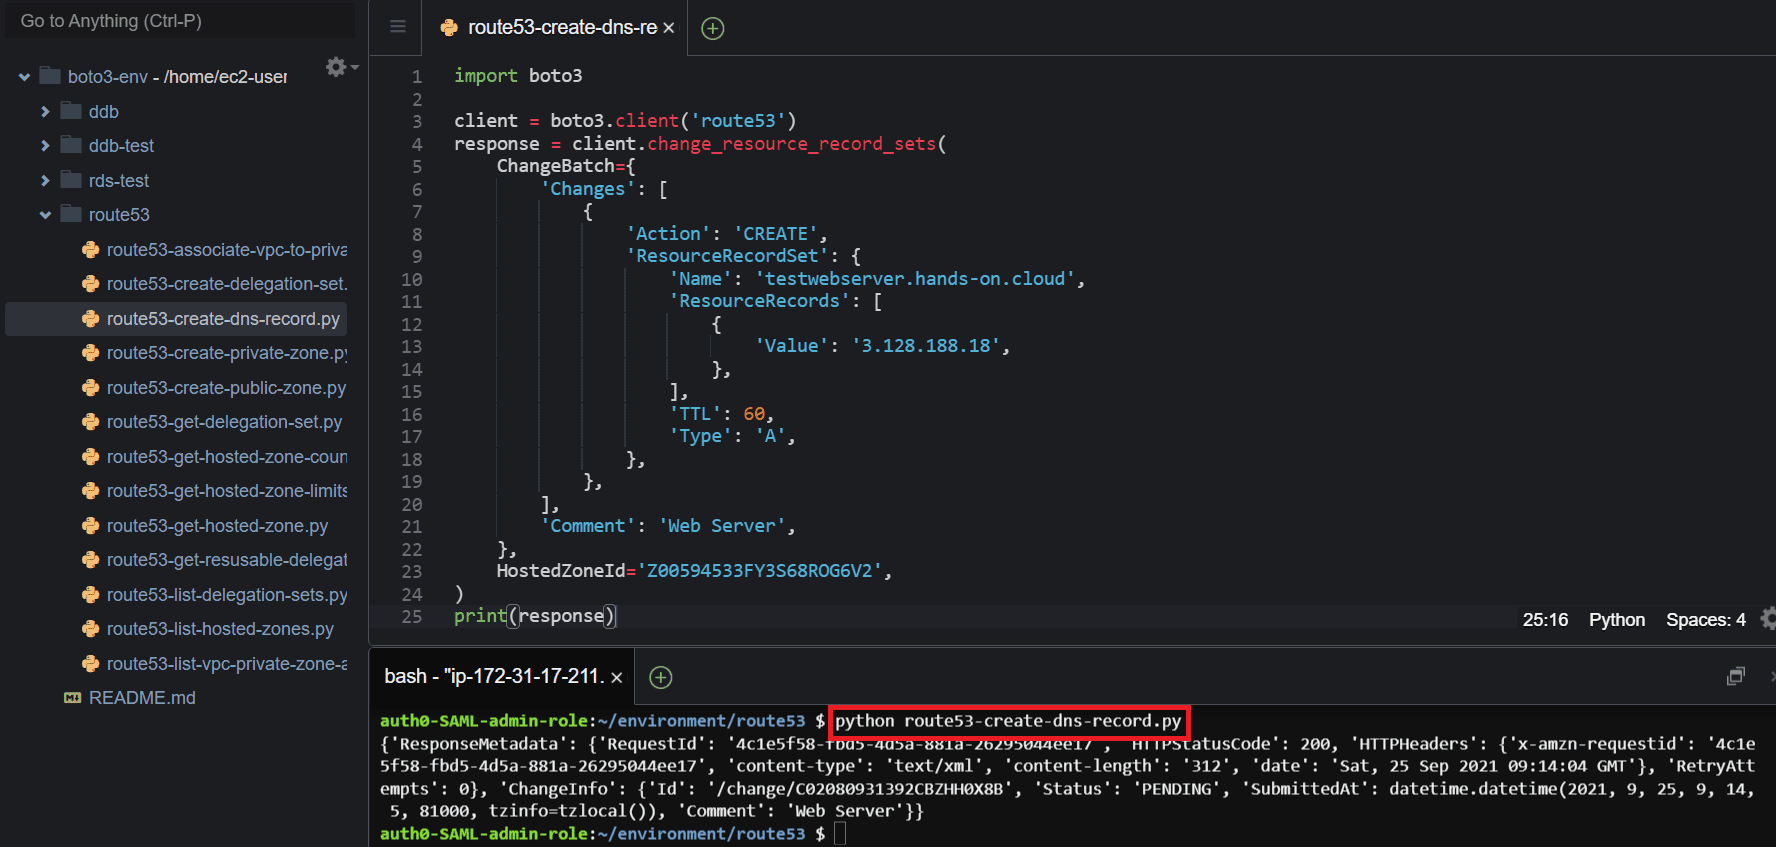
Create a resource record
To create a resource record, use the change_resource_record_sets() methodof the Boto3 Route53 client and pass the required parameters: HostedZoneId, ChangeBatch, Changes, Action, ResourceRecordSet, Name, and the Type of the DNS record.
In the following example, we will create an A record type DNS hosted zone.
import boto3
client = boto3.client('route53')
response = client.change_resource_record_sets(
    ChangeBatch={
        'Changes': [
            {
                'Action': 'CREATE',
                'ResourceRecordSet': {
                    'Name': 'testwebserver.hands-on.cloud',
                    'ResourceRecords': [
                        {
                            'Value': '3.128.188.18',
                        },
                    ],
                    'TTL': 60,
                    'Type': 'A',
                },
            },
        ],
        'Comment': 'Web Server',
    },
    HostedZoneId='Z00594533FY3S68ROG6V2',
)
print(response)
Here is the execution output.
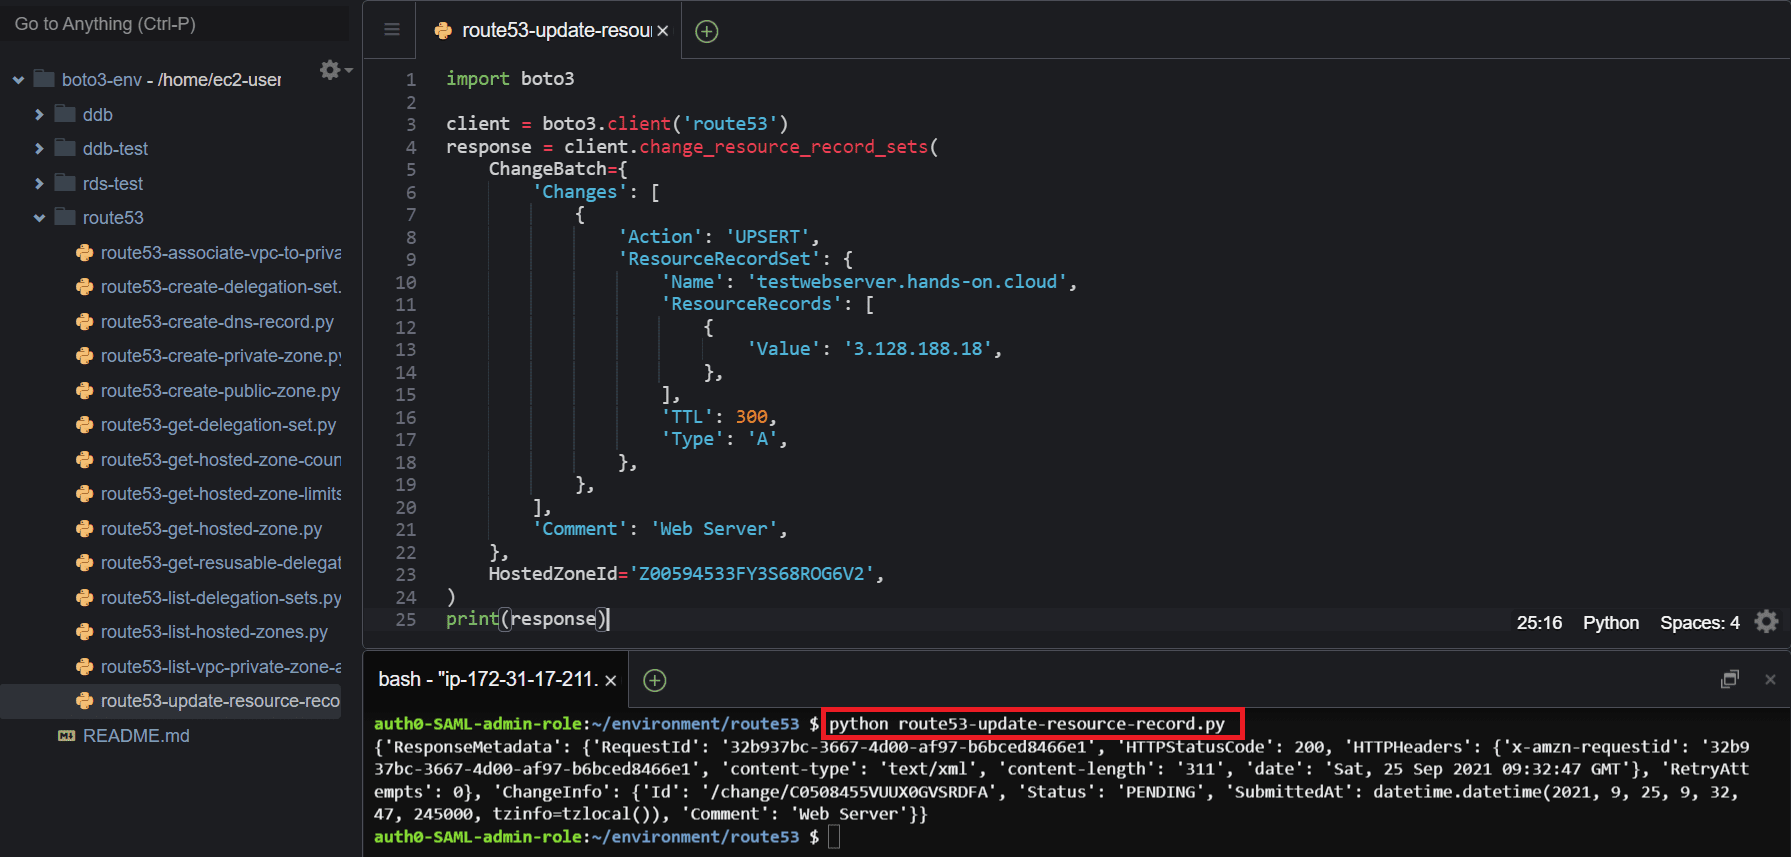
Update a resource record
To update a resource record, use the change_resource_record_sets() methodof the Boto3 Route53 client and pass the Action parameter using UPSERT as the option.
In the following example, I will update the Time to Live value (TTL) of an existing record from 60 seconds to 300 seconds.
import boto3
client = boto3.client('route53')
response = client.change_resource_record_sets(
    ChangeBatch={
        'Changes': [
            {
                'Action': 'UPSERT',
                'ResourceRecordSet': {
                    'Name': 'testwebserver.hands-on.cloud',
                    'ResourceRecords': [
                        {
                            'Value': '3.128.188.18',
                        },
                    ],
                    'TTL': 300,
                    'Type': 'A',
                },
            },
        ],
        'Comment': 'Web Server',
    },
    HostedZoneId='Z00594533FY3S68ROG6V2',
)
print(response)
Here is the execution output.
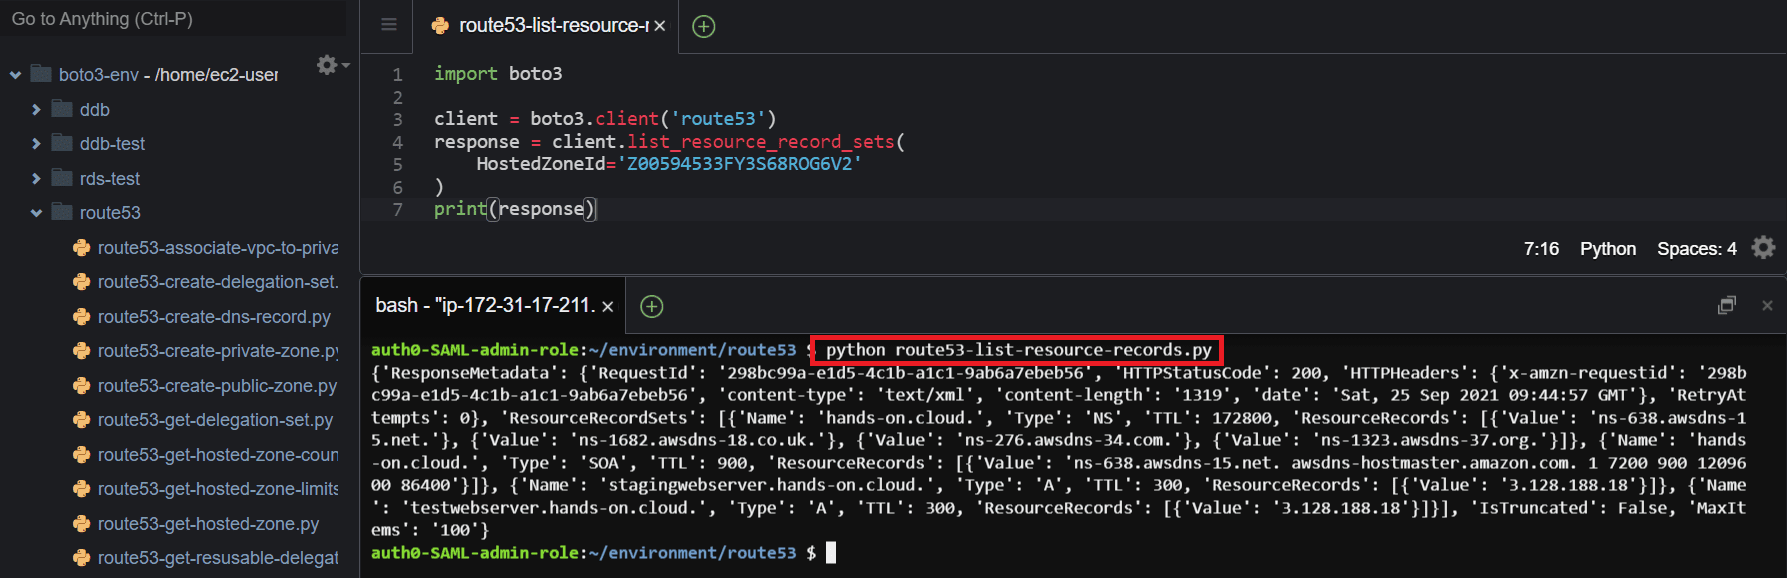
List resource records
To list all the resource records within a given hosted zone, use the list_resource_record_sets() methodof the Boto3 Route53 client and pass the required parameter (HostedZoneId).
import boto3
client = boto3.client('route53')
response = client.list_resource_record_sets(
    HostedZoneId='Z00594533FY3S68ROG6V2'
)
print(response)
Here is the execution output.
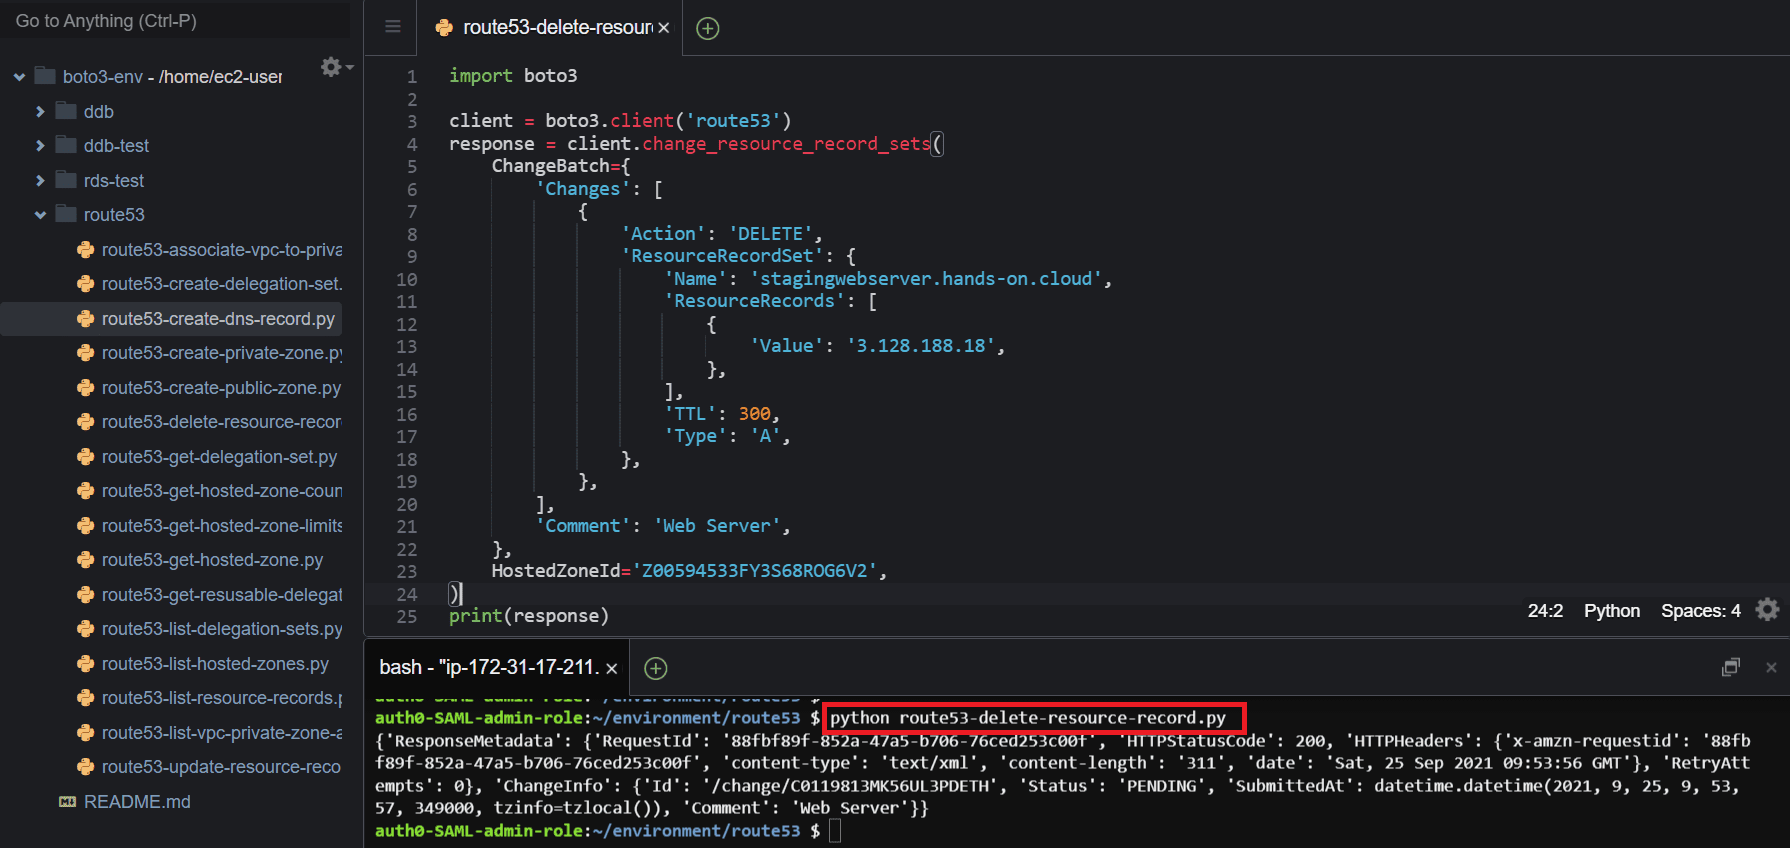
Delete a resource record
To delete a resource record, use the change_resource_record_set()methodof the Boto3 Route53 client and change the option of the Action parameter to DELETE.
import boto3
client = boto3.client('route53')
response = client.change_resource_record_sets(
    ChangeBatch={
        'Changes': [
            {
                'Action': 'DELETE',
                'ResourceRecordSet': {
                    'Name': 'stagingwebserver.hands-on.cloud',
                    'ResourceRecords': [
                        {
                            'Value': '3.128.188.18',
                        },
                    ],
                    'TTL': 300,
                    'Type': 'A',
                },
            },
        ],
        'Comment': 'Web Server',
    },
    HostedZoneId='Z00594533FY3S68ROG6V2',
)
print(response)
Here is the execution output.
Test DNS Answer
To test a DNS answer in Amazon Route 53, use the test_dns_answer()methodof the Boto3 Route53 client and pass the required parameters, such as the HostedZoneId, RecordName, and RecordType.
import boto3
client = boto3.client('route53')
response = client.test_dns_answer(
    HostedZoneId='Z00594533FY3S68ROG6V2',
    RecordName='testwebserver.hands-on.cloud',
    RecordType='A',
)
print(response)
Here is the execution output.

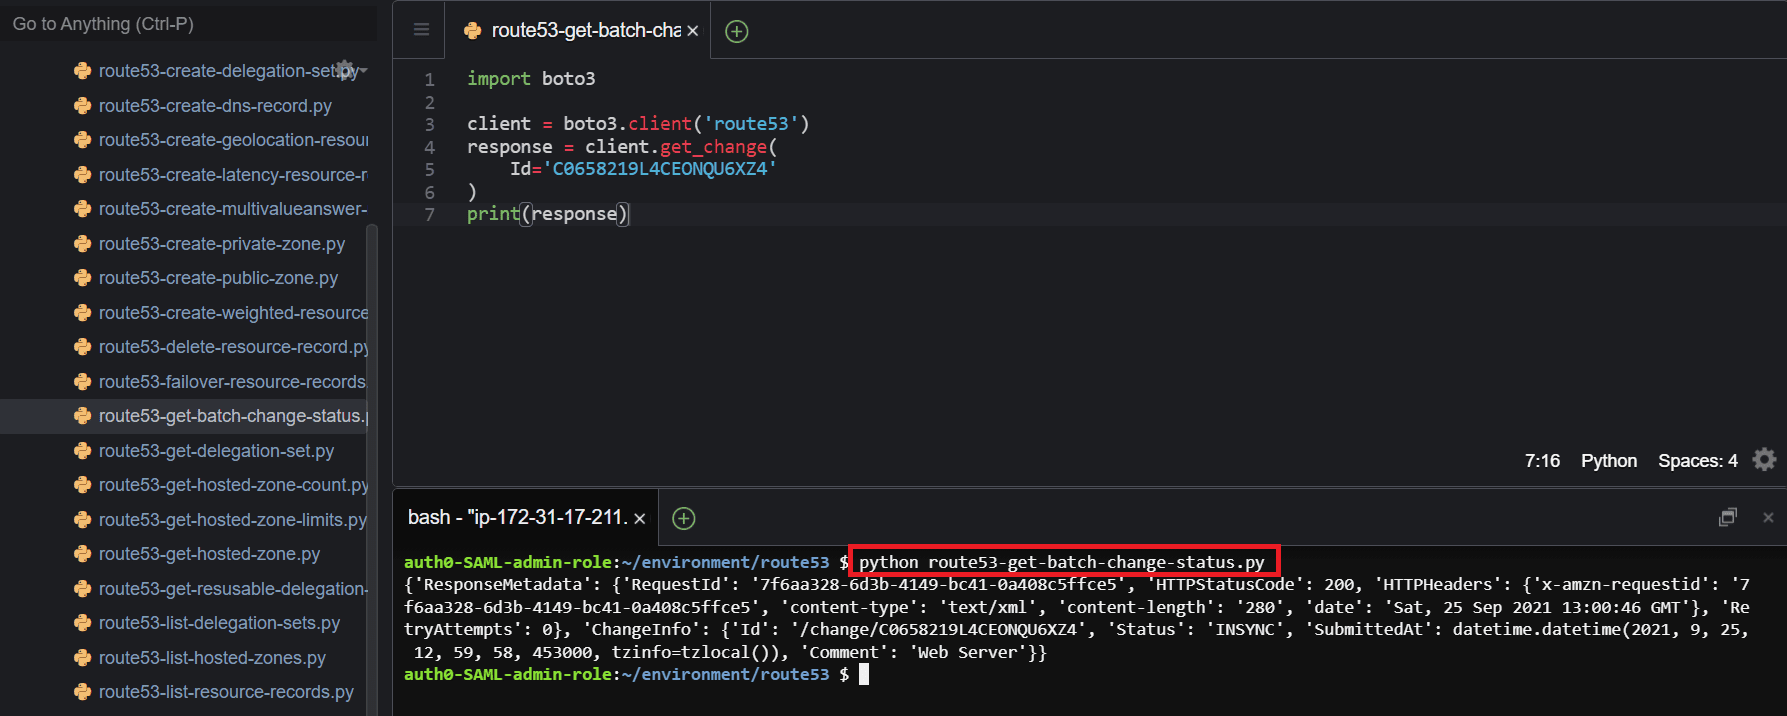
Get resource records change status
To get the DNS resource record’s change status, use the get_change()methodof the Boto3 Route53 client and assign the required parameter (Id). The Id is returned by the change resource records sets method.
import boto3
client = boto3.client('route53')
response = client.get_change(
    Id='C0658219L4CEONQU6XZ4'
)
print(response)
Here is the execution output.
Manage resource records routing policies using Boto3
In this section of the article, we’ll cover how to manage Route53 resource records routing policies by using the Boto3 library.
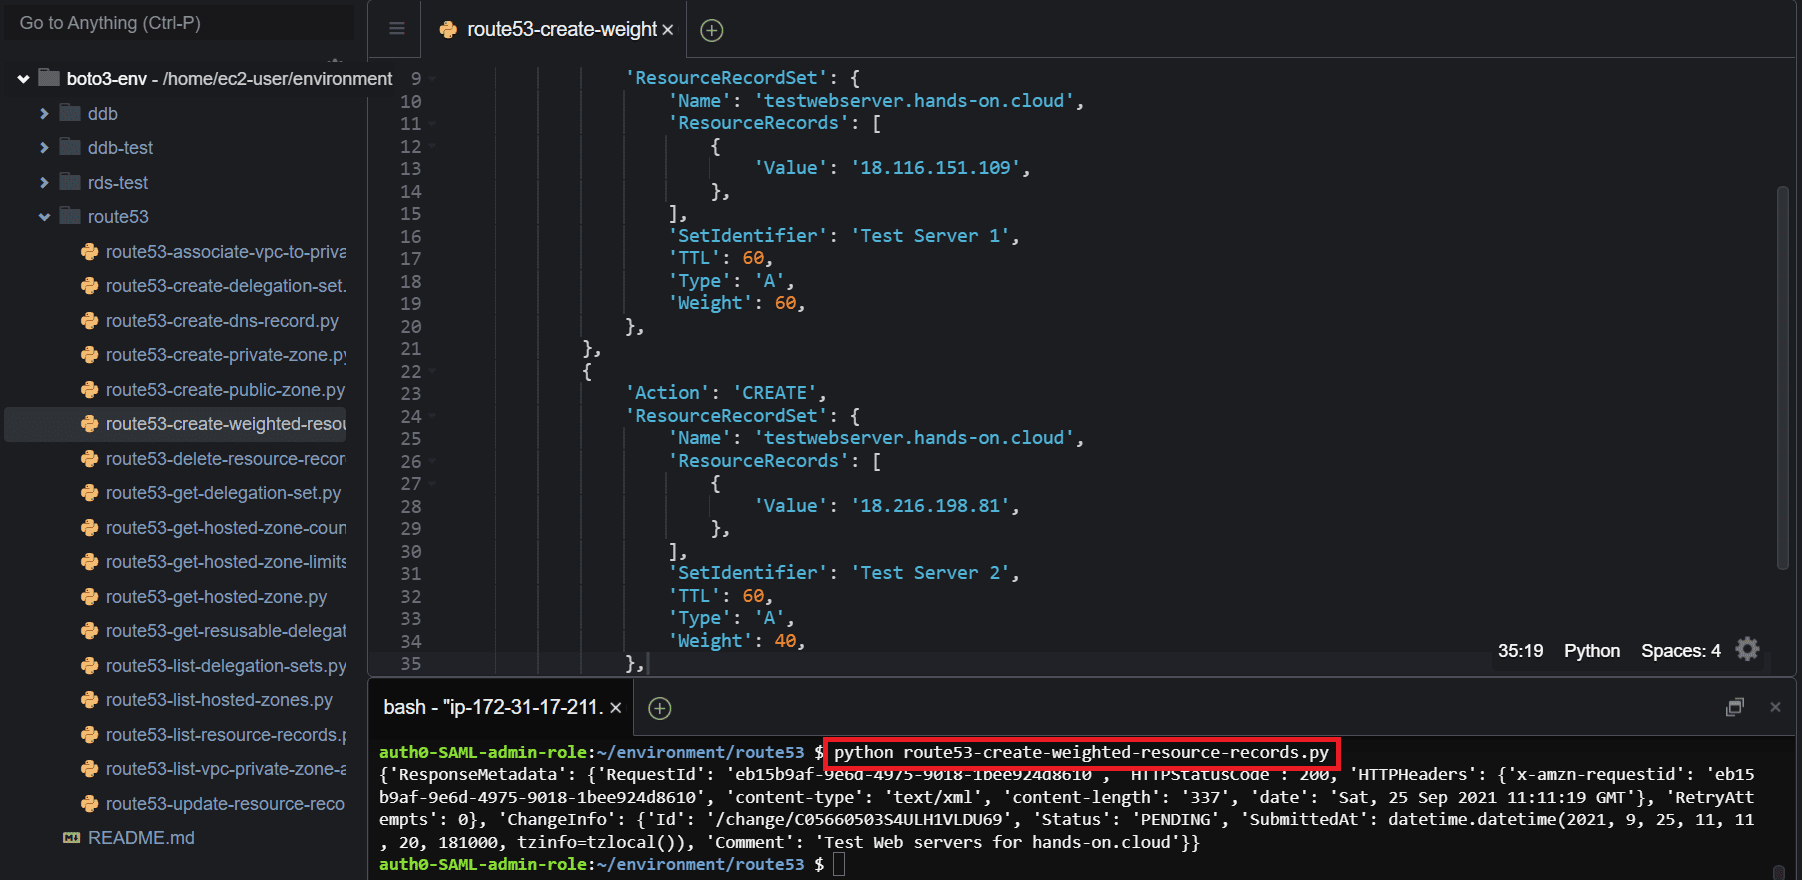
Created weighted resource records
To create weighted resource record sets, use the change_resource_record_sets()methodof the Boto3 Route53 client and assign the required parameters to create a weighted resource record.
Weighted resource records enable the distribution of traffic among different instances using the Route 53 DNS zones.
The following example shows how to create two weighted resource record sets and assign a weight to each of the records of 60 and 40, respectively.
import boto3
client = boto3.client('route53')
response = client.change_resource_record_sets(
    ChangeBatch={
        'Changes': [
            {
                'Action': 'CREATE',
                'ResourceRecordSet': {
                    'Name': 'testwebserver.hands-on.cloud',
                    'ResourceRecords': [
                        {
                            'Value': '18.116.151.109',
                        },
                    ],
                    'SetIdentifier': 'Test Server 1',
                    'TTL': 60,
                    'Type': 'A',
                    'Weight': 60,
                },
            },
            {
                'Action': 'CREATE',
                'ResourceRecordSet': {
                    'Name': 'testwebserver.hands-on.cloud',
                    'ResourceRecords': [
                        {
                            'Value': '18.216.198.81',
                        },
                    ],
                    'SetIdentifier': 'Test Server 2',
                    'TTL': 60,
                    'Type': 'A',
                    'Weight': 40,
                },
            },
        ],
        'Comment': 'Test Web servers for hands-on.cloud',
    },
    HostedZoneId='Z00594533FY3S68ROG6V2',
)
print(response)
Here is the execution output.
Create latency resource records
To create latency resource records, use the change_resource_record_sets() method of the Boto3 Route53 client and assign the required parameters to create a latency resource record.
Latency resource records enable you to use Amazon Route 53 to route traffic using the closest AWS region to the user.
import boto3
client = boto3.client('route53')
response = client.change_resource_record_sets(
    ChangeBatch={
        'Changes': [
            {
                'Action': 'CREATE',
                'ResourceRecordSet': {
                    'Name': 'stagingwebserver.hands-on.cloud',
                    'Region': 'us-east-2',
                    'ResourceRecords': [
                        {
                            'Value': '18.116.151.109',
                        },
                    ],
                    'SetIdentifier': 'Ohio region',
                    'TTL': 60,
                    'Type': 'A',
                },
            },
            {
                'Action': 'CREATE',
                'ResourceRecordSet': {
                    'Name': 'stagingwebserver.hands-on.cloud',
                    'Region': 'us-west-2',
                    'ResourceRecords': [
                        {
                            'Value': '3.131.244.131',
                        },
                    ],
                    'SetIdentifier': 'Oregon region',
                    'TTL': 60,
                    'Type': 'A',
                },
            },
        ],
        'Comment': 'Staging Web servers for hands-on.cloud',
    },
    HostedZoneId='Z00594533FY3S68ROG6V2',
)
print(response)
Here is the execution output.
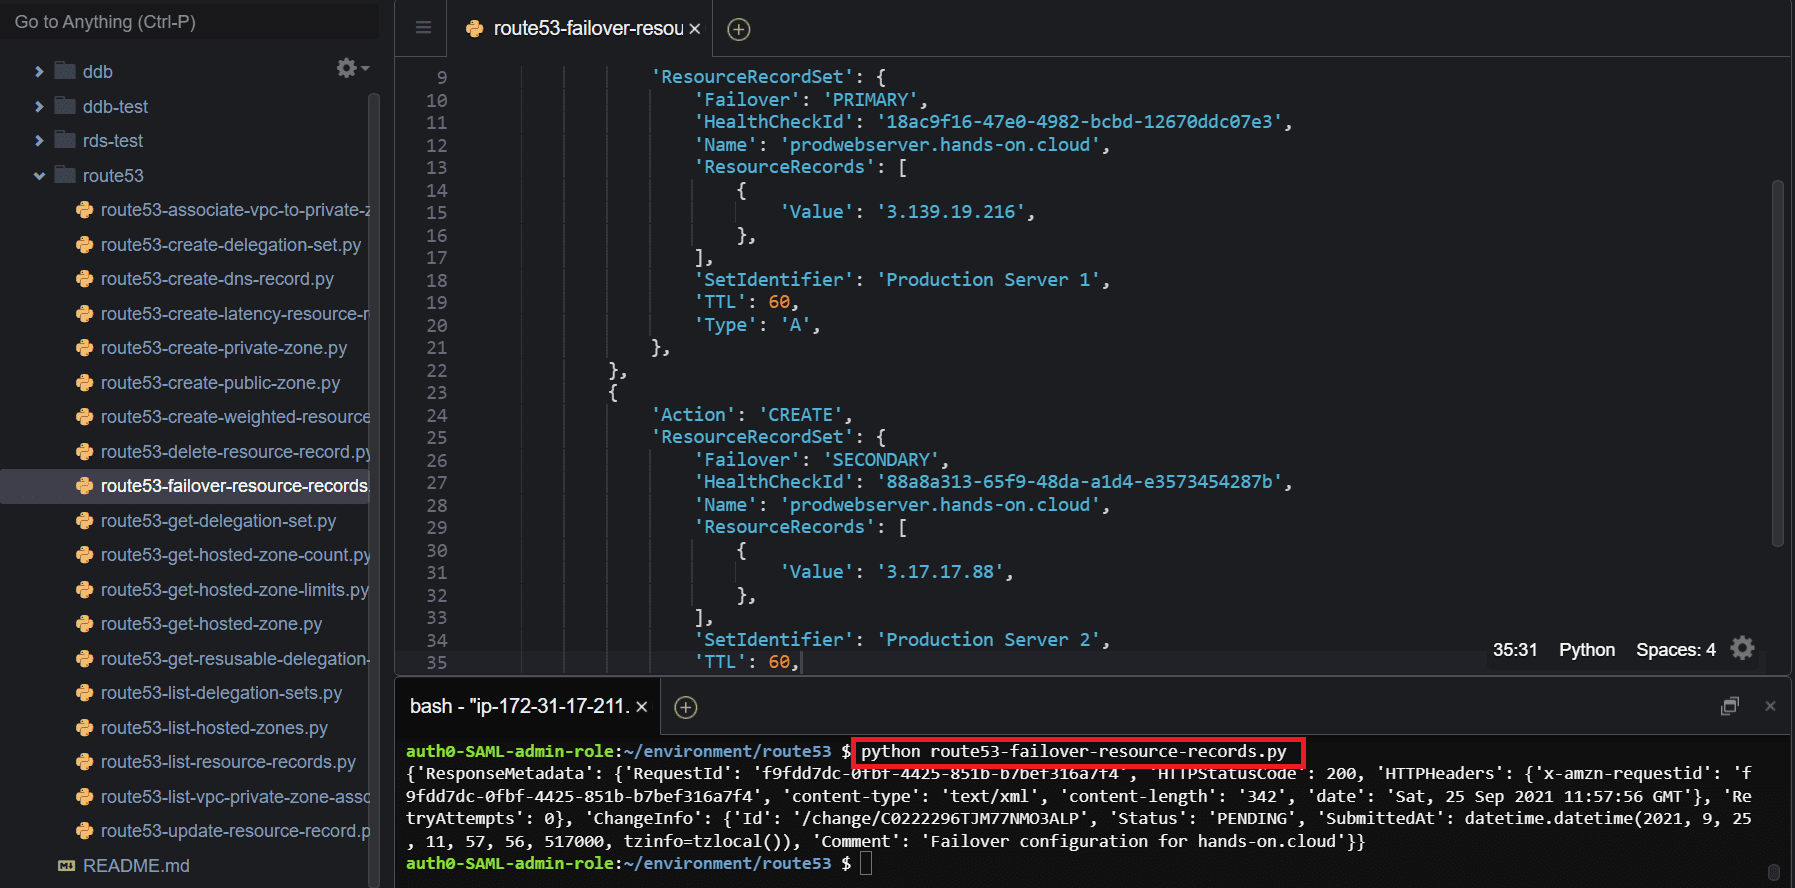
Create failover resource records
To create the failover resource records, use the change_resource_record_sets()method of the Boto3 Route53 client and pass the required parameters and options to create the records.
Failover resource records in Amazon route 53 provide the functionality to create primary and secondary resource records, enabling you to route traffic to a different instance/service in case one is down. You can combine failover resource records with health checks to make sure traffic is routed to a service that is considered healthy.
import boto3
client = boto3.client('route53')
response = client.change_resource_record_sets(
    ChangeBatch={
        'Changes': [
            {
                'Action': 'CREATE',
                'ResourceRecordSet': {
                    'Failover': 'PRIMARY',
                    'HealthCheckId': '18ac9f16-47e0-4982-bcbd-12670ddc07e3',
                    'Name': 'prodwebserver.hands-on.cloud',
                    'ResourceRecords': [
                        {
                            'Value': '3.139.19.216',
                        },
                    ],
                    'SetIdentifier': 'Production Server 1',
                    'TTL': 60,
                    'Type': 'A',
                },
            },
            {
                'Action': 'CREATE',
                'ResourceRecordSet': {
                    'Failover': 'SECONDARY',
                    'HealthCheckId': '88a8a313-65f9-48da-a1d4-e3573454287b',
                    'Name': 'prodwebserver.hands-on.cloud',
                    'ResourceRecords': [
                        {
                            'Value': '3.17.17.88',
                        },
                    ],
                    'SetIdentifier': 'Production Server 2',
                    'TTL': 60,
                    'Type': 'A',
                },
            },
        ],
        'Comment': 'Failover configuration for hands-on.cloud',
    },
    HostedZoneId='Z00594533FY3S68ROG6V2',
)
print(response)
Here is the execution output.
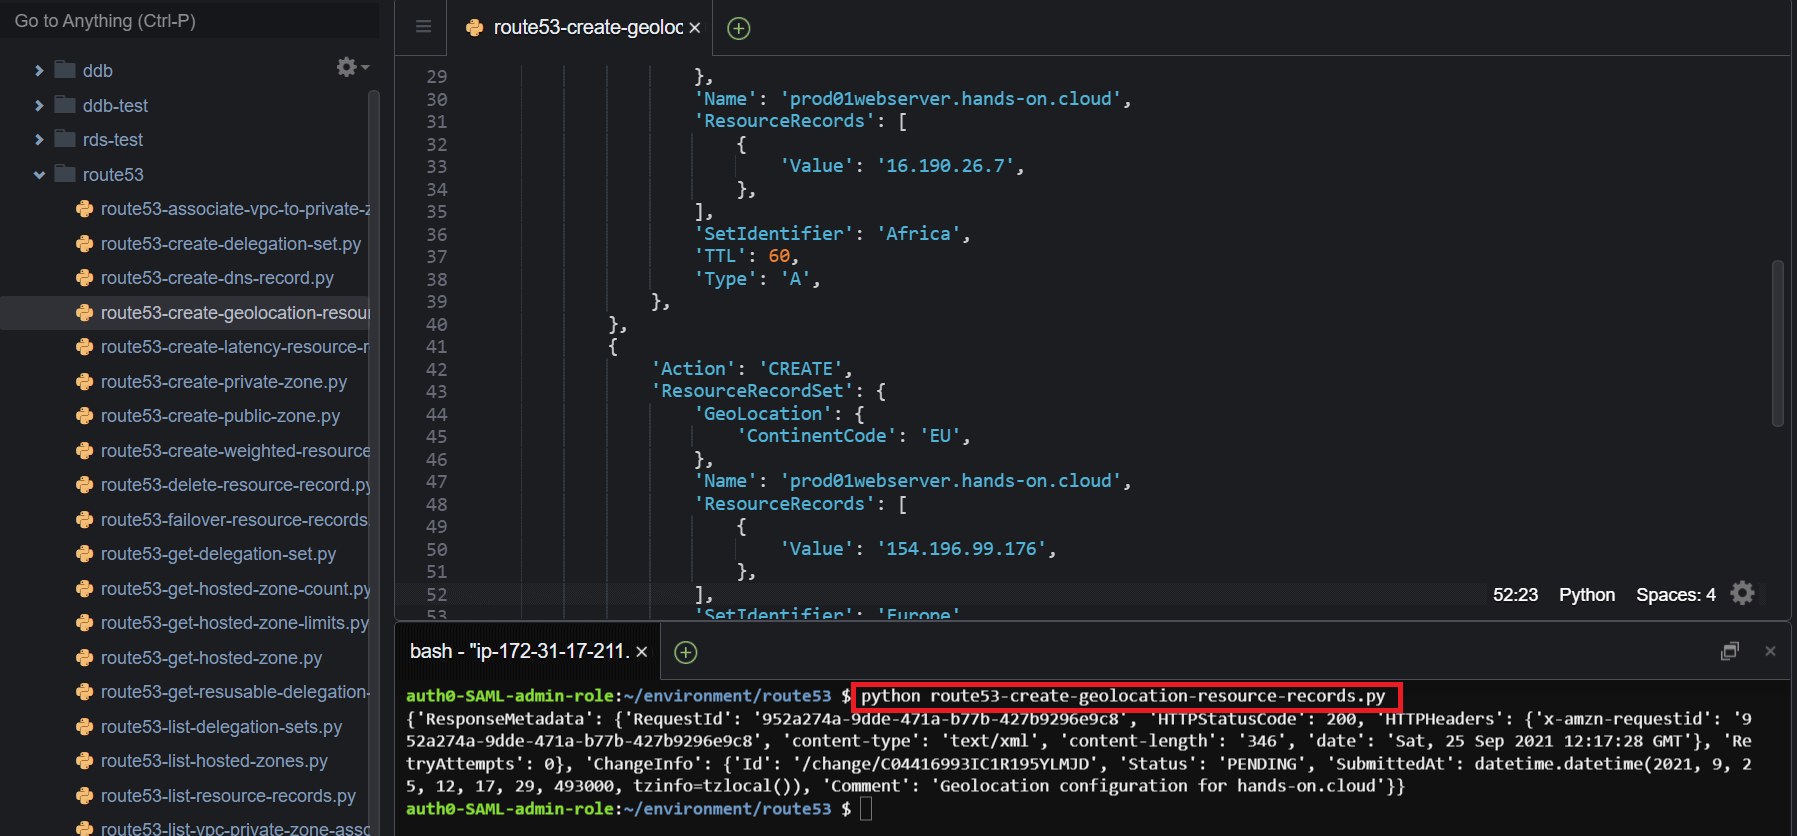
Create geolocation resource records
To create geolocation resource records, use the change_resource_records_sets() method of the Boto3 Route53 client and pass the required parameters and options for creating the records.
Geolocation resource records in Amazon Route 53 provide the functionality to respond to DNS queries based on the Geographic origin of the DNS query. This enables a faster response time to DNS queries of the different services using the resource records in the hosted DNS zone.
import boto3
client = boto3.client('route53')
response = client.change_resource_record_sets(
    ChangeBatch={
        'Changes': [
            {
                'Action': 'CREATE',
                'ResourceRecordSet': {
                    'GeoLocation': {
                        'ContinentCode': 'NA',
                    },
                    'Name': 'prod01webserver.hands-on.cloud',
                    'ResourceRecords': [
                        {
                            'Value': '137.215.223.99',
                        },
                    ],
                    'SetIdentifier': 'North America',
                    'TTL': 60,
                    'Type': 'A',
                },
            },
            {
                'Action': 'CREATE',
                'ResourceRecordSet': {
                    'GeoLocation': {
                        'ContinentCode': 'AF',
                    },
                    'Name': 'prod01webserver.hands-on.cloud',
                    'ResourceRecords': [
                        {
                            'Value': '16.190.26.7',
                        },
                    ],
                    'SetIdentifier': 'Africa',
                    'TTL': 60,
                    'Type': 'A',
                },
            },
            {
                'Action': 'CREATE',
                'ResourceRecordSet': {
                    'GeoLocation': {
                        'ContinentCode': 'EU',
                    },
                    'Name': 'prod01webserver.hands-on.cloud',
                    'ResourceRecords': [
                        {
                            'Value': '154.196.99.176',
                        },
                    ],
                    'SetIdentifier': 'Europe',
                    'TTL': 60,
                    'Type': 'A',
                },
            },
            {
                'Action': 'CREATE',
                'ResourceRecordSet': {
                    'GeoLocation': {
                        'CountryCode': '*',
                    },
                    'Name': 'prod01webserver.hands-on.cloud',
                    'ResourceRecords': [
                        {
                            'Value': '162.235.70.246',
                        },
                    ],
                    'SetIdentifier': 'Other locations',
                    'TTL': 60,
                    'Type': 'A',
                },
            },
        ],
        'Comment': 'Geolocation configuration for hands-on.cloud',
    },
    HostedZoneId='Z00594533FY3S68ROG6V2',
)
print(response)
Here is the execution output.
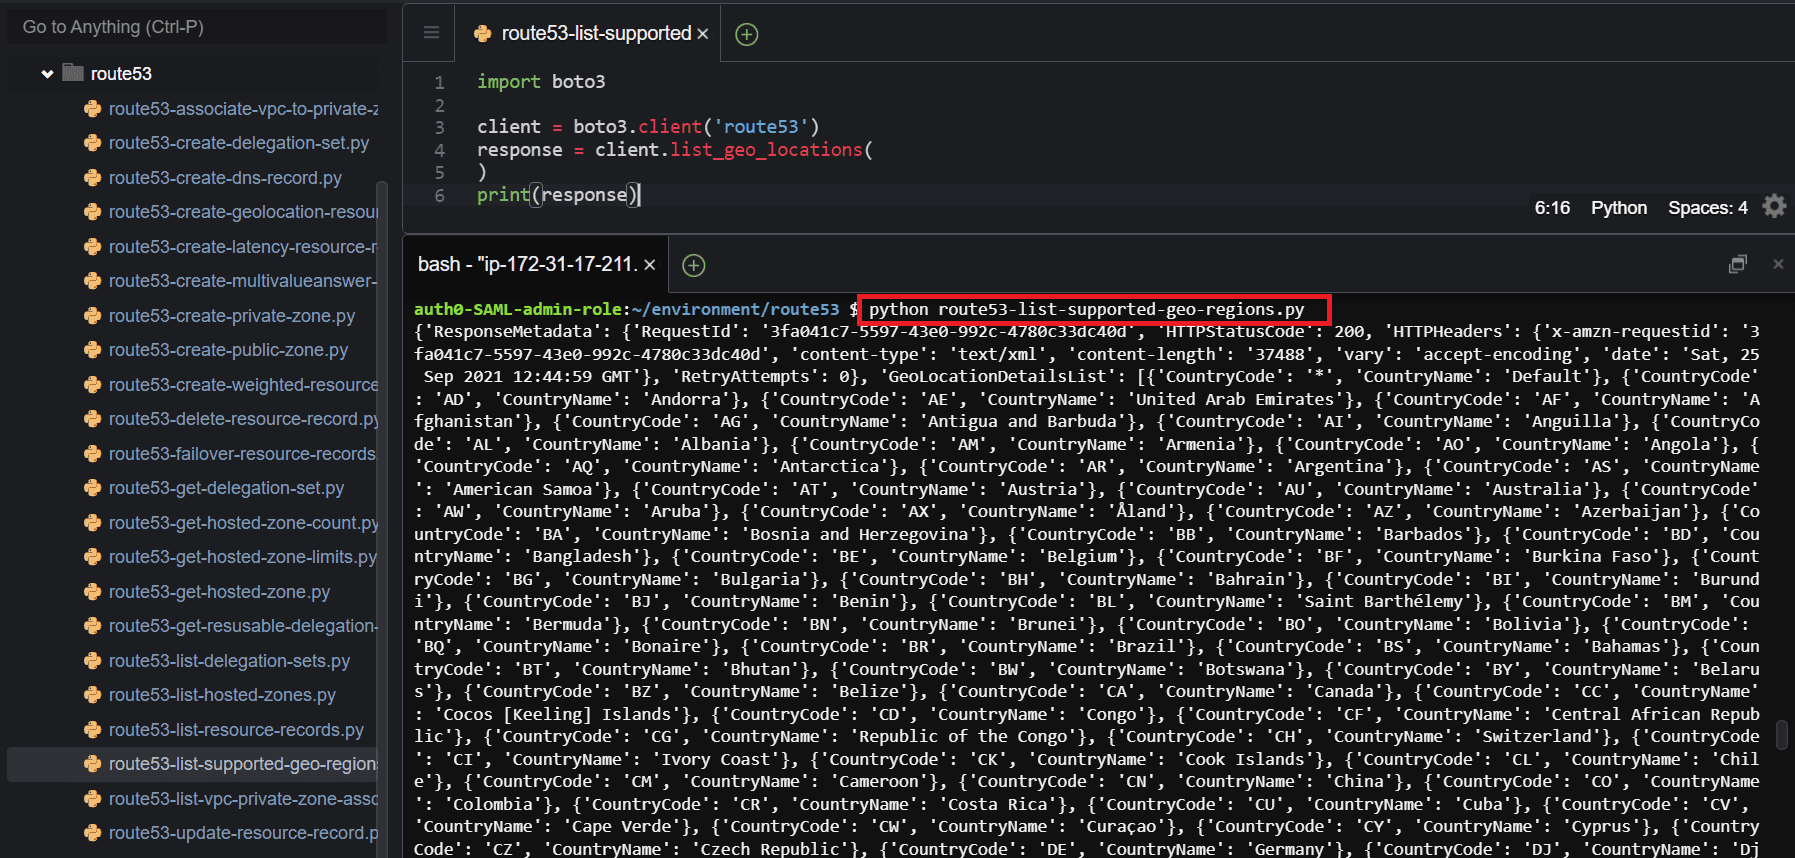
List supported geographic locations
To view the list of supported geographic locations by Amazon Route 53, use the list_geo_locations()method of the Boto3 Route53 client and assign any of your desired parameters.
import boto3
client = boto3.client('route53')
response = client.list_geo_locations(
)
print(response)
Here is the execution output.
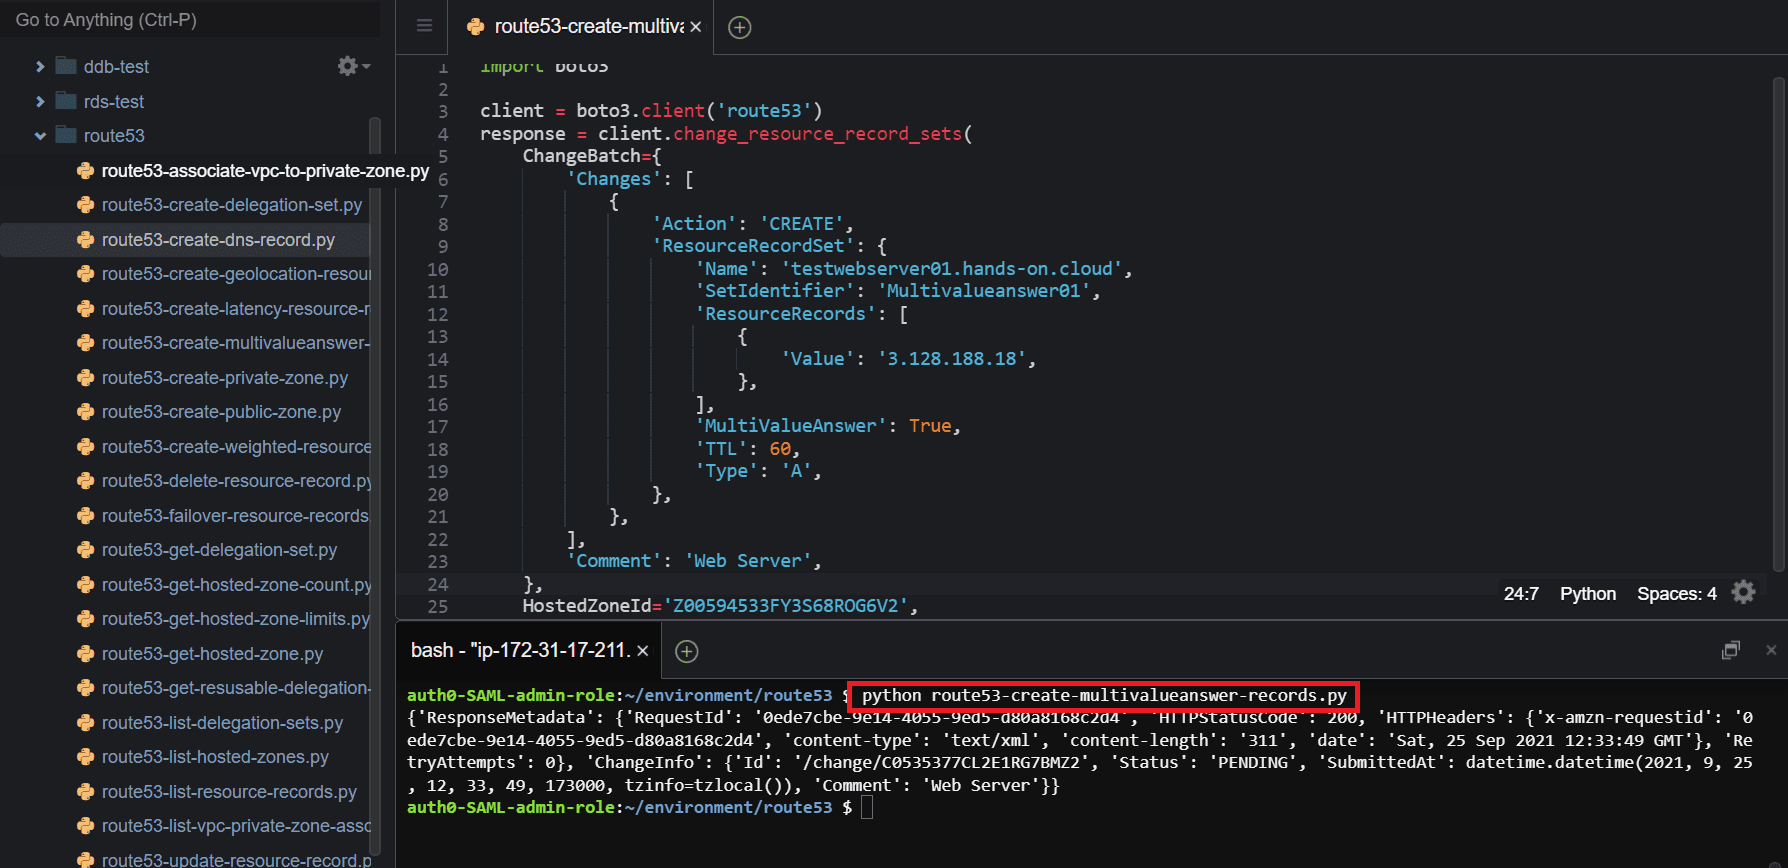
Create multivalue answer resource records
To create a multivalue answer record, use the change_resource_record_sets() method of the Boto3 Route53 client, pass the required parameters, and set the MultiValueAnswer option to True.
Multivalue answer resource records provide the functionality to route traffic randomly to multiple services/instances, enabling you to achieve some load balancing between your instances.
import boto3
client = boto3.client('route53')
response = client.change_resource_record_sets(
    ChangeBatch={
        'Changes': [
            {
                'Action': 'CREATE',
                'ResourceRecordSet': {
                    'Name': 'testwebserver01.hands-on.cloud',
                    'SetIdentifier': 'Multivalueanswer01',
                    'ResourceRecords': [
                        {
                            'Value': '3.128.188.18',
                        },
                    ],
                    'MultiValueAnswer': True,
                    'TTL': 60,
                    'Type': 'A',
                },
            },
        ],
        'Comment': 'Web Server',
    },
    HostedZoneId='Z00594533FY3S68ROG6V2',
)
print(response)
Here is the execution output.
Manage DNS health checks using Boto3
Health checks in Amazon Route 53 are used to track the health status of your resources. This helps you to route traffic to instances/resources that are considered healthy.
In the following section, we are going to look at how to create, list, and delete health checks in Amazon Route 53 using Boto3.
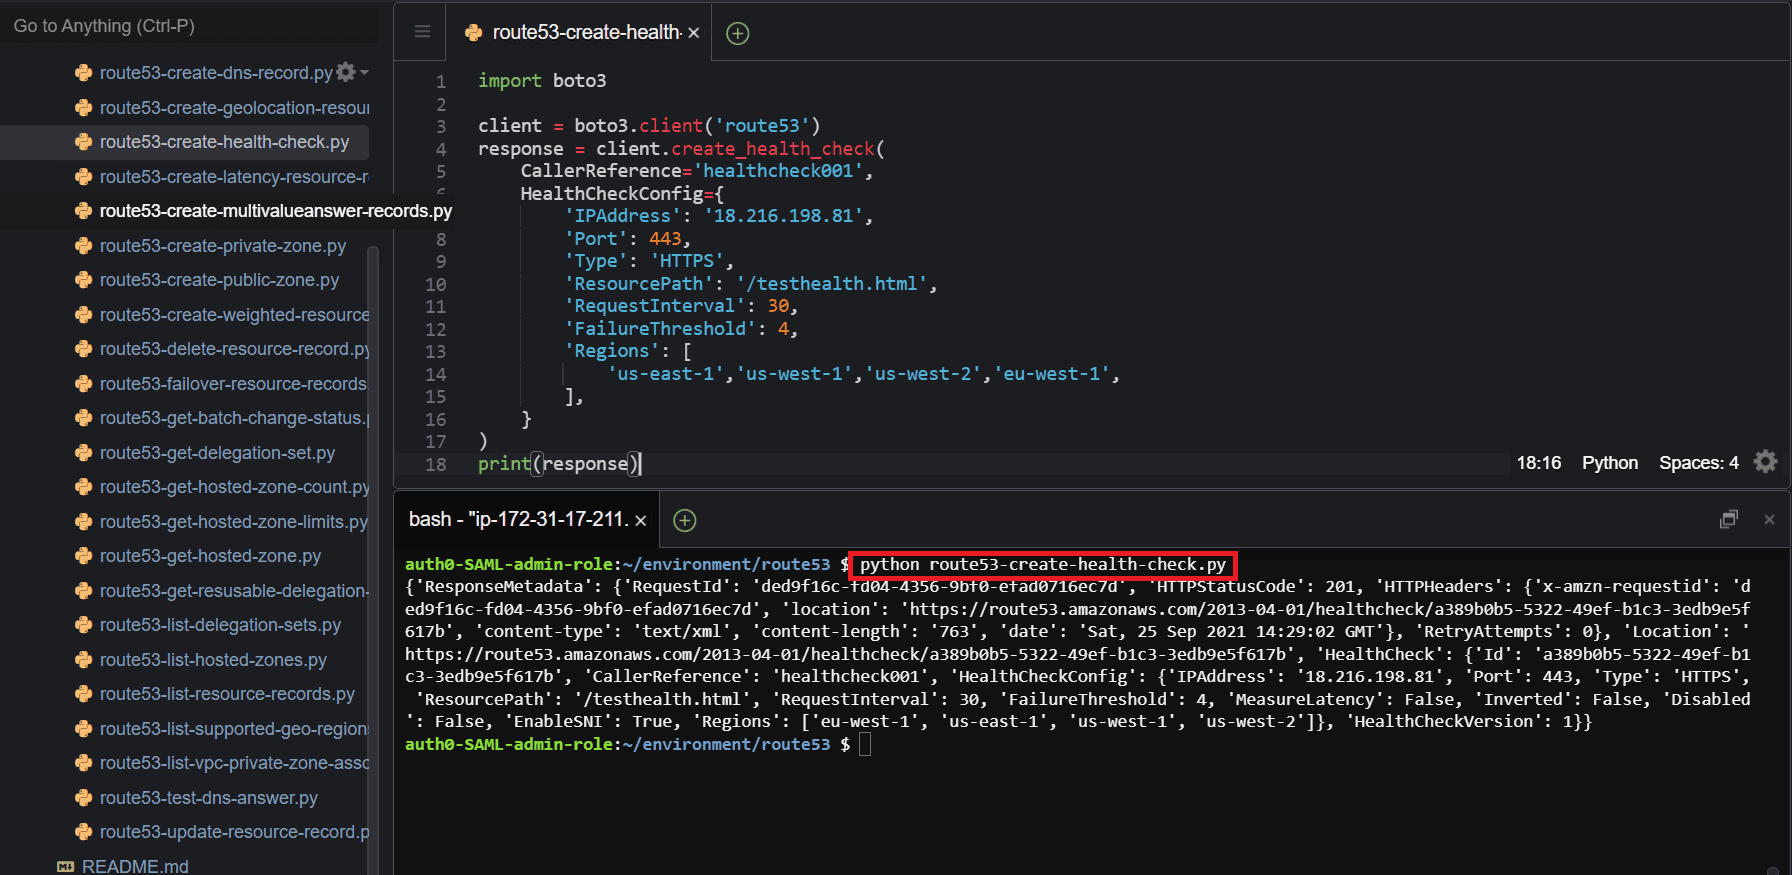
Create a health check
To create a new health check, use the create_health_check()method of the Boto3 Route53 client and pass the required parameters, such as CallerReference, HealthCheckConfig, and Type.
import boto3
client = boto3.client('route53')
response = client.create_health_check(
    CallerReference='healthcheck001',
    HealthCheckConfig={
        'IPAddress': '18.216.198.81',
        'Port': 443,
        'Type': 'HTTPS',
        'ResourcePath': '/testhealth.html',
        'RequestInterval': 30,
        'FailureThreshold': 4,
        'Regions': [
            'us-east-1','us-west-1','us-west-2','eu-west-1',
        ],
    }
)
print(response)
Here is the execution output.
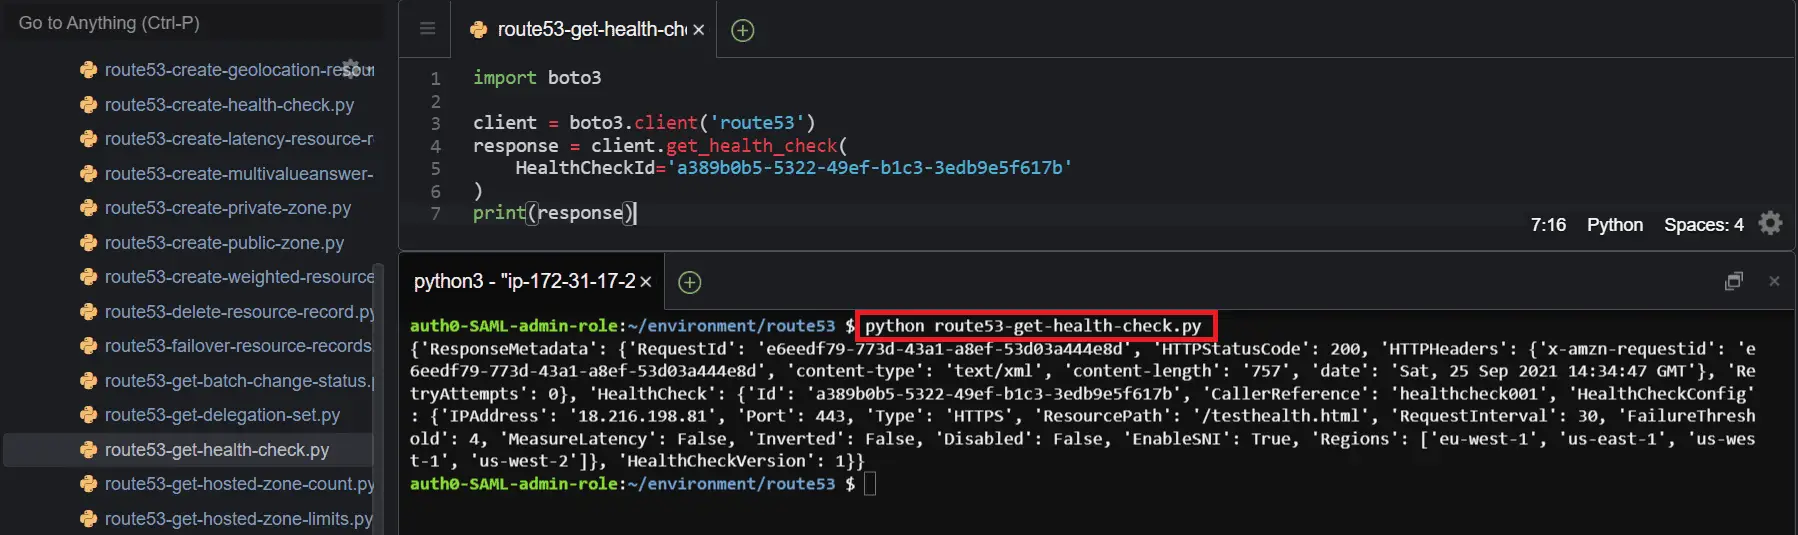
Get a health check
To get information about a specific health check, use the get_health_check()method of the Boto3 Route53 client and pass the required parameter (HealthCheckId).
import boto3
client = boto3.client('route53')
response = client.get_health_check(
    HealthCheckId='a389b0b5-5322-49ef-b1c3-3edb9e5f617b'
)
print(response)
Here is the execution output.
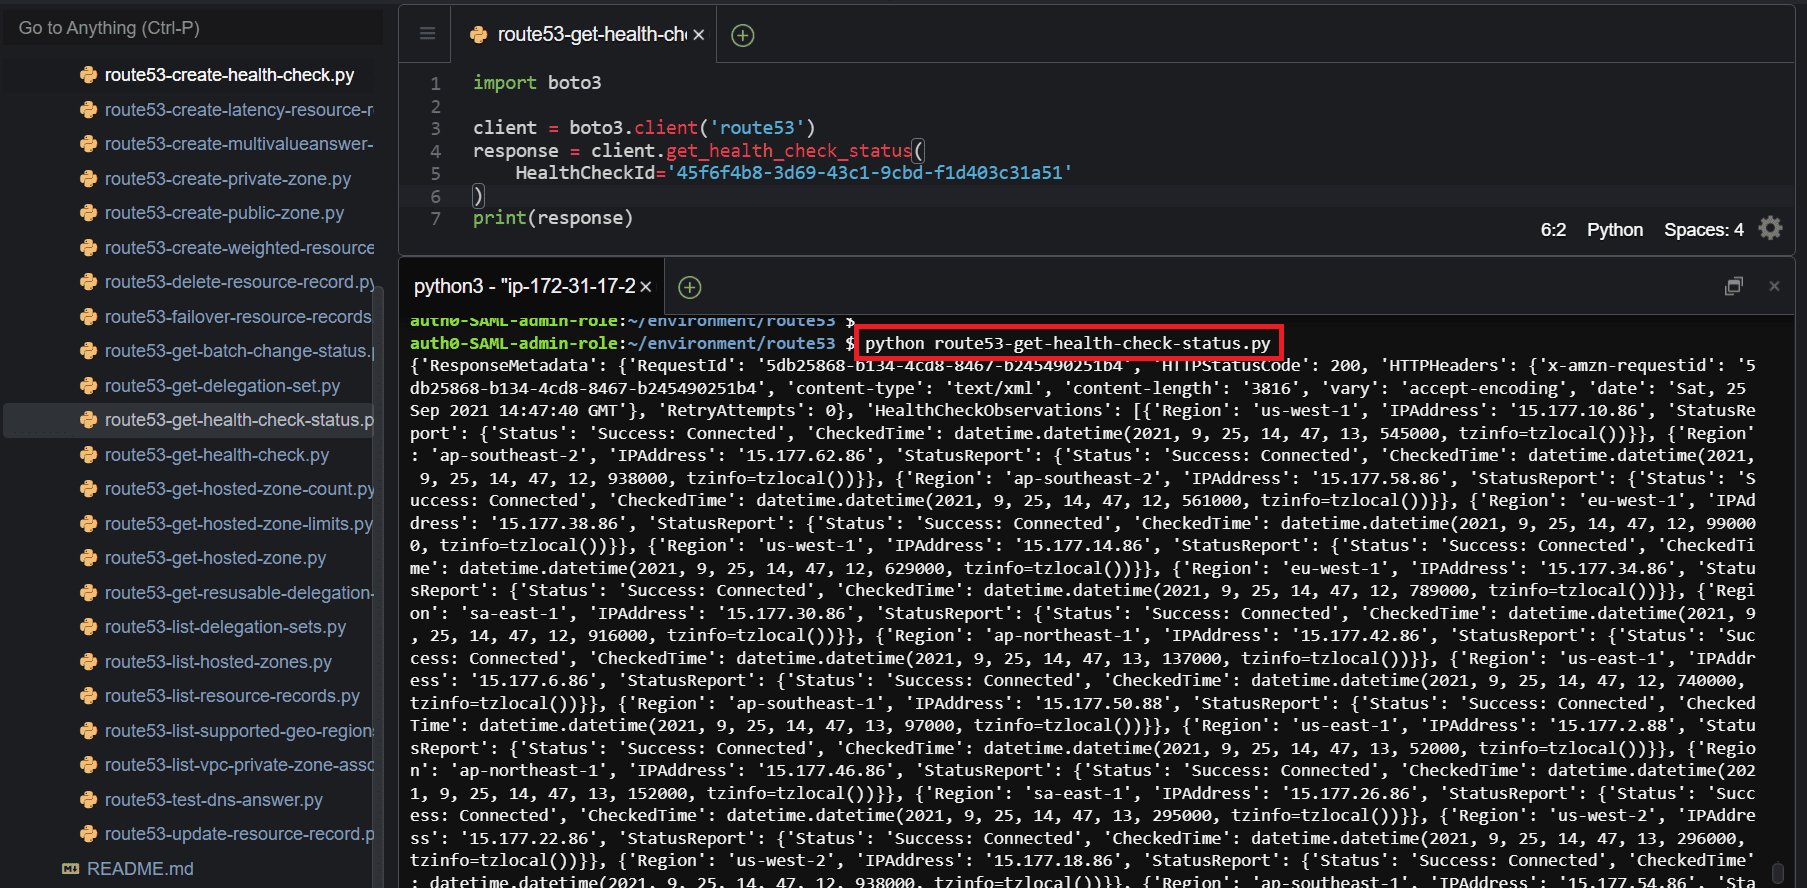
Get health check status
To get the status of a health check, use the get_health_check_status()method of the Boto3 Route53 client and pass the required parameter (HealthCheckId).
import boto3
client = boto3.client('route53')
response = client.get_health_check_status(
    HealthCheckId='45f6f4b8-3d69-43c1-9cbd-f1d403c31a51'
)
print(response)
Here is the execution output.
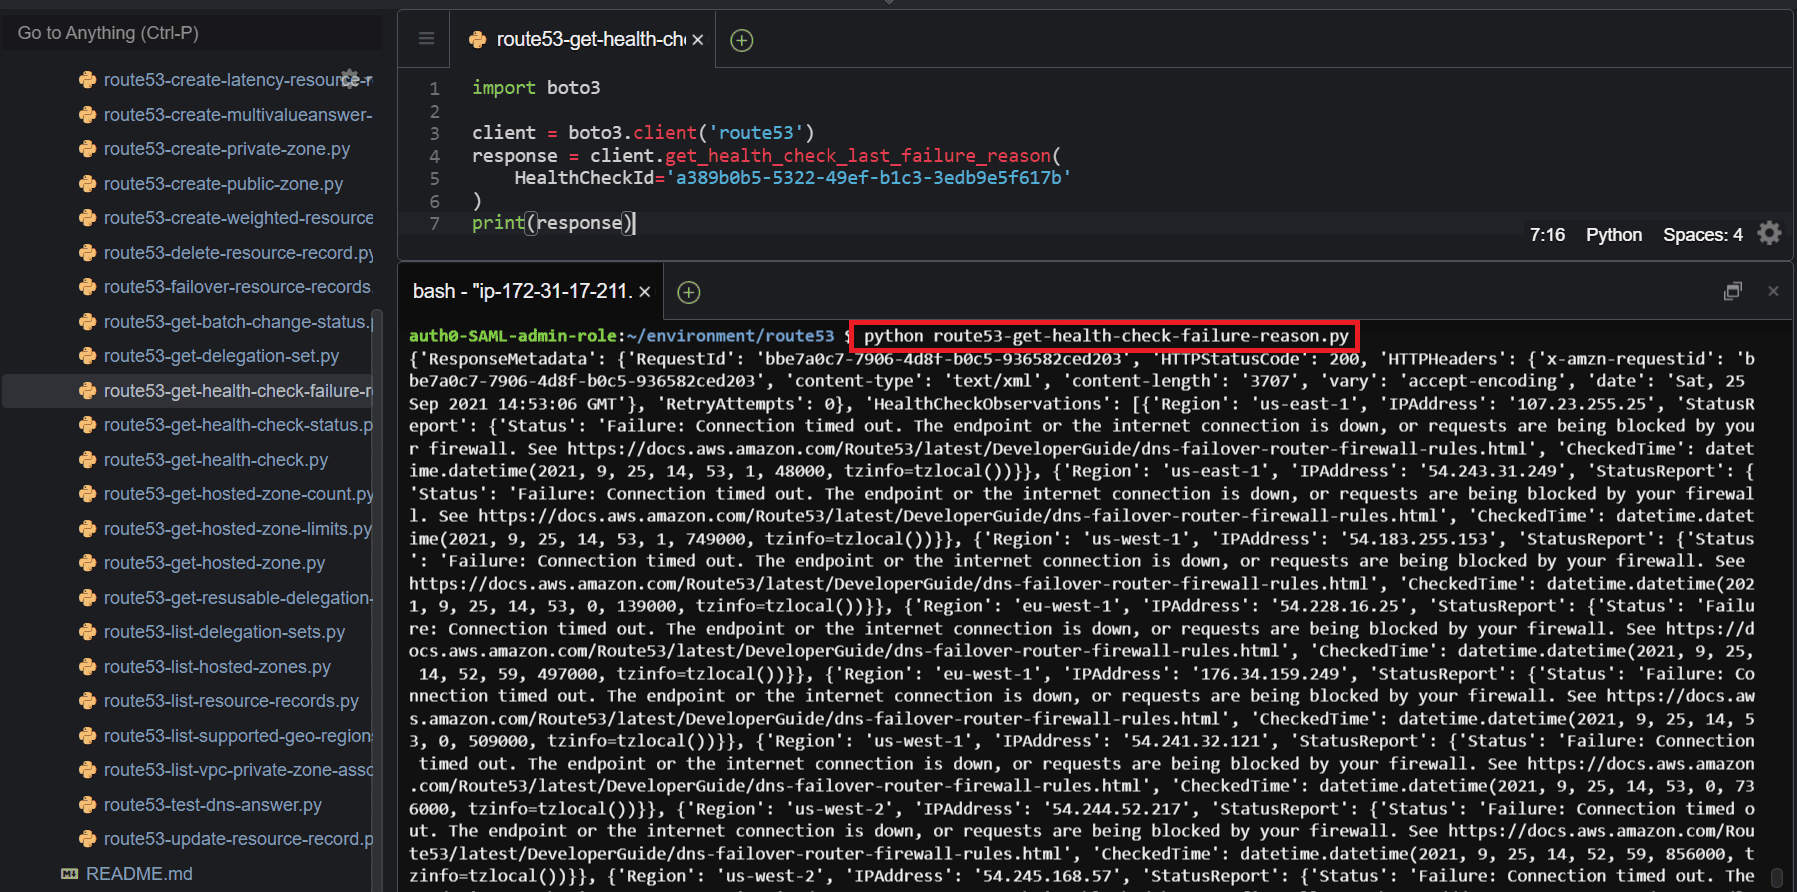
Get a health check failure reason
To get a reason why a specified DNS health check failed, use the get_health_check_last_failure_reason()method of the Boto3 Route53 client and pass the required parameter (HealthCheckId).
import boto3
client = boto3.client('route53')
response = client.get_health_check_last_failure_reason(
    HealthCheckId='a389b0b5-5322-49ef-b1c3-3edb9e5f617b'
)
print(response)
Here is the execution output.
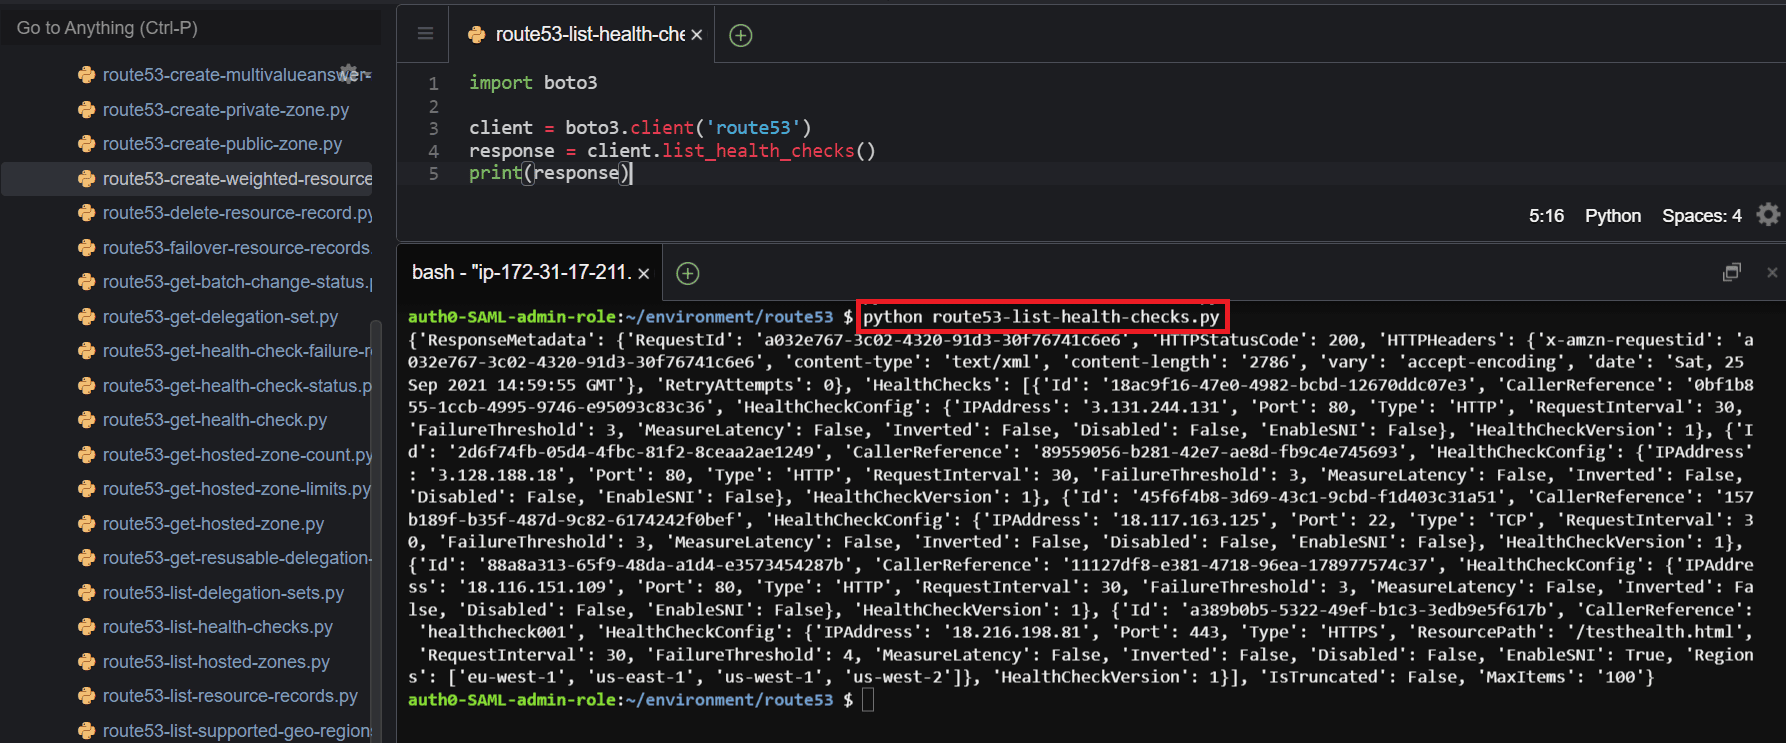
List health checks
To list all health checks associated with your AWS account, use the list_health_checks()method of the Boto3 Route53 client.
import boto3
client = boto3.client('route53')
response = client.list_health_checks()
print(response)
Here is the execution output.
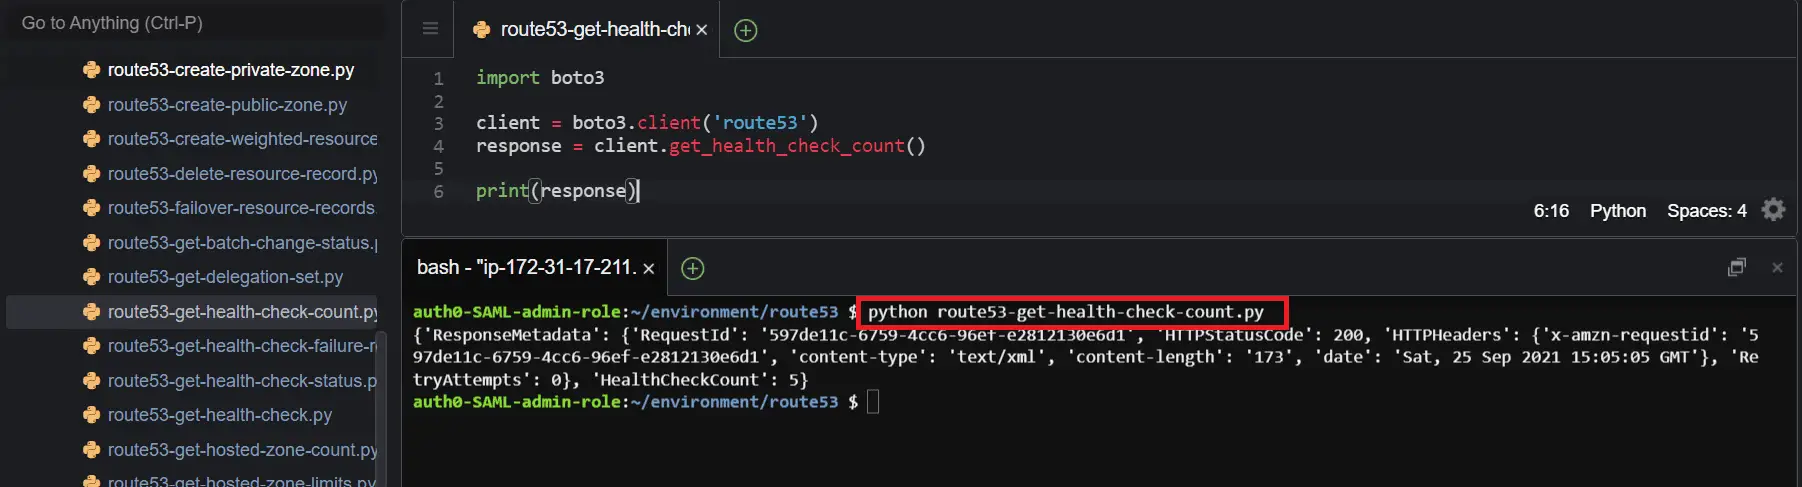
Get health checks count
To get the total number of health checks that at associated with your AWS account, use the get_health_check_count()method of the Boto3 Route53 client.
import boto3
client = boto3.client('route53')
response = client.get_health_check_count()
print(response)
Here is the execution output.
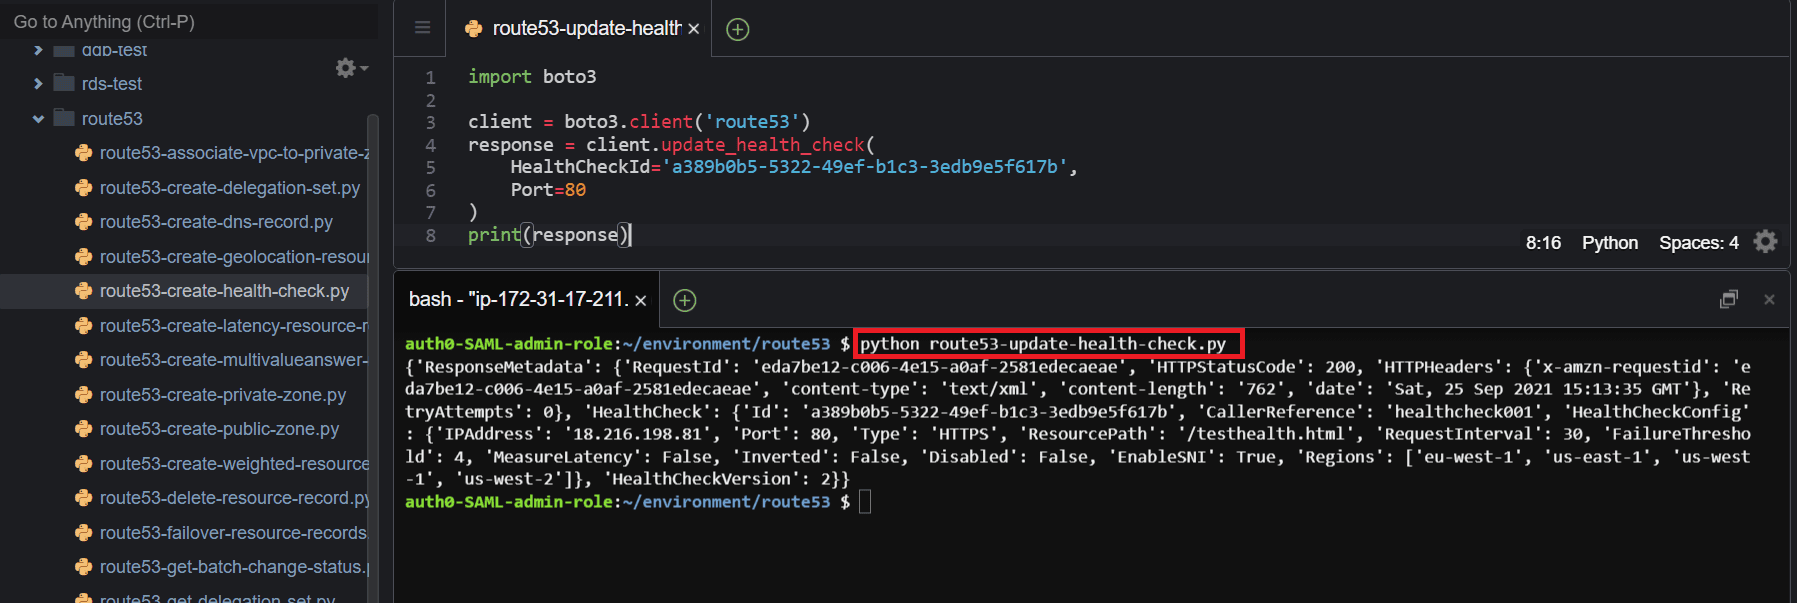
Update a health check
To update a health check, use the update_health_check()method of the Boto3 Route53 client and pass the required parameter (HealthCheckId), and specify which values you want to update.
In the following example, I will update the Port value to a different port number for the health check.
import boto3
client = boto3.client('route53')
response = client.update_health_check(
    HealthCheckId='a389b0b5-5322-49ef-b1c3-3edb9e5f617b',
    Port=80
)
print(response)
Here is the execution output.
Manage DNSSEC using Boto3
Domain Name System Security Extensions (DNSSEC) in Amazon Route 35 provides the capability for DNS resolvers to sign responses using public-key cryptography and validate that responses from Route 53 have not been modified. The following section will describe the various ways that you can work with DNSSEC, including enabling DNSSEC for hosted zones and creating key signing keys.
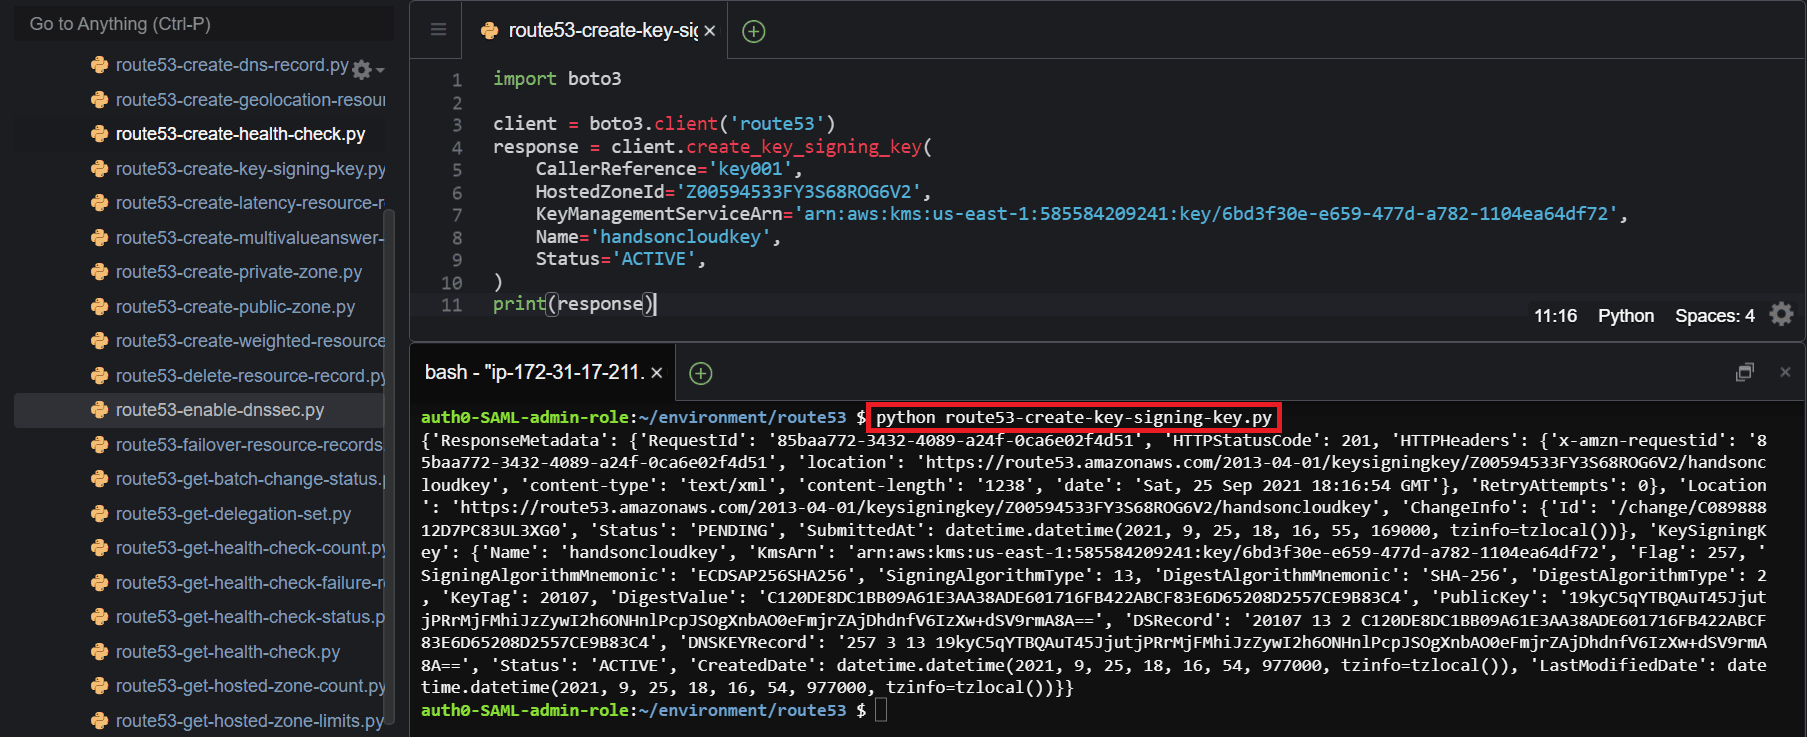
Create aDNSSEC signing key
To create aDNSSEC signing key, use the create_key_signing_key()method of the Boto3 Route53 client and pass the required parameters, such as the CallerReference, HostedzoneId, KeyManagementServiceArn, Name and Status.
import boto3
client = boto3.client('route53')
response = client.create_key_signing_key(
    CallerReference='key001',
    HostedZoneId='Z00594533FY3S68ROG6V2',
    KeyManagementServiceArn='arn:aws:kms:us-east-1:585584209241:key/6bd3f30e-e659-477d-a782-1104ea64df72',
    Name='handsoncloudkey',
    Status='ACTIVE',
)
print(response)
Here is the execution output.
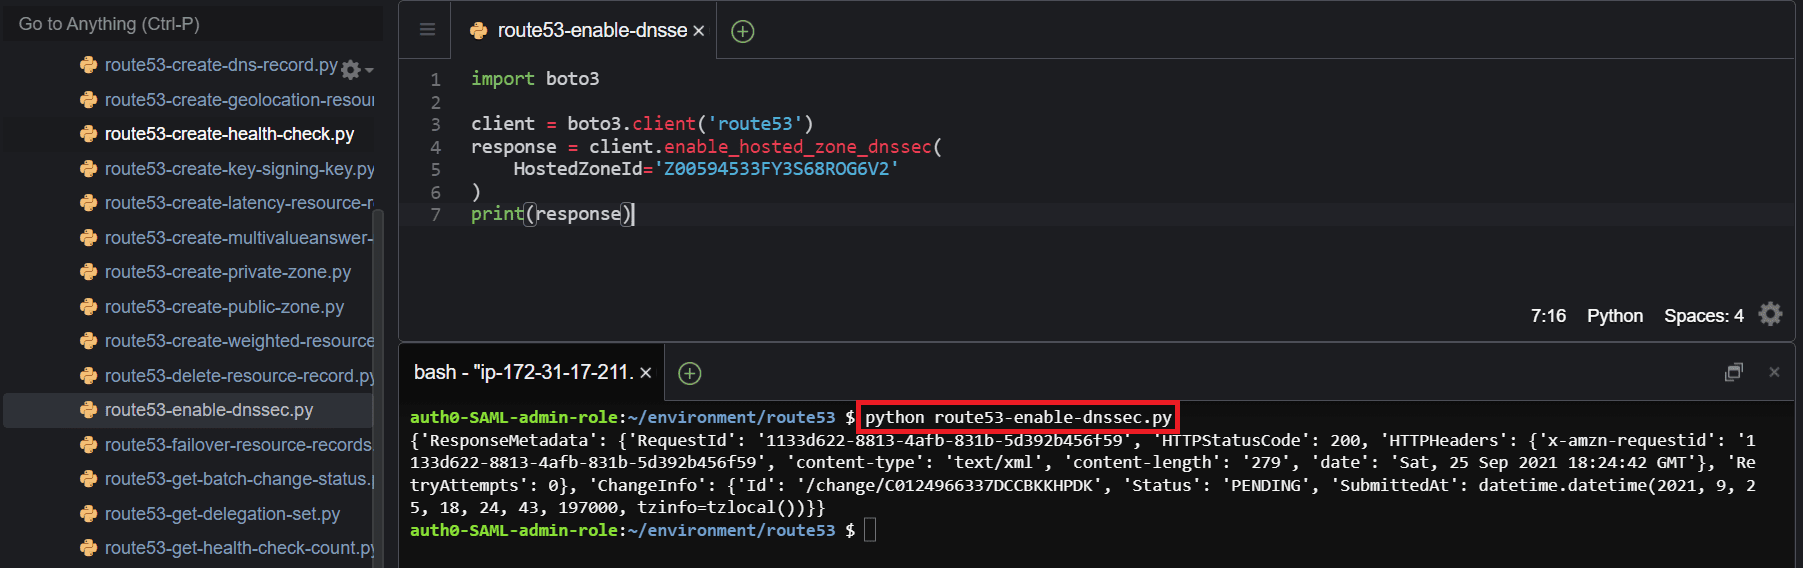
Enable DNSSEC for hosted zones
To enable DNSSEC for your hosted zone, use the enable_hosted_zone_dnssec()method of the Boto3 Route53 client and pass the required parameter (HostedZoneId) for your hosted zone.
import boto3
client = boto3.client('route53')
response = client.enable_hosted_zone_dnssec(
    HostedZoneId='Z00594533FY3S68ROG6V2'
)
print(response)
Here is the execution output.
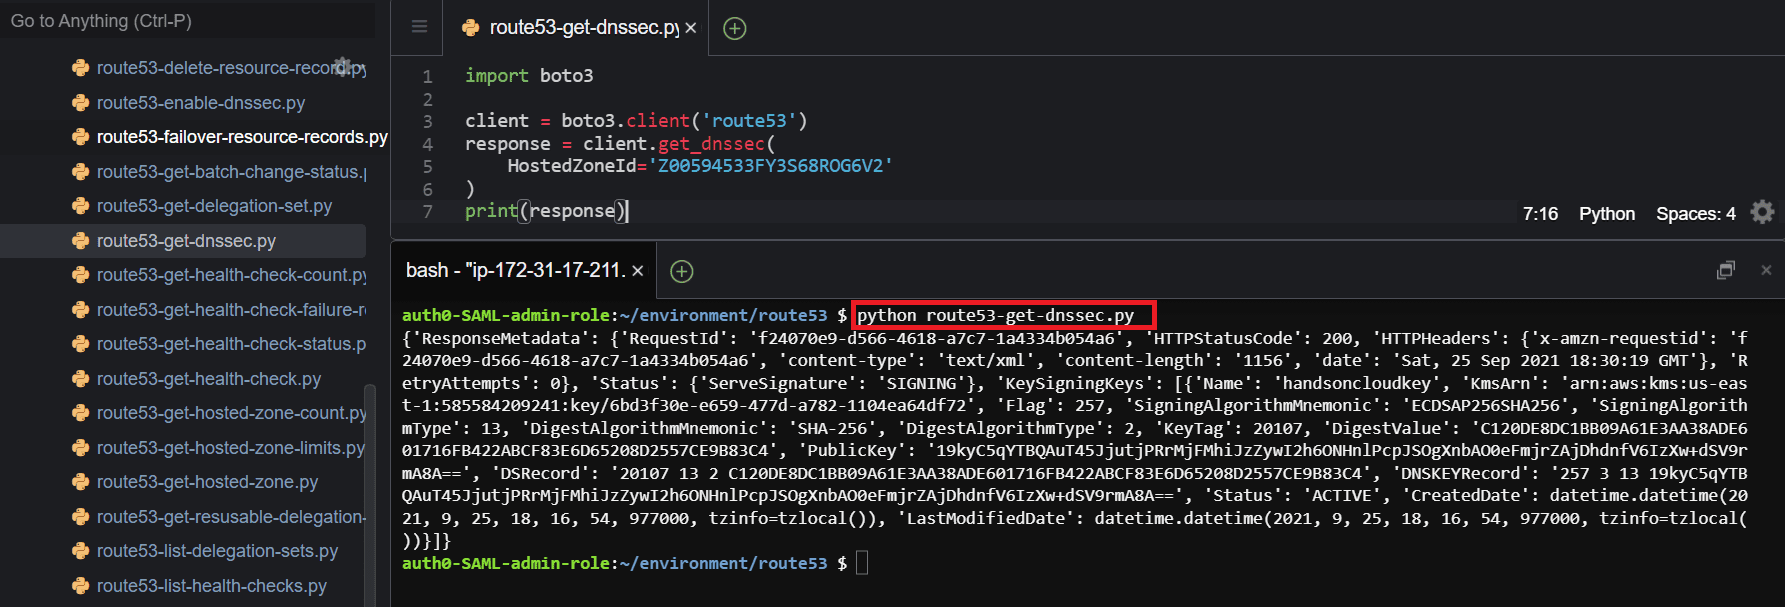
Get DNSSEC information
To get information about DNSSEC for a hosted zone, use the get_dnssec()method of the Boto3 Route53 client and assign the required parameter (HostedZoneId).
import boto3
client = boto3.client('route53')
response = client.get_dnssec(
    HostedZoneId='Z00594533FY3S68ROG6V2'
)
print(response)
Here is the execution output.
Disable DNSSEC
To disable DNSSEC for a hosted zone, use the disable_hosted_zone_dnssec()method of the Boto3 Route53 client and pass the required parameter (HostedZoneId).
import boto3
client = boto3.client('route53')
response = client.disable_hosted_zone_dnssec(
    HostedZoneId='Z00594533FY3S68ROG6V2'
)
print(response)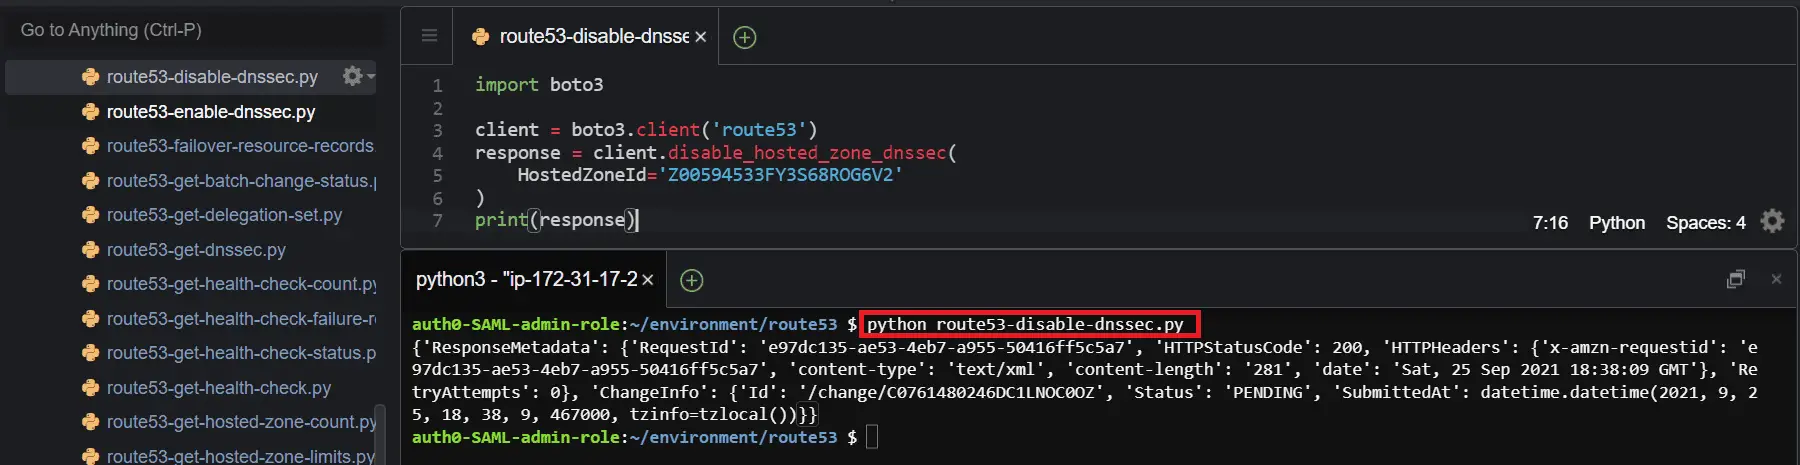
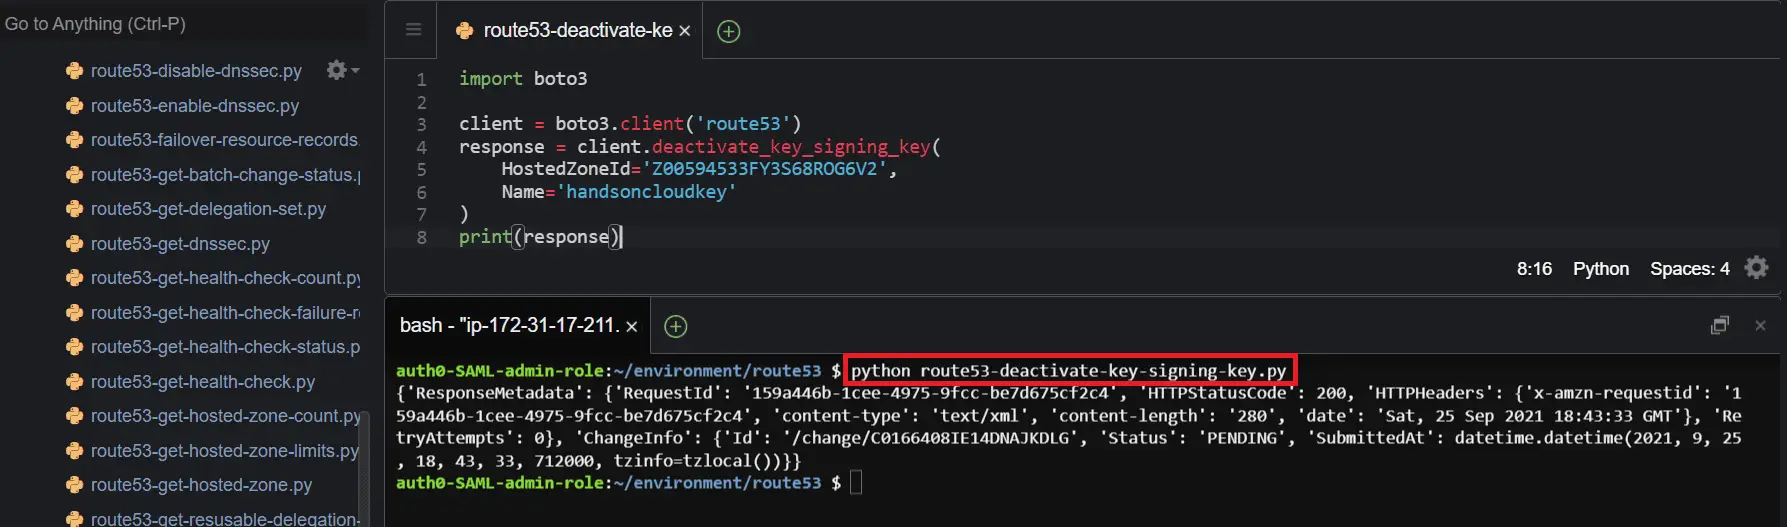
Deactivate aDNSSEC signing key
To deactivate aDNSSEC signing key, use the deactivate_key_signing_key()method of the Boto3 Route53 client and pass the required parameters, such as HostedZoneId and Name of the key-signing key.
import boto3
client = boto3.client('route53')
response = client.deactivate_key_signing_key(
    HostedZoneId='Z00594533FY3S68ROG6V2',
    Name='handsoncloudkey'
)
print(response)
Here is the execution output.
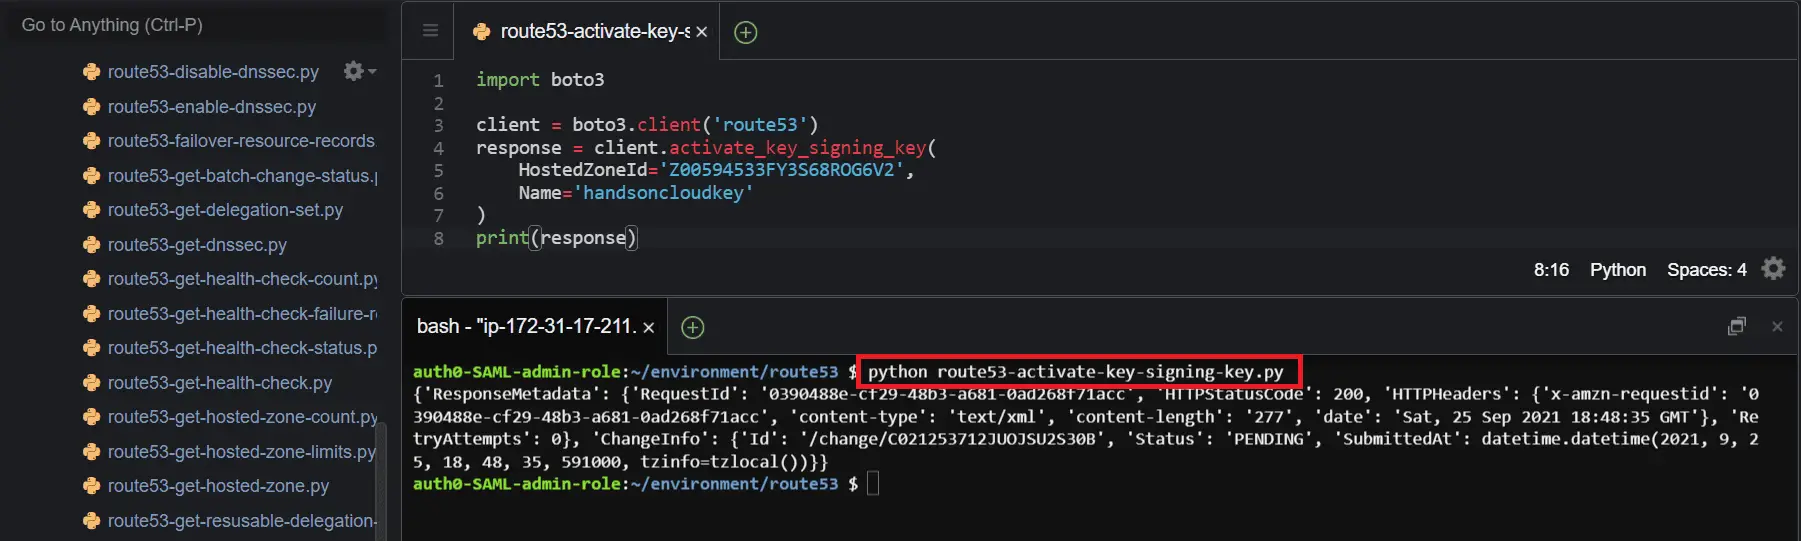
Activate aDNSSEC signing key
To activate aDNSSEC signing key, use the activate_key_sigining_key()method of the Boto3 Route53 client and pass the required parameters: the HostedZoneId and Name of the key signing key.
import boto3
client = boto3.client('route53')
response = client.activate_key_signing_key(
    HostedZoneId='Z00594533FY3S68ROG6V2',
    Name='handsoncloudkey'
)
print(response)
Here is the execution output.
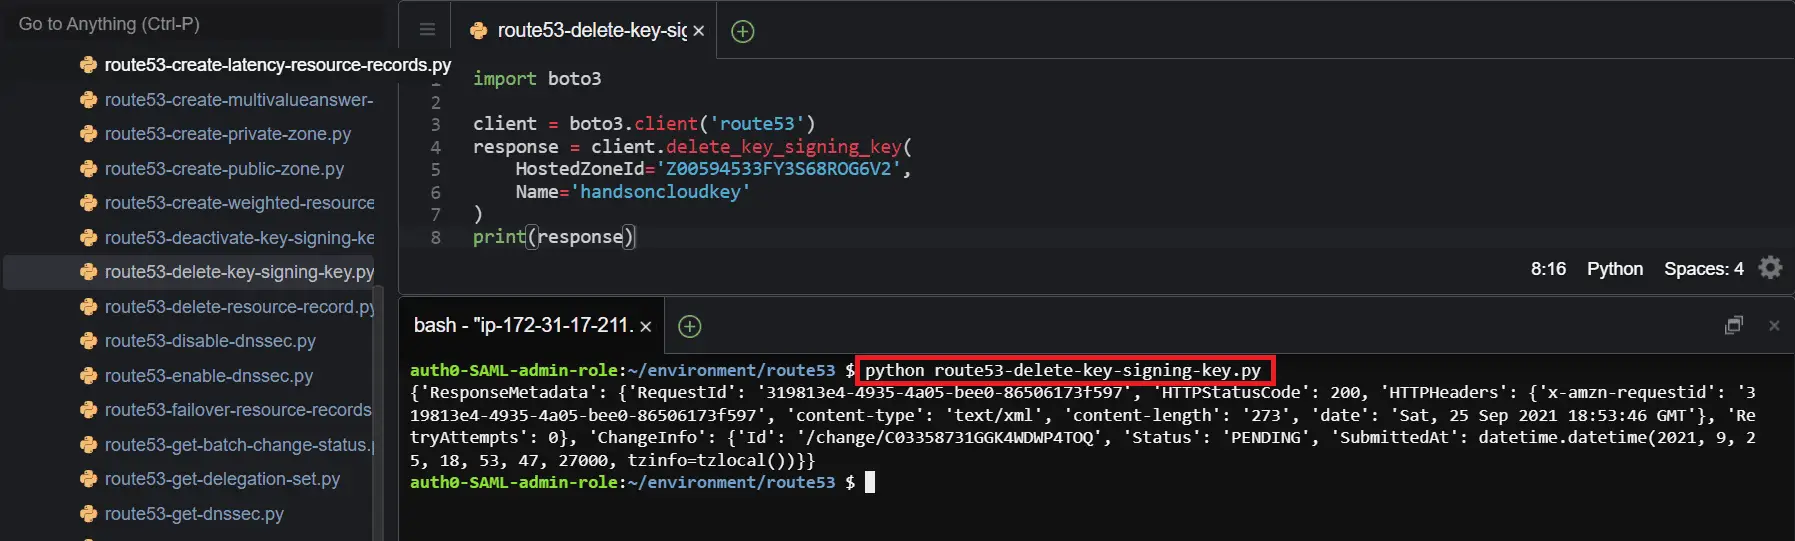
Delete aDNSSEC signing key
To delete aDNSSEC signing key, use the delete_key_signing_key()method of the Boto3 Route53 client and pass the required parameters: the HostedZoneId and Name of the key signing key.
The key signing key must be in an inactive state for the delete operation to be successful.
import boto3
client = boto3.client('route53')
response = client.delete_key_signing_key(
    HostedZoneId='Z00594533FY3S68ROG6V2',
    Name='handsoncloudkey'
)
print(response)
Here is the execution output.
Configure query logging for DNS zones using Boto3
Amazon Route 53 includes the functionality of logging DNS queries for public hosted zones. In the following section, we are going to describe how we can achieve that using Boto3.
Create Route53 resource policy
To enable DNS query logging, you need to define a resource policy document that allows Route53 to access the CloudWatch log group that will store your query logs.
To create the resource policy, use the put_resource_policy()method of the Boto3 logs client and make sure to specify the AWS Region for CloudWatch Logs.
import json
import boto3
client = boto3.client('logs', region_name='us-east-1')
policy = {
  "Version": "2012-10-17",
  "Statement": [
    {
      "Sid": "Route53LogsToCloudWatchLogs",
      "Effect": "Allow",
      "Principal": {
        "Service": [
          "route53.amazonaws.com"
        ]
      },
      "Action": [
        "logs:CreateLogStream",
        "logs:PutLogEvents"
      ],
      "Resource": "arn:aws:logs:us-east-1:585584209241:log-group:*"
    }
  ]
}
response = client.put_resource_policy(
    policyName='Route53Logs',
    policyDocument= json.dumps(policy)
)
print(response)
Here is the execution output.
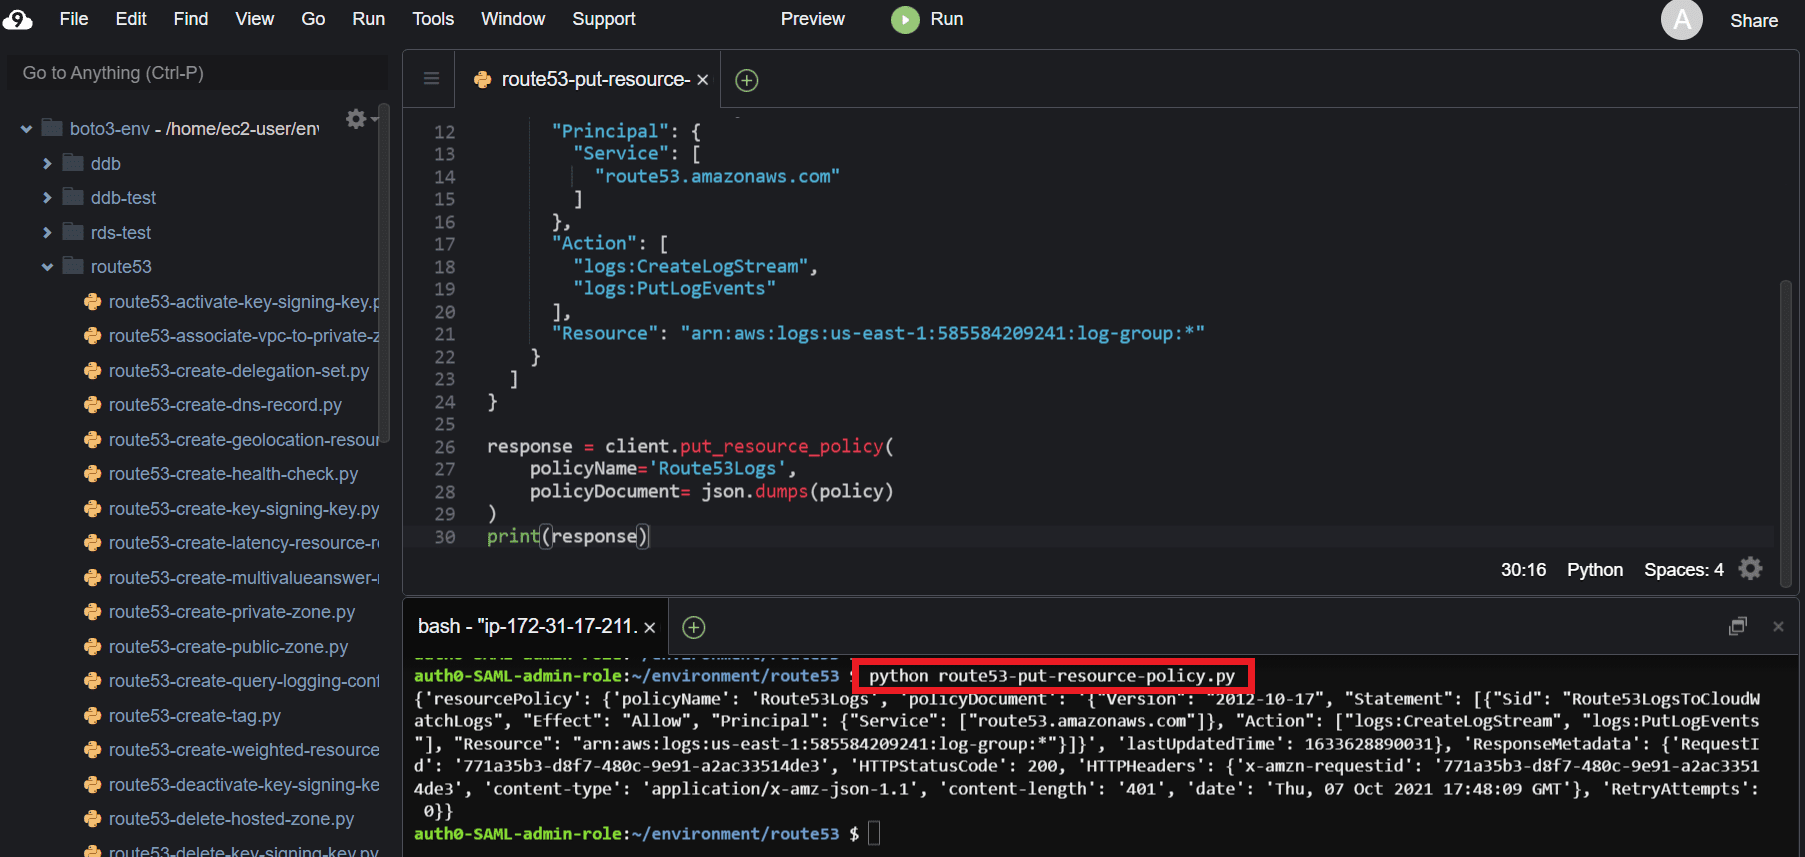
For more information about AWS IAM, check the A quick intro to AWS Identity and Access Management (IAM) article.
Create DNS query logging configuration
To create the DNS query logging configuration, use the create_query_logging_config()method of the Boto3 Route53 client and pass the required parameters: the HostedZoneId and the CloudWatchLogsLogGroupArn.
import boto3
client = boto3.client('route53',region_name="us-east-1")
response = client.create_query_logging_config(
    HostedZoneId='Z00594533FY3S68ROG6V2',
    CloudWatchLogsLogGroupArn='arn:aws:logs:us-east-1:585584209241:log-group:/aws/route53/hands-on.cloud'
)
print(response)
Here is the execution output.

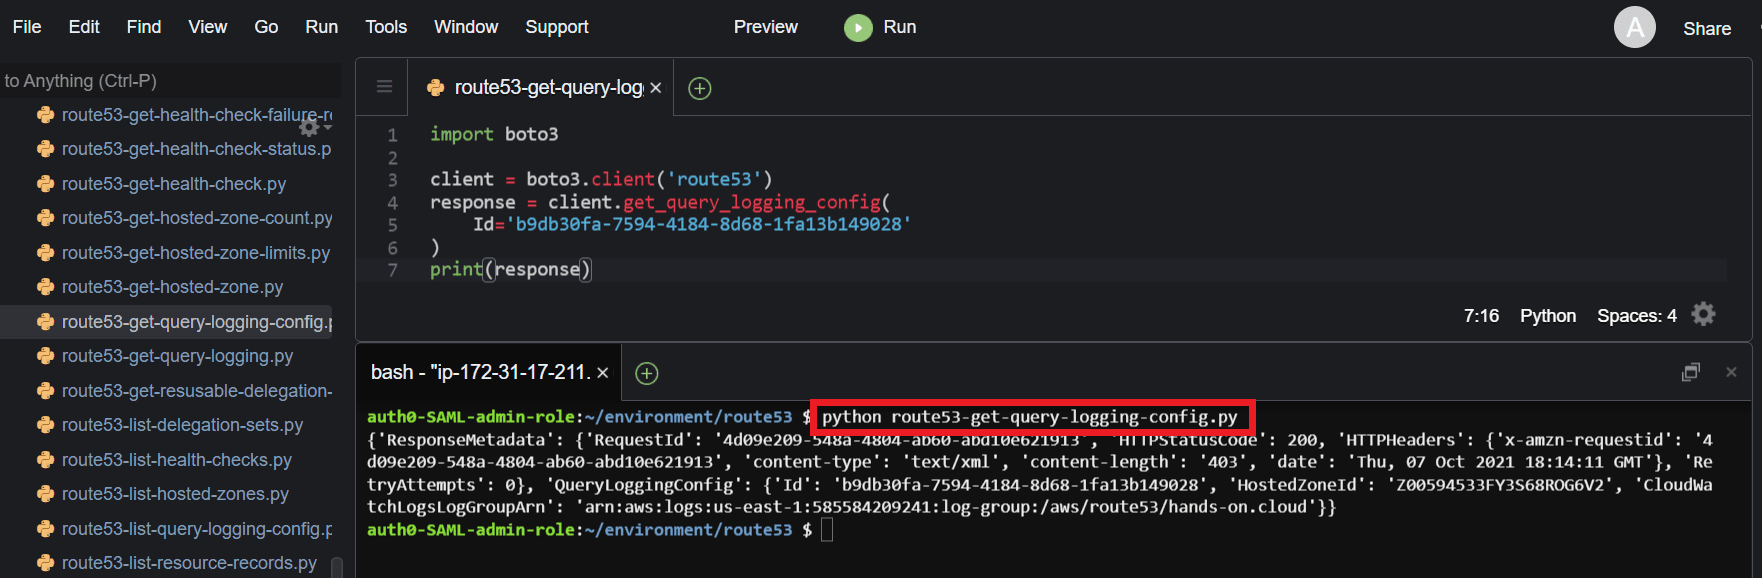
Get query logging configuration
To retrieve information about a specific query logging configuration, use the get_query_logging_config()method of the Boto3 Route53 client and pass the Id parameter, the identifier for the DNS query logging configuration.
import boto3
client = boto3.client('route53')
response = client.get_query_logging_config(
    Id='b9db30fa-7594-4184-8d68-1fa13b149028'
)
print(response)
Here is the execution output.
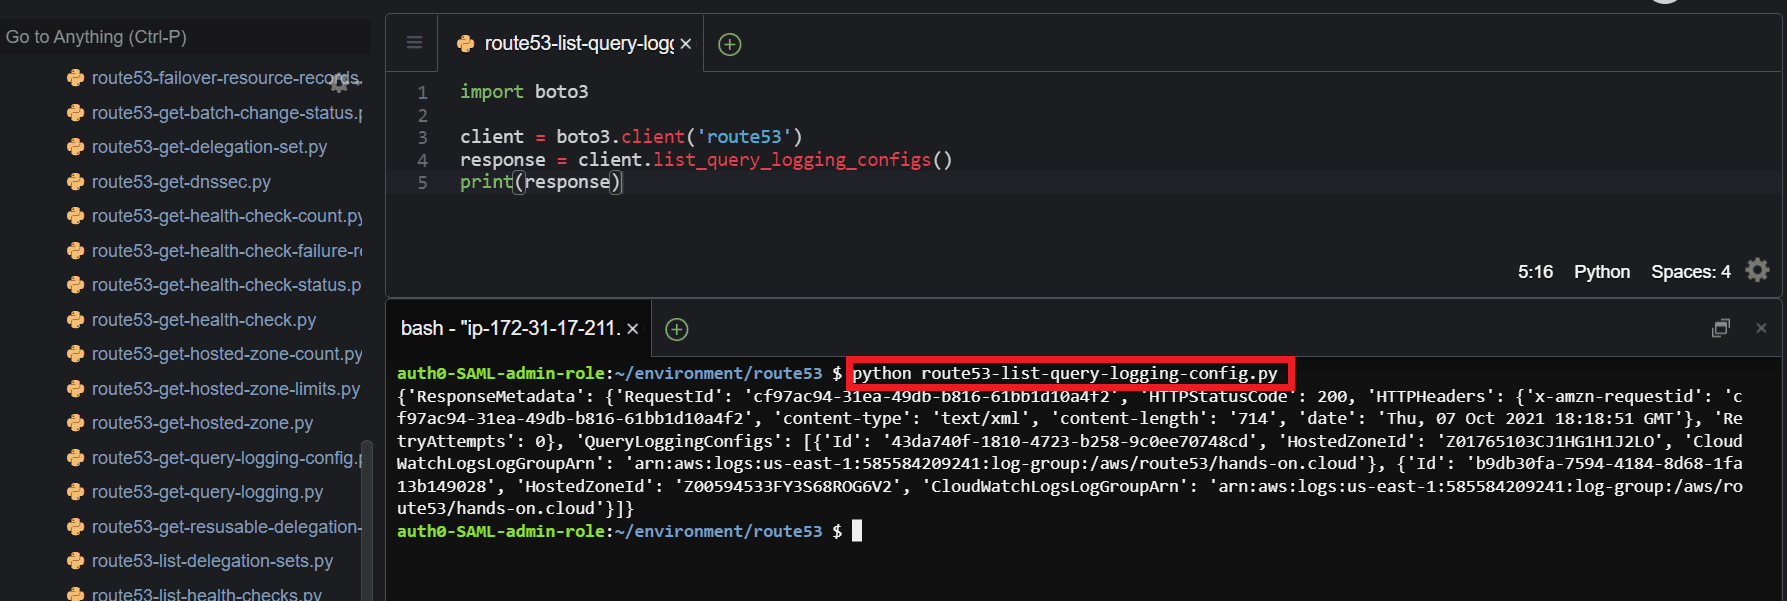
List query logging confgurations
To list all the query logging associated with your AWS account, use the list_query_logging_configs()method of the Boto3 Route53 client.
import boto3
client = boto3.client('route53')
response = client.list_query_logging_configs()
print(response)
Here is the execution output.
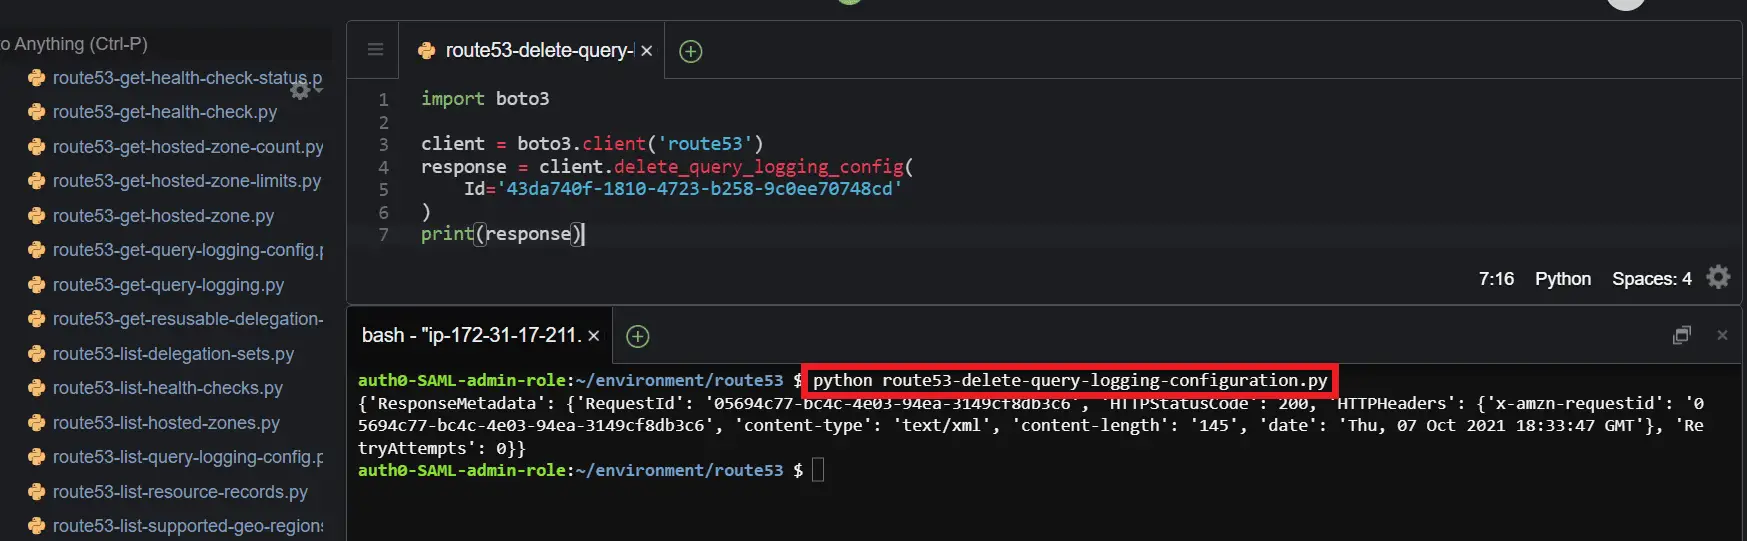
Delete query logging configuration
To delete a query logging configuration, use the delete_query_logging_config()method of the Boto3 Route53 client and pass the required parameter, the Id of the query logging configuration.
import boto3
client = boto3.client('route53')
response = client.delete_query_logging_config(
    Id='43da740f-1810-4723-b258-9c0ee70748cd'
)
print(response)
Here is the execution output.
Configure DNS resource tagging using Boto3
Resource tags are used to group Amazon Web Service resources for different purposes, such as grouping and easing the identification of multiple environments and other uses cases such as budgeting and cost allocation.
In the following section, we will describe the different ways you can work with resource tags in Amazon Route 53.
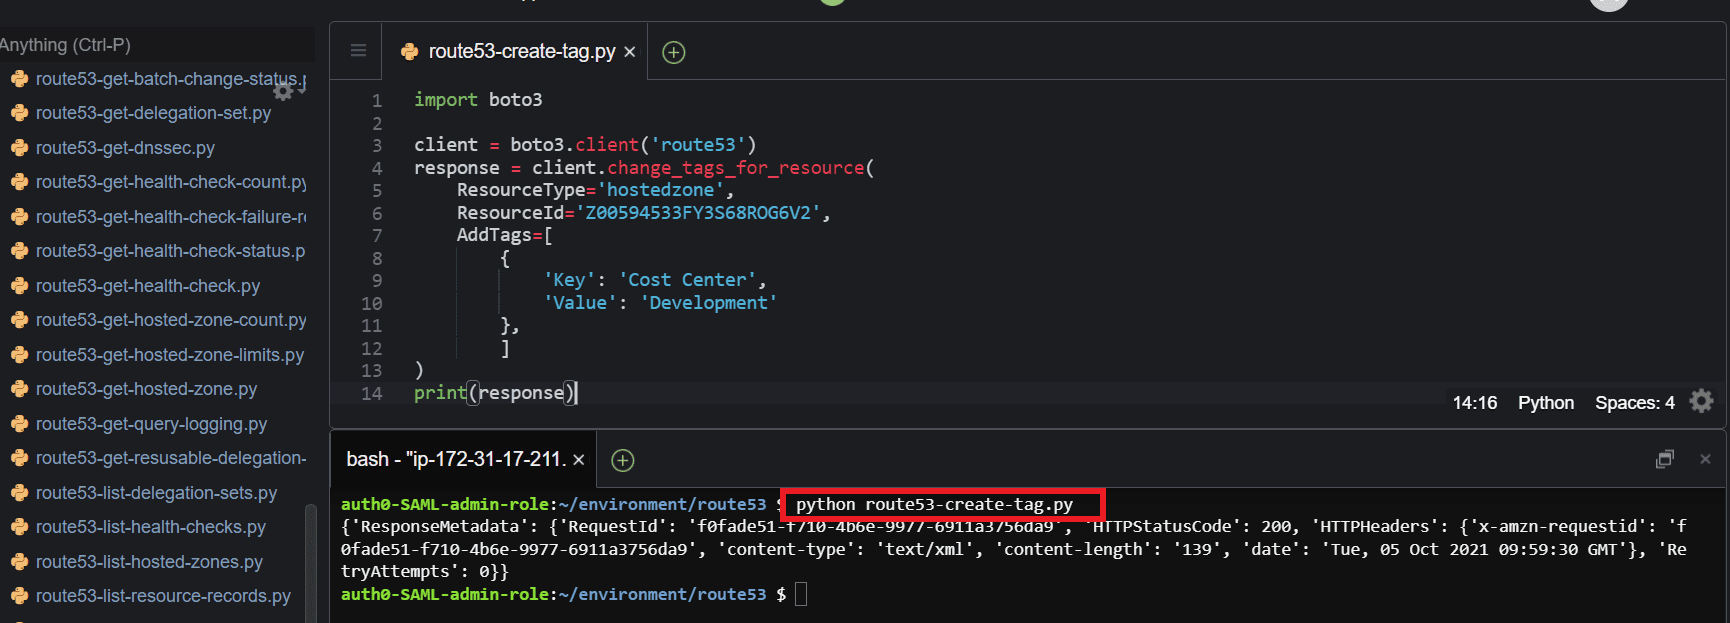
Create resource tags
To create a new tag for a hosted zone, use the change_tags_for_resoure()method of the Boto3 Route53 client and pass the required parameter, such as ResourceType and ResourceId.
Tags can be created for either Amazon Route 53 zones or health checks.
import boto3
client = boto3.client('route53')
response = client.change_tags_for_resource(
    ResourceType='hostedzone',
    ResourceId='Z00594533FY3S68ROG6V2',
    AddTags=[
        {
            'Key': 'Cost Center',
            'Value': 'Development'
        },
        ]
)
print(response)
Here is the execution output.
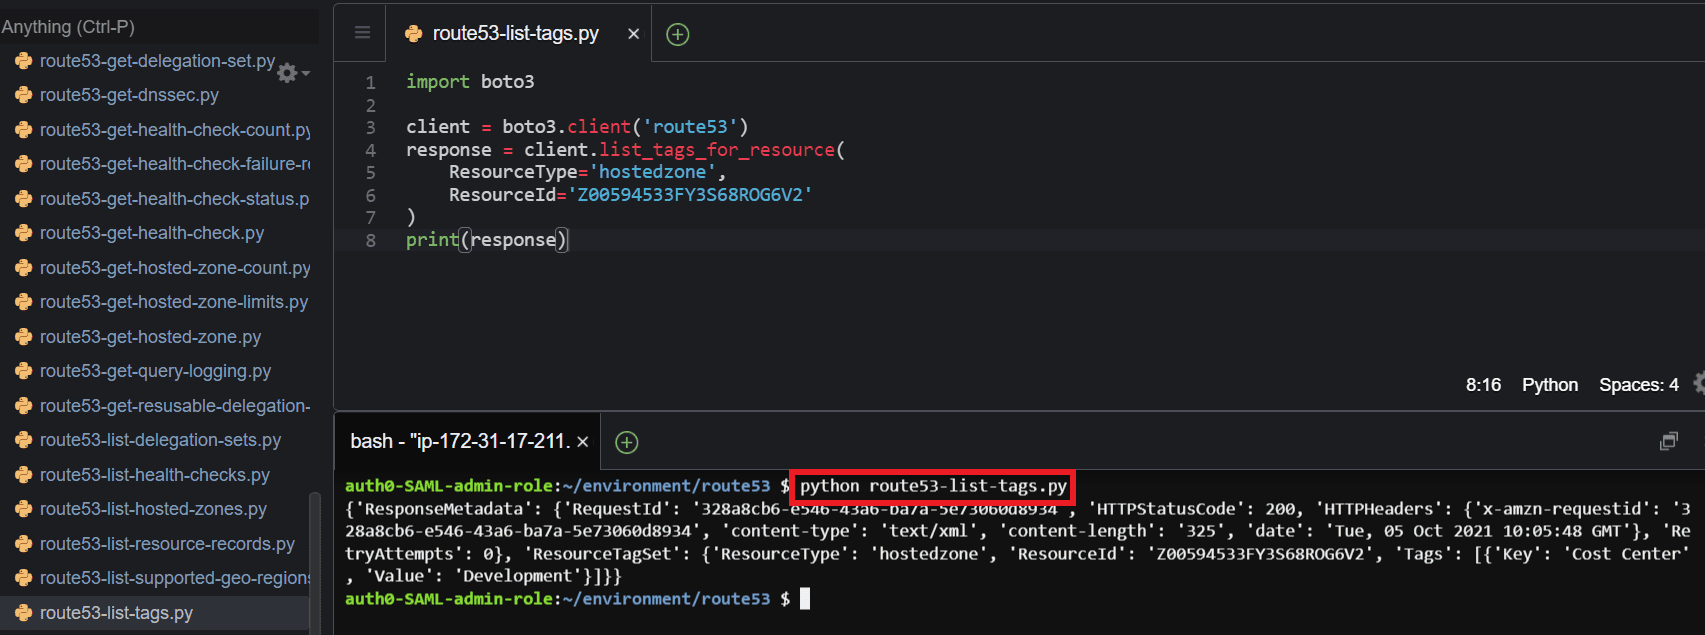
List resource tags
To list Amazon Route 53 resource tags, use the list_tgs_for_resource()of the Boto3 Route53 client and pass the required parameters, such as ResourceType and ResourceId.
import boto3
client = boto3.client('route53')
response = client.list_tags_for_resource(
    ResourceType='hostedzone',
    ResourceId='Z00594533FY3S68ROG6V2'
)
print(response)
Here is the execution output.
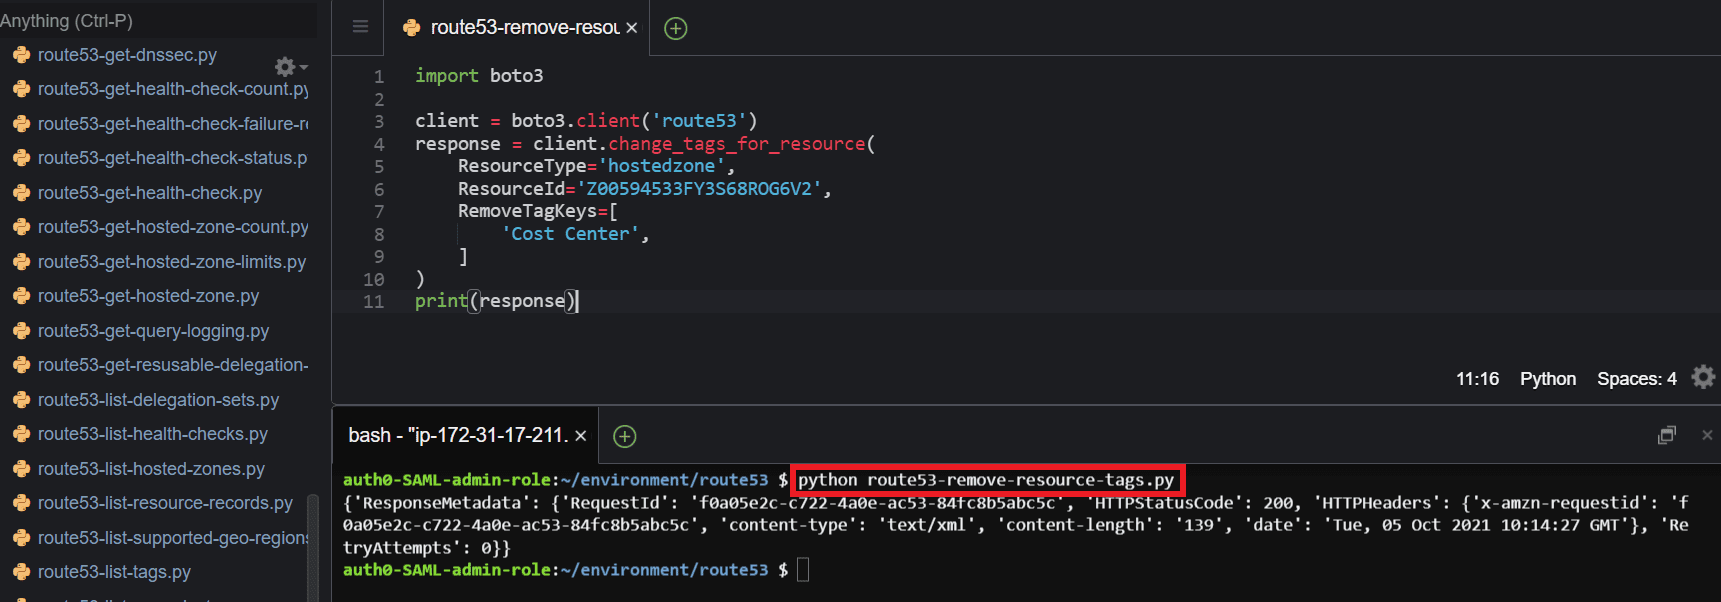
Remove resource tags
To remove a tag from an Amazon Route 53 resource, use the change_tags_for_resource()of the Boto3 Route53 client and pass the required parameters, such as ResourceType and ResourceId.
import boto3
client = boto3.client('route53')
response = client.change_tags_for_resource(
    ResourceType='hostedzone',
    ResourceId='Z00594533FY3S68ROG6V2',
    RemoveTagKeys=[
        'Cost Center',
    ]
)
print(response)
Here is the execution output.
Summary
This article covered Python and the Boto3 library to create and manage DNS zones and records in the Amazon Route53.
