Terraform ECS Tutorial – Easy AWS ECS Management
Amazon ECS is a service provided by AWS that manages the orchestration and provisioning of the containers. It allows the application to run in the cloud without configuring the environment for the application to run. With Amazon ECS, your containers are defined in a task definition that you use to run an individual task or task within a service. It can quickly deploy, manage, and scale Docker containers running applications, services, and batch processes based on your resource needs. It can also be integrated with AWS services like AWS cloudwatch, Elastic Load Balancing, EC2 security groups, EBS volumes, and IAM roles.
This article demonstrates how to manage Amazon ECS (including Fargate) clusters, services, and tasks using Terraform ECS resources.
Check the AWS Containers – The most important information article for more information about container technologies at AWS
Table of contents
Initial Setup
To start with Terraform, we need to install it. Just go along with the steps in this guide to install it.
Verify the installation by typing:
$ terraform --version
Terraform v1.1.6
Create a directory to setup the Terraform project
Create a new project directory on your machine. I will create a directory named terraform-ecs-demo. Inside the project directory, we’ll need to create the providers.tf file. It allows Terraform to interact with cloud providers. Some providers require you to configure them with endpoint URLs, AWS Regions, or other settings before Terraform can use them.
Terraform Initial Configuration
The Terraform configuration I used was quite simple. The first step is to create an AWS S3 bucket to store the Terraform State. It’s not required, but it’ll make us easier if someone else needs to maintain this infrastructure. This is the providers.tf file with this configuration. DynamoDB can be a locking mechanism for remote storage backend S3 to store state files.
terraform {
  required_providers {
    aws = {
      source  = "hashicorp/aws"
      version = "~> 3.0"
    }
  }
  backend "s3" {
    bucket         = "ecs-terraform-remote-state-s3"
    key            = "vpc.tfstate"
    region         = "us-east-1"
    encrypt        = "true"
    dynamodb_table = "ecs-terraform-remote-state-dynamodb"
  }
}
provider "aws" {
  region     = var.aws_region
}
Then, we need to create the variables.tf file which will store the variables required for the provider to function. I will use the us-east-1 region in this article.
variable "aws_region" {
  type        = string
  description = "The region in which to create and manage resources"
  default     = "us-east-1"
}
Terraform will keep the state in an s3 bucket. For that to happen, we need to set up two environment variables:
$ export AWS_SECRET_ACCESS_KEY=...
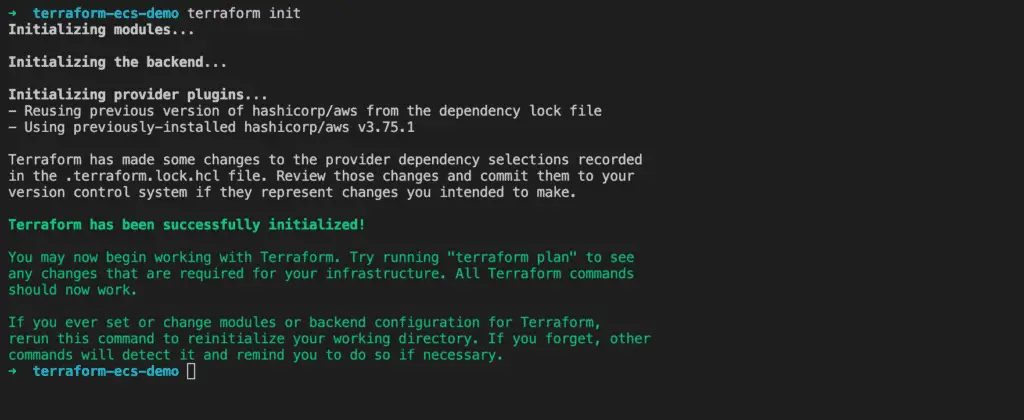
$ export AWS_ACCESS_KEY_ID=..Once these files are created, execute the following command to initialize the working directory on your root terminal.
terraform initWe will see similar outputs like this.
Configure An AWS VPC
Before creating a VPC, let’s define local values such as aws_region and vpc_cidr_block.
locals {
  aws_region = "us-east-1"
  prefix     = "Terraform-ECS-Demo"
  common_tags = {
    Project   = local.prefix
    ManagedBy = "Terraform"
  }
  vpc_cidr = var.vpc_cidr
}
Configure the VPC for your cluster. You can choose an existing VPC or create a new one. In my case, I will create a new VPC called Terraform-ECS-Demo-vpc.You can use the official Terraform terraform-aws-modules/vpc/aws module to create the VPC resources such as route tables, NAT gateway, and internet gateway.
module "ecs_vpc" {
  source = "terraform-aws-modules/vpc/aws"
  name = "${local.prefix}-vpc"
  cidr = local.vpc_cidr
  azs             = var.azs
  private_subnets = var.private_subnets
  public_subnets  = var.public_subnets
  enable_nat_gateway     = true
  enable_dns_hostnames   = true
  one_nat_gateway_per_az = true
  tags = local.common_tags
}
Then, we need to create the variables required for this VPC module inside the variables.tf file. Add the following variables.
variable "vpc_cidr" {
  default = "10.100.0.0/16"
}
variable "azs" {
  type = list(string)
  description = "the name of availability zones to use subnets"
  default = [ "us-east-1a", "us-east-1b" ]
}
variable "public_subnets" {
  type = list(string)
  description = "the CIDR blocks to create public subnets"
  default = [ "10.100.10.0/24", "10.100.20.0/24" ]
}
variable "private_subnets" {
  type = list(string)
  description = "the CIDR blocks to create private subnets"
  default = [ "10.100.30.0/24", "10.100.40.0/24" ]
}
Then, we need to run terraform init or terraform get to install the module in our local working directory.
$ terraform get Now we are ready to run terraform apply to create the VPC resources.
$ terraform apply --auto-approve Terraform ECS cluster – EC2
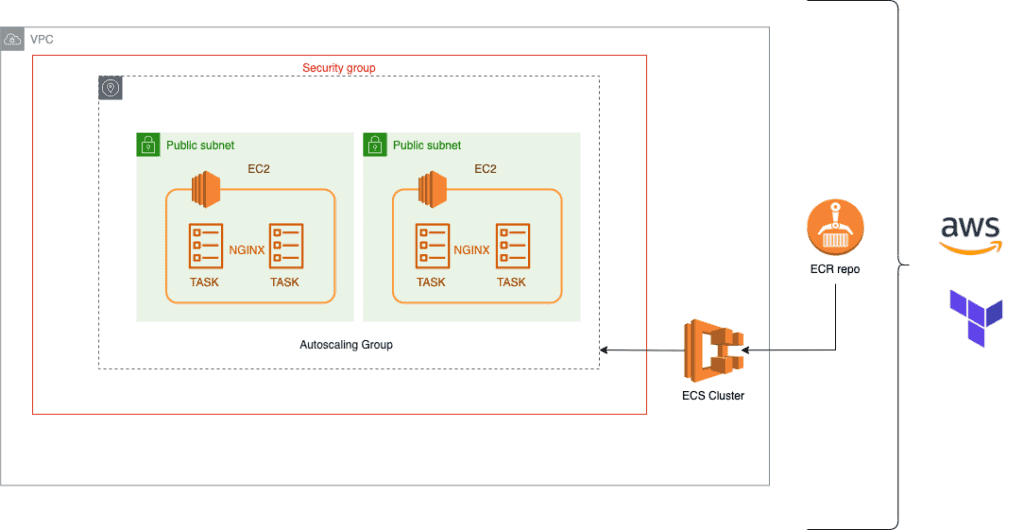
An Amazon ECS cluster is a logical group of tasks or services. Your tasks and services are run on infrastructure registered to a cluster. The infrastructure capacity can be provided by AWS Fargate, the serverless infrastructure that AWS manages, Amazon EC2 instances that you manage, or an on-premise server or virtual machine (VM) that you manage remotely. Here’s an architectural diagram of the topic.
Create A Container Repository
Now, it’s time to create the Container Registry. Amazon Elastic Container Registry (Amazon ECR) is an AWS-managed container image registry service that is secure, scalable, and reliable. Amazon ECR supports private repositories with resource-based permissions using AWS IAM. This is so that specified users or Amazon EC2 instances can access your container repositories and images. You can use your preferred CLI to push, pull, and manage the Docker images.
resource "aws_ecr_repository" "nginx" {
  name                 = "nginx"
  image_tag_mutability = "MUTABLE"
  image_scanning_configuration {
    scan_on_push = true
  }
}
Notable here is that image_tag_mutability is set to be MUTABLE. This is necessary to put the latest tag on the most recent image.
Building Docker Image
Then, push your NGINX docker image used in the task definition to your ECR repository.
export MY_AWS_ACCOUNT=$(aws sts get-caller-identity | jq -r .Account")
export MY_AWS_REGION=$(aws configure get default.region)
docker pull nginx
docker tag nginx:latest $MY_AWS_ACCOUNT.dkr.ecr.$MY_AWS_REGION.amazonaws.com/private-nginx:latest
aws ecr get-login-password --region us-east-1 | docker login --username AWS --password-stdin $MY_AWS_ACCOUNT.dkr.ecr.$MY_AWS_REGION.amazonaws.com
docker push $MY_AWS_ACCOUNT.dkr.$MY_AWS_REGION.amazonaws.com/private-fargate-demo-nginx:latest
Create Security Group
Then, create a security group for the EC2 instances in the ECS cluster. Inbound traffic is allowed to two ports – 22 for SSH and 80 for HTTP exported by the task.
module "ec2_sg" {
source = "terraform-aws-modules/security-group/aws"
name = "ec2_sg"
vpc_id = data.terraform_remote_state.vpc.outputs.vpc_id
ingress_with_cidr_blocks = [
{
from_port = local.service_port #80
to_port = local.service_port #80
protocol = "tcp"
description = "http port"
cidr_blocks = "0.0.0.0/0"
},
{
from_port = local.ssh_port #22
to_port = local.ssh_port #22
protocol = "tcp"
description = "ssh port"
cidr_blocks = "0.0.0.0/0"
}
]
egress_with_cidr_blocks = [
{
from_port = 0
to_port = 0
protocol = "-1"
cidr_blocks = "0.0.0.0/0" }
]
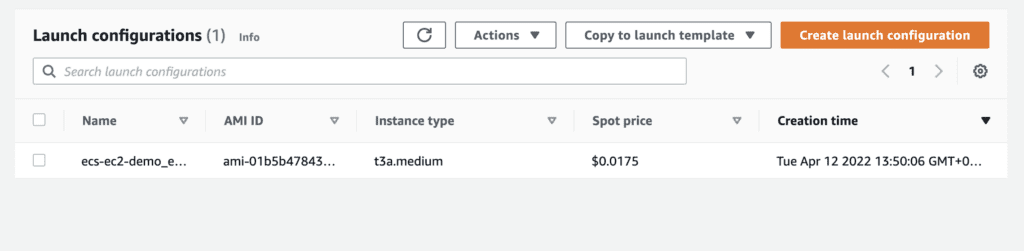
}Run the terraform get command again to install the security group module. Then, run the terraform apply command. You will see similar output like this.
Create an Auto Scaling Group for the ECS cluster with a Launch Configuration
We could automate the launch of EC2 instances using autoscaling groups when the load of the ECS cluster reaches over a certain metric such as CPU and memory utilization.
Before we launch the EC2 instances and register them into the ECS cluster, we have to create an IAM role and an instance profile to use when they are launched.
data "aws_iam_policy_document" "ecs_agent" {
  statement {
    actions = ["sts:AssumeRole"]
    principals {
      type        = "Service"
      identifiers = ["ec2.amazonaws.com"]
    }
  }
}
resource "aws_iam_role" "ecs_agent" {
  name               = "ecs-agent"
  assume_role_policy = data.aws_iam_policy_document.ecs_agent.json
}

resource "aws_iam_role_policy_attachment" "ecs_agent" {
  role       = aws_iam_role.ecs_agent.name
  policy_arn = "arn:aws:iam::aws:policy/service-role/AmazonEC2ContainerServiceforEC2Role"
}
Then, we have to create an instance profile that attaches to the EC2 instances launched from the autoscaling group. An instance profile is a container for an IAM role that you can use to pass role information to an EC2 instance when the instance starts.
resource "aws_iam_instance_profile" "ecs_agent" {
  name = "ecs-agent"
  role = aws_iam_role.ecs_agent.name
}
Create A Launch Configuration
Before creating an autoscaling group, we need to create a launch configuration that defines what type of EC2 instances will be launched when scaling occurs.
We will use Amazon EC2 Spot Instances in the instance configuration. It lets you take advantage of unused EC2 capacity in the AWS cloud. Spot Instances are available at up to a 60-90% discount compared to On-Demand prices.
resource "aws_launch_configuration" "ecs_config_launch_config_spot" {
  name_prefix                 = "${var.cluster_name}_ecs_cluster_spot"
  image_id                    = data.aws_ami.aws_optimized_ecs.id
  instance_type               = var.instance_type_spot
  spot_price                  = var.spot_bid_price
  associate_public_ip_address = true
  lifecycle {
    create_before_destroy = true
  }
  user_data = <<EOF
#!/bin/bash
echo ECS_CLUSTER=${var.cluster_name} >> /etc/ecs/ecs.config
EOF
  security_groups = [module.ec2_sg.security_group_id]
  key_name             = aws_key_pair.ecs.key_name
  iam_instance_profile = aws_iam_instance_profile.ecs_agent.arn
}
The data source will help us get the most up-to-date AWS EC2 AMI that is ECS optimized.
data "aws_ami" "aws_optimized_ecs" {
  most_recent = true
  filter {
    name   = "name"
    values = ["amzn-ami*amazon-ecs-optimized"]
  }
  filter {
    name   = "architecture"
    values = ["x86_64"]
  }
  filter {
    name   = "virtualization-type"
    values = ["hvm"]
  }
  owners = ["591542846629"] # AWS
}
Then, we need to create the variables required to create a launch configuration inside the variables.tf file. Add the following variables.
variable "instance_type_spot" {
default = "t3a.medium"
type = string
}
variable "spot_bid_price" {
default = "0.0175"
description = "How much you are willing to pay as an hourly rate for an EC2 instance, in USD"
}
variable "cluster_name" {
default = "ecs_terraform_ec2"
type = string
description = "the name of an ECS cluster"
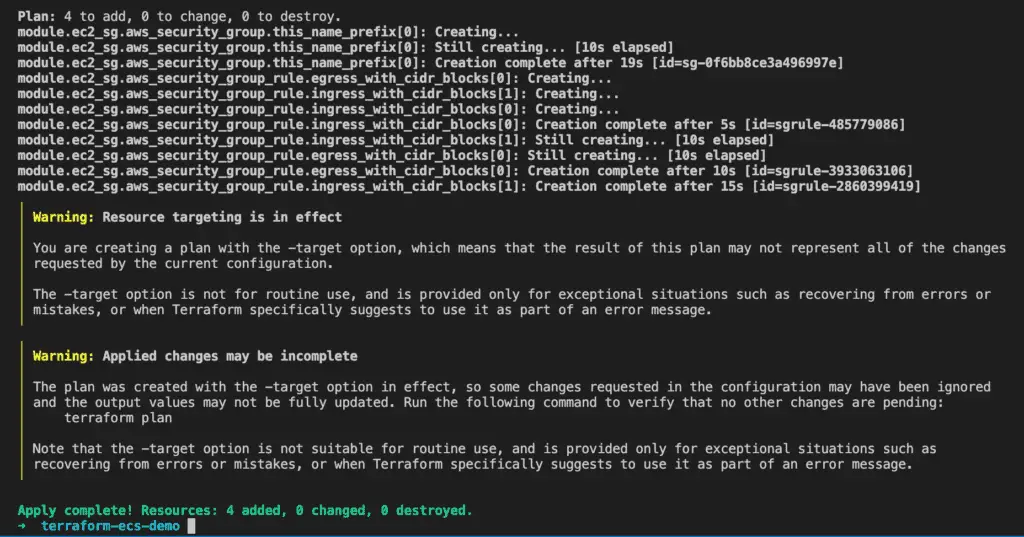
}After running terraform apply, go to the EC2 console, where you will see a launch configuration like this.
Create An Autoscaling Group
Then, we need to create an autoscaling group that defines the minimum, the maximum, and the desired EC2 instances count.
resource "aws_autoscaling_group" "ecs_cluster_spot" {
  name_prefix = "${var.cluster_name}_asg_spot_"
  termination_policies = [
     "OldestInstance"
  ]
  default_cooldown          = 30
  health_check_grace_period = 30
  max_size                  = var.max_spot
  min_size                  = var.min_spot
  desired_capacity          = var.min_spot
  launch_configuration      = aws_launch_configuration.ecs_config_launch_config_spot.name
  lifecycle {
    create_before_destroy = true
  }
  vpc_zone_identifier = data.terraform_remote_state.vpc.outputs.vpc_id
  tags = [
    {
      key                 = "Name"
      value               = var.cluster_name,
      propagate_at_launch = true
    }
  ]
}
We also need to set the variables required to create the autoscaling group inside the variables.tf file. Add the following variables.
variable "min_spot" {
default = "2"
description = "The minimum EC2 spot instances to be available"
}
variable "max_spot" {
default = "5"
description = "The maximum EC2 spot instances that can be launched at peak time"
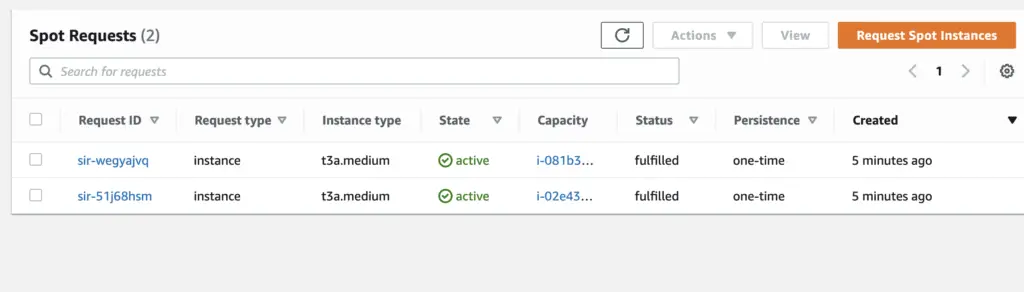
}After running terraform apply, go to the EC2 console, where you will be able to see two spot instances.
Create An ECS Cluster
Now we are ready to create an ECS cluster. The cluster name is important here since we used it previously when creating the launch configuration. This ECS cluster is where newly created EC2 instances will register.
resource "aws_ecs_cluster" "ecs_cluster" {
    name  = var.cluster_name
}
Create A Task Definition
A task definition is required to run Docker containers in Amazon ECS. You can set the parameters in a task definition, such as container image, how much CPU and memory to use with each task or container within a task, etc. You can define multiple containers up to ten in a task definition.
I will use the container image from the ECR repository. That is a sample Nginx container image. The family parameter is required, representing the unique name of our task definition.
resource "aws_ecs_task_definition" "task_definition" {
  family             = local.task_def_name
  execution_role_arn = "arn:aws:iam::${local.aws_account_id}:role/ecsTaskExecutionRole"
  memory             = 1024
  cpu                = 512
  container_definitions = jsonencode([
    {
      name      = local.task_def_name
      image     = "${local.aws_account_id}.dkr.ecr.${local.aws_region}.amazonaws.com/${local.task_def_name}:latest"
      cpu       = 512
      memory    = 1024
      essential = true
      portMappings = [
        {
          containerPort = 80
          hostPort      = 80
        }
      ]
    }
  ])
  tags = merge(
    local.common_tags,
    {
      Name = local.task_def_name
    }
  )
}
Here:
task_role_arn is an optional IAM role that tasks can use to make API requests to authorized AWS services such as DynamoDB.execution_role_arntasks require pulling container images and publishing container logs to Amazon CloudWatch on your behalf.
Create An Simple ECS Service
After we create a task definition with terraform apply command, we could create an ECS service. It allows you to run and maintain a specified number of instances of a task definition simultaneously in an Amazon ECS cluster. A service is used to guarantee that you always have some number of Tasks running at all times.
resource "aws_ecs_service" "nginx" {
  name            = local.service_name
  cluster         = aws_ecs_cluster.ecs_cluster.id
  task_definition = aws_ecs_task_definition.task_definition.arn
  desired_count   = 2
}
Once we run terraform apply successfully, go to the ECS console, where we can see two tasks running in the ECS cluster. You can update the desired number of tasks later as you require.

ECS Tasks ( AWS Console ) 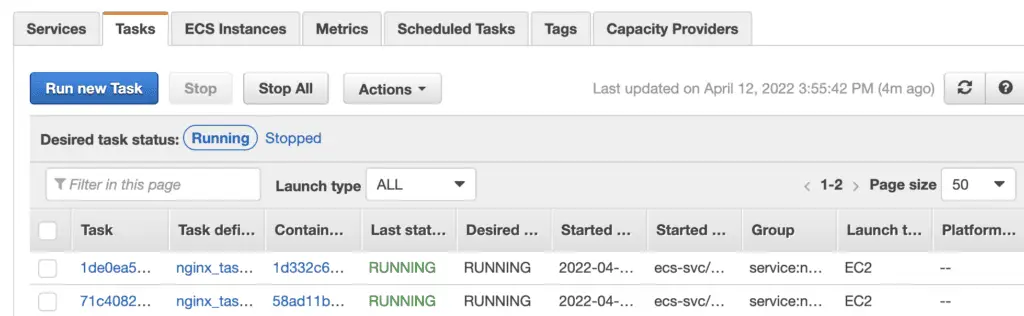
Then, we could access our ECS service through the external link.
Nginx Default Page 
Terraform ECS cluster - Fargate
AWS Fargate is a serverless service that you can use with Amazon ECS and EKS to run containers without managing servers or clusters of Amazon EC2 instances. With Fargate, you no longer have to provision, configure, or scale clusters of virtual machines to run containers. This session shows you how to set up an ECS cluster and deploy a service with tasks using the Fargate launch type.
In this session, I will run Fargate tasks in private subnets. However, Fargate tasks might require internet access for specific operations, such as pulling an image from a public repository or sourcing secrets. You can provision your NAT gateway in public subnets to provide outbound internet access to Fargate tasks that don't require a public IP address.
Create Task Execution IAM Role
Before we create an ECS cluster and the task definition, we have to create an IAM role for the tasks to pull container images from the ECR repository and publish container logs to Amazon CloudWatch on your behalf.
resource "aws_iam_role" "ecs_task_execution_role" {
  name = "${var.cluster_name}-ecsTaskExecutionRole"

  assume_role_policy = <<EOF
{
 "Version": "2012-10-17",
 "Statement": [
   {
     "Action": "sts:AssumeRole",
     "Principal": {
       "Service": "ecs-tasks.amazonaws.com"
     },
     "Effect": "Allow",
     "Sid": ""
   }
 ]
}
EOF
}

resource "aws_iam_role_policy_attachment" "ecs-task-execution-role-policy-attachment" {
  role       = aws_iam_role.ecs_task_execution_role.name
  policy_arn = "arn:aws:iam::aws:policy/service-role/AmazonECSTaskExecutionRolePolicy"
}
Create An ECS Cluster
Then, we need to create an ECS cluster. To create an empty cluster, you need to provide only the cluster name, and no further settings are required.
resource "aws_ecs_cluster" "ecs_fargate" {
  name = var.cluster_name
}
Create A Task Definition
This step will create a Fargate Launch Type task definition containing a WordPress docker image.
Before creating a task definition, you should create an AWS RDS database instance. WordPress has a lot of data that it needs to store, such as user accounts and posts, etc., to store the data efficiently for storage and retrieval. I have already created an RDS database instance.
RDS Instance ( AWS Console ) 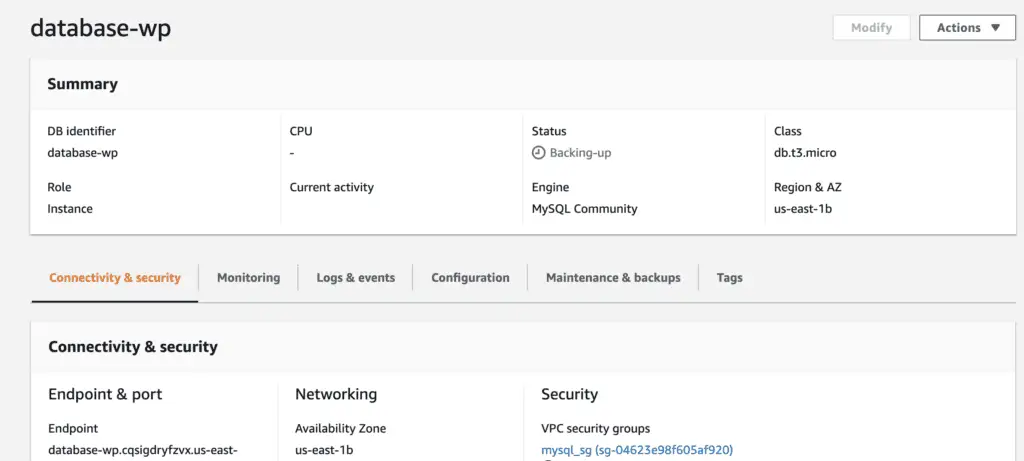
If you don't have a database instance, create a database for WordPress to store the data. Then, create a database user for your WordPress application and permit it to access the WordPress database. Run the following commands in your terminal.
CREATE USER 'wordpress' IDENTIFIED BY 'wordpress';
GRANT ALL PRIVILEGES ON wordpress.* TO wordpress;
FLUSH PRIVILEGES;
We also need to set a family parameter similar to a name for multiple versions of the task definition, specified with a revision number.
resource "aws_ecs_task_definition" "wordpress" {
  family                   = local.task_def_name
  requires_compatibilities = ["FARGATE"]
  network_mode             = "awsvpc"
  execution_role_arn       = "arn:aws:iam::${local.aws_account_id}:role/ecsTaskExecutionRole"
  memory                   = 4096
  cpu                      = 2048
  container_definitions = jsonencode([
    {
      name      = "${local.image_name}"
      image     = "${local.image_name}:latest"
      cpu       = 1024
      memory    = 2048
      essential = true
      portMappings = [
        {
          containerPort = local.service_port
          hostPort      = local.service_port
        }
      ]
      environment = [
        {
          "name" : "WORDPRESS_DB_USER",
          "value" : var.wp_db_user
        },
        {
          "name" : "WORDPRESS_DB_HOST",
          "value" : var.wp_db_host
        },
        {
          "name" : "WORDPRESS_DB_PASSWORD",
          "value" : var.wp_db_password
        },
        {
          "name" : "WORDPRESS_DB_NAME",
          "value" : var.wp_db_name
        }
      ]
    }
  ])
  tags = merge(
    local.common_tags,
    {
      Name = local.task_def_name
    }
  )
}
Also, set the environment variables such as WORDPRESS_DB_HOST connecting the WordPress to the RDS database.
Create An Application Load Balancer
Next, we will create an ALB that will manage the distribution of requests to all the running tasks. It consists of one listener for HTTP, where the HTTP listener forwards to the target group. The ECS service later uses this target group to propagate the running tasks. Before creating an application load balancer, we must create a security group for that ALB.
resource "aws_security_group" "alb_sg" {
  name   = local.alb_name
  vpc_id = data.terraform_remote_state.vpc.outputs.vpc_id
  ingress {
    from_port        = local.service_port
    to_port          = local.service_port
    protocol         = "tcp"
    cidr_blocks      = ["0.0.0.0/0"]
    ipv6_cidr_blocks = ["::/0"]
  }
  egress {
    from_port        = 0
    to_port          = 0
    protocol         = "-1"
    cidr_blocks      = ["0.0.0.0/0"]
    ipv6_cidr_blocks = ["::/0"]
  }
  tags = {
    Name = local.alb_name
  }
}
It only allows ingress access to the port that will be exposed by the task later.
resource "aws_lb" "ecs_alb" {
  name               = local.alb_name
  internal           = false
  load_balancer_type = "application"
  security_groups    = [aws_security_group.alb_sg.id]
  subnets            = data.terraform_remote_state.vpc.outputs.public_subnets
  enable_deletion_protection = false
}
resource "aws_alb_target_group" "ecs_alb_target_group" {
  name        = local.target_group_name
  port        = local.service_port
  protocol    = "HTTP"
  vpc_id      = data.terraform_remote_state.vpc.outputs.vpc_id
  target_type = "ip"
  health_check {
    healthy_threshold   = "3"
    interval            = "30"
    protocol            = "HTTP"
    matcher             = "200"
    timeout             = "3"
    unhealthy_threshold = "2"
  }
}
resource "aws_alb_listener" "http" {
  load_balancer_arn = aws_lb.ecs_alb.id
  port              = local.service_port
  protocol          = "HTTP"
  default_action {
    target_group_arn = aws_alb_target_group.ecs_alb_target_group.arn
    type             = "forward"
  }
}
Here we should set the target_type to IP since the Amazon ECS task on Fargate is provided an elastic network interface (ENI) with a primary private IP address by default. When using a public subnet, you may optionally assign a public IP address to the task's ENI.
Create A Security Group For ECS Task
This security group is needed for the ECS task that will later house our container, allowing ingress access only to the port exposed by the task. You may also need to allow inbound traffic from the load balancer.
resource "aws_security_group" "ecs_task_sg" {
  name   = local.ecs_service_sg_name
  vpc_id = data.terraform_remote_state.vpc.outputs.vpc_id
  ingress {
    from_port        = 80
    to_port          = 80
    protocol         = "tcp"
    cidr_blocks      = ["0.0.0.0/0"]
    ipv6_cidr_blocks = ["::/0"]
  }
  ingress {
    from_port        = 0
    to_port          = 0
    protocol         = "-1"
    security_groups = ["${aws_security_group.alb_sg.id}"]
  }
  egress {
    from_port        = 0
    to_port          = 0
    protocol         = "-1"
    cidr_blocks      = ["0.0.0.0/0"]
    ipv6_cidr_blocks = ["::/0"]
  }
  tags = {
    Name = local.ecs_service_sg_name
  }
}
Create An ECS Service
Service in the ECS world is a configuration that defines how many of the tasks should run in parallel and makes sure that there are always enough health tasks running in the cluster. So now we have an ECS cluster and a task definition, and we are ready to create an ECS service. Here is the service configuration I came up with:
resource "aws_ecs_service" "wordpress" {
  name                               = var.service_name
  cluster                            = aws_ecs_cluster.ecs_fargate.id
  task_definition                    = aws_ecs_task_definition.wordpress.arn
  desired_count                      = 2
  deployment_minimum_healthy_percent = 50
  deployment_maximum_percent         = 200
  platform_version                   = "1.4.0"
  launch_type                        = "FARGATE"
  scheduling_strategy                = "REPLICA"
  network_configuration {
    security_groups  = ["${aws_security_group.ecs_task_sg.id}"]
    subnets          = data.terraform_remote_state.vpc.outputs.private_subnets
    assign_public_ip = false
  }
  load_balancer {
    target_group_arn = aws_alb_target_group.ecs_alb_target_group.arn
    container_name   = local.image_name
    container_port   = local.service_port
  }
}
Ensure that the tasks run in the private subnets and are attached to the target group. Finally, access the WordPress application by accessing the load balancer URL. You will need to do some initial setup like admin name, password, etc., for the first time, create your first WordPress blog and publish the blog.
WordPress Installation 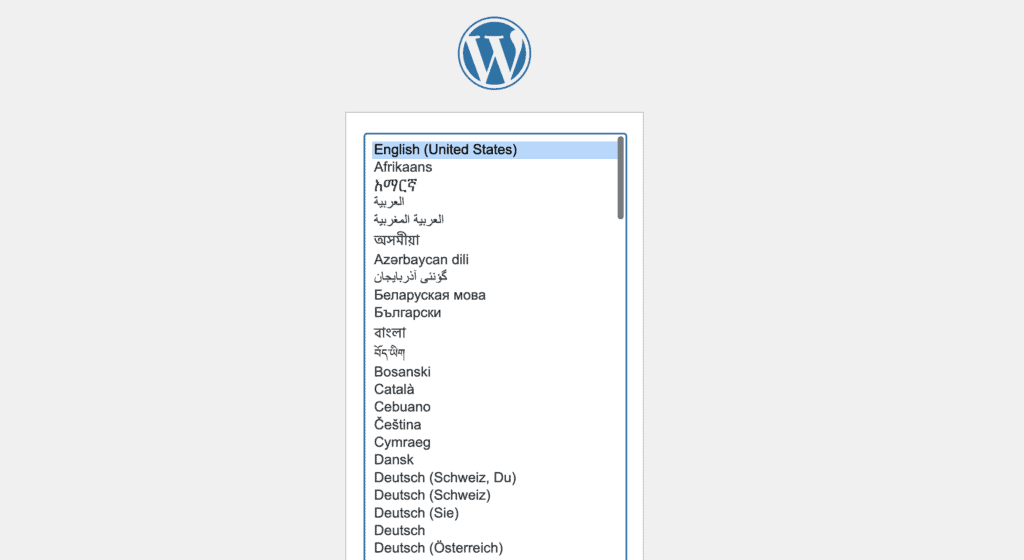
Mount EFS File System on a Fargate task
Amazon Elastic File System (Amazon EFS) provides simple, scalable file storage for your Amazon ECS tasks. To mount an Amazon EFS file system on a Fargate task or container, you must create a task definition and then make that task definition available to the containers in your task. Then, your Fargate tasks use Amazon EFS to mount the file system automatically to the tasks specified in your definition.
Don't forget to enable the vpc hostname in your AWS VPC. You can use an existing AWS EFS module to create an EFS file system. This module will automatically create the mount targets in the subnets as defined.
module "efs" {
  source = "git::https://github.com/terraform-iaac/terraform-aws-efs?ref=v2.0.4"
  name         = local.efs_name
  vpc_id       = data.terraform_remote_state.vpc.outputs.vpc_id
  subnet_ids   = data.terraform_remote_state.vpc.outputs.private_subnets
  whitelist_sg = ["${aws_security_group.ecs_task_sg.id}"]
}subnet_ids- VPC Subnet IDs where Terraform will create EFS mount targetwhitelist_sg
After creating an EFS file system and mounting targets, you must create a new revision for the WordPress task definition. Mount your EFS file system with the WordPress container path.
resource "aws_ecs_task_definition" "wordpress" {
  family                   = local.task_def_name
  requires_compatibilities = ["FARGATE"]
  network_mode             = "awsvpc"
  execution_role_arn       = "arn:aws:iam::${local.aws_account_id}:role/ecsTaskExecutionRole"
  memory                   = 4096
  cpu                      = 2048
  container_definitions = jsonencode([
    {
      name      = "${local.image_name}"
      image     = "${local.image_name}:latest"
      cpu       = 1024
      memory    = 2048
      essential = true
      portMappings = [
        {
          containerPort = local.service_port
          hostPort      = local.service_port
        }
      ]
      environment = [
        {
          "name" : "WORDPRESS_DB_USER",
          "value" : var.wp_db_user
        },
        {
          "name" : "WORDPRESS_DB_HOST",
          "value" : var.wp_db_host
        },
        {
          "name" : "WORDPRESS_DB_PASSWORD",
          "value" : var.wp_db_password
        },
        {
          "name" : "WORDPRESS_DB_NAME",
          "value" : var.wp_db_name
        }
      ]
      mountPoints = [
        {
          "readOnly": null,
          "containerPath": "/var/www/html/",
          "sourceVolume": "efs"
        }
      ]
    }
  ])
  volume {
    name = "efs"
    efs_volume_configuration {
      file_system_id          = "${module.efs.efs_id}"
      transit_encryption      = "DISABLED"
      root_directory          = "/"
      authorization_config {
        iam             = "DISABLED"
      }
    }
  }
  tags = merge(
    local.common_tags,
    {
      Name = local.task_def_name
    }
  )
}
Create An ECS Service Autoscaling
It automatically provides the ability to increase or decrease the desired count of tasks in the Amazon ECS service.
Amazon ECS publishes CloudWatch metrics with your service’s average CPU and memory usage. You can use these CloudWatch metrics to scale out your service to deal with high demand at peak times and scale in your service to reduce costs during periods of low utilization. When your CloudWatch alarms trigger an Auto Scaling policy, Application Auto Scaling decides the new desired count based on the configured scaling policy.
Create An IAM Role
Firstly, we need to create an IAM role with a policy to manage the autoscaling with the service application-autoscaling.amazonaws.com. This means you permit the autoscaling service to adjust the desired count of tasks in your ECS Service based on Cloudwatch metrics.
The Terraform configuration to create an IAM role looks like this:
resource "aws_iam_role" "ecs_autoscale_role" {
  name = "ecs-service-autoscale"
  assume_role_policy = <<EOF
{
  "Version": "2012-10-17",
  "Statement": [
    {
      "Action": "sts:AssumeRole",
      "Principal": {
        "Service": "application-autoscaling.amazonaws.com"
      },
      "Effect": "Allow"
    }
  ]
}
EOF
}
resource "aws_iam_role_policy_attachment" "ecs_autoscale" {
  role = aws_iam_role.ecs_autoscale_role.id
  policy_arn = "arn:aws:iam::aws:policy/service-role/AmazonEC2ContainerServiceAutoscaleRole"
}
Create An App Autoscaling Target
The next step is to create an app autoscaling target with the ECS service. You also need to set the resource_id, the minimum and the maximum number of tasks to scale in and out.
resource "aws_appautoscaling_target" "ecs_service_target" {
  max_capacity       = 5
  min_capacity       = 2
  resource_id        = "service/${var.cluster_name}/${var.service_name}"
  scalable_dimension = "ecs:service:DesiredCount"
  service_namespace  = "ecs"
  role_arn           = aws_iam_role.ecs_autoscale_role.arn
}
Create An App Autoscaling Policy
The desired count of tasks gets scaled up to the maximum value of 5 once the average CPU utilization of your ECS service is 80% as defined. Once the CPU utilization value falls under this limit, the autoscaling reduces the desired count value to the minimum value of 2.
resource "aws_appautoscaling_policy" "ecs_target_cpu" {
  name               = "application-scaling-policy-cpu"
  policy_type        = "TargetTrackingScaling"
  resource_id        = aws_appautoscaling_target.ecs_service_target.resource_id
  scalable_dimension = aws_appautoscaling_target.ecs_service_target.scalable_dimension
  service_namespace  = aws_appautoscaling_target.ecs_service_target.service_namespace
  target_tracking_scaling_policy_configuration {
    predefined_metric_specification {
      predefined_metric_type = "ECSServiceAverageCPUUtilization"
    }
    target_value = 80
  }
  depends_on = [aws_appautoscaling_target.ecs_service_target]
}
Service utilization is measured as the percentage of CPU and memory used by the Amazon ECS tasks that belong to a service on a cluster compared to the CPU and memory specified in the service's task definition.
                                (Total CPU units used by tasks in service) x 100
Service CPU utilization =  ------------------------------------------------------------
                          (Total CPU units defined in task definition) x number of task
After running terraform apply, go to the ECS console, where you can see the ECS service auto-scaling policy with the average CPU utilization metric.
ECS Autoscale ( AWS Console ) 
Create ECS Scheduled Autoscaling
Scheduled autoscaling can automatically increase or decrease the number of ECS tasks at a specific time of the day.
Create An Autoscaling Target
If you want to configure autoscaling for ECS service, you must create an autoscaling target first. Set the minimum and the maximum number of tasks to scale in and out. Here resource_id will be your WordPress ECS service.
resource "aws_appautoscaling_target" "ecs_service_target" {
  max_capacity       = 5
  min_capacity       = 2
  resource_id        = "service/${var.cluster_name}/${var.service_name}"
  scalable_dimension = "ecs:service:DesiredCount"
  service_namespace  = "ecs"
  role_arn           = aws_iam_role.ecs_autoscale_role.arn
}
Configure Your Scheduled Actions
You will need to define at least two scheduled actions to scale in and scale out your ECS service, one to increase the number of desired tasks and the second to decrease it. Run terraform apply to create those scheduled actions.
resource "aws_appautoscaling_scheduled_action" "wp_service_scale_out" {
  name               = "scale-out"
  service_namespace  = aws_appautoscaling_target.ecs_service_target.service_namespace
  resource_id        = aws_appautoscaling_target.ecs_service_target.resource_id
  scalable_dimension = aws_appautoscaling_target.ecs_service_target.scalable_dimension
  schedule           = "cron(5 9 * * ? *)"
  timezone           = "Europe/London"
  scalable_target_action {
    min_capacity = 3
    max_capacity = 5
  }
}
resource "aws_appautoscaling_scheduled_action" "wp_service_scale_in" {
  name               = "scale-in"
  service_namespace  = aws_appautoscaling_target.ecs_service_target.service_namespace
  resource_id        = aws_appautoscaling_target.ecs_service_target.resource_id
  scalable_dimension = aws_appautoscaling_target.ecs_service_target.scalable_dimension
  schedule           = "cron(0 18 * * ? *)"
  timezone           = "Europe/London"
  scalable_target_action {
    min_capacity = 2
    max_capacity = 2
  }
  depends_on = [aws_appautoscaling_scheduled_action.wp_service_scale_out]
}
Then, run the following command to check recent autoscaling activities in your terminal.
$ aws application-autoscaling describe-scaling-activities --service-namespace ecsSince you declared the minimum capacity to 3 in your wp_service_scale_out scheduled action, it will ensure three tasks are running in your ECS service at 9:05 AM London Time.
Scaling Activities 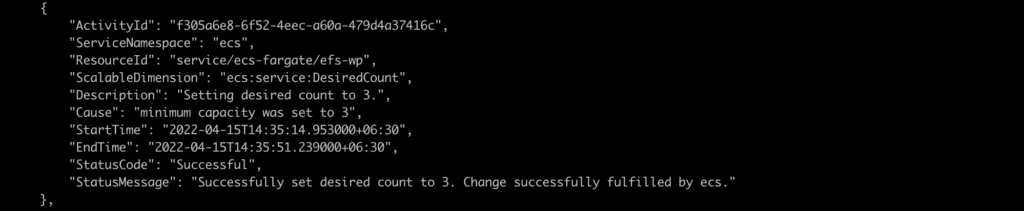
Integration With Service Discovery
You can optionally configure the Amazon ECS service to use Amazon ECS Service Discovery. Using AWS Cloud Map API actions, it manages HTTP and DNS namespaces for your Amazon ECS services. It can only be configured when first creating a service. Updating the existing services to configure service discovery for the first time is not supported.
At the time of service creation, the service registers itself to the privately hosted domain in Route 53 by creating a new record set under it. Whenever the service scales out or scales in, it updates the Private Hosted Zone record by adding or removing new records.
Create A Service Discovery Namespace
First, we need to create a private service discovery DNS namespace for our ECS service to create a service discovery for our ECS service. It is a logical group of service discovery services that share the same domain name, such as ecsdemo.cloud.
resource "aws_service_discovery_private_dns_namespace" "ecs" {
  name = var.private_dns_name # ecsdemo.cloud
  vpc  = data.terraform_remote_state.vpc.outputs.vpc_id
}
Create A Service Discovery Service
After creating a private DNS namespace, we need to associate this private DNS namespace with an aws_service_discovery_service resource. It exists within the service discovery namespace and consists of the namespace's service name and DNS configuration.
resource "aws_service_discovery_service" "ecs" {
  name = var.service_discovery_service #wp
  dns_config {
    namespace_id   = aws_service_discovery_private_dns_namespace.ecs.id
    routing_policy = "MULTIVALUE"
    dns_records {
      ttl  = 10
      type = "A"
    }
  }
  health_check_custom_config {
    failure_threshold = 5
  }
}
Create An ECS Service
Finally, we need to register our service discovery resource with our ECS service.
resource "aws_ecs_service" "wordpress" {
  name                               = var.service_name
  cluster                            = aws_ecs_cluster.ecs_fargate.id
  task_definition                    = aws_ecs_task_definition.wordpress.arn
  desired_count                      = 2
  deployment_minimum_healthy_percent = 50
  deployment_maximum_percent         = 200
  platform_version                   = "1.4.0"
  launch_type                        = "FARGATE"
  scheduling_strategy                = "REPLICA"
  network_configuration {
    security_groups  = ["${aws_security_group.ecs_task_sg.id}"]
    subnets          = data.terraform_remote_state.vpc.outputs.private_subnets
    assign_public_ip = false
  }
  load_balancer {
    target_group_arn = aws_alb_target_group.ecs_alb_target_group.arn
    container_name   = local.image_name
    container_port   = local.service_port
  }
  service_registries {
    registry_arn = "${aws_service_discovery_service.ecs.arn}"
  }
}
After running terraform apply, this will create your new ECS service with integrated service discovery. Then, go to the AWS Route 53 service, where you will see two DNS records for the ECS service in your private hosted zone.
Route 53 ( AWS Console ) 
Execute the following command from one of the EC2 instances within the same VPC where you created the ECS service to verify the service discovery is working.
~$ dig +short wp.ecsdemo.cloud
10.100.20.222
10.100.10.55
Summary
You can quickly deploy, manage, and scale Docker containers running applications, services, and batch processes based on your resource needs. Amazon ECS is a service provided by AWS that manages the orchestration and provisioning of the containers. With Amazon ECS, your containers are defined in a task definition that you use to run an individual task or task within a service. It can also be integrated with AWS services like AWS cloudwatch, Elastic Load Balancing, EC2 security groups, EBS volumes, and IAM roles. This article demonstrated how to use Terraform ECS resources to manage Amazon ECS (including Fargate) clusters, services, and tasks.
