CloudFront Terraform examples – Easy AWS automation
Amazon CloudFront is a low-latency Content Delivery Network (CDN) offered by AWS. It helps speed up the process of serving all the static assets of a website (such as CSS files, JS files, media files, images, etc.) by distributing these files across various edge locations across AWS Global Infrastructure and caching them. CloudFront integrates with other commonly used AWS services such as S3, EC2, Application Load Balancers (ALB), etc. This article contains code examples of using CloudFront Terraform resources and demonstrates CloudFront integration with EC2, S3, ALB, and Lambda@Edge services.
Table of contents
Prerequisites
- Terraform must be installed and configured on your local machine. You can install it from here.
- AWS CLI must be installed on your local machine and configured with a profile having appropriate IAM permissions (preferably an admin role).
- You must be familiar with the basics of Terraform and AWS to follow along.
Integrating CloudFront with S3 using Terraform
One of Amazon CloudFront’s most popular use cases is using it as CDN to serve static files hosted in an S3 bucket. This approach is beneficial (especially in scenarios of hosting static websites on S3) because :
- We get to leverage the feature of caching at edge locations to serve our content faster to our users
- CloudFront acts as a proxy to our S3 bucket.
- We can enforce HTTPS connections by registering a domain name and generating a certificate using ACM. This makes the website trustworthy and secure for our users.
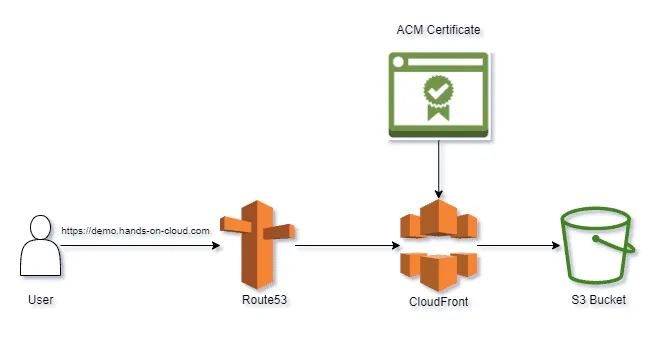
Earlier, we covered website hosting in the Terraform S3 Tutorial – Easy AWS automation blog post. In this section, we shall take a step further by serving our website hosted on S3 via CloudFront. You can find the completed code for this section here (the cloudfront_s3 folder).
Initial Setup
To follow along, you would need a registered domain name with a hosted zone created in Route53.
First, let us set up our Terraform AWS provider in the providers.tf file :
terraform {
  required_version = ">= 1.0.8"
  required_providers {
    aws = {
      version = ">= 4.15.0"
      source  = "hashicorp/aws"
    }
  }
}
provider "aws" {
  region = var.region
}
Next, we shall declare some variables that we will be using later in our application in the variables.tf file :
variable "region" {
  type        = string
  description = "The AWS Region to use"
  default     = "us-east-1"
}
variable "bucket_prefix" {
  type        = string
  description = "The prefix for the S3 bucket"
  default     = "tf-s3-website-"
}
variable "domain_name" {
  type        = string
  description = "The domain name to use"
  default     = "demo.hands-on-cloud.com"
}
Finally, we shall initialize our Terraform project by running the following command from the root level of the cloudfront_s3 folder :
terraform initNow we are all set to write the necessary Terraform configurations!
Setting up Website on S3 using Terraform
First, let us prepare the website files – index.html and error.html inside the uploads folder :
<!DOCTYPE html>
<html lang="en">
	<head>
		<title>S3 Website</title>
        <style>
            .container{
                width: 100%;
                height: 100%;
                display: flex;
                flex-direction: column;
                justify-content: center;
                align-items: center;
            }
            .container img{
                width : 800px;
                height: auto;
                object-fit: contain;
            }
        </style>
	</head>
    <body>
        <div class="container">
            <h1>S3 Website</h1>
            <p> This website is being hosted on Amazon S3!</p>
            <p>Here is a view of Kasol</p>
            <img src="https://static.india.com/wp-content/uploads/2018/08/kasol1.jpg?impolicy=Medium_Resize&w=1200&h=800" alt="Kasol"/>
        </div>

</html>
<!DOCTYPE html>
<html lang="en">
<head>
<title>S3 Website</title>
<style>
.container{
width: 100%;
height: 100%;
display: flex;
flex-direction: column;
justify-content: center;
align-items: center;
}
.container h1{
font-size: 6rem;
color: red;
}
.container p{
font-size: 3rem;
color: blue;
}
</style>
</head>
<body>
<div class="container">
<h1>404</h1>
<p>Oops....there was an error :(</p>
</div>
</html>Next, we add the following configuration to the s3_website.tf file :
# create S3 Bucket:
resource "aws_s3_bucket" "bucket" {
  bucket_prefix = var.bucket_prefix #prefix appends with timestamp to make a unique identifier
  tags = {
    "Project"   = "hands-on.cloud"
    "ManagedBy" = "Terraform"
  }
  force_destroy = true
}
# create bucket ACL :
resource "aws_s3_bucket_acl" "bucket_acl" {
  bucket = aws_s3_bucket.bucket.id
  acl    = "private"
}
# block public access :
resource "aws_s3_bucket_public_access_block" "public_block" {
  bucket = aws_s3_bucket.bucket.id
  block_public_acls       = true
  block_public_policy     = true
  restrict_public_buckets = true
  ignore_public_acls      = true
}
# encrypt bucket using SSE-S3:
resource "aws_s3_bucket_server_side_encryption_configuration" "encrypt" {
  bucket = aws_s3_bucket.bucket.id
  rule {
    apply_server_side_encryption_by_default {
      sse_algorithm = "AES256"
    }
  }
}
# create S3 website hosting:
resource "aws_s3_bucket_website_configuration" "website" {
  bucket = aws_s3_bucket.bucket.id
  index_document {
    suffix = "index.html"
  }
  error_document {
    key = "error.html"
  }
}
# add bucket policy to let the CloudFront OAI get objects:
resource "aws_s3_bucket_policy" "bucket_policy" {
  bucket = aws_s3_bucket.bucket.id
  policy = data.aws_iam_policy_document.bucket_policy_document.json
}
#upload website files to s3:
resource "aws_s3_object" "object" {
  bucket = aws_s3_bucket.bucket.id
  for_each     = fileset("uploads/", "*")
  key          = "website/${each.value}"
  source       = "uploads/${each.value}"
  etag         = filemd5("uploads/${each.value}")
  content_type = "text/html"
  depends_on = [
    aws_s3_bucket.bucket
  ]
}
In the configuration above, we have –
- Created an S3 bucket
- Attached a private ACL to the bucket
- Blocked all public access to the bucket
- Encrypted the contents of the bucket using SSE-S3 encryption
- Configured website hosting without DNS domain
- Created a Bucket Policy to enable access from the CloudFront OAI (to be discussed later in this section)
- Uploaded the website files and distributed media files to the bucket
Let us also generate the Bucket Policy document in the data.tf file :
# data source to generate bucket policy to let OAI get objects:
data "aws_iam_policy_document" "bucket_policy_document" {
  statement {
    actions = ["s3:GetObject"]
    resources = [
      aws_s3_bucket.bucket.arn,
      "${aws_s3_bucket.bucket.arn}/*"
    ]
    principals {
      type        = "AWS"
      identifiers = [aws_cloudfront_origin_access_identity.oai.iam_arn]
    }
  }
}
The above code generates an IAM policy document with an iam certificate identifier that grants the CloudFront OAI (to be discussed later in this section) GetObject permission on our S3 bucket and all resources inside it using the aws_iam_policy_document data source.
Check the Terraform IAM Tutorial – Easy AWS automation article for more information about the topic.
Domain Certificate Generation using Terraform
In this section, we shall generate a certificate for our registered domain name using Amazon Certificate Manager (ACM), validate it, and finally create an ‘A’ record for our domain name in Route53.
Note: CloudFront mandates that the ACM certificate to be used with the distribution must be requested on imported from the AWS region us-east-1 (N. Virginia) only. You may read more here. That is why we have set the value of the region variable in the variables.tf to us-east-1 for the demos in this article.
First, we fetch information about the hosted zone created for our domain in Route53 in the data.tf file :
# data source to fetch hosted zone info from domain name:
data "aws_route53_zone" "hosted_zone" {
  name = var.domain_name
}
Next, we add the following Terraform configurations to the domain.tf file :
# generate ACM cert for domain :
resource "aws_acm_certificate" "cert" {
  domain_name               = var.domain_name
  subject_alternative_names = ["*.${var.domain_name}"]
  validation_method         = "DNS"
  tags = {
    "Project"   = "hands-on.cloud"
    "ManagedBy" = "Terraform"
  }
}
# validate cert:
resource "aws_route53_record" "certvalidation" {
  for_each = {
    for d in aws_acm_certificate.cert.domain_validation_options : d.domain_name => {
      name   = d.resource_record_name
      record = d.resource_record_value
      type   = d.resource_record_type
    }
  }
  allow_overwrite = true
  name            = each.value.name
  records         = [each.value.record]
  ttl             = 60
  type            = each.value.type
  zone_id         = data.aws_route53_zone.hosted_zone.zone_id
}
resource "aws_acm_certificate_validation" "certvalidation" {
  certificate_arn         = aws_acm_certificate.cert.arn
  validation_record_fqdns = [for r in aws_route53_record.certvalidation : r.fqdn]
}
# creating A record for domain:
resource "aws_route53_record" "websiteurl" {
  name    = var.domain_name
  zone_id = data.aws_route53_zone.hosted_zone.zone_id
  type    = "A"
  alias {
    name                   = aws_cloudfront_distribution.cf_dist.domain_name
    zone_id                = aws_cloudfront_distribution.cf_dist.hosted_zone_id
    evaluate_target_health = true
  }
}
Let us understand the above code :
- First, we have generated a certificate for our domain name using the
aws_acm_certificateresource. - Then, we created some DNS records for the generated certificate using the
aws_route53_recordresource and validated the certificate using theaws_acm_certificate_validationresource. - Finally, we have created an ‘A’ record for our domain name in Route53 by mentioning the CloudFront distribution details (which we will create right after this). This will ensure mapping the domain name to the CloudFront distribution.
Finally, let us configure CloudFront to serve HTTPS requests to the website from the S3 bucket.
CloudFront Integration using Terraform
First, we shall create the CloudFront Origin Access Identity (OAI) using the aws_cloudfront_origin_access_identity resource in the cloudfront.tf file :
#creating OAI :
resource "aws_cloudfront_origin_access_identity" "oai" {
  comment = "OAI for ${var.domain_name}"
}
Next, we shall create our CloudFront Distribution using the resource aws_cloudfront_distribution :
# cloudfront terraform - creating AWS Cloudfront distribution :
resource "aws_cloudfront_distribution" "cf_dist" {
  enabled             = true
  aliases             = [var.domain_name]
  default_root_object = "website/index.html"
  origin {
    domain_name = aws_s3_bucket.bucket.bucket_regional_domain_name
    origin_id   = aws_s3_bucket.bucket.id
    s3_origin_config {
      origin_access_identity = aws_cloudfront_origin_access_identity.oai.cloudfront_access_identity_path
    }
  }
  default_cache_behavior {
    allowed_methods        = ["GET", "HEAD", "OPTIONS", "PUT", "POST", "PATCH", "DELETE"]
    cached_methods         = ["GET", "HEAD", "OPTIONS"]
    target_origin_id       = aws_s3_bucket.bucket.id
    viewer_protocol_policy = "redirect-to-https" # other options - https only, http
    forwarded_values {
      headers      = []
      query_string = true
      cookies {
        forward = "all"
      }
    }
  }
  restrictions {
    geo_restriction {
      restriction_type = "whitelist"
      locations        = ["IN", "US", "CA"]
    }
  }
  tags = {
    "Project"   = "hands-on.cloud"
    "ManagedBy" = "Terraform"
  }
  viewer_certificate {
    acm_certificate_arn      = aws_acm_certificate.cert.arn
    ssl_support_method       = "sni-only"
    minimum_protocol_version = "TLSv1.2_2018"
  }
}
In the above code, we have created an AWS CloudFront distribution with the S3 bucket as the origin with some cache configurations in the HTTP methods CloudFront processes located in the default cache behavior and the ACM certificate. Note how we have restricted access and distribution of the bucket’s contents to only a few countries using the restrictions block. Feel free to change the countries as per your requirement.
Finally, let us apply all the configurations we have written so far by executing the following commands :
terraform validate
terraform plan
terraform apply -auto-approve
Once applied successfully, you may visit the CloudFront dashboard in the AWS console. Your distribution would be listed there. Note the alternate domain name:
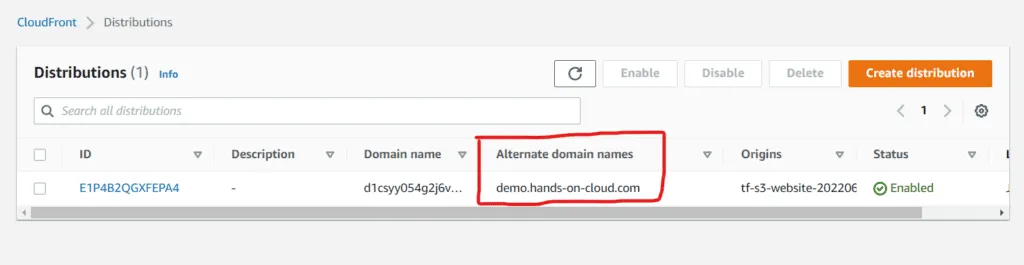
Now, if you visit the domain name URL of the alternate domain name, you will see the web page served :

Thus, we have successfully integrated CloudFront with Amazon S3!
Cleanup
To destroy the resources created in this section, run the following command from the root level of the cloudfront_s3 folder :
terraform destroy --auto-approveIntegrating CloudFront with EC2 using Terraform
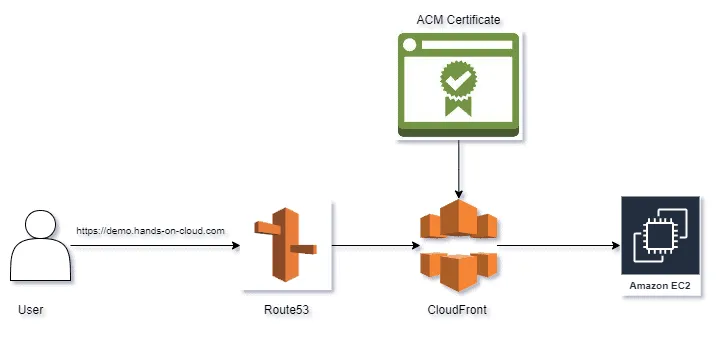
In the previous section, we used CloudFront as a proxy to access our website hosted in an S3 bucket. In this section, we shall change the origin into a custom origin for CloudFront to an Amazon EC2 Instance and implement the same design. This would help demonstrate how you can easily leverage CloudFront to serve static web pages and real-world dynamic web applications. This approach helps us ensure better security as we no longer have to expose our EC2 instance publicly and use an ACM Certificate with our domain name with a custom name to ensure connections are made via HTTPS.
The completed code for this section is available here. All the code for this section would be inside the cloudfront_ec2 folder.
Initial Setup
Let us configure the providers for our project in the providers.tf file :
terraform {
  required_version = ">= 1.0.8"
  required_providers {
    aws = {
      version = ">= 4.15.0"
      source  = "hashicorp/aws"
    }
  }
}
provider "aws" {
  region = var.region
}
Next, let us add the common tags for all our infra to the locals.tf file :
locals {
  tags = {
    "Project"   = "hands-on.cloud"
    "ManagedBy" = "Terraform"
  }
}
Finally, let us declare the required variables for the project in the variables.tf file :
variable "region" {
  type        = string
  description = "The AWS Region to use"
  default     = "us-east-1"
}
variable "domain_name" {
  type        = string
  description = "The domain name to use"
  default     = "demo.hands-on-cloud.com"
}
To initialize the Terraform project :
terraform initCreating an EC2 Instance using Terraform
Amazon Elastic Cloud Compute (EC2) is a compute service offered by AWS that lets us spin up virtual machines (VMs) in the cloud with our desired environment, memory, and compute capacity. In this section, we shall create a simple EC2 instance running Ubuntu 20.04 LTS OS using Terraform and run an Apache Web Server on the instance. The web server would serve as a web page.
Let us add the following configuration to the ec2.tf file :
# creating ec2 instance :
resource "aws_instance" "ec2" {
  ami                         = data.aws_ami.ubuntu_ami.id
  instance_type               = "t2.micro"
  user_data                   = data.template_cloudinit_config.user_data.rendered


  tags = merge(local.tags, {
    Name = "ec2-cloudfront"
  })
}
The above code creates an EC2 instance type t2.micro. We have used two data sources here – one to fetch the Ubuntu AMI and another to generate an EC2 User Data Script which enables us to run some commands and configure our EC2 instance the first time when the instance starts up. Let us add the above data sources to the data.tf file :
# fetch ubuntu ami id:
data "aws_ami" "ubuntu_ami" {
  filter {
    name   = "name"
    values = ["ubuntu/images/hvm-ssd/ubuntu-focal-20.04-amd64-server-*"]
  }
  filter {
    name   = "virtualization-type"
    values = ["hvm"]
  }
  most_recent = true
  owners      = ["099720109477"]
}
# generate user data script :
data "template_cloudinit_config" "user_data" {
  gzip          = false
  base64_encode = true
  part {
    content_type = "text/x-shellscript"
    content      = <<-EOT
    #! /bin/bash
    sudo apt-get update
    sudo apt-get install -y apache2
    sudo systemctl start apache2
    sudo systemctl enable apache2
    echo "<h1>Deployed to AWS EC2 via Terraform </h1>" | sudo tee /var/www/html/index.html

    EOT
  }
}
The aws_ami data source in the above code fetches the Ubuntu 20.04 AMI to be used as the AMI for our EC2 instance and the template_cloudinit_config data source generates a bash script that installs an Apache web server on the instance and serves some custom HTML instead of the default web page of Apache.
Let us also add some important outputs to the outputs.tf file :
# ec2 outputs :
output "public_dns" {
  value = aws_instance.ec2.public_dns
}
output "instance_id" {
  value = aws_instance.ec2.id
}
Now, let us apply the above configurations :
terraform validate
terraform plan
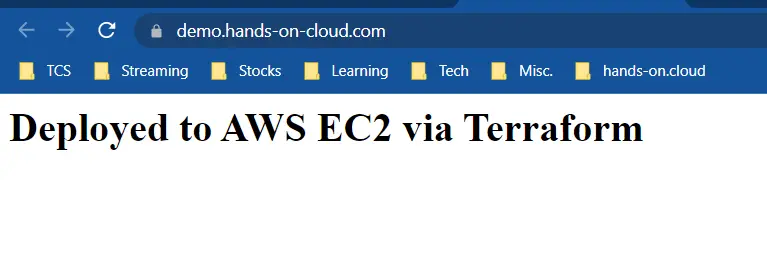
terraform apply -auto-approveAt this stage, we would have an EC2 instance running an Apache web server. Note the public DNS address or the DNS domain name from the Terraform output :

If you visit the public DNS address in your web browser, you will see the web page rendered by Apache. However, the connection would be over HTTP and not HTTPS :

Let us now integrate CloudFront to visit the website via our registered domain over HTTPS!
Domain Configuration using Terraform
The idea is the same as the previous section – to generate an ACM certificate, validate it and create an A record in Route53 so requests get redirected to CloudFront. The code for this part would also remain the same in the domain.tf file :
# generate ACM cert for domain :
resource "aws_acm_certificate" "cert" {
  domain_name               = var.domain_name
  subject_alternative_names = ["*.${var.domain_name}"]
  validation_method         = "DNS"
  tags                      = local.tags
}
# validate cert:
resource "aws_route53_record" "certvalidation" {
  for_each = {
    for d in aws_acm_certificate.cert.domain_validation_options : d.domain_name => {
      name   = d.resource_record_name
      record = d.resource_record_value
      type   = d.resource_record_type
    }
  }
  allow_overwrite = true
  name            = each.value.name
  records         = [each.value.record]
  ttl             = 60
  type            = each.value.type
  zone_id         = data.aws_route53_zone.hosted_zone.zone_id
}
resource "aws_acm_certificate_validation" "certvalidation" {
  certificate_arn         = aws_acm_certificate.cert.arn
  validation_record_fqdns = [for r in aws_route53_record.certvalidation : r.fqdn]
}
# creating A record for domain:
resource "aws_route53_record" "websiteurl" {
  name    = var.domain_name
  zone_id = data.aws_route53_zone.hosted_zone.zone_id
  type    = "A"
  alias {
    name                   = aws_cloudfront_distribution.cf_dist.domain_name
    zone_id                = aws_cloudfront_distribution.cf_dist.hosted_zone_id
    evaluate_target_health = true
  }
}
Let us also add the required data source to fetch the hosted zone information in the data.tf file :
# data source to fetch hosted zone info from domain name:
data "aws_route53_zone" "hosted_zone" {
  name = var.domain_name
}
CloudFront Integration with EC2 using Terraform
Now that we have our EC2 instance and domain configuration in place, let’s create the AWS CloudFront distribution for our website in the cloudfront.tf file :
#creating AWS CloudFront distribution :
resource "aws_cloudfront_distribution" "cf_dist" {
  enabled             = true
  aliases             = [var.domain_name]
  origin {
    domain_name = aws_instance.ec2.public_dns
    origin_id   = aws_instance.ec2.public_dns
    custom_origin_config {
      http_port              = 80
      https_port             = 443
      origin_protocol_policy = "http-only"
      origin_ssl_protocols   = ["TLSv1.2"]
    }
  }
  default_cache_behavior {
    allowed_methods        = ["GET", "HEAD", "OPTIONS", "PUT", "POST", "PATCH", "DELETE"]
    cached_methods         = ["GET", "HEAD", "OPTIONS"]
    target_origin_id       = aws_instance.ec2.public_dns
    viewer_protocol_policy = "redirect-to-https" # other options - https only, http
    forwarded_values {
      headers      = []
      query_string = true
      cookies {
        forward = "all"
      }
    }
  }
  restrictions {
    geo_restriction {
      restriction_type = "whitelist"
      locations        = ["IN", "US", "CA"]
    }
  }
  tags = local.tags
  viewer_certificate {
    acm_certificate_arn      = aws_acm_certificate.cert.arn
    ssl_support_method       = "sni-only"
    minimum_protocol_version = "TLSv1.2_2018"
  }
}
The code is almost similar to creating a CloudFront distribution for S3. The only difference lies in the configuration of the origin block with the custom origin config arguments, where we have configured the public DNS address of the EC2 instance as the origin domain name and configured the required HTTPS port, which is the port for HTTP and HTTPS connections. This ensures that CloudFront routes the request to the EC2 instance whenever we visit our registered domain link.
Let us apply the configurations :
terraform apply -auto-approveOn success, a CloudFront distribution gets created with its origin set as the EC2 instance. You can verify this by visiting the domain link :
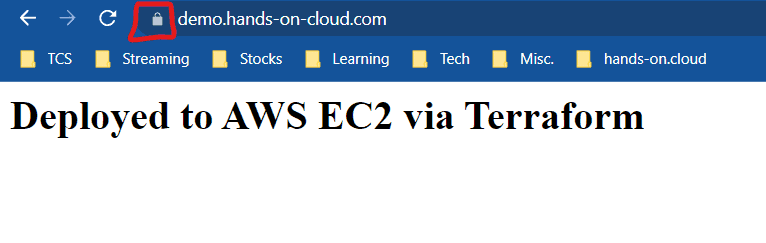
A secure HTTPS connection is established via our registered domain to the website hosted on the EC2 instance! Thus, we have successfully integrated CloudFront with EC2.
Cleanup
terraform destroy --auto-approveIntegrating CloudFront with ALB using Terraform
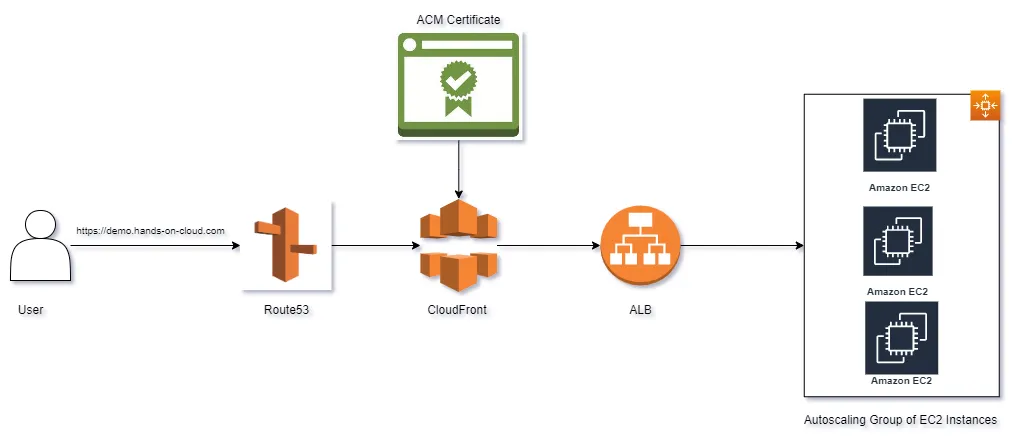
In the previous section, we discussed how we could set up CloudFront as a proxy for requests made to our application running on an Amazon EC2 instance. We configured a single EC2 instance as the origin of our CloudFront distribution. However, we seldom have a single EC2 instance serving our application in real-world projects. Instead, the application gets served from a fleet of instances (usually part of an autoscaling group) sitting behind an Application Load Balancer (ALB).
In this section, we shall cover how we can configure CloudFront using Terraform to proxy requests so that the request matches an ALB – which would then forward the request to an EC2 instance. This would help us leverage the CDN feature of CloudFront and improve the user experience of our web applications served via an ALB. Such a setup would be very useful for applications with cacheable content – such as product pages of e-commerce websites, blogs, documentation websites, etc.
You can find the completed code for this section here. All the code for this section would be inside the folder cloudfront_alb .
Initial Setup
First, we initialize our provider in the providers.tf file :
terraform {
  required_version = ">= 1.0.8"
  required_providers {
    aws = {
      version = ">= 4.15.0"
      source  = "hashicorp/aws"
    }
  }
}
provider "aws" {
  region = var.region
}
Next, we declare the required variables for the project in the variables.tf file :
variable "region" {
  type        = string
  description = "The AWS Region to use"
  default     = "us-east-1"
}
variable "domain_name" {
  type        = string
  description = "The domain name to use"
  default     = "demo.hands-on-cloud.com"
}
variable "vpc_cidr" {
  type        = string
  default     = "10.10.0.0/16"
  description = "AWS VPC CIDR range"
}
Next, we define some commonly used tags for our AWS resources in the locals.tf file :
locals {
  tags = {
    "Project"   = "hands-on.cloud"
    "ManagedBy" = "Terraform"
  }
}
Finally, we initialize the Terraform project :
terraform initCreating a VPC using Terraform
We shall create a VPC with two public and two private subnets to ensure security best practices. The private subnets would have the EC2 instances (which would be part of the autoscaling group), and the public subnets would have the Application Load Balancer. We would be using multiple subnets in either case to ensure the high availability of our application.
To create a VPC and required subnets using Terraform, we shall use the community-maintained AWS VPC Terraform module and add the following code to the vpc.tf file :
module "vpc" {
  source = "terraform-aws-modules/vpc/aws"
  name = "tf-cloudfront-alb-demo-vpc"
  cidr = var.vpc_cidr
  azs = ["${var.region}a", "${var.region}b"]
  public_subnets = [
    cidrsubnet(var.vpc_cidr, 8, 0),
    cidrsubnet(var.vpc_cidr, 8, 1)
  ]
  private_subnets = [
    cidrsubnet(var.vpc_cidr, 8, 2),
    cidrsubnet(var.vpc_cidr, 8, 3)
  ]
  enable_nat_gateway   = true
  single_nat_gateway   = false
  enable_dns_hostnames = true

  tags = local.tags
}
The above code creates a VPC with two public and two private subnets across two availability zones.
For more in-depth information about building Amazon VPC from scratch, check the Terraform AWS VPC – Complete Tutorial article.
Creating an Autoscaling Group using Terraform
An Auto Scaling Group in AWS is a group of EC2 instances. The number of EC2 instances in this group can be scaled up or down (i.e., increased or decreased) based on traffic or load on the individual instances. This feature enables us to scale our applications deployed to AWS horizontal scaling. In this section, we shall create an autoscaling group of instances using Terraform.
First, we add some data sources to the data.tf file :
# fetch ubuntu ami id:
data "aws_ami" "ubuntu_ami" {
  filter {
    name   = "name"
    values = ["ubuntu/images/hvm-ssd/ubuntu-focal-20.04-amd64-server-*"]
  }
  filter {
    name   = "virtualization-type"
    values = ["hvm"]
  }
  most_recent = true
  owners      = ["099720109477"]
}
# generate user data script :
data "template_cloudinit_config" "user_data" {
  gzip          = false
  base64_encode = true
  part {
    content_type = "text/x-shellscript"
    content      = <<-EOT
    #! /bin/bash
    sudo apt-get update
    sudo apt-get install -y apache2
    sudo systemctl start apache2
    sudo systemctl enable apache2
    echo "<h1>Deployed to AWS EC2 via Terraform </h1>" | sudo tee /var/www/html/index.html

    EOT
  }
}
The above code fetches the Ubuntu AMI to use as the OS for the EC2 instances. It also generates a bash script that installs an Apache Web Server that serves a static HTML web page.
Next, we add all the configurations required to create our autoscaling group (ASG) in the asg.tf file :
# Create a security group for EC2 instances to allow ingress on port 80 :
resource "aws_security_group" "ec2_ingress" {
  name        = "ec2_http_ingress"
  description = "Used for autoscale group"
  vpc_id      = module.vpc.vpc_id
  # HTTP access from anywhere
  ingress {
    from_port   = 80
    to_port     = 80
    protocol    = "tcp"
    cidr_blocks = ["0.0.0.0/0"]
  }
  egress {
    from_port   = 0
    to_port     = 0
    protocol    = "-1"
    cidr_blocks = ["0.0.0.0/0"]
  }
  lifecycle {
    create_before_destroy = true
  }
}
# create launch configuration for ASG :
resource "aws_launch_configuration" "asg_launch_conf" {
  name_prefix     = "tf-cloufront-alb-demo-"
  image_id        = data.aws_ami.ubuntu_ami.id
  instance_type   = "t2.micro"
  user_data       = data.template_cloudinit_config.user_data.rendered
  security_groups = [aws_security_group.ec2_ingress.id]
  lifecycle {
    create_before_destroy = true
  }
}
# create ASG with Launch Configuration :
resource "aws_autoscaling_group" "asg" {
  name                 = "tf-cloudfront-alb-asg"
  launch_configuration = aws_launch_configuration.asg_launch_conf.name
  min_size             = 3
  max_size             = 10
  vpc_zone_identifier  = module.vpc.private_subnets # placing asg in private subnet
  target_group_arns    = [aws_lb_target_group.alb_tg.arn]
  lifecycle {
    create_before_destroy = true
  }
  depends_on = [
    module.vpc,
    aws_lb_target_group.alb_tg,
    aws_launch_configuration.asg_launch_conf
  ]
}
Let us understand the above code :
- First, we have created a Security Group using the
aws_security_groupresource to allow HTTP traffic on port 80. - Then, we created a launch configuration using the
aws_launch_configurationresource by specifying thesecurity_groupsusing the above-created security group andimage_idanduser_datafrom the previously used data sources. - Finally, we have created an AWS Autoscaling Group using the
aws_autoscaling_groupresource, where we have mentioned thelaunch_configurationusing the above-created launch configuration resource. We have also mentioned the load balancer target group ARN in thetarget_group_arnsparameter, which we shall create later in this section.
Creating an Application Load Balancer (ALB) using Terraform
An Application Load Balancer (ALB) in AWS helps us distribute incoming traffic among multiple targets (such as EC2 instances, lambda functions, etc.). These targets have to be registered in target groups. A listener is attached to the load balancer, which helps listen to requests made using a certain protocol and forward the request to the target group configured in the listener rules.
To create an ALB using Terraform, we add the following code to the alb.tf file :
# Create Security Group for ALB Ingress :
resource "aws_security_group" "alb_ingress" {
  name   = "alg_http_ingress"
  vpc_id = module.vpc.vpc_id
  # Allow ingress to http port 80 from anywhere
  ingress {
    from_port   = 80
    to_port     = 80
    protocol    = "tcp"
    cidr_blocks = ["0.0.0.0/0"]
  }
  egress {
    from_port   = 0
    to_port     = 0
    protocol    = "-1"
    cidr_blocks = ["0.0.0.0/0"]
  }
}
# Create ALB :
resource "aws_lb" "alb" {
  name            = "tf-cloudfront-alb"
  subnets         = module.vpc.public_subnets
  security_groups = [aws_security_group.alb_ingress.id]
  internal        = false
  idle_timeout    = 60
  tags            = local.tags
}
resource "aws_lb_target_group" "alb_tg" {
  name     = "tf-cloudfront-alb-tg"
  port     = "80"
  protocol = "HTTP"
  vpc_id   = module.vpc.vpc_id
  tags     = local.tags
  health_check {
    healthy_threshold   = 3
    unhealthy_threshold = 10
    timeout             = 5
    interval            = 10
    path                = "/"
    port                = 80
  }
}
resource "aws_lb_listener" "alb_listener" {
  load_balancer_arn = aws_lb.alb.arn
  port              = 80
  protocol          = "HTTP"
  default_action {
    target_group_arn = aws_lb_target_group.alb_tg.arn
    type             = "forward"
  }
}
Let us understand the above code –
- First, we have created a security group with AWS WAF to allow HTTP ingress into port 80
- Next, we created the ALB itself using the
aws_lbresource by mentioning the security group created above using thesecuirty_group_idsparameter - Next, we have created a target group for the ALB using the
aws_lb_target_group. First, we have created a security group to allow HTTP ingress into port 80 - Next, we created the ALB itself using the
aws_lbresource by mentioning the security group created above using thesecuirty_group_idsparameter - Next, we have created a target group for the ALB using the
aws_lb_target_groupresource. Here, we have configured some health check parameters to ensure that the instance the request gets forwarded is healthy. - Finally, we have created a listener for the ALB, which listens on port 80 and forwards all traffic to the above-created target group using the
aws_lb_listenerresource.
Note that we have referred to the ARN of the ALB created above in the target_group_arns parameter of the autoscaling group earlier in this section.
Let us add the DNS name of the created ALB to the outputs.tf file for our convenience :
output "alb_dns_name" {
  value = aws_lb.alb.dns_name
}
Now, let us apply the above configurations :
terraform validate
terraform plan
terraform apply -auto-approve
On applying, the DNS name of the ALB would appear in the output on the terminal. Copy it and visit the link in your browser :


So at this stage, we have an autoscaling group serving a website via an ALB. We are ready to start integrating CloudFront into our setup!
Integrating CloudFront with ALB using Terraform
The approach in this section would be similar to the one followed in the previous section (Integrating CloudFront with EC2) with one minor change, which we will see later in this section.
First, we fetch the domain’s hosted zone details in the data.tf file :
# data source to fetch hosted zone info from domain name:
data "aws_route53_zone" "hosted_zone" {
  name = var.domain_name
}
Next, we configure the ACM certificate and create the required A record for our domain in the domain.tf :
# generate ACM cert for domain :
resource "aws_acm_certificate" "cert" {
  domain_name               = var.domain_name
  subject_alternative_names = ["*.${var.domain_name}"]
  validation_method         = "DNS"
  tags                      = local.tags
}
# validate cert:
resource "aws_route53_record" "certvalidation" {
  for_each = {
    for d in aws_acm_certificate.cert.domain_validation_options : d.domain_name => {
      name   = d.resource_record_name
      record = d.resource_record_value
      type   = d.resource_record_type
    }
  }
  allow_overwrite = true
  name            = each.value.name
  records         = [each.value.record]
  ttl             = 60
  type            = each.value.type
  zone_id         = data.aws_route53_zone.hosted_zone.zone_id
}
resource "aws_acm_certificate_validation" "certvalidation" {
  certificate_arn         = aws_acm_certificate.cert.arn
  validation_record_fqdns = [for r in aws_route53_record.certvalidation : r.fqdn]
}
# creating A record for domain:
resource "aws_route53_record" "websiteurl" {
  name    = var.domain_name
  zone_id = data.aws_route53_zone.hosted_zone.zone_id
  type    = "A"
  alias {
    name                   = aws_cloudfront_distribution.cf_dist.domain_name
    zone_id                = aws_cloudfront_distribution.cf_dist.hosted_zone_id
    evaluate_target_health = true
  }
}
Finally, we create our AWS CloudFront distribution in the cloudfront.tf file :
#creating Cloudfront distribution :
resource "aws_cloudfront_distribution" "cf_dist" {
  enabled             = true
  aliases             = [var.domain_name]
  origin {
    domain_name = aws_lb.alb.dns_name
    origin_id   = aws_lb.alb.dns_name
    custom_origin_config {
      http_port              = 80
      https_port             = 443
      origin_protocol_policy = "http-only"
      origin_ssl_protocols   = ["TLSv1.2"]
    }
  }
  default_cache_behavior {
    allowed_methods        = ["GET", "HEAD", "OPTIONS", "PUT", "POST", "PATCH", "DELETE"]
    cached_methods         = ["GET", "HEAD", "OPTIONS"]
    target_origin_id       = aws_lb.alb.dns_name
    viewer_protocol_policy = "redirect-to-https"
    forwarded_values {
      headers      = []
      query_string = true
      cookies {
        forward = "all"
      }
    }
  }
  restrictions {
    geo_restriction {
      restriction_type = "whitelist"
      locations        = ["IN", "US", "CA"]
    }
  }
  tags = local.tags
  viewer_certificate {
    acm_certificate_arn      = aws_acm_certificate.cert.arn
    ssl_support_method       = "sni-only"
    minimum_protocol_version = "TLSv1.2_2018"
  }
}
The only change from the previous section is that we have set the origin block to have the ALB DNS Name (aws_lb.alb.dns_name) as the distribution’s origin.
Finally, we apply the configurations :
terraform validate
terraform apply --auto-approve
After applying, visit the CloudFront domain name URL (https://demo.hands-on-cloud.com in our case). The web page would get served :
Thus, we have successfully integrated CloudFront with ALB using Terraform!
Cleanup
terraform destroy --auto-approveCloudFront with Lamda@Edge using Terraform
So far, we have explored various features of CloudFront using Terraform. We have seen how CloudFront lets us customize multiple aspects of the requests and responses, for example – cookies, cache policies, methods, geo-restriction, etc. Now we shall explore another powerful feature of CloudFront called Lamda@Edge.
Lambda@Edge lets us deploy and run AWS Lambda functions at edge locations of the CDN. This means we can set up a highly available multi-region backend while paying for only what we use – as it’s an entirely serverless setup. These CloudFront functions, written in Python or Node.js, let us achieve a higher level of customization in the request-response cycle of CloudFront. Any of the 4 event hooks can trigger Lambda@Edge functions:
- After CloudFront receives a request from a viewer (viewer request)
- Before CloudFront forwards the request to the origin (origin request)
- After CloudFront receives the response from the origin (origin response)
- Before CloudFront forwards the response to the viewer (viewer response)

In this section, we shall set up an AWS CloudFront distribution with an S3 bucket as the origin and hook it up with a Lamda@Edge function, which would be responsible for including some security headers in the response from the origin, using Terraform. Common use cases for Lambda@Edge include performance optimization, dynamic content generation, which automatically compresses content, enforcing security best practices such as requesting headers or the signing of requests or including required headers, creating prettier URLs, etc. You may find a detailed explanation here.
You can find the completed code for this section here. All the code for this section would be inside the cloudfront_lambda_edge folder.
Initial Setup
First, we declare the Terraform AWS provider and variables :
terraform {
  required_version = ">= 1.0.8"
  required_providers {
    aws = {
      version = ">= 4.15.0"
      source  = "hashicorp/aws"
    }
  }
}
provider "aws" {
  region = var.region
}
variable "region" {
  type        = string
  description = "The AWS Region to use for resources"
  default     = "us-east-1"
}
variable "bucket_prefix" {
  type        = string
  description = "The prefix for the S3 bucket"
  default     = "tf-s3-website-"
}
variable "domain_name" {
  type        = string
  description = "The domain name to use"
  default     = "demo.hands-on-cloud.com"
}
Next, we add some commonly used tags in the locals.tf file :
locals {
  tags = {
    "Project"   = "hands-on.cloud"
    "ManagedBy" = "Terraform"
  }
}
Since most of the code for this section would be identical to that of the section on Integrating CloudFront with S3 using Terraform, we shall copy the following files right away :
The index and error pages which can be a custom error page for the static website inside the uploads folder :
<!DOCTYPE html>
<html lang="en">
	<head>
		<title>S3 Website</title>
        <style>
            .container{
                width: 100%;
                height: 100%;
                display: flex;
                flex-direction: column;
                justify-content: center;
                align-items: center;
            }
            .container img{
                width : 800px;
                height: auto;
                object-fit: contain;
            }
        </style>
	</head>
    <body>
        <div class="container">
            <h1>S3 Website</h1>
            <p> This website is being hosted on Amazon S3!</p>
            <p>Here is a view of Kasol</p>
            <img src="https://static.india.com/wp-content/uploads/2018/08/kasol1.jpg?impolicy=Medium_Resize&w=1200&h=800" alt="Kasol"/>
        </div>

</html>
<!DOCTYPE html>
<html lang="en">
<head>
<title>S3 Website</title>
<style>
.container{
width: 100%;
height: 100%;
display: flex;
flex-direction: column;
justify-content: center;
align-items: center;
}
.container h1{
font-size: 6rem;
color: red;
}
.container p{
font-size: 3rem;
color: blue;
}
</style>
</head>
<body>
<div class="container">
<h1>404</h1>
<p>Oops....there was an error :(</p>
</div>
</html>The S3 Website configuration in the s3_website.tf file :
# create S3 Bucket:
resource "aws_s3_bucket" "bucket" {
  bucket_prefix = var.bucket_prefix #prefix appends with timestamp to make a unique identifier
  tags = local.tags
  force_destroy = true
}
# create bucket ACL :
resource "aws_s3_bucket_acl" "bucket_acl" {
  bucket = aws_s3_bucket.bucket.id
  acl    = "private"
}
# block public access :
resource "aws_s3_bucket_public_access_block" "public_block" {
  bucket = aws_s3_bucket.bucket.id
  block_public_acls       = true
  block_public_policy     = true
  restrict_public_buckets = true
  ignore_public_acls      = true
}
# encrypt bucket using SSE-S3:
resource "aws_s3_bucket_server_side_encryption_configuration" "encrypt" {
  bucket = aws_s3_bucket.bucket.id
  rule {
    apply_server_side_encryption_by_default {
      sse_algorithm = "AES256"
    }
  }
}
# create S3 website hosting:
resource "aws_s3_bucket_website_configuration" "website" {
  bucket = aws_s3_bucket.bucket.id
  index_document {
    suffix = "index.html"
  }
  error_document {
    key = "error.html"
  }
}
# add bucket policy to let the CloudFront OAI get objects:
resource "aws_s3_bucket_policy" "bucket_policy" {
  bucket = aws_s3_bucket.bucket.id
  policy = data.aws_iam_policy_document.bucket_policy_document.json
}
#upload website files to s3:
resource "aws_s3_object" "object" {
  bucket = aws_s3_bucket.bucket.id
  for_each     = fileset("uploads/", "*")
  key          = "website/${each.value}"
  source       = "uploads/${each.value}"
  etag         = filemd5("uploads/${each.value}")
  content_type = "text/html"
  depends_on = [
    aws_s3_bucket.bucket
  ]
}
The required data sources in the data.tf file :
# data source to generate bucket policy to let OAI get objects:
data "aws_iam_policy_document" "bucket_policy_document" {
  statement {
    actions = ["s3:GetObject"]
    resources = [
      aws_s3_bucket.bucket.arn,
      "${aws_s3_bucket.bucket.arn}/*"
    ]
    principals {
      type        = "AWS"
      identifiers = [aws_cloudfront_origin_access_identity.oai.iam_arn]
    }
  }
}
# data source to fetch hosted zone info from domain name:
data "aws_route53_zone" "hosted_zone" {
  name = var.domain_name
}
The domain and ACM certificate configurations in the domain.tf file :
# generate ACM cert for domain :
resource "aws_acm_certificate" "cert" {
  domain_name               = var.domain_name
  subject_alternative_names = ["*.${var.domain_name}"]
  validation_method         = "DNS"
  tags = local.tags

  lifecycle{
    create_before_destroy = true
  }
}
# validate cert:
resource "aws_route53_record" "certvalidation" {
  for_each = {
    for d in aws_acm_certificate.cert.domain_validation_options : d.domain_name => {
      name   = d.resource_record_name
      record = d.resource_record_value
      type   = d.resource_record_type
    }
  }
  allow_overwrite = true
  name            = each.value.name
  records         = [each.value.record]
  ttl             = 60
  type            = each.value.type
  zone_id         = data.aws_route53_zone.hosted_zone.zone_id
}
resource "aws_acm_certificate_validation" "certvalidation" {
  certificate_arn         = aws_acm_certificate.cert.arn
  validation_record_fqdns = [for r in aws_route53_record.certvalidation : r.fqdn]
}
# creating A record for domain:
resource "aws_route53_record" "websiteurl" {
  name    = var.domain_name
  zone_id = data.aws_route53_zone.hosted_zone.zone_id
  type    = "A"
  alias {
    name                   = aws_cloudfront_distribution.cf_dist.domain_name
    zone_id                = aws_cloudfront_distribution.cf_dist.hosted_zone_id
    evaluate_target_health = true
  }
}
Finally, we initialize the Terraform project :
terraform initPreparing the Lamda@Edge Function
At this stage, we must prepare the code for the Lambda@Edge function. It would be a simple Node.js Lambda function that would add a few security headers to the response of the CloudFront distribution.
We add the following code to the index.js file inside the src folder:
exports.handler = async (event) => {
	// Get Contents of CF response :
	const res = event.Records[0].cf.response;
	// set required security headers :
	res.headers["x-frame-options"] = [{ key: "X-Frame-Options", value: "DENY" }];
	res.headers["x-xss-protection"] = [
		{ key: "X-XSS-Protection", value: "1; mode=block" },
	];
	res.headers["referrer-policy"] = [
		{ key: "Referrer-Policy", value: "no-referrer" },
	];
	return res;
};
Now that our function code is ready let us write the necessary Terraform configurations to deploy the same. Here, we shall make use of the official AWS Lambda Terraform module.
Note: AWS Mandates that Lambda@Edge functions are deployed to the AWS region us-east-1 (N. Virginia) only.
We add the following code to the lambda.tf file :
module "lambda_at_edge" {
  source = "terraform-aws-modules/lambda/aws"
  lambda_at_edge = true
  function_name = "lambda_at_edge"
  description   = "Demo lambda@edge function"
  handler       = "index.handler"
  runtime       = "nodejs14.x"
  source_path = "src/index.js"
  tags = merge(
    {
      "lambda_at_edge" = "true"
    },
    local.tags
  )
}
In the above code, we have mentioned the lambda function created would be a Lambda@Edge function by setting the lambda_at_edge parameter to true. This creates a Lambda function under the hood which would be very similar to a normal lambda function with one key difference – the execution role of this function would have both lambda.amazonaws.com and edgelambda.amazonaws.com as its trusted entities.
{
    "Version": "2012-10-17",
    "Statement": [
        {
            "Sid": "",
            "Effect": "Allow",
            "Principal": {
                "Service": [
                    "lambda.amazonaws.com",
                    "edgelambda.amazonaws.com"
                ]
            },
            "Action": "sts:AssumeRole"
        }
    ]
}
Here is a list of differences between normal Lambda and Lambda@Edge functions.
CloudFront Integration with Lambda@Edge using Terraform
Finally, it is time for us to integrate the above-created Lambda@Edge function with our CloudFront distribution.
We add the following code to the cloudfront.tf file :
#creating OAI :
resource "aws_cloudfront_origin_access_identity" "oai" {
  comment = "OAI for ${var.domain_name}"
}
#creating AWS CloudFront distribution :
resource "aws_cloudfront_distribution" "cf_dist" {
  enabled             = true
  aliases             = [var.domain_name]
  default_root_object = "website/index.html"
  origin {
    domain_name = aws_s3_bucket.bucket.bucket_regional_domain_name
    origin_id   = aws_s3_bucket.bucket.id
    s3_origin_config {
      origin_access_identity = aws_cloudfront_origin_access_identity.oai.cloudfront_access_identity_path
    }
  }
  default_cache_behavior {
    allowed_methods        = ["GET", "HEAD", "OPTIONS", "PUT", "POST", "PATCH", "DELETE"]
    cached_methods         = ["GET", "HEAD", "OPTIONS"]
    target_origin_id       = aws_s3_bucket.bucket.id
    viewer_protocol_policy = "redirect-to-https"
    forwarded_values {
      headers      = []
      query_string = true
      cookies {
        forward = "all"
      }
    }
    lambda_function_association {
      event_type   = "origin-response"
      lambda_arn   = module.lambda_at_edge.lambda_function_qualified_arn
      include_body = false
    }
  }
  restrictions {
    geo_restriction {
      restriction_type = "whitelist"
      locations        = ["IN", "US", "CA"]
    }
  }

  viewer_certificate {
    acm_certificate_arn      = aws_acm_certificate.cert.arn
    ssl_support_method       = "sni-only"
    minimum_protocol_version = "TLSv1.2_2018"
  }
  tags = local.tags
  depends_on = [
    module.lambda_at_edge
  ]
}
This code is mostly identical to the code in the section on Integrating CloudFront with S3, except for two differences :
- We have used a
lambda_function_associationblock inside thedefault_cache_behaviourblock with the specified HTTP methods. We have used this block to specify the Lambda@Edge function using the ARN of the current version of the function (lambda_function_qualified_arn) and the invocation event type viaevent_type = "origin-response". This ensures that the function is executed while the CloudFront distribution sends the response from the origin (S3) to the user. - We have added an explicit dependency on the lambda module.
That’s all the configuration required for integrating Lambda@Edge with a CloudFront distribution. Let us apply these configurations :
terraform validate
terraform plan
terraform apply -auto-approve
After successfully applying the configurations above, you may use the curl command to probe the domain URL and inspect the headers with the header data in the response :
curl -D - https://demo.hands-on-cloud.com 
Thus, we have successfully added the required security headers to the origin response of the CloudFront distribution using Lambda@Edge!
Cleanup
terraform destroy -auto-approveSummary
In this article, we have covered setting up CloudFront with S3 as an origin and integration of CloudFront with EC2, ALB, and Lambda@Edge using Terraform.
