Terraform S3 Tutorial – Easy AWS automation
Amazon S3 (Simple Storage Service) is a scalable, secure, and highly available object storage service offered by Amazon Web Services(AWS). It is one of the most popular cloud object storage services for customers use from different industries. Amazon S3 provides us with managed features such as storage classes, access management, analytics, logging and monitoring, strong consistency, versioning, cross-region replication, etc… These features make it a go-to choice when you need to store a vast amount of data in the cloud. This article covers how you can automate managing S3 buckets, S3 objects, ACLs, bucket policies, S3 bucket replication, S3 bucket encryption, configure S3 events, and S3 website configuration using Terraform.
Table of contents
Prerequisites
- Terraform with AWS provider version 4.0.0.0+ is installed and configured on your system. You can get installation instructions from here.
- AWS CLI is installed and configured on your system.
- An IAM user/role having proper permissions to manage S3 (preferably administrator permissions).
- Basic understanding of Terraform and AWS.
We also suggest you use aws-vault for managing access to multiple AWS environments.
S3 Basics using Terraform
This section covers the two essential aspects of managing Amazon Simple Storage Service (Amazon S3) using Terraform – S3 buckets and S3 objects.
Amazon S3 is an online file storage system that Amazon Web Services (AWS) provides. S3 is a scalable, high-speed, low-cost web-based storage service for data lakes, online backup, static website content, and data archives and application programs. It stores data as objects, which are organized into buckets. You can access data stored in S3 from anywhere on the internet. S3 is among the most popular AWS services used by many large companies, including Airbnb, Dropbox, and Netflix.
S3 objects are stored in S3 buckets, and each can be up to 5 GB in size. Objects are accessed via a URL and can be public or private. Public objects can be accessed by anyone, while private objects require authentication. You can use S3 objects to store any data, including images, videos, and text files. S3 objects are frequently used to serve static content for websites. This includes images, CSS files, and JavaScript libraries. Using S3 objects, website owners can improve their performance by reducing the bandwidth required to serve static content.
Let’s explore how we can create and manage these resources using Terraform! You can find the completed code for this section inside the s3_basics folder in our GitHub repository.
Creating an S3 bucket using Terraform
Every S3 Bucket resides in its own AWS Region and has to have a unique name (S3 bucket domain name) within the AWS cloud. So, we need to add the AWS provider and initialize it with the region for creating S3-related resources. Create a providers.tf file at the root level of the project directory (s3_basics) and add the following code:
terraform {
  required_providers {
    aws = {
      source  = "hashicorp/aws"
      version = "~> 4.0.0"
    }
  }
}
provider "aws" {
  region = var.region
}
After that, we can go ahead and define the S3 bucket resource. Add the following code to the main.tf file:
resource "aws_s3_bucket" "bucket" {
  bucket_prefix = var.bucket_prefix
  tags = {
    "Project" = "hands-on.cloud"
  }
}
The above code uses the aws_s3_bucket resource to create an S3 bucket. We’re using the bucket Terraform resource name for referencing our S3 Bucket throughout the Terraform code. The bucket_prefix argument refers to the string used as a prefix for the S3 Bucket we create. The last name would be the specified prefix appended with some randomly generated number to allow you to create a unique bucket name.
Let’s define Terraform module variables used in our configuration in the variables.tf file:
variable "region" {
  type        = string
  description = "The AWS region name to create/manage resources in"
  default     = "ap-south-1"
}
variable "bucket_prefix" {
  type        = string
  description = "The prefix to use for the S3 bucket name"
  default     = "tf-bucket"
}
Let’s also output the name of the Bucket created by Terraform. Create a file called output.tf at the root level (of s3_basics directory) and add the following code:
# S3 bucket name
output "s3_bucket_name" {
  value = aws_s3_bucket.bucket.id
}
To apply the configuration, we need to execute the following commands from the root level of the s3_basics directory:
terraform init
terraform validate
terraform apply --auto-approve
On successful execution, we should see a Terraform output showing the name of the S3 Bucket created in our AWS account:

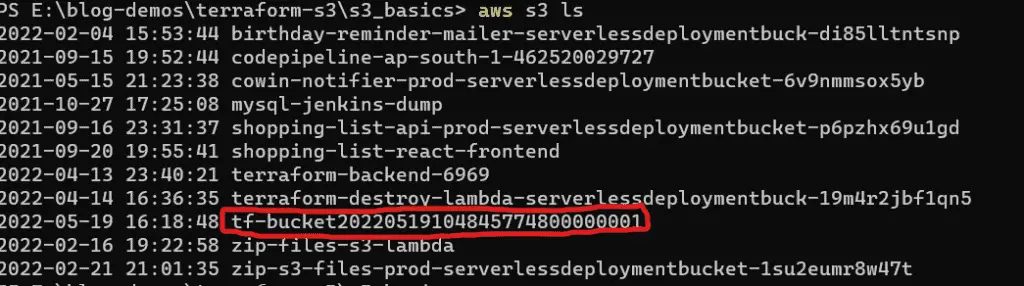
We can verify if this Bucket has been created by executing the following command:
aws s3 lsThis would list all the S3 buckets in the account, and we should find our existing Bucket in that list:
Now, we can start uploading S3 objects to the Bucket!
Sometimes, your organization might need to protect data stored in Amazon S3. In that case, you can use the Amazon S3 Object Lock configuration. Object lock is a feature of Amazon S3 that enables you to place an object lock configuration on an object or object version. An object lock configuration can be locked or unlocked in one of two states. In the locked state, object lock protects an object from being deleted or overwritten for a specified number of days or indefinitely. Once an object is locked, you cannot unlock it. You can use object lock to meet compliance requirements, such as SEC Rule 17a-4(f), which requires the ability to prevent the deletion of records for a certain period. You can also use object lock to implement your business requirements, requiring that documents receive final approval before being deleted or overwritten. Object lock is available for all Amazon S3 storage classes except for the Standard – Infrequent Access (Standard – IA) storage class. You can enable object lock at the bucket level, and then all newly created objects in the Bucket will have object lock enabled by default.
Let’s look at how you can configure Amazon Object Lock Configuration using Terraform. To achieve this goal, you need to update your main.tf file using the following content:
resource "aws_s3_bucket" "bucket" {
  bucket_prefix = var.bucket_prefix
  object_lock_enabled = true
  tags = {
    "Project" = "hands-on.cloud"
  }
}
resource "aws_s3_bucket_object_lock_configuration" "bucket" {
  bucket = aws_s3_bucket.bucket.bucket
  rule {
    default_retention {
      mode = "COMPLIANCE"
      days = 365
    }
  }
}
The above configuration consists of two parts:
- The
object_lock_enabledparameter in theaws_s3_bucketresource makes Object Lock configuration enabled for your S3 Bucket by default - The aws_s3_bucket_object_lock_configuration resource configures a compliance policy (valid values for the default retention mode are
COMPLIANCEandGOVERNANCE) that will prevent locked object modification for 365 days after the object has been locked.
Creating an S3 object using Terraform
In this section, we will upload a couple of files to our created S3 bucket using Terraform. First, create a folder called uploads inside the s3_basics folder. I shall keep three files – dog.jpg, cat.jpg and rabbit.jpg inside this folder – to be uploaded to our S3 Bucket. Now add the following code to the main.tf file after the aws_s3_bucket resource block:
# Creating an S3 object
resource "aws_s3_object" "object" {
  bucket = aws_s3_bucket.bucket.id
  for_each = fileset("uploads/", "*")
  key    = each.value
  source = "uploads/${each.value}"
  etag = filemd5("uploads/${each.value}")
  depends_on = [
    aws_s3_bucket.bucket
  ]
}
We’ve used the aws_s3_object resource to create three S3 objects. Inside the resource block, we’ve used the for_each block to loop over the files inside our uploads folder using the fileset function and uploaded them to our S3 Bucket using the same filename as the key. The etag attribute ensures that updates get triggered only when there is a file change.
Note: using for_each loop allows you to write cleaner configuration files without defining a new resource whenever you need a similar Terraform resource.
To apply the above configuration, you need to execute the terraform apply command:
terraform apply -auto-approveOnce applied, you may note the S3 bucket name and execute the following command:
aws s3 ls s3://<bucket_name>Replace bucket_name with the actual name of your Bucket. You should see an output like this:

The command lists uploaded files. You may also verify the files by downloading them to your laptop using the AWS S3 web console or AWS CLI.
Managing ACLs and Blocking Public Access using Terraform
Access Control Lists (ACLs) regulate access to our buckets and objects. Let’s see how we can set up a simple ACL to make our bucket private using Terraform. In the main.tf file inside the s3_basics folder, add the following block of code below the aws_s3_object resource:
# Creating a S3 bucket ACL
resource "aws_s3_bucket_acl" "bucket_acl" {
  bucket = aws_s3_bucket.bucket.id
  acl    = "private"
}
You may also block public access to your Bucket by using this configuration:
# Block S3 public access
resource "aws_s3_bucket_public_access_block" "block" {
  bucket = aws_s3_bucket.bucket.id
  block_public_acls   = true
  block_public_policy = true
}
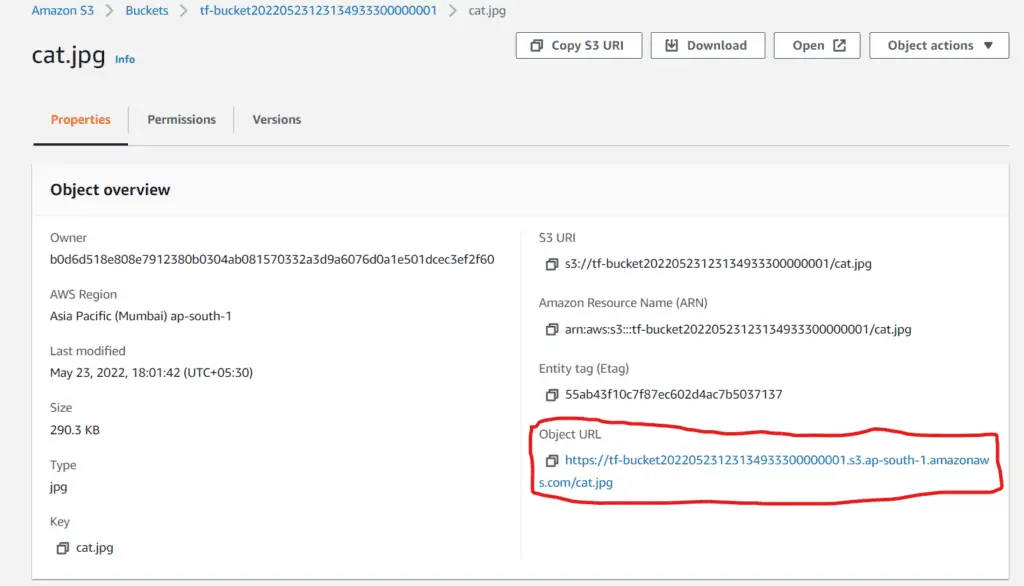
After applying these configurations, visit the S3 console and navigate the previously uploaded objects to test the above settings. Click on the Object URL:
You would get the following message :
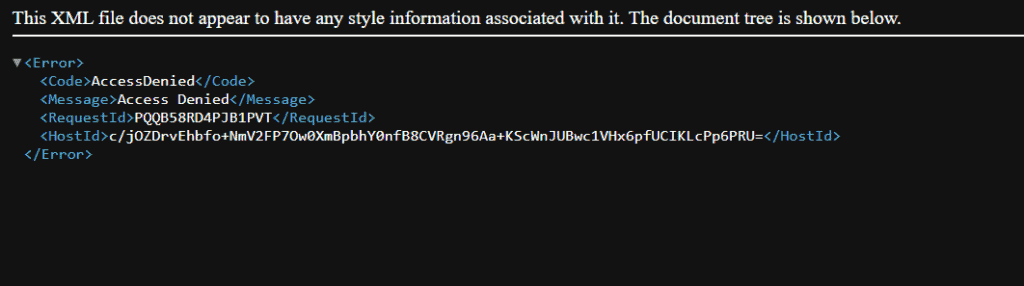
Thus, our Bucket is private and not accessible publicly.
Note that AWS does not recommend using ACLs for access management anymore. Instead, use S3 Bucket Policy, which we will cover in the next section.
Cleanup
To destroy the resources created in this section, execute the following command from the root level of the s3_basics directory:
terraform destroy --auto-approveS3 Bucket Policies using Terraform
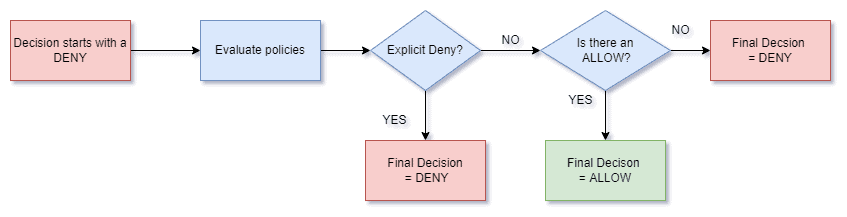
The S3 bucket policy is a resource-based (applied directly to an AWS resource) policy that you can use to regulate access to an S3 Bucket. It can be controlled only by the owner of the Bucket. Like IAM policies, these policies are written in a JSON-based access policy language. The following diagram illustrates how Bucket Policies are evaluated:
In this section, we will explore bucket policy management using Terraform! You can find the completed code for this section in our GitHub repository here.
Initial Setup
First, let’s create a basic S3 bucket containing a single object for this demo. Create a new folder called s3_bucket_policy. This folder will store all the code for this section. Inside the folder, add the following provider.tf file:
terraform {
  required_providers {
    aws = {
      source  = "hashicorp/aws"
      version = ">= 4.15.1"
    }
  }
}
provider "aws" {
  region = var.region
}
Next, create an uploads folder and store the file you want to upload to the Bucket inside this folder. In my case, it would be a file called confidential.jpg. After that, create a file called s3.tf to house all the code for the S3 bucket configuration and add the following code:
#creating a bucket:
resource "aws_s3_bucket" "bucket" {
  bucket_prefix = var.bucket_prefix
  tags = {
    "Project" = "hands-on.cloud"
  }
}
#terraform s3 - creating an object:
resource "aws_s3_object" "object" {
  bucket = aws_s3_bucket.bucket.id
  key    = basename(var.upload_source)
  source = var.upload_source
  etag   = filemd5(var.upload_source)
  depends_on = [
    aws_s3_bucket.bucket
  ]
}
In the above code, we have created an S3 bucket and uploaded the file stored inside upload_source. Note the use of the basename function to extract the file name from the full path of the file. Let’s now add the required variables for these configurations to work in the variables.tf file:
variable "region" {
  type        = string
  description = "The region name where the AWS Resources would get provisioned"
  default     = "ap-south-1"
}
variable "bucket_prefix" {
  type        = string
  description = "The prefix to use for the S3 bucket name"
  default     = "tf-confidential"
}
variable "upload_source" {
  type        = string
  description = "The source file to upload"
  default     = "uploads/confidential.jpg"
}
Finally, let’s add some outputs in the outputs.tf file:
# Bucket name
output "s3_bucket_name" {
  value = aws_s3_bucket.bucket.id
}
Let’s apply these configurations:
terraform init
terraform apply -auto-approve
At this stage, you should have an S3 bucket with a name starting with the prefix “tf-confidential“, containing a file called confidential.jpg. Let us now implement a Bucket Policy.
Creating an IAM User using Terraform
To test out a Bucket Policy, we need an AWS principal. In our case, the principal will be an IAM user we create using Terraform.
Alternatively, you can use the AWS IAM role for testing purposes if you’re using AWS SSO for authentication in your AWS account.
Create a file called iam_user.tf inside the s3_bucket_policy folder and add the following code:
resource "aws_iam_user" "user" {
  name = var.iam_username
  tags = {
    Project = "hands-on.cloud"
  }
}
resource "aws_iam_user_login_profile" "login" {
  user = aws_iam_user.user.name
}
The above code creates an IAM user using the aws_iam_user resource and their corresponding login password using the aws_iam_user_login_profile resource.
For more information about managing AWS IAM using Terraform, check out the “Managing AWS IAM using Terraform” article.
Also, we will need the details of the created IAM user to log in to the console, so let us add them to our outputs.tf file:
#IAM user details:
output "iam_user_arn" {
  value = aws_iam_user.user.arn
}
output "iam_user_id" {
  value = aws_iam_user.user.id
}
output "iam_user_password" {
  value = aws_iam_user_login_profile.login.password
}
Finally, let’s add the variables needed for the above configurations to work to the variables.tf file:
variable "iam_username" {
  type        = string
  description = "The IAM username to use"
  default     = "terraform"
}
To apply the above configurations:
terraform apply -auto-approveOnce applied, the above Terraform configuration will create an IAM user named “terraform” with no permissions attached to the user. Note the username and password from the Terraform output in the terminal window:
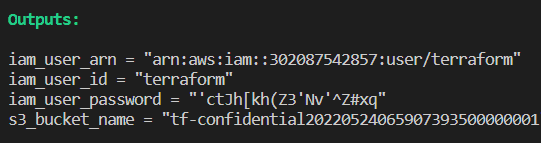
Note: it is not secure to manage AWS credentials in such a way. We’re doing this only to simplify the configuration example. Consider using AWS Systems Manager Parameter Store or AWS Secrets Manager for production.
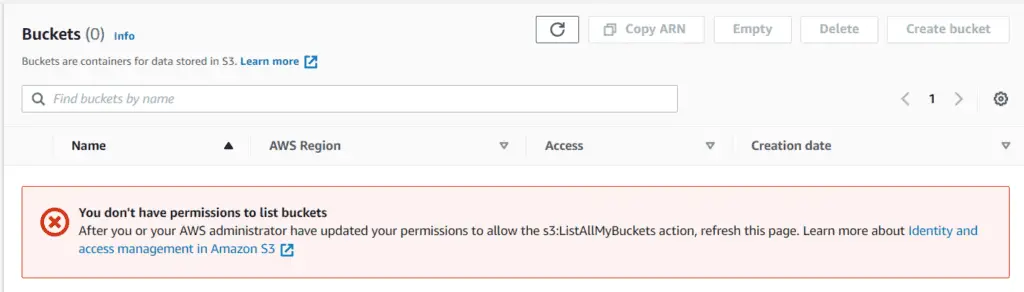
Now, open an Incognito window (or a private window) in your browser and log in to the AWS console using the above IAM User’s credentials. After that, visit the S3 console. You must see something like this :
Thus, we have an IAM user with console access but no IAM role to view the S3 buckets in our account. Let’s attach an IAM policy to the user to permit it to list all the buckets in our account. Create a file called policies.tf and add the following code:
# IAM Policy - to list all S3 buckets in the account - to be attached to the created user
data "aws_iam_policy_document" "s3_list" {
  statement {
    sid    = "ListS3Buckets"
    effect = "Allow"
    actions   = ["s3:ListAllMyBuckets"]
    resources = ["*"] # List all S3 buckets in the account
  }
}
In the above code, we have used the aws_iam_policy_document data source lets us write IAM policies in HCL and then convert them internally to JSON. The above code generates an IAM policy to allow the user to list all the S3 buckets in the AWS Account. To attach the policy to the IAM user, add the following code to the iam_user.tf file:
resource "aws_iam_policy" "policy" {
  name        = "S3ListPolicy"
  description = "Allow listing S3 buckets"
  policy      = data.aws_iam_policy_document.s3_list.json
}
resource "aws_iam_user_policy_attachment" "attach" {
  user       = aws_iam_user.user.name
  policy_arn = aws_iam_policy.policy.arn
}
Now apply the configuration:
terraform apply -auto-approveAfter applying, go back to the Incognito window and refresh the S3 console. You will see a list of all the S3 buckets in the account :
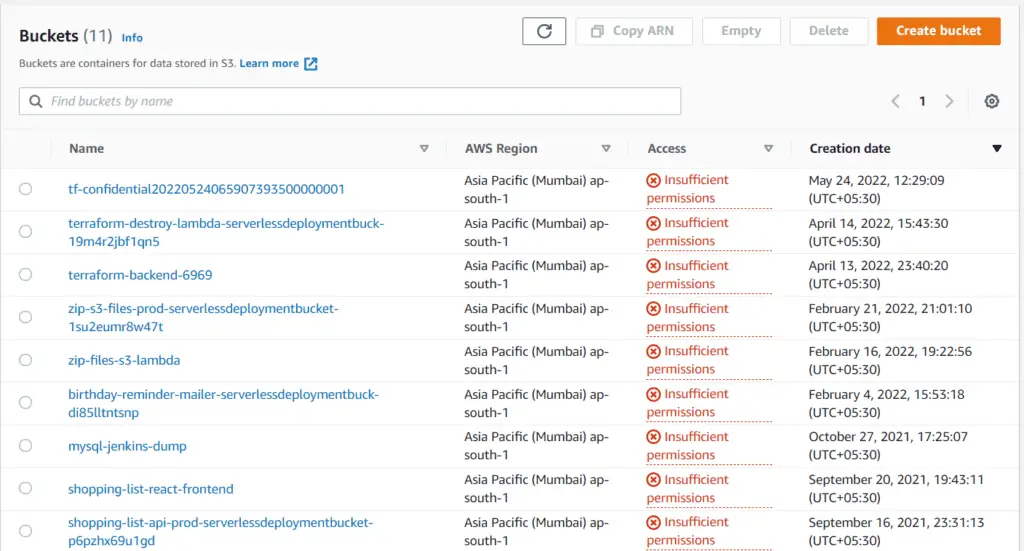
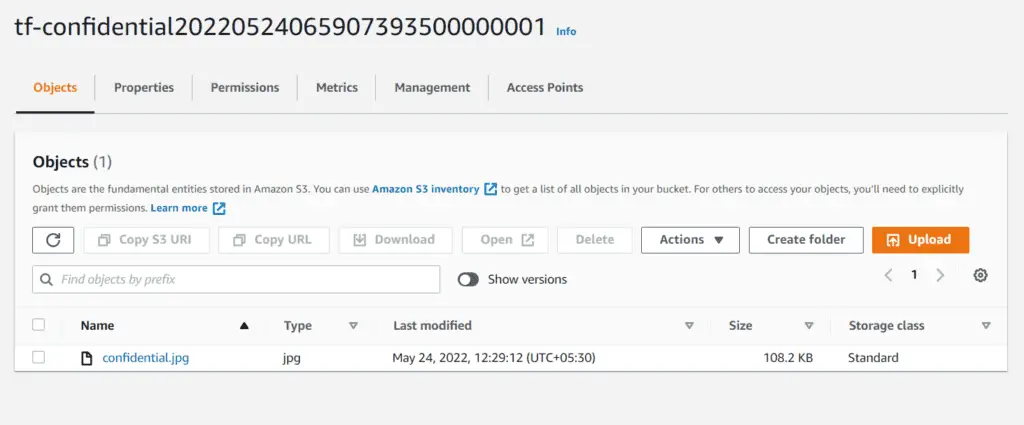
The user can now get a list of all S3 buckets in the account, but he still does not have permission to access the buckets as indicated by the Access column. If you click on the Bucket created (tf-confidential20220524065907393500000001) you will see the following message:
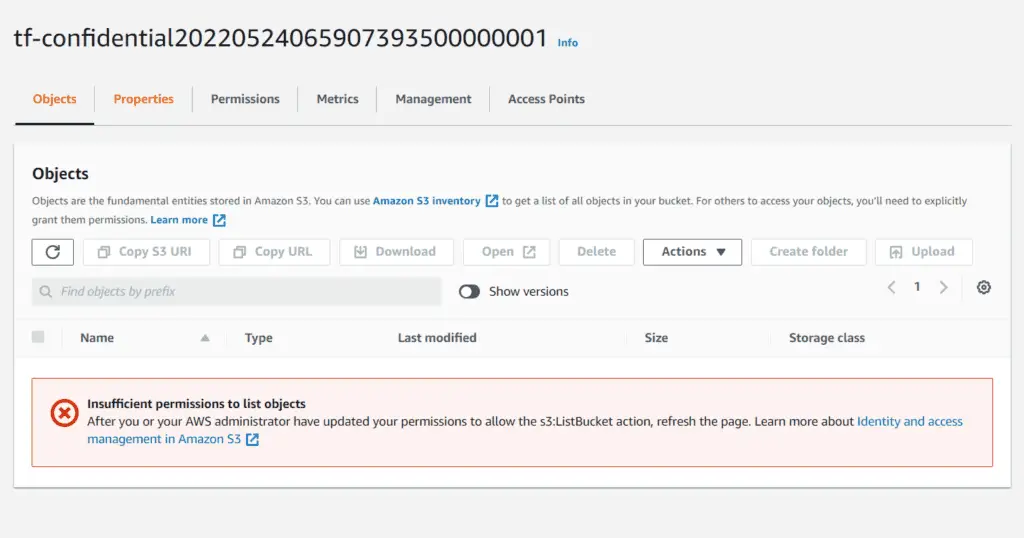
In the next section, we shall create a bucket policy allowing the above user to access the S3 Bucket.
Creating an S3 Bucket Policy using Terraform
Let’s create the S3 bucket policy document. Add the following code to the policies.tf file (below the IAM policy previously created) :
# S3 Bucket Policy -  to allow access to a particular bucket's objects - to be attached to bucket
data "aws_iam_policy_document" "bucket_policy_document" {
  statement {
    principals {
      type        = "AWS"
      identifiers = [aws_iam_user.user.arn]
    }
    actions = [
      "s3:GetObject",
      "s3:ListBucket",
    ]
    resources = [
      aws_s3_bucket.bucket.arn,
      "${aws_s3_bucket.bucket.arn}/*",
    ]
  }
}
Attach this policy document to our S3 Bucket as a Bucket Policy. Add the following code at the end of the s3.tf file:
#creating a S3 bucket policy
resource "aws_s3_bucket_policy" "bucket_policy" {
  bucket = aws_s3_bucket.bucket.id
  policy = data.aws_iam_policy_document.bucket_policy_document.json
}
Now apply the above configuration:
terraform apply -auto-approveOn successful execution, refresh the S3 console page in the Incognito window, and you will see that the file inside the Bucket can be listed:
You may also download the file by accessing it from the console :
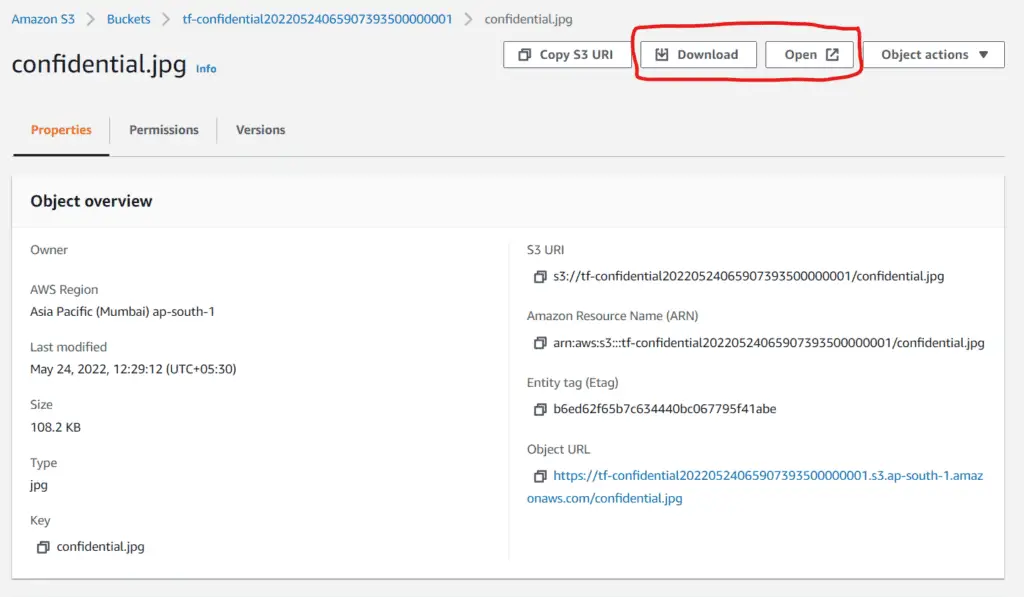
Thus we have successfully added a bucket policy to our S3 Bucket!
Configure S3 bucket replication using Terraform
One of the ways we can achieve high availability of data in Amazon S3 is by using S3 bucket replication. It’s a mechanism of asynchronously copying objects from one S3 Bucket to another within the same region (Same Region Replication – SRR) or to a different region (Cross-Region Replication – CRR). This section will cover how we can replicate our objects across S3 buckets in different regions using Terraform (CRR). You can find the completed code for this section in our GitHub repository here.
Initial Setup
All the code for this section would be inside the s3_replication folder. First, let’s initialize the Terraform AWS Provider in two different regions – one for the source S3 Bucket and the other for the destination. Add the following code to the providers.tf file:
terraform {
  required_providers {
    aws = {
      source  = "hashicorp/aws"
      version = ">= 4.15.1"
    }
  }
}
#source bucket provider
provider "aws" {
  alias  = "source"
  region = var.src_region
}
#destination bucket provider
provider "aws" {
  alias  = "destination"
  region = var.dest_region
}
We have used an alias for each Terraform AWS provider block in the above code to distinguish between them easily. Every AWS provider is configured for its region to allow us to manage Terraform resources from the same module in different regions. Let’s add the required variables to the variables.tf file:
variable "src_region" {
  type        = string
  description = "The Source Bucket's region"
  default     = "us-east-1"
}
variable "dest_region" {
  type        = string
  description = "The Destination Bucket's region"
  default     = "us-west-2"
}
Next, add the following code to the s3.tf file inside the s3_replication folder:
#create source bucket :
resource "aws_s3_bucket" "src" {
  provider      = aws.source
  bucket_prefix = var.src_bucket_prefix
}
#enable versioning - source bucket:
resource "aws_s3_bucket_versioning" "src_versioning" {
  provider = aws.source
  bucket = aws_s3_bucket.src.id
  versioning_configuration {
    status = "Enabled"
  }
}
#create destination bucket:
resource "aws_s3_bucket" "dest" {
  provider      = aws.destination
  bucket_prefix = var.dest_bucket_prefix
}
#enable versioning - destination bucket:
resource "aws_s3_bucket_versioning" "dest_versioning" {
  provider = aws.destination
  bucket = aws_s3_bucket.dest.id
  versioning_configuration {
    status = "Enabled"
  }
}
We have created the source and destination S3 buckets in different regions in the above code. We have also enabled bucket versioning on both the S3 buckets using the aws_s3_bucket_versioning resource – as versioning configuration is a prerequisite for Cross-Region Replication.
Let us add the required variables to the variables.tf file :
variable "src_bucket_prefix" {
  type        = string
  description = "The Source Bucket's prefix"
  default     = "tf-src-bucket"
}
variable "dest_bucket_prefix" {
  type        = string
  description = "The Destination Bucket's prefix"
  default     = "tf-dest-bucket"
}
Now we can apply these configurations:
terraform init
terraform apply -auto-approve
After applying, we would see two buckets created in different regions in the S3 console:

Now, we are ready to configure cross-region replication from the source bucket to the destination bucket.
Creating IAM Roles and Policies required for S3 CRR using Terraform
The process of CRR requires some IAM permissions to be given to the buckets and the objects within them. Let us create the necessary IAM policy documents using Terraform first. Create a file called policies.tf and add the following code:
#IAM policy - STS Assume Role for S3:
data "aws_iam_policy_document" "sts" {
  statement {
    sid     = "S3AssumeRole"
    actions = ["sts:AssumeRole"]
    principals {
      type        = "Service"
      identifiers = ["s3.amazonaws.com"]
    }
    effect = "Allow"
  }
}
#IAM Policy - S3 CRR :
data "aws_iam_policy_document" "replication" {
  #bucket level permissions:
  statement {
    actions = [
      "s3:CreateBucketReplication",
      "s3:ListBucket"
    ]
    resources = ["${aws_s3_bucket.src.arn}"]
    effect    = "Allow"
  }
  #object level permissions - source bucket:
  statement {
    actions = [
      "s3:GetObjectVersionForReplication",
      "s3:GetObjectVersionAcl",
      "s3:GetObjectVersionTagging"
     ]
    effect    = "Allow"
    resources = ["${aws_s3_bucket.src.arn}/*"]
  }
  #object level permissions - destination bucket:
  statement {
    actions = [
      "s3:ReplicateObject",
      "s3:ReplicateDelete",
      "s3:ReplicateTags"
    ]
    effect    = "Allow"
    resources = ["${aws_s3_bucket.dest.arn}/*"]
  }
}
In the above code, we have created two policies using the aws_iam_policy_document data source – the first required to perform the STS Assume role operation, and the second to allow the necessary actions on the buckets and objects for the replication operation.
Next, we must create the IAM role and policy required for performing CRR. Create a file called iam.tf and add the following code:
#create IAM role for S3 replication:
resource "aws_iam_role" "replication" {
  name               = "tf-s3-replication-role"
  assume_role_policy = data.aws_iam_policy_document.sts.json
}
resource "aws_iam_policy" "replication" {
  name   = "tf-s3-replication-policy"
  policy = data.aws_iam_policy_document.replication.json
}
resource "aws_iam_role_policy_attachment" "attach" {
  role       = aws_iam_role.replication.name
  policy_arn = aws_iam_policy.replication.arn
}
With this, we’re all done with the IAM side of things! Now we move on to replication configuration for our source bucket.
S3 Replication Configuration using Terraform
Add the following code to the s3.tf file:
#create replication configuration for source bucket:
resource "aws_s3_bucket_replication_configuration" "replication" {
  provider = aws.source
  # Must have bucket versioning enabled first
  depends_on = [aws_s3_bucket_versioning.src_versioning]
  role   = aws_iam_role.replication.arn
  bucket = aws_s3_bucket.src.id
  rule {
    status = "Enabled"
    destination {
      bucket        = aws_s3_bucket.dest.arn
      storage_class = "STANDARD"
    }
    #perform replication only objects having this tag:
    filter {
      tag {
        key   = "replication"
        value = "true"
      }
    }
    delete_marker_replication {
      status = "Disabled"
    }
  }
}
In the above code, we have used the aws_s3_bucket_replication_configuration resource to set up the replication configuration for the source bucket. In the rule block, we specified a filter to ensure only the objects with the mentioned tags would be replicated.
That’s all the configuration required to set up Cross-Region Replication for our S3 Bucket. Let’s now upload an object to our source bucket so that we can verify that the replication is working, Create a uploads folder and place any file that you would like to upload to the Bucket inside it (file.txt in my case). After that, add the following code to the s3.tf file :
#upload object to source bucket to check replication
resource "aws_s3_object" "object" {
  provider = aws.source
  bucket = aws_s3_bucket.src.id
  key    = basename(var.upload_path)
  source = var.upload_path
  tags = {
    "replication" = "true" #tag to allow replication
  }
#adding explicit dependency to enable replication:
  depends_on = [
    aws_s3_bucket.src,
    aws_s3_bucket_replication_configuration.replication,
    aws_s3_bucket.dest,
    aws_s3_bucket_versioning.dest_versioning,
  ]
}
The above code uploads the file from the supplied upload path to the source S3 Bucket with the required tags for triggering replication.
Let’s add the required variables to the variables.tf file:
variable "upload_path" {
  type        = string
  description = "The path to the file to upload"
  default     = "uploads/file.txt"
}
Finally, let’s apply the above configurations:
terraform apply -auto-approveAfter successfully applying, you may verify the replication by going to the S3 console. First, go to the source bucket and verify you uploaded the file:
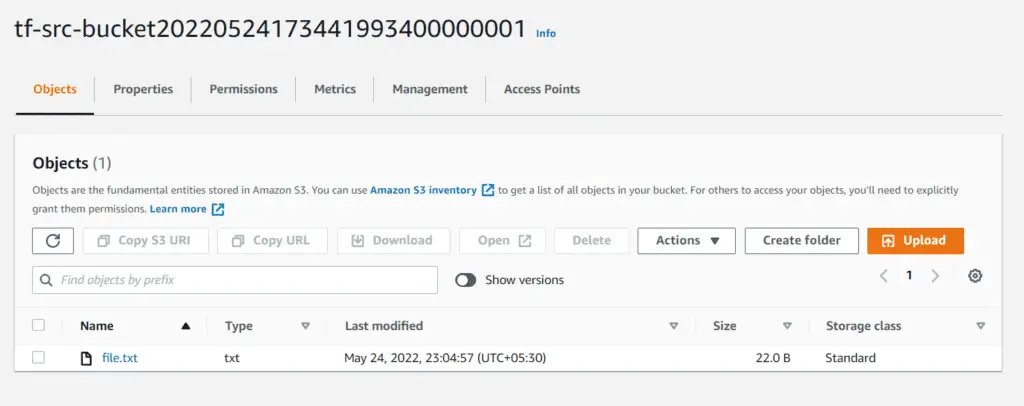
Next, go to the destination bucket and verify the same file is available there :
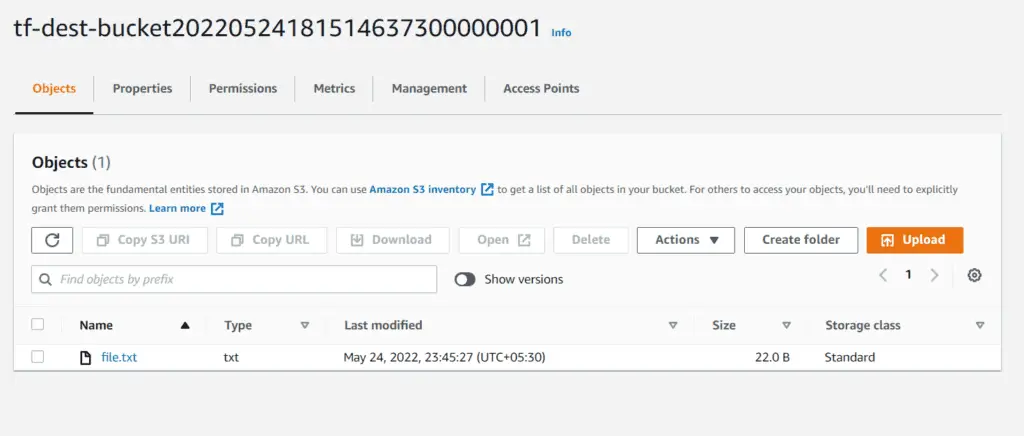
You may not see the replicated file inside the destination file, as replication is an asynchronous process. If the file does not appear in the destination bucket, wait for a few seconds and refresh the page.
And with that, we’re done with replication in S3 using Terraform!
Cleanup
As the replicated file inside the destination bucket is not part of the terraform state, you would need to delete it from the S3 console manually. After that, destroy the Terraform resources :
terraform destroy --auto-approveConfiguring S3 bucket encryption using Terraform
Security is a top priority for many businesses. Sensitive data, such as credit card numbers and client information, is essential. As Amazon S3 is one of the most popular cloud storage choices, it comes with powerful encryption mechanisms that users can leverage to enforce strong security for their data. In Amazon S3, Server Side Encryption (SSE) can be achieved in three ways – SSE-S3, SSE-KMS, and SSE-C. In this section, we shall cover the implementation of SSE-S3 and SSE-KMS using Terraform. You can find the completed code for this section here.

Initial Setup
We need to place the code to this section inside the s3_encryption folder.
Let’s initialize the AWS Terraform provider with the appropriate region first by adding the following code to the providers.tf file :
terraform {
  required_providers {
    aws = {
      source  = "hashicorp/aws"
      version = ">= 4.15.1"
    }
  }
}
provider "aws" {
  region = var.region
}
Next, let’s add the required variables to the variables.tf file:
variable "region" {
  type        = string
  description = "The region where the AWS Resources would get provisioned"
  default     = "ap-south-1"
}
Finally, let’s initialize the provider:
terraform initNow we’re all set to begin working on our S3 buckets!
SSE-S3 Encryption in S3 using Terraform
If we enable SSE-S3 encryption, AWS S3 encrypts each object with a unique key that is fully managed and rotated by the AWS S3 service. All encryption is performed using AES256 algorithms – one of the strongest. Let’s implement SSE-S3 encryption on an S3 bucket using Terraform.
We will house all the code related to S3 in a file called s3.tf. Let’s add the following code to it:
#SSE-S3 bucket encryption:
resource "aws_s3_bucket" "sse_s3_bucket" {
  bucket_prefix = "${var.bucket_prefix}sse-s3"
}
resource "aws_s3_bucket_server_side_encryption_configuration" "sse_config" {
  bucket = aws_s3_bucket.sse_s3_bucket.id
  rule {
    apply_server_side_encryption_by_default {
      sse_algorithm     = "AES256"
    }
  }
}
resource "aws_s3_object" "sse_s3_object" {
  bucket = aws_s3_bucket.sse_s3_bucket.id
  key    = basename(var.upload_source)
  source = var.upload_source
  etag   = filemd5(var.upload_source)
  server_side_encryption = "AES256"
  depends_on = [
    aws_s3_bucket.sse_s3_bucket
  ]
}
A lot happens in the code above:
- First, we have created a simple S3 bucket using the
aws_s3_bucketresource block.
- Next, we used the
aws_s3_bucket_server_side_encryption_configurationresource block to enable the SSE-S3 type of encryption on the Bucket by specifying thesse_algorithmparameter asAES256. This ensures bucket-level encryption.
- Finally, we have uploaded an object (
file.txtstored inside theuploadsfolder, as usual) to the Bucket. Notice how we have specified theserver_side_encryptionparameter to mentionAES256which ensures that the object uploaded to the Bucket gets automatically encrypted using SSE-S3. This ensures object-level encryption.
Let’s add the required variables to the variables.tf file:
variable "bucket_prefix" {
  type        = string
  description = "The prefix to use for the S3 bucket"
  default     = "tf-demo-"
}
variable "upload_source" {
  type        = string
  description = "The source file to upload to S3"
  default     = "uploads/file.txt"

}
Now, let’s apply the above configurations:
terraform plan
terraform apply -auto-approve
Visit the S3 console and click the Bucket created to verify the above settings. Under the ‘Properties’ tab of the Bucket, scroll down a little to the ‘Default Encryption’ section. You would see something like this:
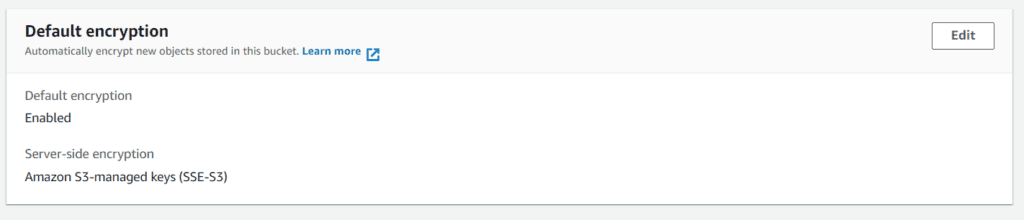
Next, go to the uploaded file inside the Bucket (file.txt, in my case). Scroll down to the ‘Server-side encryption settings’ section on the object details page. You would see something like this:
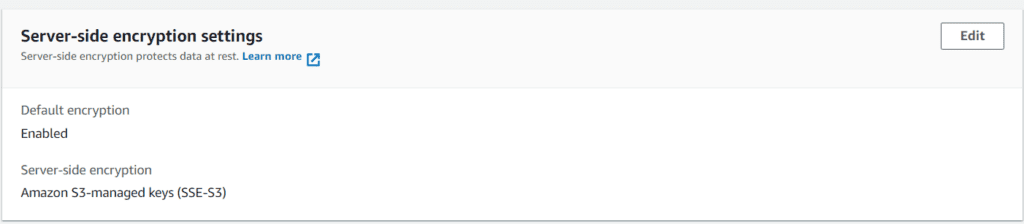
Thus, we have successfully enabled SSE-S3 at the bucket and object levels.
SSE-KMS Encryption in S3 using Terraform
In this method of server-side encryption, we will use encryption keys managed by AWS Key Management Service (KMS) instead of AWS S3 service. We will generate a Customer Master Key (CMK) using AWS KMS (now called AWS KMS Key) and then use it to encrypt our data in S3. Let’s implement this using Terraform!
First, let’s generate the CMK using KMS with the help of the aws_kms_key resource in Terraform by adding the following code to the kms.tf file:
# Create a KMS key - CMK
resource "aws_kms_key" "key" {
  description             = "This key is used to encrypt bucket objects"
  deletion_window_in_days = 10
}
We may now proceed with implementing SSE-KMS by adding the following code to the s3.tf file :
#SSE-KMS bucket encryption:
resource "aws_s3_bucket" "sse_kms_bucket" {
  bucket_prefix = "${var.bucket_prefix}sse-kms"
}
resource "aws_s3_bucket_server_side_encryption_configuration" "sse_kms_config" {
  bucket = aws_s3_bucket.sse_kms_bucket.id
  rule {
    apply_server_side_encryption_by_default {
      kms_master_key_id = aws_kms_key.key.arn
      sse_algorithm     = "aws:kms"
    }
  }
}
resource "aws_s3_object" "sse_kms_object" {
  bucket = aws_s3_bucket.sse_kms_bucket.id
  key    = basename(var.upload_source)
  source = var.upload_source
  etag   = filemd5(var.upload_source)
  server_side_encryption = "aws:kms"
  depends_on = [
    aws_s3_bucket.sse_kms_bucket
  ]
}
Let’s understand the code above:
- First, we have created a new S3 bucket using the
aws_s3_bucketresource block.
- Next, we used the
aws_s3_bucket_server_side_encryption_configurationresource block to enable SSE-KMS on our Bucket by specifying the KMS Master Key (or the CMK previously generated). We have also specified thesse_algorithmparameter asaws:kms. This ensures SSE-KMS is enabled at the bucket level.
- Finally, we have used the
aws_s3_objectresource to upload the same object as in the previous section. However, this time, we have mentioned theserver_side_encryptionparameter asaws:kmsso that SSE-KMS encryption gets applied to the uploaded object. This ensures SSE-KMS at the object level.
Let’s apply these configurations:
terraform apply -auto-approveWe can verify the above settings by following a process similar to what we did in the previous section. Go to the Bucket created in the S3 console and check the “Properties” tab. You would see something like this:

And similarly, for the object uploaded (file.txt):
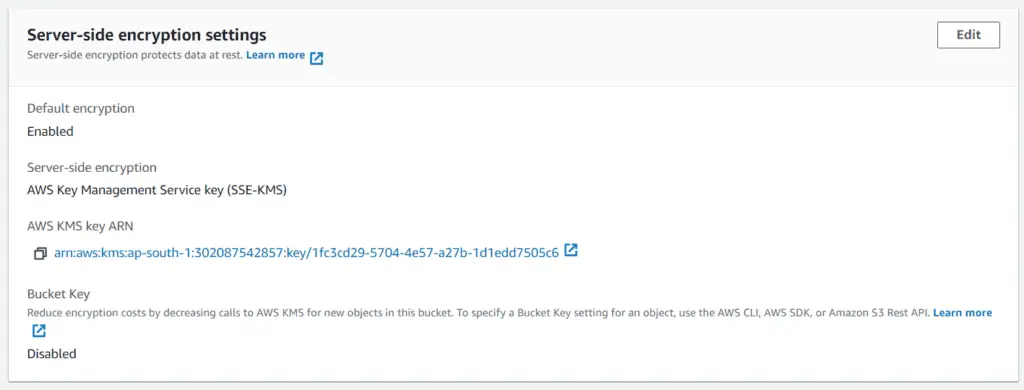
Thus, we have successfully enabled SSE-KMS encryption at the bucket and object levels. To ensure better security, we may use SSE encryption techniques along with a Bucket Policy that enforces the object to be encrypted and prevents unencrypted objects from ever being uploaded. This approach would also help comply with security requirements (if any). We have discussed Bucket Policies in detail in a previous section.
Configuring S3 bucket events using Terraform
Amazon S3 has an asynchronous event-based notification system that lets us react to various events (such as uploading a file, deleting file objects, etc.) by triggering another AWS service (like Lambda, SQS, or SNS). In this section, we will see how we can implement an upload event that triggers a Lambda function that reads the data from the uploaded file and logs it to CloudWatch using Terraform. You can find the completed code for this section here.
Initial Setup
We will place the code for this section inside the s3_upload_events folder.
Let’s add the provider configuration first to the provider.tf file:
terraform {
  required_providers {
    aws = {
      source  = "hashicorp/aws"
      version = ">= 4.15.1"
    }
  }
}
provider "aws" {
  region = var.region
}
Let’s also create the S3 Bucket for this project by adding the following code to the s3.tf file:
#create S3 bucket:
resource "aws_s3_bucket" "bucket" {
  bucket_prefix = var.bucket_prefix
}
Finally, let’s add the required variables to the variables.tf file:
variable "region" {
  type        = string
  description = "The region to use for the S3 bucket"
  default     = "ap-south-1"
}
variable "bucket_prefix" {
  type        = string
  description = "The prefix to use for the S3 bucket"
  default     = "tf-s3-events-demo-"
}
Now initialize the Terraform project:
terraform initApply the configurations:
terraform plan
terraform apply --auto-approve
Setting up the Lambda with necessary IAM permissions using Terraform
In this section, we will define a Lambda function to read S3 bucket events from the S3 Bucket that triggers it. We will also write all the Terraform configurations required to deploy the Lambda function.
Writing the Lambda Function Code
Let’s write the code for the Lambda function using Node.js inside a folder called function_code.
Add the following code to the index.js file:
const AWS = require("aws-sdk");
//initiliaze the AWS S3 SDK
const s3 = new AWS.S3();
exports.handler = async (event) => {
	//get the bucket and key name from the event
	const Bucket = event.Records[0].s3.bucket.name;
	const Key = decodeURIComponent(
		event.Records[0].s3.object.key.replace(/\+/g, " ")
	);
	const params = { Bucket, Key };
	try {
		//read file content from s3:
		const data = await s3.getObject(params).promise();
		//parse the file content to JSON:
		const parsedData = JSON.parse(data.Body.toString());
		//log and the parsed data:
		console.log(parsedData);
		return parsedData;
	} catch (err) {
		console.error("Error in reading s3 file content", err);
		return;
	}
};
In the above code, we have used the AWS SDK for JavaScript to handle the incoming S3 bucket events from the S3 service. The handler function gets the S3 bucket name and key of the file and reads the file using the getObject method. It then logs and returns the data read from the file.
Lambda function deployment
First, we need to generate some IAM policy documents for the Lambda function to work. Let’s add the following code to the policies.tf file:
data "aws_iam_policy_document" "sts_lambda" {
  statement {
    actions = ["sts:AssumeRole"]
    principals {
      type        = "Service"
      identifiers = ["lambda.amazonaws.com"]
    }
    effect = "Allow"
  }
}
data "aws_iam_policy_document" "lambda_execution" {
  statement {
    actions = [
      "logs:CreateLogGroup",
      "logs:CreateLogStream",
    ]
    effect    = "Allow"
    resources = ["${aws_cloudwatch_log_group.lambda_log_group.arn}*:*"]
  }
  statement {
    actions = [
      "logs:PutLogEvents"
    ]
    effect    = "Allow"
    resources = ["${aws_cloudwatch_log_group.lambda_log_group.arn}*:*:*"]
  }
  statement {
    actions = [
      "s3:GetObject",
    ]
    effect = "Allow"
    resources = [
      aws_s3_bucket.bucket.arn,
      "${aws_s3_bucket.bucket.arn}/*",
    ]
  }
}
In the above code, we have used the aws_iam_policy_document data source to generate two IAM policies – the STS Assume Role policy for Lambda and the execution role. The execution role grants the Lambda permissions to write logs to CloudWatch and also perform the GetObject operation on our S3 Bucket.
Next, we must create the IAM roles for Lambda to work. Let’s add the following code to the iam.tf file:
# create IAM role for Lambda:
resource "aws_iam_role" "iam_for_lambda" {
  name               = "iam_for_lambda"
  assume_role_policy = data.aws_iam_policy_document.sts_lambda.json
}
#create IAM Policy for lambda execution:
resource "aws_iam_policy" "lambda_execution_policy" {
  policy = data.aws_iam_policy_document.lambda_execution.json
  name   = "s3_event_lambda_execution_policy"
}
#attach the lambda execution role:
resource "aws_iam_role_policy_attachment" "attach" {
  role       = aws_iam_role.iam_for_lambda.name
  policy_arn = aws_iam_policy.lambda_execution_policy.arn
}
In the above code, we have used the previously generated policy documents to create an IAM role with a policy that lets Lambda perform all the desired operations.
Finally, let us write the Terraform configuration required for our Lambda function by adding the following code to the lambda.tf file:
#cloudwatch log group for lambda
resource "aws_cloudwatch_log_group" "lambda_log_group" {
  name              = "/aws/lambda/${aws_lambda_function.func.function_name}"
  retention_in_days = 30
}
#create zip file for Lambda:
data "archive_file" "lambda_code" {
  type        = "zip"
  source_dir  = "${path.module}/function_code"
  output_path = "${path.module}/function_code.zip"
}
#lambda function:
resource "aws_lambda_function" "func" {
  filename      = data.archive_file.lambda_code.output_path
  function_name = "S3UploadEventHandler"
  role          = aws_iam_role.iam_for_lambda.arn
  handler       = "index.handler"
  runtime       = "nodejs16.x"
}
#lambda permission to allow invocation by s3:
resource "aws_lambda_permission" "allow_bucket" {
  statement_id  = "AllowExecutionFromS3Bucket"
  action        = "lambda:InvokeFunction"
  function_name = aws_lambda_function.func.arn
  principal     = "s3.amazonaws.com"
  source_arn    = aws_s3_bucket.bucket.arn
}
Let’s understand the above code :
- First, we have created a CloudWatch log group using the
aws_cloudwatch_log_groupresource block. This is where all the logs from our Lambda function will be written. - Next, we created a zip file of our lambda source code using the
archive_filedata source. - Next, we created our lambda function using the aws_lambda_function resource block, which refers to the previously generated zip file and IAM role for Lambda.
- Finally, we have created resource-based permission for our lambda function using the
aws_lambda_permissionresource block. This allows the S3 Bucket to invoke the lambda function.
Creating an Upload Event Notification for our S3 Bucket using Terraform
Finally, let’s create the event notification for our S3 Bucket by adding the following code to the s3.tf file:
#create S3 Event Notification:
resource "aws_s3_bucket_notification" "bucket_notification" {
  bucket = aws_s3_bucket.bucket.id
  lambda_function {
    lambda_function_arn = aws_lambda_function.func.arn
    events              = ["s3:ObjectCreated:*"]
    filter_prefix       = "test"
    filter_suffix       = ".json"
  }
  depends_on = [aws_lambda_permission.allow_bucket]
}
In the above code, we have used the aws_s3_bucket_notification resource block to create a new event for our S3 Bucket. The event triggers a Lambda function, as specified by the lambda_function block and is fired only when an object is uploaded to the Bucket (s3:ObjectCreated:* event).
Finally, let’s apply the above configuration:
terraform plan
terraform apply -auto-approve
Now, we can upload an object to the Bucket. For this demo, we will upload the following JSON file (test.json stored in uploads folder):
{
	"foo": "bar"
}
Let’s add the following code to the s3.tf file to upload the above file:
#upload object to S3:
resource "aws_s3_object" "object" {
  bucket = aws_s3_bucket.bucket.id
  key    = "test.json"
  source = "uploads/test.json"
  etag   = filemd5("uploads/test.json")
  depends_on = [
    aws_s3_bucket.bucket,
  ]
}
Let’s apply the above configuration:
terraform apply -auto-approveOn applying, the object gets uploaded to the S3 Bucket. This triggers the Lambda. We can verify that by checking the logs of the lambda function in CloudWatch:
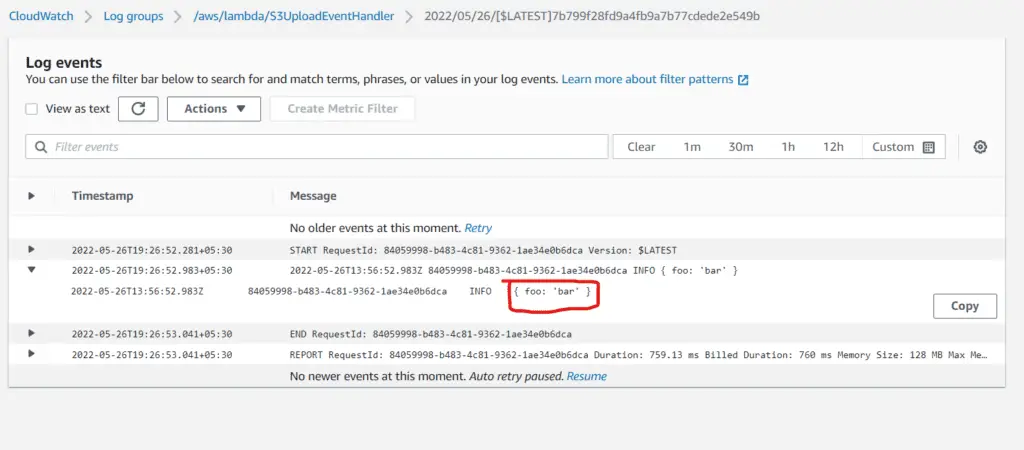
As evident, the content of the JSON file gets logged by the Lambda function, proving that the file upload indeed triggered it.
Cleanup
To destroy the resources created using Terraform, execute the following command at the root level of the s3_upload_events folder:
terraform destroy --auto-approveS3 Website Configuration using Terraform
ATTENTION: The following setup is NOT THE BEST PRACTICE and is covered only for information purposes. The better and more secure way of hosting a static website is by exposing S3 bucket content through Amazon CloudFront.
This section will show how we can host a simple website on S3 using Terraform. You can find the completed code for this section here.
Initial Setup
We need to place the code for this section inside the s3_website folder.
Let’s add the provider configuration first to the provider.tf file:
terraform {
  required_providers {
    aws = {
      source  = "hashicorp/aws"
      version = ">= 4.15.1"
    }
  }
}
provider "aws" {
  region = var.region
}
Let’s also create the S3 Bucket for this project by adding the following code to the s3.tf file:
# create S3 bucket:
resource "aws_s3_bucket" "bucket" {
  bucket_prefix = var.bucket_prefix
}
Finally, let us add the required variables to the variables.tf file:
variable "region" {
  type        = string
  description = "The region to use for the S3 bucket"
  default     = "ap-south-1"
}
variable "bucket_prefix" {
  type        = string
  description = "The prefix to use for the S3 bucket"
  default     = "tf-s3-website-demo-"
}
Now initialize the Terraform project:
terraform initApply the configurations:
terraform apply -auto-approveEvery Amazon S3 bucket with the website feature enabled has a bucket region-specific domain name: {bucket-name}.s3.{region}.amazonaws.com.
If you’re using a bucket region-specific domain name, you can use HTTP and HTTPS connections for your data transfer.
Creating a Simple Website
We need to upload two simple web pages to our S3 Bucket to serve as a website. Inside the uploads folder, we shall have the following two files.
The index.html file:
<!DOCTYPE html>
<html lang="en">
	<head>
		<title>S3 Website</title>
        <style>
            .container{
                width: 100%;
                height: 100%;
                display: flex;
                flex-direction: column;
                justify-content: center;
                align-items: center;
            }
        </style>
	</head>
    <body>
        <div class="container">
            <h1>S3 Website</h1>
            <p> This website is being hosted on Amazon S3!</p>
            <p>Here is a view of Manali</p>
            <img src="https://assets.traveltriangle.com/blog/wp-content/uploads/2017/12/76.jpg" alt="manali"/>
        </div>

</html>
The error.html file:
<!DOCTYPE html>
<html lang="en">
	<head>
		<title>S3 Website</title>
        <style>
            .container{
                width: 100%;
                height: 100%;
                display: flex;
                flex-direction: column;
                justify-content: center;
                align-items: center;
            }
            .container h1{
                font-size: 6rem;
                color: red;
            }
            .container p{
                font-size: 3rem;
                color: blue;
            }
        </style>
	</head>
    <body>
        <div class="container">
            <h1>404</h1>
            <p>Oops....there was an error :(</p>
        </div>

</html>
Enabling Website Configuration for S3 using Terraform
Hosting a website is essential to make our Bucket publicly accessible. Let’s add a Bucket Policy for our S3 Bucket to s3.tf for that:
#bucket must be public for website hosting:
resource "aws_s3_bucket_policy" "bucket_policy" {
  bucket = aws_s3_bucket.bucket.id
  policy = <<EOF
{
  "Version": "2012-10-17",
  "Statement": [
    {
      "Sid": "PublicReadGetObject",
      "Effect": "Allow",
      "Principal": "*",
      "Action": "s3:GetObject",
      "Resource": "arn:aws:s3:::${aws_s3_bucket.bucket.id}/*"
    }
  ]
}
EOF
}
Next, we need to add the website configuration for our Bucket using the aws_s3_bucket_website_configuration resource block:
# create S3 website hosting:
resource "aws_s3_bucket_website_configuration" "website" {
  bucket = aws_s3_bucket.bucket.id
  index_document {
    suffix = "index.html"
  }
  error_document{
    key = "error.html"
  }
}
You can always get your S3 bucket website endpoint by referencing the website_endpoint attribute in the output resource, for example:
output "bucket_website_endpoint" {
  value = aws_s3_bucket.bucket.website_endpoint
}
Finally, let’s upload the website files from the local uploads folder to a folder called website inside our S3 Bucket:
#upload website files to s3:
resource "aws_s3_object" "object" {
  bucket = aws_s3_bucket.bucket.id
  for_each     = fileset("uploads/", "*")
  key          = "website/${each.value}"
  source       = "uploads/${each.value}"
  etag         = filemd5("uploads/${each.value}")
  content_type = "text/html"
  depends_on = [
    aws_s3_bucket.bucket
  ]
}
Note that content_type is essential as it sets the ‘Content-Type’ metadata attribute of the object to text/html which ensures that the browser renders the HTML instead of trying to download the file.
Now, let’s apply the Terraform configuration:
terraform apply -auto-approveAfter applying, visit the S3 console. Inside the created S3 Bucket, you will find the website folder. Inside the folder, click on the index.html and visit its Object URL:
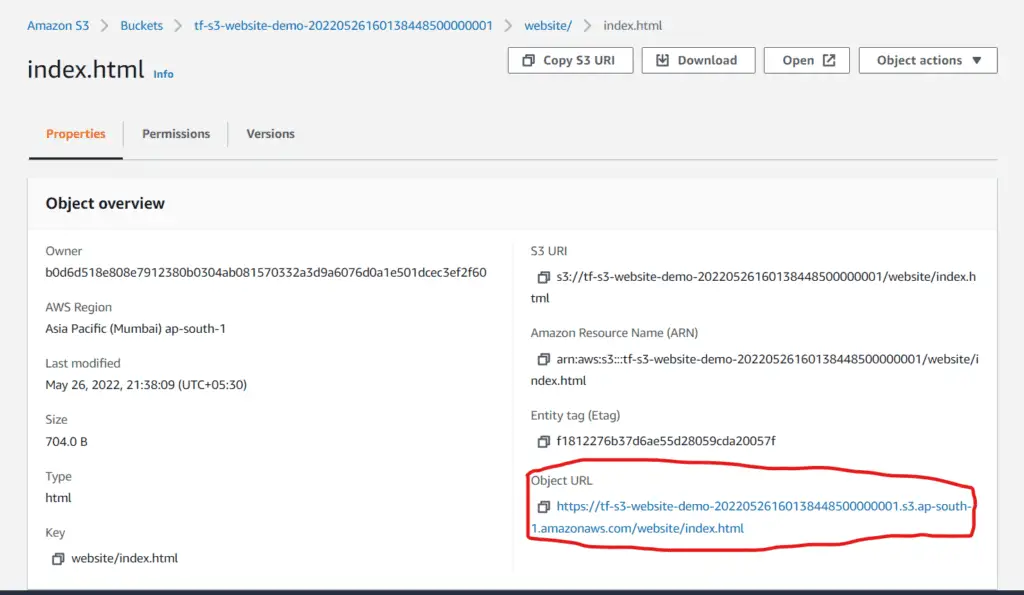
You would see the webpage rendered. The Object URL acts as the public URL for your website :
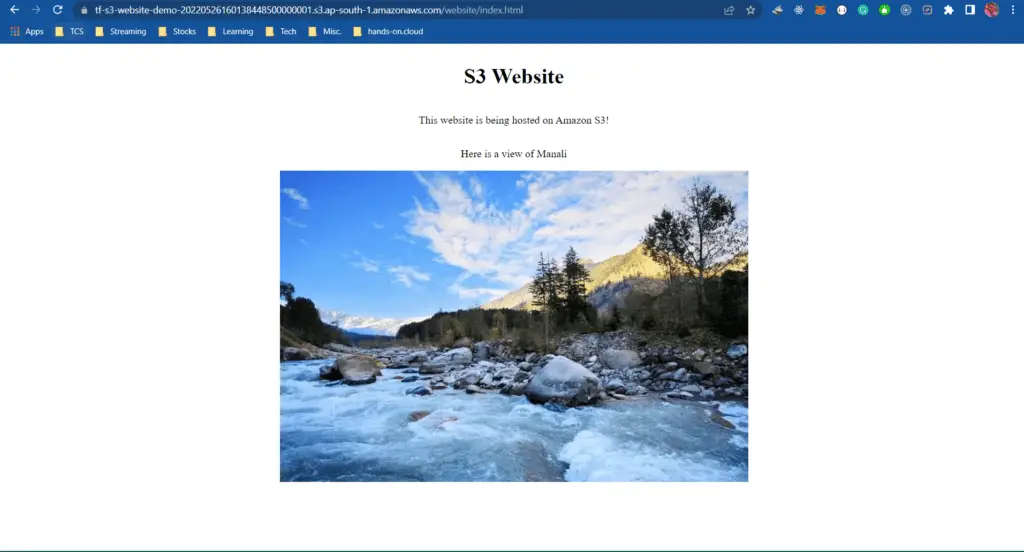
Thus, we have successfully hosted a static website on S3.
Cleanup
terraform destroy --auto-approveS3 as a Remote Backend for Terraform
We know that by default, Terraform stores all its state information in a local state file called terraform.tfstate. This is fine as long as you’re the only developer working on the project. However, whenever multiple developers work on the same project, managing state imposes challenges in maintaining the consistency and integrity of the infrastructure being managed using Terraform.
Multiple developers applying changes to the infrastructure at the same time may cause conflicts in the state that Terraform would have trouble reconciling. This is why Terraform comes with the feature of using a remote backend. Remote backends make it easier for developers to collaborate on the same infrastructure project and help run Terraform scripts in a Continuous Integration (CI) environment. One of the most popular choices for Terraform’s remote backend is Amazon S3. This section will cover using Amazon S3 as a backend for Terraform.
All the code for this section would be stored in the s3_backend folder. You can find the completed code for this section here.
Infrastructure to support S3 backend for Terraform
We would need to provide the following infrastructure to use S3 as a backend for our Terraform projects:
- An S3 Bucket – this is where the JSON state file would get stored
- A DynamoDB table – this would be used to lock the state. State locking is essential while using a remote backend as that would prevent two developers from modifying the state simultaneously, ensuring consistency of the infrastructure information in the state.
Let’s use Terraform to create the above infrastructure. All the code would be stored inside the backend_infra folder which would be inside the s3_backend folder. First, we need to declare the provider block for the project in the providers.tf file:
terraform {
  required_providers {
    aws = {
      source  = "hashicorp/aws"
      version = ">= 4.15.1"
    }
  }
}
provider "aws" {
  region = var.region
}
Next, let’s create the S3 Bucket for holding the state file:
#create S3 Bucket to act as backend
resource "aws_s3_bucket" "backend_bucket" {
  bucket_prefix = var.bucket_prefix
  tags = {
    "Project" = "hands-on.cloud"
  }
}
Next, let’s create the DynamoDB table for locking the state:
#creating dynamoDB table for state locking:
resource "aws_dynamodb_table" "state_lock_table" {
  name           = var.table_name
  billing_mode   = "PROVISIONED"
  read_capacity  = 5
  write_capacity = 5
  hash_key       = "LockID" #terraform requires this for state locking
  attribute {
    name = "LockID"
    type = "S"
  }
  tags = {
    "Project" = "hands-on.cloud"
  }
}
Note that the hash_key attribute of LockID is specifically required to use the table for state locking.
Let’s declare the variables necessary for these configurations to work:
variable "region" {
  type        = string
  description = "The AWS region to use"
  default     = "ap-south-1"
}
variable "bucket_prefix" {
  type        = string
  description = "The name of the S3 bucket to use"
  default     = "terraform-remote-backend-"
}
variable "table_name" {
  type        = string
  description = "The name of the DynamoDB table to use"
  default     = "terraform-state-lock"
}
Let’s also output the name of the S3 Bucket and DynamoDB table as we would need them later:
output "dynamodb_table_name" {
  value = aws_dynamodb_table.state_lock_table.name
}
output "s3_bucket_name" {
  value = aws_s3_bucket.backend_bucket.id
}
Finally, let’s apply this configuration:
terraform init
terraform plan
terraform apply -auto-approve
On successful execution, we would get the outputs logged to screen :

Copy and save these above values as needed in the next section.
Creating a Terraform project using S3 as a Backend
Now that we have the necessary infrastructure, let us work on a small Terraform project using S3 as a backend. We shall create a simple VPC and a security group in this project. We shall also output some values so that they can be fetched by another Terraform project covered in the next section. All the code for this section shall be in the VPC folder inside the s3_backend folder.
First, let us set up the provider and backend in the providers.tf file :
terraform {
  required_providers {
    aws = {
      source  = "hashicorp/aws"
      version = ">= 4.15.1"
    }
  }
  #specifying remote backend configuration:
  backend "s3" {
    bucket         = "terraform-remote-backend-20220527093846103400000001"
    key            = "terraform-vpc.tfstate" #the file name with which state will get saved
    region         = "ap-south-1"        #cant use variable here
    dynamodb_table = "terraform-state-lock"
  }
}
provider "aws" {
  region = var.region
}
Notice the use of the backend block. We have used it to specify the kind of backend (S3), the Bucket to store the state, the key (filename) to use while storing the state, and the DynamoDB table to use for state locking. The relevant values have been taken from the output of the previous section.
Next, we can write our main Terraform configuration to create the VPC and security group in the main.tf file :
# using the VPC module to create a VPC:
module "vpc" {
  source = "terraform-aws-modules/vpc/aws"
  name = var.vpc_name
  cidr = var.vpc_cidr
  azs = ["${var.region}a", "${var.region}b"]
  public_subnets = [
    cidrsubnet(var.vpc_cidr, 8, 0),
    cidrsubnet(var.vpc_cidr, 8, 1)
  ]
  private_subnets = [
    cidrsubnet(var.vpc_cidr, 8, 2),
    cidrsubnet(var.vpc_cidr, 8, 3)
  ]
  enable_nat_gateway   = true
  single_nat_gateway   = true
  enable_dns_hostnames = true

  tags = {
    Name    = var.vpc_name
    Project = "hands-on.cloud"
  }
}
#create a security group :
module "web_server_sg" {
  source = "terraform-aws-modules/security-group/aws//modules/http-80"
  name        = "web-server"
  description = "Security group for web-server with HTTP ports open within VPC"
  vpc_id      = module.vpc.vpc_id
  ingress_cidr_blocks = [var.vpc_cidr]
}
We have used the Terraform AWS modules for VPC and Security Groups to provide our desired infrastructure in the above code.
Let’s output some important values to use in the next section:
#required outputs for EC2 instances:
output "subnet_ids" {
  value       = module.vpc.public_subnets
  description = "VPC public subnets' IDs list"
}
output "sg_ids" {
  value       = [module.web_server_sg.security_group_id]
  description = "Security Group ID"
}
Let’s add some variables:
variable "region" {
  type        = string
  description = "The AWS Region to use"
  default     = "ap-south-1"
}
variable "vpc_name" {
  type        = string
  description = "The name of the VPC to use"
  default     = "terraform-remote-backend-vpc"
}

variable "vpc_cidr" {
  type        = string
  description = "The CIDR block to use for the VPC"
  default     = "10.0.0.0/16"
}
Finally, let’s apply the above configurations:
terraform init
terraform plan
terraform apply -auto-approve
You would see an S3 bucket created in the S3 console on applying. This Bucket would also have the state file for the VPC project:

Take a note of the output :
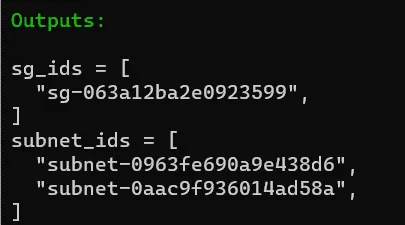
Thus, we have set up a Terraform project using S3 as a remote backend!
Fetching Remote State data in a different Terraform Project
Often, we may run into situations where we’d need to use the values exported by the state file of an entirely different Terraform project in our project. In this section, we shall use the values exported from our previous (VPC) project and create a new Terraform to spin up a couple of EC2 Instances. All the code for this section would be in the ec2 folder inside the s3_backend folder.
As usual, first, we need to set up the provider along with the remote backend in the providers.tf:
terraform {
  required_providers {
    aws = {
      source  = "hashicorp/aws"
      version = ">= 4.15.1"
    }
  }
  #specifying remote backend configuration:
  backend "s3" {
    bucket         = "terraform-remote-backend-20220527093846103400000001"
    key            = "terraform-ec2.tfstate" #the file name with which state will get saved
    region         = "ap-south-1"        #cant use variable here
    dynamodb_table = "terraform-state-lock"
  }
}
provider "aws" {
  region = var.region
}
Note that the value of the attribute key must be different from the one used in the VPC project.
Let’s fetch the required data from the state of the VPC project:
#fetching VPC state data from s3 bucket:
data "terraform_remote_state" "vpc" {
  backend = "s3"
  config = {
    bucket = "terraform-remote-backend-20220527093846103400000001"
    key    = "terraform-vpc.tfstate"
    region = "ap-south-1"
  }
}
In the code above, we have used the terraform_remote_state data source to fetch all the output values from the VPC project’s state file.
Next. let’s create our desired infrastructure in the main.tf file:
#fetch latest Ubuntu AMI:
data "aws_ami" "ubuntu" {
  most_recent = true
  filter {
    name   = "name"
    values = ["ubuntu/images/hvm-ssd/ubuntu-focal-20.04-amd64-server-*"]
  }
  filter {
    name   = "virtualization-type"
    values = ["hvm"]
  }
  owners = ["099720109477"]
}
#create two EC2 instances using the AMI:
module "ec2_instance" {
  source  = "terraform-aws-modules/ec2-instance/aws"
  version = "~> 3.0"
  for_each = toset(["0", "1"])
  name = "instance-${each.key}"
  ami                    = data.aws_ami.ubuntu.id
  instance_type          = "t2.micro"
  monitoring             = true
  vpc_security_group_ids = data.terraform_remote_state.vpc.outputs.sg_ids
  subnet_id              = data.terraform_remote_state.vpc.outputs.subnet_ids[each.key]
  tags = {
    Project = "hands-on.cloud"
  }
}
In the above code, we have used the AWS Terraform EC2 module to create two EC2 instances using the security group IDs and subnet IDs extracted from the VPC project’s state file using the data source above.
Let’s create the required variables in the variables.tf file:
variable "region" {
  type        = string
  description = "The AWS Region to use"
  default     = "ap-south-1"
}
Finally, let’s apply the configurations:
terraform init
terraform plan
terraform apply -auto-approve
Once applied, you can see the state file created in the S3 console. You may also verify the EC2 configurations by visiting the EC2 console.
Thus, we have successfully used the values of one Terraform project’s state file in another project!
Cleanup
To clean up the resources created in this section, execute the following command from the root level of the s3_bucket_policy directory :
terraform destroy --auto-approveSummary
AWS provides a wealth of services to help customers automate their infrastructure. This article shows you how to use Terraform to manage your Amazon S3 buckets and objects. This can save you time and ensure that your S3 resources are always in sync. We hope you find this information useful and would be happy to answer any questions about using Terraform with Amazon S3.
