EKS Terraform Tutorial – Easy EKS Cluster deployment
Amazon EKS is a managed service that allows you to run Kubernetes on AWS without installing, operating, or maintaining your Kubernetes control plane or nodes. If you’re looking for a way to simplify the deployment and management of Kubernetes, you should consider using Amazon Elastic Kubernetes Service (Amazon EKS). This article will show how to deploy the Amazon EKS cluster, Cluster Autoscaler, and Horizontal Pod Autoscaler (HPA) using Terraform EKS resources using Infrastructure as Code (IaC) approach.
Table of contents
Prerequisites
To follow along, you need the following:
- Basic knowledge of Terraform and Kubernetes
- An AWS account with a suitable IAM User (preferably with an admin role)
- AWS CLI should be installed and configured on your local machine
- Kubectl installed on your local machine to interact with the EKS Control Plane
The source code for all examples for this article is located in our GitHub repository: managing-amazon-eks-using-terraform.
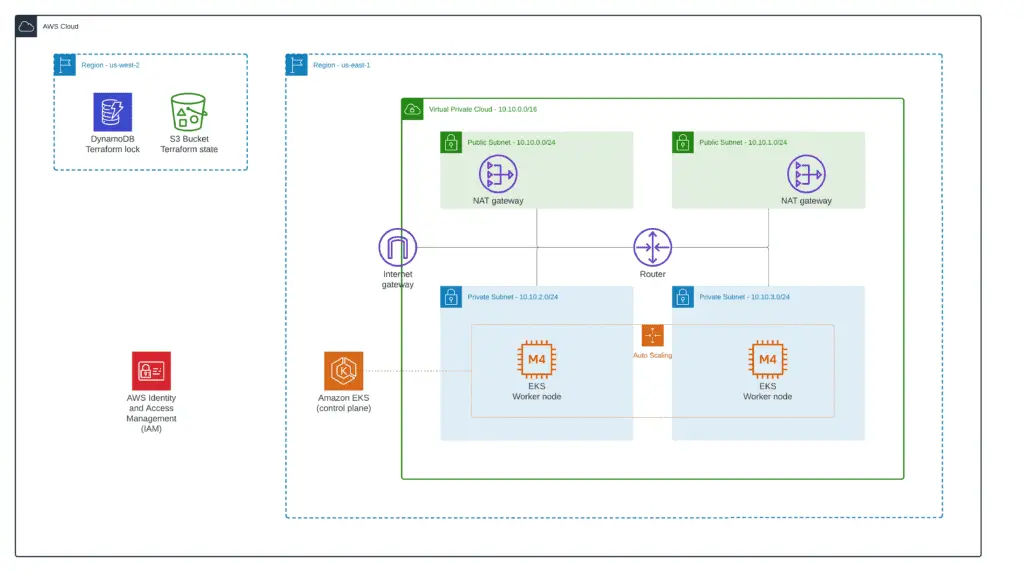
EKS cluster deployment architecture
In this article, we’ll deploy the Amazon EKS Cluster and self-managed EKS Worker Node Group in the Auto Scaling group in a separate VPC across two availability zones using Terraform. A custom VPC will have public and private subnets to allow you to launch public and private Kubernetes workloads. AWS manages the control plane of EKS (master nodes); you do not need to worry about them.
EKS worker nodes will host Kubernetes PODs, Services, Daemons, and other Kubernetes resources.
Load balancers for EKS services, depending on the Kubernetes application definition, can be deployed in the public or private subnets to distribute traffic to the pods inside the worker nodes.
We will split our project into several parts:
- Base VPC infrastructure
- K8s Cluster
- Cluster Autoscaler
- EKS demo application
Setting up the VPC infrastructure
The networking infrastructure consists of a VPC, two public & private subnets, NAT Gateways, route tables, and route table associations. Setting up all of these from scratch could be very tedious, so we will leverage the AWS VPC module from Terraform to simplify the deployment.
The complete module source code can be found in our GitHub repository folder: 1_vpc.

If you’re interested in how to set up VPCs from scratch, check out the Terraform AWS VPC – Complete Tutorial article.
First, we need to create a project folder called managing-amazon-eks-using-terraform. Within the project folder, we create a Terraform module (folder) for managing VPC called 1_vpc.
In our implementation, we use Terraform S3 backend storing state files and DynamoDB for Terraform execution locks. You can quickly deploy the S3 bucket and DynamoDB table for your Terraform-managed AWS infrastructure using our existing module: managing-amazon-eks-using-terraform/0_remote_state.
terraform {
  backend "s3" {
    bucket  = "hands-on-cloud-terraform-remote-state-s3"
    key     = "managing-eks-terraform-vpc.tfstate"
    region  = "us-west-2"
    encrypt = "true"
    dynamodb_table = "hands-on-cloud-terraform-remote-state-dynamodb"
  }
}
Here you’re specifying the following parameters for Terraform S3 backend:
bucket– the name of the S3 bucket to store Terraform state fileskey– Terraform state file name (for the current Terraform module)region– the region of the S3 bucket for storing Terraform stateencrypt– optional feature, allowing you to encrypt Terraform state file using S3 server-side encryptionDynamoDB_table – optional DynamoDB table, which is used to lock Terraform module executions from different machines at the same time
If you'd like to pin Terraform provider version, you can do it in providers.tf file:
# Set up Terraform provider version (if required)
terraform {
  required_providers {
    aws = {
      source  = "hashicorp/aws"
      version = "~> 4.9"
    }
  }
}
# Defining AWS provider
provider "aws" {
  region = var.aws_region
}
Next, let's add the variables.tf file for storing project resources common prefix, AWs region, and VPC CIDR range:
variable "prefix" {
  default     = "managing-eks-terraform"
  description = "Common prefix for AWS resources names"
}
variable "aws_region" {
  default     = "us-east-1"
  description = "AWS Region to deploy VPC"
}
variable "vpc_cidr" {
  default     = "10.10.0.0/16"
  description = "AWS VPC CIDR range"
}
Also, we need to define several Terraform local variables which we'll use within the module:
locals {
  prefix        = "managing-eks-terraform"
  vpc_name      = "${local.prefix}-vpc"
  vpc_cidr      = var.vpc_cidr
  common_tags   = {
    Environment = "dev"
    Project     = "hands-on.cloud"
  }
}
Now, we're ready to create a file here called vpc.tf, which will contain the VPC definition:
module "vpc" {
  source = "terraform-aws-modules/vpc/aws"
  name = local.vpc_name
  cidr = local.vpc_cidr
  azs = ["${var.aws_region}a", "${var.aws_region}b"]
  public_subnets = [
    cidrsubnet(local.vpc_cidr, 8, 0),
    cidrsubnet(local.vpc_cidr, 8, 1)
  ]
  private_subnets = [
    cidrsubnet(local.vpc_cidr, 8, 2),
    cidrsubnet(local.vpc_cidr, 8, 3)
  ]
  enable_nat_gateway   = true
  single_nat_gateway   = false
  enable_dns_hostnames = true

  tags = merge(
    {
      Name = local.vpc_name
    },
    local.common_tags
  )
  public_subnet_tags = {
    "kubernetes.io/role/elb"                        = "1"
    "kubernetes.io/cluster/${local.prefix}-cluster" = "owned"
  }
}
Public subnets need to have the required tags for load balancer placement (the public_subnet_tags argument).
Finally, we need to define some outputs which we'll use in Terraform modules managing cluster deployment:
output "prefix" {
  value       = local.prefix
  description = "Exported common resources prefix"
}
output "common_tags" {
  value       = local.common_tags
  description = "Exported common resources tags"
}
output "vpc_id" {
  value       = module.vpc.vpc_id
  description = "VPC ID"
}
output "public_subnets" {
  value       = module.vpc.public_subnets
  description = "VPC public subnets' IDs list"
}
output "private_subnets" {
  value       = module.vpc.private_subnets
  description = "VPC private subnets' IDs list"
}
To apply this module, you need to execute the following Terraform commands from the 1_vpc folder:
terraform init
terraform apply -auto-approve
Setting up the cluster
In this part of the article, we will define and set up the K8s cluster with all required IAM roles, cluster worker nodes, etc. Create a 2_eks folder inside the project folder, which will house all required Terraform code.
The complete module source code can be found in our GitHub repository folder: 2_eks.

Note: This article shows how to define the K8s cluster using Terraform from scratch. At the same time, we highly recommend you check out an excellent official AWS terraform-aws-modules/eks which has more functionality than we're covering in this article.
EKS module variables
To be able to deploy the K8s cluster, we need to define several local Terraform variables for storing VPC module outputs:
locals {
  remote_state_bucket_region    = "us-west-2"
  remote_state_bucket           = "hands-on-cloud-terraform-remote-state-s3"
  infrastructure_state_file     = "managing-eks-terraform-vpc.tfstate"
  prefix          = data.terraform_remote_state.vpc.outputs.prefix
  common_tags     = data.terraform_remote_state.vpc.outputs.common_tags
  vpc_id          = data.terraform_remote_state.vpc.outputs.vpc_id
  public_subnets  = data.terraform_remote_state.vpc.outputs.public_subnets
  private_subnets = data.terraform_remote_state.vpc.outputs.private_subnets
}
data "terraform_remote_state" "vpc" {
  backend = "s3"
  config = {
    bucket = local.remote_state_bucket
    region = local.remote_state_bucket_region
    key    = local.infrastructure_state_file
  }
}
In addition to that, let's define an external module variable for managing the AWS region for K8s cluster deployment:
variable "aws_region" {
  default     = "us-east-1"
  description = "AWS Region to deploy VPC"
}
Creating an IAM Role for the K8s cluster using Terraform
Next, we need to create an IAM service role for our cluster and attach an AWS Managed IAM policy called AmazonEKSClusterPolicy to it.
AmazonEKSClusterPolicy is an IAM service role that provides Amazon EKS with the permissions it needs to create and delete AWS resources on your behalf. AmazonEKSClusterPolicy is used by Amazon EKS to create the following AWS resources:
An Amazon EKS control plane environment in your account, including the VPC subnets, security groups, and route tables that Amazon EKS creates for the control plane serversAn Amazon Elastic Load Balancing network load balancer in your account for each Availability Zone in the region to allow west-east traffic between your worker nodes and the Amazon EKS control plane environmentAn Amazon EFS file system in your account if you enable self-managed worker nodes (nodes that are not launched and managed by an Amazon EKS node group)
When you delete an Amazon EKS, Amazon EKS deletes these AWS resources. For more information, see Amazon Resource Names (ARNs), IAM Roles, Service Principals, and Policies in the AWS Identity and Access Management User Guide. If you create multiple clusters in a single account, we recommend using a separate IAM service role for each cluster.
To define an EKS IAM service role using Terraform, create a file called iam.tf inside the 2_eks module folder and add the following code:
# EKS Terraform - IAM Role for K8s Cluster (Control Plane)
resource "aws_iam_role" "eks_iam_role" {
  name = "eks-service-role"
  assume_role_policy = jsonencode({
    Version = "2012-10-17",
    Statement = [{
      Action = "sts:AssumeRole"
      Effect = "Allow"
      Principal = {
        Service = "eks.amazonaws.com"
      }
    }]
  })
  tags = {
    "Terraform" = "true"
  }
}
resource "aws_iam_role_policy_attachment" "eks_iam_policy_attachment" {
  policy_arn = "arn:aws:iam::aws:policy/AmazonEKSClusterPolicy"
  role       = aws_iam_role.eks_iam_role.name
}
Creating an IAM Role for the EKS worker nodes using Terraform
Next, we must create a role for EC2 instances used in the EKS-managed node group. This EC2 worker node will contain the following AWS IAM Managed policies:
AmazonEKSWorkerNodePolicyis an IAM policy that you can attach to an Amazon EKS worker node's instance profile role. Amazon EKS uses theAmazonEKSWorkerNodePolicyto allow your worker nodes to join the EKS cluster as specified in the ClusterEndpoint. After you create anAmazonEKSWorkerNodePolicy, you must apply it to your Amazon EKS worker node instance profile roles for the nodes to function properly.AmazonEKS_CNI_Policyis an Amazon EKS-managed policy you can attach to your worker node instance profile role to grant Amazon EKS permission to manage the Amazon EKS pod networking for your worker nodes. Amazon EKS customers use Amazon EKS to run Kubernetes pods on top of AWS compute resources such as Amazon EC2 instances.AmazonEC2ContainerRegistryReadOnlyis an Amazon Elastic Container Registry (Amazon ECR) permission level that lets Amazon EKS operators grant read-only access to the Amazon ECR resources in their account to Amazon EKS worker nodes. Amazon EKS worker nodes are Amazon EC2 instances registered within the K8s cluster and run the Docker daemon and the Amazon EKS container agent.
Add the following code to the same (iam.tf) file:
# EKS Terraform - IAM Role for EKS Worker Nodes
resource "aws_iam_role" "eks_node_role" {
  name = "eks-node-role"
  assume_role_policy = jsonencode({
    Version = "2012-10-17",
    Statement = [{
      Action = "sts:AssumeRole"
      Effect = "Allow"
      Principal = {
        Service = "ec2.amazonaws.com"
      }
    }]
  })
  tags = {
    Terraform = "true"
  }
}
resource "aws_iam_role_policy_attachment" "worker_node_policy_attachment" {
  policy_arn = "arn:aws:iam::aws:policy/AmazonEKSWorkerNodePolicy"
  role       = aws_iam_role.eks_node_role.name
}
resource "aws_iam_role_policy_attachment" "cni_policy_attachment" {
  policy_arn = "arn:aws:iam::aws:policy/AmazonEKS_CNI_Policy"
  role       = aws_iam_role.eks_node_role.name
}
resource "aws_iam_role_policy_attachment" "ecr_readonly_policy_attachment" {
  policy_arn = "arn:aws:iam::aws:policy/AmazonEC2ContainerRegistryReadOnly"
  role       = aws_iam_role.eks_node_role.name
}
Now we're ready to define the K8s cluster, and EKS-managed worker node group. Create a file called eks.tf in the 2_eks module folder with the following code:
Creating K8s cluster using Terraform
locals {
  cluster_name    = "${local.prefix}-cluster"
  aws_account_id  = data.aws_caller_identity.current.account_id
}
data "aws_caller_identity" "current" {}
# EKS Terraform - Cluster
resource "aws_eks_cluster" "eks_cluster" {
  depends_on = [ aws_iam_role_policy_attachment.eks_iam_policy_attachment ]
  name     = local.cluster_name
  role_arn = aws_iam_role.eks_iam_role.arn
  vpc_config {
    subnet_ids = concat(local.public_subnets, local.private_subnets)
  }
  tags = merge(
    {
      Name = local.cluster_name
    },
    local.common_tags
  )
}
# EKS Terraform - Creating the private EKS Node Group
resource "aws_eks_node_group" "private_node_group" {
  depends_on = [
    aws_iam_role_policy_attachment.worker_node_policy_attachment,
    aws_iam_role_policy_attachment.cni_policy_attachment,
    aws_iam_role_policy_attachment.ecr_readonly_policy_attachment
  ]
  cluster_name    = aws_eks_cluster.eks_cluster.name
  node_group_name = "${local.cluster_name}-private-ng"
  node_role_arn   = aws_iam_role.eks_node_role.arn
  subnet_ids      = local.private_subnets
  ami_type       = "AL2_x86_64"
  capacity_type  = "ON_DEMAND"
  instance_types = ["m4.medium"]
  disk_size      = 8
  scaling_config {
    desired_size = 2
    max_size     = 6
    min_size     = 1
  }
  update_config {
    max_unavailable = 2
  }
  tags = merge(
    {
      Name = local.cluster_name
    },
    local.common_tags
  )
}
data "template_file" "config" {
  template = file("${path.module}/templates/config.tpl")
  vars = {
    certificate_data  = aws_eks_cluster.eks_cluster.certificate_authority[0].data
    cluster_endpoint  = aws_eks_cluster.eks_cluster.endpoint
    aws_region        = var.aws_region
    cluster_name      = local.cluster_name
    account_id        = local.aws_account_id
  }
}
resource "local_file" "config" {
  content  = data.template_file.config.rendered
  filename = "${path.module}/${local.cluster_name}_config"
}
In the code above, we've defined two local variables for storing AWS account ID (obtained from the aws_caller_identity data resource) and cluster name.
Next, we're using the aws_eks_cluster resource to define the K8s cluster control plane (managed by AWS).
The aws_eks_node_group resource allows us to define a managed node group of EKS workers (EC2 instances) managed by the Auto Scaling Group. EC2 instances in this Auto Scaling group will be managed by the Cluster Autoscaler (defined in the next section). You can apply a custom cluster Security Group by using the source_security_group_ids argument here. For more information, check out the Amazon EKS security group considerations documentation.
There are three available options of EKS worker node groups available for you:
Self managed node groups - this is a group of worker nodes that are controlled and managed by the user. With self managed node groups, the user has complete control over the underlying instances, AMIs, any automation, and can choose to launch instances in any region or Availability Zone. Self managed cluster node groups are ideal for users who need complete control over their worker nodes, and who require the ability to launch instances in multiple regions or Availability Zones. Self managed node group can be used with any K8s cluster.
Managed worker node group - this is a feature of Amazon EKS that makes it easy to provision and manage groups of worker nodes. With managed node groups, you can specify the desired number of nodes and the instance type for each group, and Amazon EKS will create and maintain the underlying EC2 instances. This makes it easy to scale worker nodes up or down as needed, and removes the hassle of managing worker nodes manually. Overall, managed node groups provide a simpler and more cost-effective way to manage workers in your cluster.
AWS Fargate - these node groups are a fully managed AWS compute engine for EKS that makes it easy to run Kubernetes worker nodes without having to manage the underlying EC2 instances (you need to provide only CPU and RAM requirements for your container applications). AWS Fargate node groups provide on-demand and autoscaling compute capacity for your EKS worker nodes, so you can optimize costs while ensuring that your applications always have the resources they need.
In addition, we're using a template_file Terraform resource to generate the content of the kubectl config file and the local_file resource to save this config to the local filesystem. We're using the basic (default) cluster identity provider configurations, allowing only the user who created the cluster to access it. Check out the Enabling IAM user and role access to your cluster documentation if you need more flexibility here. The kubectl config contains the cluster endpoint, authentication, IAM user mappings, and other important information.
To apply this module and deploy the K8s cluster using Terraform, you need to execute the following commands from the 2_eks folder:
terraform init
terraform apply -auto-approve
The cluster creation time will take approximately 10-15 mins.
Once the configurations are successfully applied, you can verify the creation of the cluster by executing the following AWS CLI command:
aws eks list-clustersThe above command returns a list of control plane clusters in your account. You would get an output like this:
{
    "clusters": [
        "managing-eks-terraform-cluster"
    ]
}
Connecting to the cluster
In the previous section, we deployed the cluster and generated kubectl config. Set up the KUBECONFIG with the location path to this file:
export KUBECONFIG=$(pwd)/managing-eks-terraform-cluster_configTest connection to the cluster, let's try to get the information about all workers available in our EKS-managed node group:
kubectl get nodesYou should get a similar output:
NAME                          STATUS   ROLES    AGE   VERSION
ip-10-10-2-183.ec2.internal   Ready    <none>   13m   v1.21.5-eks-9017834
ip-10-10-3-179.ec2.internal   Ready    <none>   13m   v1.21.5-eks-9017834
Nginx deployment
Now, let's create a deployment manifest for a simple Nginx server. We will be using a separate nginx-ns namespace for this demo application. Create a folder called 3_k8s_apps at the root level of the project folder and the nginx subfolder within it. Create a nginx.yml file within the nginx folder with the following resources definitions:
# K8s example - Nginx Namespace
kind: Namespace
apiVersion: v1
metadata:
  name: nginx-ns
  labels:
    name: nginx-ns
---
# K8s example - Nginx Deployment
apiVersion: apps/v1
kind: Deployment
metadata:
  name: nginx
  namespace: nginx-ns
spec:
  replicas: 2
  selector:
    matchLabels:
      app: nginx
  template:
    metadata:
      labels:
        app: nginx
    spec:
      containers:
        - name: nginx
          image: nginx:latest
          ports:
            - name: web
              containerPort: 80
          resources:
            requests:
              memory: 128Mi
              cpu: 100m
            limits:
              memory: 256Mi
              cpu: 250m
---
# K8s example - Nginx Load Balancer (NLB)
apiVersion: v1
kind: Service
metadata:
  name: nginx-nlb
  namespace: nginx-ns
  annotations:
    service.beta.kubernetes.io/aws-load-balancer-type: nlb
spec:
  type: LoadBalancer
  selector:
    app: nginx
  ports:
    - protocol: TCP
      port: 80
      targetPort: web
It's a simple manifest that defines a separate Kubernetes Namespace for Nginx Deployment and LoadBalancer service to expose it to the outside world.
Load Balancers are created using the Service and Ingress resources. For simplicity, we're exposing Nginx POD through a Network Load Balancer (NLB) defined as a Service resource. You may also set up an Application Load Balancer (ALB) using the ALB Ingress Controller.
To apply the above manifest, run the following command:
kubectl apply -f 3_k8s_apps/nginx/nginx.ymlOnce applied, we can wait for a few seconds and inspect the cluster PODs using the following command:
kubectl get pods --namespace nginx-nsThe output would be something like this:
Nginx PODs 
You can get the URL of the Network Load Balancer for the deployed Nginx PODs using the following command:
kubectl get service --namespace nginx-nsHere's an example output:

Now, you can use the Load balancer EXTERNAL-IP (URL) information to connect to the Nginx PODs:
Nginx default home page 
We have successfully created a K8s cluster with the self-managed worker node group in private subnets and deployed a demo Nginx application with an internet-facing load balancer at public subnets.
Scaling the EKS Cluster
In the event of increased traffic or requests to our application, we can configure our Kubernetes cluster to scale horizontally to handle sudden traffic spikes. Scaling can happen at two levels - at the pod level (using HPA) and at the node level (using Cluster Autoscaler). In this section, we shall discuss and implement both!
Horizontal Pod Autoscaler (HPA)
The Horizontal Pod Autscaler (HPA) is a special Kubernetes object that automatically scales up or down the number of pods in a deployment/replica set. It works by tracking metrics such as CPU, memory, etc. Whenever the utilization of these resources exceeds a certain percentage, a scale-out action is triggered, adding more identical pods to the deployment. Similarly, when the utilization percentage reduces, a scale in action is triggered, and unnecessary pods are terminated.
HPA Manifest
To track the metrics mentioned above, we need to install the metrics-server in the kube-system namespace of our cluster. You can install that by following the documentation here.
kubectl apply -f https://github.com/kubernetes-sigs/metrics-server/releases/latest/download/components.yamlOnce the metrics-server is installed on the cluster, we can add the HPA manifest (the hpa.yml file) inside our 3_k8s_apps/hpa folder:
# EKS Terraform - Nginx HPA
apiVersion: autoscaling/v2beta1
kind: HorizontalPodAutoscaler
metadata:
  name: nginx-hpa
  namespace: nginx-ns
spec:
  scaleTargetRef:
    apiVersion: apps/v1
    kind: Deployment
    name: nginx
  minReplicas: 2
  maxReplicas: 8
  metrics:
    - type: Resource
      resource:
        name: cpu #scaling based on CPU
        targetAverageUtilization: 5 #setting low value - so that HPA scale out can be seen quickly on running load generator script
To apply the HPA manifest, use the following command:
kubectl apply -f 3_k8s_apps/hpa/hpa.ymlTesting the HPA
Let's verify the HPA installation on our cluster by running the following command:
kubectl get hpa --namespace nginx-nsThe above command would provide us with the following output :

The 'TARGETS' column would show 0% - 1% CPU utilization as the pods are not subjected to any load. To test the HPA, keep two terminal windows opened - side by side. We will use the first one to constantly monitor the state of the HPA using the following command:
kubectl get hpa --namespace nginx-ns -wWe will use the second terminal to apply load to our nginx deployment, which would, in turn, trigger a scale-out action via the HPA. In the second terminal, execute the following command :
kubectl run -i --tty load-generator --image=busybox /bin/shThe above command will create a POD called load-generator at the cluster using the busybox image and would provide us with a bash terminal from the POD container. Use the following command inside the POD terminal to put a load on the nginx deployment:
while true; do wget -q -O- http://<loadbalancer-url>; doneThe above script infinitely sends requests to the Nginx deployment via the load balancer. Do not forget to replace the loadbalancer-url with your current load balancer URL.
You should see something like this:
HPA stress test 
As the load increases, the HPA triggers a scale-out action to increase the number of PODs in the replica and decrease target utilization.
You may now stop the processes in both terminals (using CTRL+C). Note that the scale-in action takes about 5 mins to kick in on reducing load. So you would see 6 pods running during that time, after which it would again reduce to 2.
To delete the HPA, use the following command:
# kubectl delete hpa <hpa-name>
kubectl delete hpa nginx-hpa --namespace nginx-ns
Cluster Autoscaler
As discussed earlier, HPA is a Kubernetes object that scales PODs in a node, while the Cluster Autoscaler is a Kubernetes object that scales nodes in a cluster. The implementation of Cluster Autoscaler in AWS EKS is based on Autoscaling Groups in AWS. The open-source Cluster Autoscaler K8s component asks AWS Autoscaling Groups to scale the number of nodes in the cluster when the requested CPU usage goes above the available CPU. We need an authentication mechanism to enable this communication between the K8s Cluster Autoscaler and AWS components.
This authentication mechanism is provided by the IAM OIDC provider (OpenID Connect Identity Provider), which grants a service account with the necessary permissions to the Cluster Autoscaler to interact with the AWS ASG component. Let's deploy Cluster Autoscaler prerequisites using Terraform.
First, let's create a separate 4_eks_cluster_autoscaler subfolder in the project root folder to store Terraform module code. Now, we can easily pin Terraform provider version if needed:
# Set up Terraform provider version (if required)
terraform {
  required_providers {
    aws = {
      source  = "hashicorp/aws"
      version = "~> 4.9"
    }
  }
}
# Defining AWS provider
provider "aws" {
  region = var.aws_region
}
The Terraform backend configuration for the module will be defined as:
terraform {
  backend "s3" {
    bucket  = "hands-on-cloud-terraform-remote-state-s3"
    key     = "managing-eks-terraform-eks-cluster-autoscaler.tfstate"
    region  = "us-west-2"
    encrypt = "true"
    dynamodb_table = "hands-on-cloud-terraform-remote-state-dynamodb"
  }
}
We'll define the AWS region as an external module variable:
variable "aws_region" {
  default     = "us-east-1"
  description = "AWS Region to deploy VPC"
}
Also, we need to grab some information from other modules' outputs from their state files:
locals {
  remote_state_bucket_region    = "us-west-2"
  remote_state_bucket           = "hands-on-cloud-terraform-remote-state-s3"
  vpc_state_file                = "managing-eks-terraform-vpc.tfstate"
  eks_state_file                = "managing-eks-terraform-eks-cluster.tfstate"
  prefix          = data.terraform_remote_state.vpc.outputs.prefix
  common_tags     = data.terraform_remote_state.vpc.outputs.common_tags
  vpc_id          = data.terraform_remote_state.vpc.outputs.vpc_id
  public_subnets  = data.terraform_remote_state.vpc.outputs.public_subnets
  private_subnets = data.terraform_remote_state.vpc.outputs.private_subnets
}
data "terraform_remote_state" "vpc" {
  backend = "s3"
  config = {
    bucket = local.remote_state_bucket
    region = local.remote_state_bucket_region
    key    = local.vpc_state_file
  }
}
data "terraform_remote_state" "eks" {
  backend = "s3"
  config = {
    bucket = local.remote_state_bucket
    region = local.remote_state_bucket_region
    key    = local.eks_state_file
  }
}
As soon as we use the Cluster Autoscaler IAM role ARN, let's output it from the module:
output "eks_ca_iam_role_arn" {
  value = aws_iam_role.cluster_autoscaler.arn
  description = "AWS IAM role ARN for EKS Cluster Autoscaler"
}
Creating Cluster Autoscaler IAM Role using Terraform
We need to create an IAM role for the Cluster Autoscaler and allow it to use the service account to get STS credentials via Federated Login. After that, we would provide it with the permissions necessary for autoscaling operations. Let's define the Terraform configuration for that:
# Policy document allowing Federated Access for IAM Cluster Autoscaler role
data "aws_iam_policy_document" "cluster_autoscaler_sts_policy" {
  statement {
    actions = ["sts:AssumeRoleWithWebIdentity"]
    effect  = "Allow"
    condition {
      test     = "StringEquals"
      variable = "${replace(aws_iam_openid_connect_provider.eks_ca_oidc_provider.url, "https://", "")}:sub"
      values   = ["system:serviceaccount:kube-system:cluster-autoscaler"]
    }
    principals {
      identifiers = [aws_iam_openid_connect_provider.eks_ca_oidc_provider.arn]
      type        = "Federated"
    }
  }
}
# IAM Role for IAM Cluster Autoscaler
resource "aws_iam_role" "cluster_autoscaler" {
  assume_role_policy = data.aws_iam_policy_document.cluster_autoscaler_sts_policy.json
  name               = "${local.prefix}-cluster-autoscaler"
}
# IAM Policy for IAM Cluster Autoscaler role allowing ASG operations
resource "aws_iam_policy" "cluster_autoscaler" {
  name = "${local.prefix}-cluster-autoscaler"
  policy = jsonencode({
    Statement = [{
      Action = [
        "autoscaling:DescribeAutoScalingGroups",
        "autoscaling:DescribeAutoScalingInstances",
        "autoscaling:DescribeLaunchConfigurations",
        "autoscaling:DescribeTags",
        "autoscaling:SetDesiredCapacity",
        "autoscaling:TerminateInstanceInAutoScalingGroup",
        "ec2:DescribeLaunchTemplateVersions"
      ]
      Effect   = "Allow"
      Resource = "*"
    }]
    Version = "2012-10-17"
  })
}
resource "aws_iam_role_policy_attachment" "eks_ca_iam_policy_attach" {
  role       = aws_iam_role.cluster_autoscaler.name
  policy_arn = aws_iam_policy.cluster_autoscaler.arn
}
Creating the IAM OIDC provider using Terraform
Finally, we need to get a TLS certificate (the identity provider's server certificate) using the tls_certifcate data source from our K8s cluster. After that, we can reference the certificate from the IAM OIDC provider resource (aws_iam_openid_connect_provider):
locals {
  eks_cluster_name  = data.terraform_remote_state.eks.outputs.eks_cluster_name
}
data "aws_eks_cluster" "eks_cluster" {
  name = local.eks_cluster_name
}
# Obtain TLS certificate for the OIDC provider
data "tls_certificate" "tls" {
  url = data.aws_eks_cluster.eks_cluster.identity[0].oidc[0].issuer
}
# Create OIDC Provider using TLS certificate
resource "aws_iam_openid_connect_provider" "eks_ca_oidc_provider" {
  client_id_list  = ["sts.amazonaws.com"]
  thumbprint_list = [data.tls_certificate.tls.certificates[0].sha1_fingerprint]
  url             = data.aws_eks_cluster.eks_cluster.identity[0].oidc[0].issuer
}
We have completed the configuration required to set up an IAM OIDC provider for Cluster Autoscaler. This would allow the Cluster Authentication to authenticate via STS and interact with the AWS Autoscaling Group.
To apply this module and deploy the IAM OpenID Connect provider using Terraform, you need to execute the following commands from the 2_eks folder:
terraform init
terraform apply -auto-approve
You'll get the Cluster Autoscaler IAM Role ARN as the module output:
Terraform output - Cluster Autoscaler IAM Role ARN 
Deploying the Cluster Autoscaler
Let's install the Cluster Autoscaler to the cluster. First, we need to prepare the Kubernetes manifest. As the manifest is quite elaborate and complicated, we will use an existing example manifest from the open-source Kubernetes repository on GitHub. Execute the following command at the root level of your project :
curl https://raw.githubusercontent.com/kubernetes/autoscaler/master/cluster-autoscaler/cloudprovider/aws/examples
/cluster-autoscaler-autodiscover.yaml -o 3_k8s_apps/cluster_autoscaler/cluster_autoscaler.yml
The above command will download the example manifest from the GitHub repository into a file called cluster-autoscaler.yml inside the 3_k8s_apps/cluster_autoscaler directory. We need to make a couple of minor changes to the code:
Replace<YOUR CLUSTER NAME>with the name of your K8s clusterReplace <YOUR CLUSTER AUTOSCALER ROLE ARN> with the Cluster Autoscaler IAM Role ARN obtained from the Terraform module output
---
apiVersion: v1
kind: ServiceAccount
metadata:
  labels:
    k8s-addon: cluster-autoscaler.addons.k8s.io
    k8s-app: cluster-autoscaler
  name: cluster-autoscaler
  namespace: kube-system
  annotations:
    eks.amazonaws.com/role-arn: <YOUR CLUSTER AUTOSCALER ROLE ARN>
---
apiVersion: rbac.authorization.k8s.io/v1
kind: ClusterRole
metadata:
  name: cluster-autoscaler
  labels:
    k8s-addon: cluster-autoscaler.addons.k8s.io
    k8s-app: cluster-autoscaler
rules:
  - apiGroups: [""]
    resources: ["events", "endpoints"]
    verbs: ["create", "patch"]
  - apiGroups: [""]
    resources: ["pods/eviction"]
    verbs: ["create"]
  - apiGroups: [""]
    resources: ["pods/status"]
    verbs: ["update"]
  - apiGroups: [""]
    resources: ["endpoints"]
    resourceNames: ["cluster-autoscaler"]
    verbs: ["get", "update"]
  - apiGroups: [""]
    resources: ["nodes"]
    verbs: ["watch", "list", "get", "update"]
  - apiGroups: [""]
    resources:
      - "namespaces"
      - "pods"
      - "services"
      - "replicationcontrollers"
      - "persistentvolumeclaims"
      - "persistentvolumes"
    verbs: ["watch", "list", "get"]
  - apiGroups: ["extensions"]
    resources: ["replicasets", "daemonsets"]
    verbs: ["watch", "list", "get"]
  - apiGroups: ["policy"]
    resources: ["poddisruptionbudgets"]
    verbs: ["watch", "list"]
  - apiGroups: ["apps"]
    resources: ["statefulsets", "replicasets", "daemonsets"]
    verbs: ["watch", "list", "get"]
  - apiGroups: ["storage.k8s.io"]
    resources: ["storageclasses", "csinodes", "csidrivers", "csistoragecapacities"]
    verbs: ["watch", "list", "get"]
  - apiGroups: ["batch", "extensions"]
    resources: ["jobs"]
    verbs: ["get", "list", "watch", "patch"]
  - apiGroups: ["coordination.k8s.io"]
    resources: ["leases"]
    verbs: ["create"]
  - apiGroups: ["coordination.k8s.io"]
    resourceNames: ["cluster-autoscaler"]
    resources: ["leases"]
    verbs: ["get", "update"]
---
apiVersion: rbac.authorization.k8s.io/v1
kind: Role
metadata:
  name: cluster-autoscaler
  namespace: kube-system
  labels:
    k8s-addon: cluster-autoscaler.addons.k8s.io
    k8s-app: cluster-autoscaler
rules:
  - apiGroups: [""]
    resources: ["configmaps"]
    verbs: ["create","list","watch"]
  - apiGroups: [""]
    resources: ["configmaps"]
    resourceNames: ["cluster-autoscaler-status", "cluster-autoscaler-priority-expander"]
    verbs: ["delete", "get", "update", "watch"]
---
apiVersion: rbac.authorization.k8s.io/v1
kind: ClusterRoleBinding
metadata:
  name: cluster-autoscaler
  labels:
    k8s-addon: cluster-autoscaler.addons.k8s.io
    k8s-app: cluster-autoscaler
roleRef:
  apiGroup: rbac.authorization.k8s.io
  kind: ClusterRole
  name: cluster-autoscaler
subjects:
  - kind: ServiceAccount
    name: cluster-autoscaler
    namespace: kube-system
---
apiVersion: rbac.authorization.k8s.io/v1
kind: RoleBinding
metadata:
  name: cluster-autoscaler
  namespace: kube-system
  labels:
    k8s-addon: cluster-autoscaler.addons.k8s.io
    k8s-app: cluster-autoscaler
roleRef:
  apiGroup: rbac.authorization.k8s.io
  kind: Role
  name: cluster-autoscaler
subjects:
  - kind: ServiceAccount
    name: cluster-autoscaler
    namespace: kube-system
---
apiVersion: apps/v1
kind: Deployment
metadata:
  name: cluster-autoscaler
  namespace: kube-system
  labels:
    app: cluster-autoscaler
spec:
  replicas: 1
  selector:
    matchLabels:
      app: cluster-autoscaler
  template:
    metadata:
      labels:
        app: cluster-autoscaler
      annotations:
        prometheus.io/scrape: 'true'
        prometheus.io/port: '8085'
    spec:
      priorityClassName: system-cluster-critical
      securityContext:
        runAsNonRoot: true
        runAsUser: 65534
        fsGroup: 65534
      serviceAccountName: cluster-autoscaler
      containers:
        - image: k8s.gcr.io/autoscaling/cluster-autoscaler:v1.21.0
          name: cluster-autoscaler
          resources:
            limits:
              cpu: 100m
              memory: 600Mi
            requests:
              cpu: 100m
              memory: 600Mi
          command:
            - ./cluster-autoscaler
            - --v=4
            - --stderrthreshold=info
            - --cloud-provider=aws
            - --skip-nodes-with-local-storage=false
            - --expander=least-waste
            - --node-group-auto-discovery=asg:tag=k8s.io/cluster-autoscaler/enabled,k8s.io/cluster-autoscaler/<YOUR CLUSTER NAME>
          volumeMounts:
            - name: ssl-certs
              mountPath: /etc/ssl/certs/ca-certificates.crt #/etc/ssl/certs/ca-bundle.crt for Amazon Linux Worker Nodes
              readOnly: true
          imagePullPolicy: "Always"
      volumes:
        - name: ssl-certs
          hostPath:
            path: "/etc/ssl/certs/ca-bundle.crt"
Now, we can apply the manifest to the K8s cluster:
kubectl apply -f 3_k8s_apps/cluster_autoscaler/cluster_autoscaler.ymlVerify the installation by inspecting the pods in the kube-system namespace:
kubectl get pods -n kube-systemCluster Autoscaler pod highlighted 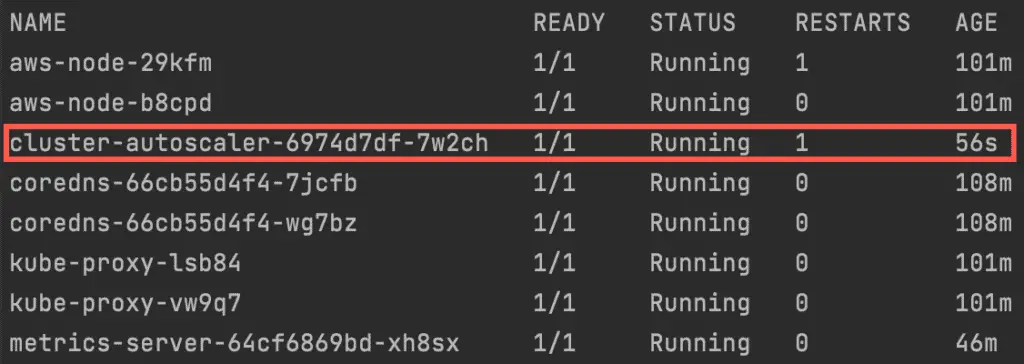
Thus, the Cluster Autoscaler is successfully installed on our cluster!
Testing the Cluster Autoscaler
Open two terminal windows side by side to monitor the number of pods and nodes in real time:
kubectl get pods --namespace nginx-ns -wkubectl get nodes -wTo test the Cluster Autoscaler, we would need to increase the replicas for our deployment to a higher number (say 10). This would increase the requested CPU and make the Cluster Autoscaler trigger a scale-out action, and add more nodes to our cluster :
kubectl scale --replicas=60 -f 3_k8s_apps/nginx/nginx.ymlOn applying the manifest, you will notice an increase in the number of pods and nodes in the two open terminal windows:
Cluster Autoscaler stress test 
We have a working Cluster Autoscaler at this stage!
Cleanup
To delete the demo Nginx Kubernetes application, we need to execute the following command:
kubectl delete -f 3_k8s_apps/nginx/nginx.ymlTo destroy Terraform provisioned infrastructure, execute the following command for the 4_eks_cluster_autoscaler, 2_eks, and 1_vpc Terraform modules:
terraform destroy --auto-approveSummary
This article used Terraform to deploy the Amazon EKS cluster, Cluster Autoscaler, and Horizontal Pod Autoscaler (HPA). Also, we've tested our K8s deployment configuration using the Nginx demo application.
