Terraform ALB Tutorial – Easy AWS ALB management
Amazon Elastic Load Balancing automatically distributes your incoming traffic across multiple targets, such as EC2 instances, containers, and even a set of IP addresses in one or more Availability Zones. It monitors the health of its registered targets and routes traffic only to healthy target destinations. Application Load Balancer is one of the Elastic Load Balancers provided by AWS for managing HTTP and HTTPS protocols.
Managing Application Load Balancers using Terraform helps you to follow the Infrastructure as Code (IaC) approach, helps increase agility and cost savings, improves scalability and reliability, automation of configurations, improves security, easier roll-backs/replication/maintenance, version control and tracking of changes, faster deployment times and reduced manual errors. Infrastructure as Code also helps standardize environments across multiple environments in the cloud.
In this article, we’ll demonstrate how to use Terraform ALB resources to manage AWS Application Load Balancers (ALB) and integrate it with EC2, S3, ACM, Cognito, Lambda, and WAF.
Table of contents
Initial Setup
To start with Terraform, we need to install it. Just go along with the steps in this guide to install it.
Verify the installation by typing:
$ terraform --version
Terraform v1.1.6
Project structure
Create a new project directory on your machine called managing-alb-using-terraform. We’ll create Terraform modules inside the project directory, each responsible for its part of the infrastructure, illustrating article examples.
Feel free to use our managing-alb-using-terraform GitHub repository for reference.
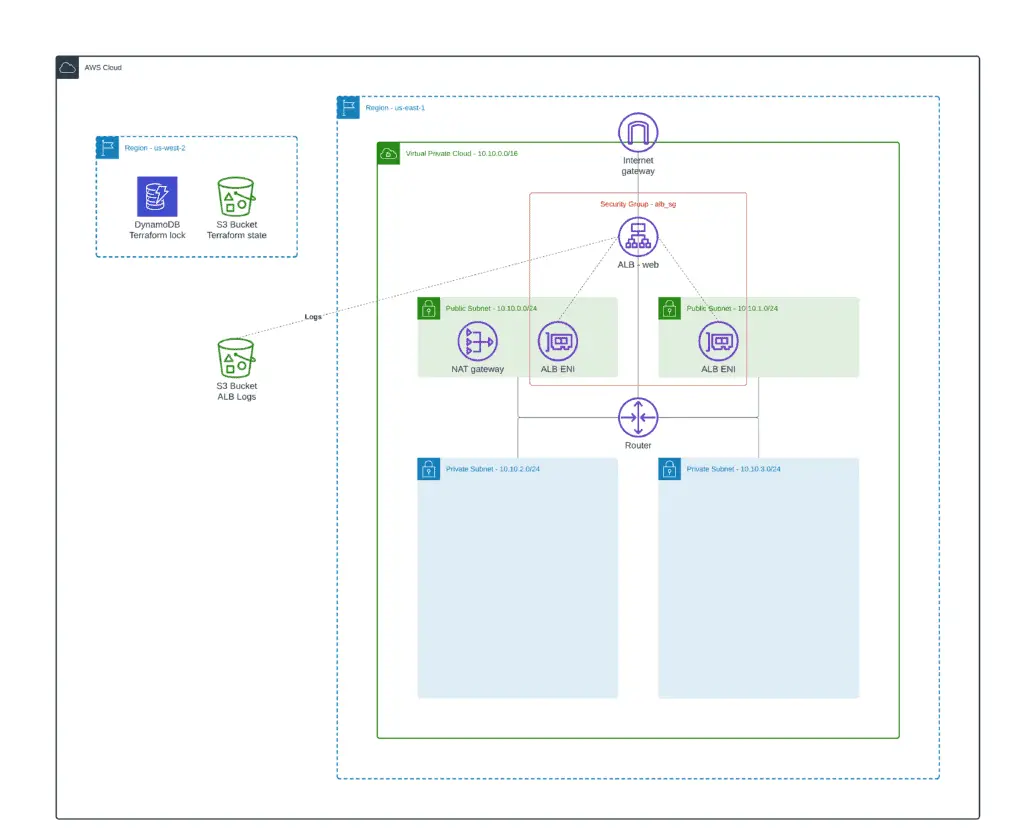
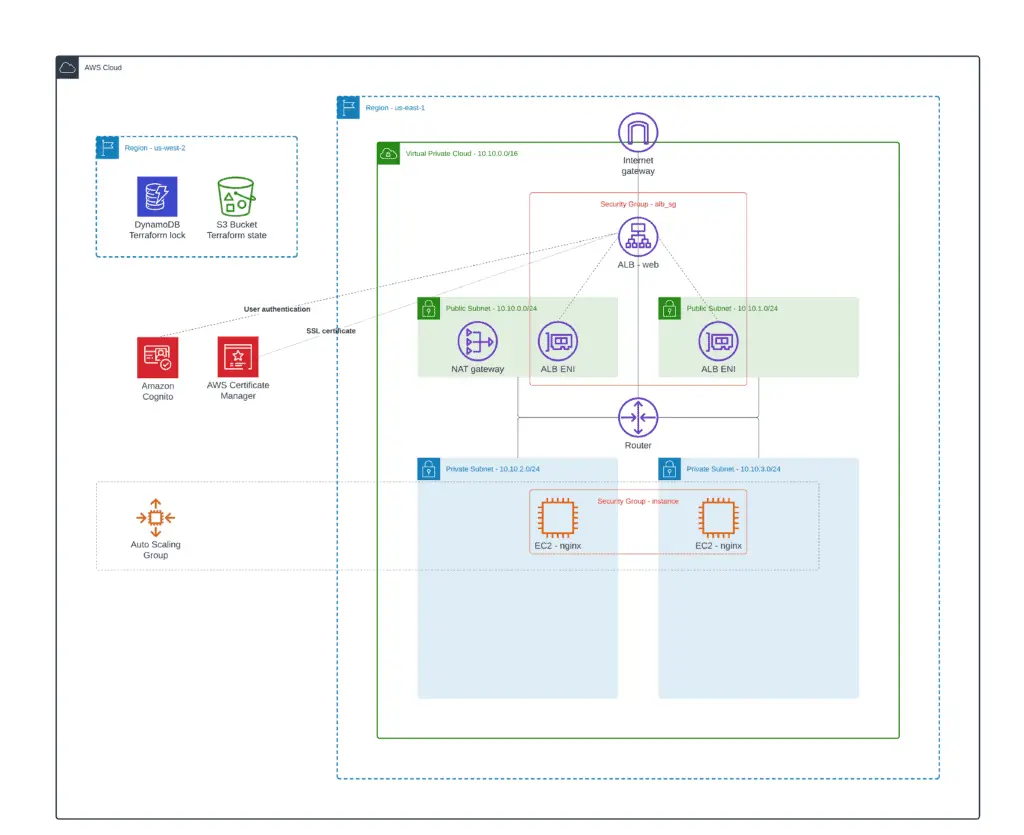
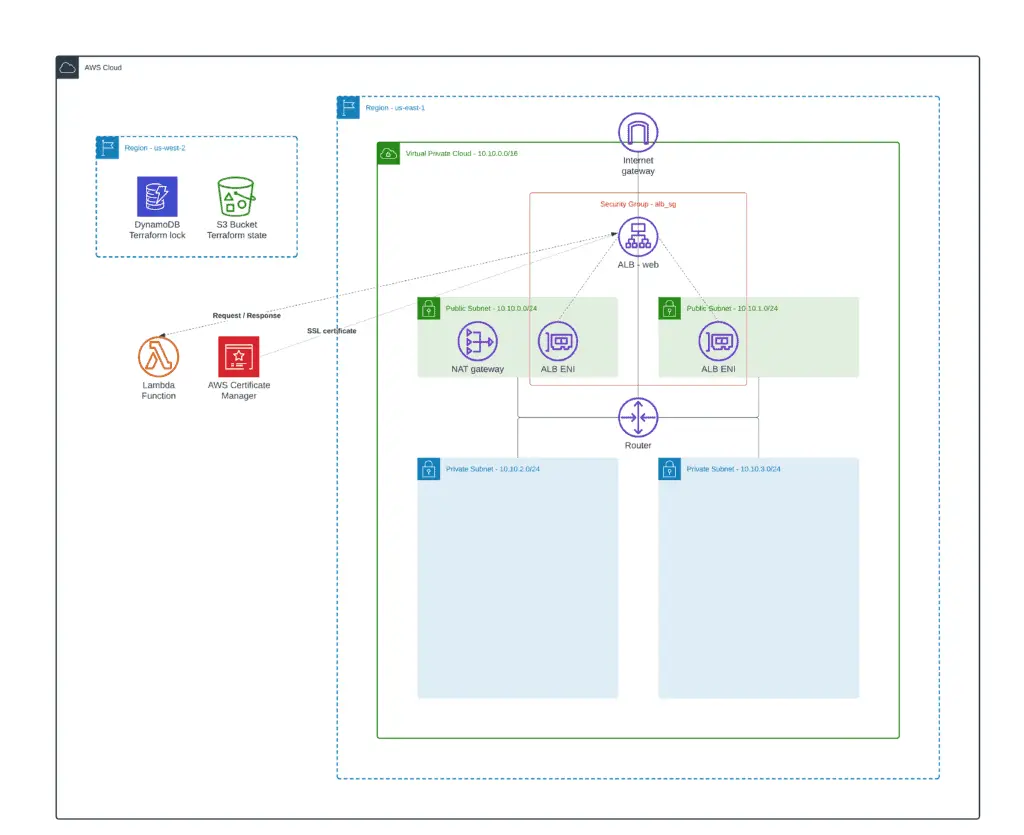
We’ll use Amazon DynamoDB to lock terraform executions and an Amazon S3 bucket to store Terraform state files. You can apply the 0_remote_state project folder to create the DynamoDB table and S3 bucket.
VPC – Basic Infrastructure
In this article section, we’ll build the following architecture: VPC, two public subnets, two private subnets, and a common NAT Gateway (for cost savings).
- Module subfolder name:
1_infrastructure - GitHub sources: 1_infrastructure
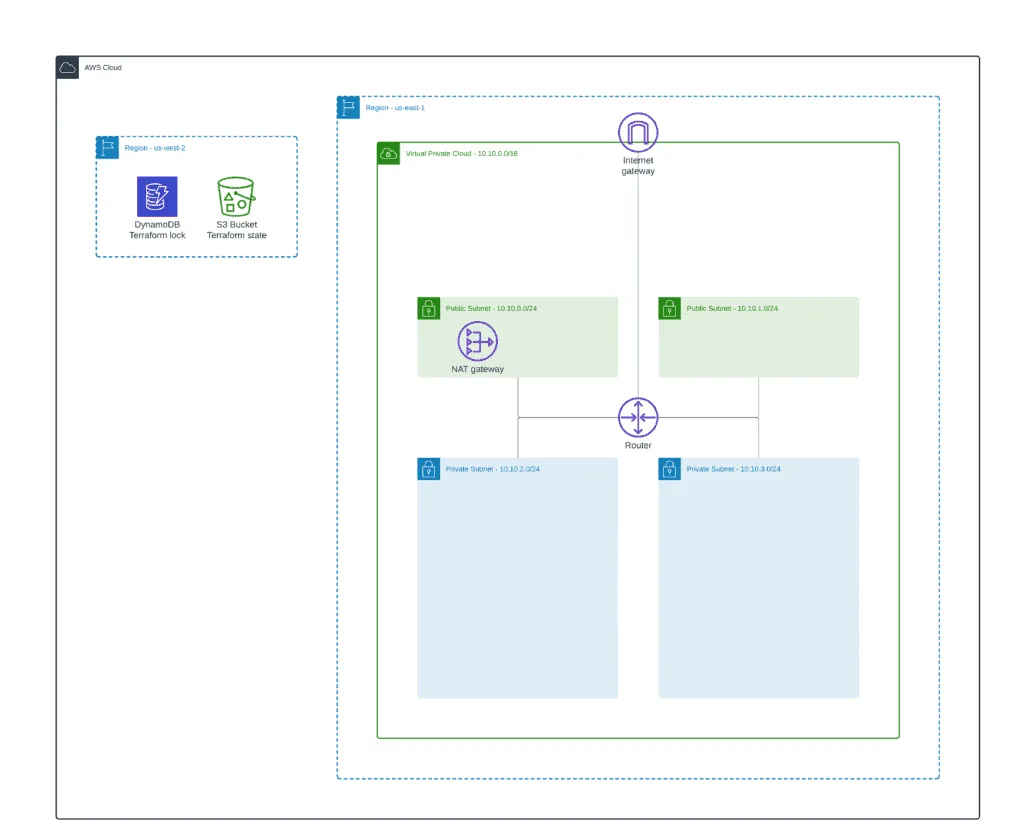
Since our main focus is to create a Terraform ALB module, you will not be explaining the details of creating a VPC. Instead, we will use the official AWS VPC module to deploy a VPC.
For external ALB, we’ll need a VPC, at least one public subnet, an Internet Gateway (IGW), and properly configured route tables for Internet connectivity.
For more information about managing VPCs, check out the following articles:
- Terraform – Managing AWS VPC – Creating Public Subnet
- Terraform – Managing AWS VPC – Creating Private Subnets
The Terraform backend configuration for the base infrastructure module will be the following:
terraform {
  backend "s3" {
    bucket  = "hands-on-cloud-terraform-remote-state-s3"
    key     = "managing-alb-using-terraform-infrastructure.tfstate"
    region  = "us-west-2"
    encrypt = "true"
    dynamodb_table = "hands-on-cloud-terraform-remote-state-dynamodb"
  }
}
We’ll also use some common variables for the module:
variable "prefix" {
  default     = "managing-alb-using-terraform"
  description = "Common prefix for AWS resources names"
}
variable "aws_region" {
  default     = "us-east-1"
  description = "AWS Region to deploy VPC"
}
Let’s define some local variables to store our VPC module configuration:
locals {
  prefix   = "managing-alb-using-terraform"
  vpc_name = "${local.prefix}-vpc"
  vpc_cidr = "10.10.0.0/16"
  common_tags = {
    Environment = "dev"
    Project     = "hands-on.cloud"
  }
}
We will use two Availability Zones, two public and two private subnets per AZ in our basic infrastructure:
module "vpc" {
  source = "terraform-aws-modules/vpc/aws"
  name = local.vpc_name
  cidr = local.vpc_cidr
  azs = ["${var.aws_region}a", "${var.aws_region}b"]
  public_subnets = [
    cidrsubnet(local.vpc_cidr, 8, 0),
    cidrsubnet(local.vpc_cidr, 8, 1)
  ]
  private_subnets = [
    cidrsubnet(local.vpc_cidr, 8, 2),
    cidrsubnet(local.vpc_cidr, 8, 3)
  ]
  enable_nat_gateway   = true
  single_nat_gateway   = true
  enable_dns_hostnames = true

  tags = merge(
    {
      Name = local.vpc_name
    },
    local.common_tags
  )
}
And finally, we’ll need some output variables, which we’ll use through Terraform state in other modules:
output "prefix" {
  value       = local.prefix
  description = "Exported common resources prefix"
}
output "common_tags" {
  value       = local.common_tags
  description = "Exported common resources tags"
}
output "vpc_id" {
  value       = module.vpc.vpc_id
  description = "VPC ID"
}
output "public_subnets" {
  value       = module.vpc.public_subnets
  description = "VPC public subnets' IDs list"
}
output "private_subnets" {
  value       = module.vpc.private_subnets
  description = "VPC private subnets' IDs list"
}
Let’s initialize Terraform in the 1_infrastructure folder:
terraform initAnd deploy VPC resources:
terraform apply --auto-approve For more in-depth information about building Amazon VPC from scratch, check the Terraform AWS VPC – Complete Tutorial article.
Creating Terraform ALB module
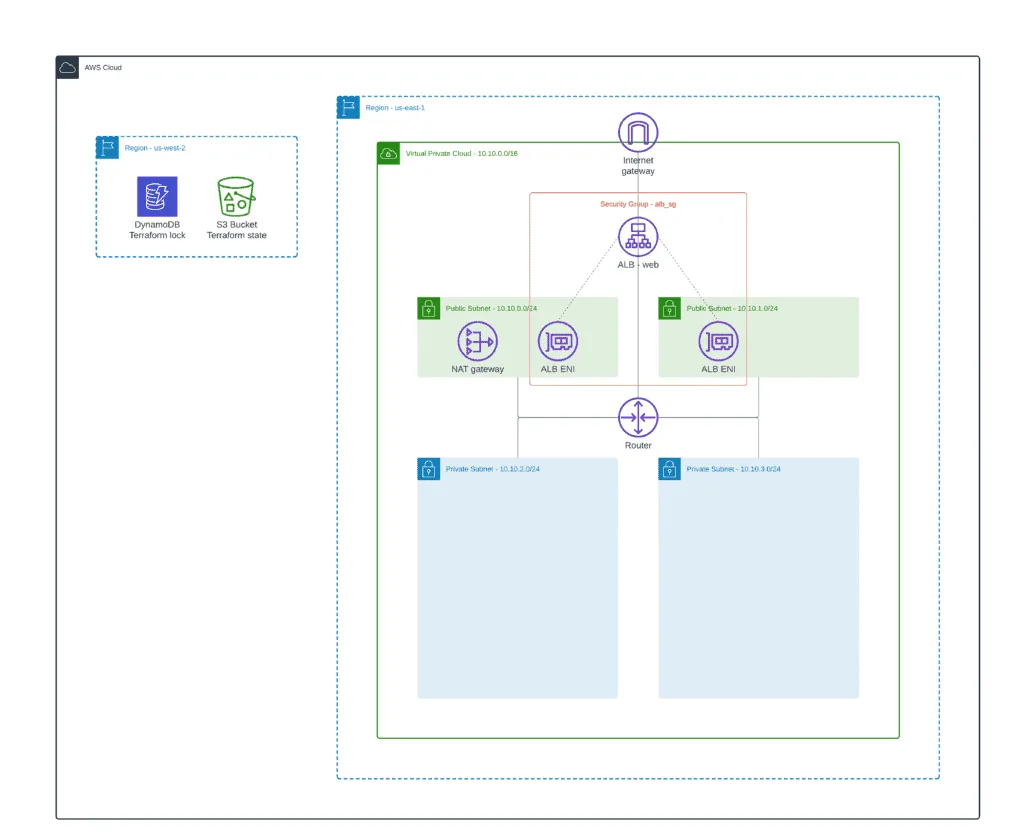
Here we will create a common publicly accessible Application Load Balancer (ALB) protected by Security Group. These resources will be shared between other modules illustrating ALB IP-based Target Group, Auto Scaling Target Group, Blue-Green deployment, and other article examples.
- Module subfolder name:
2_alb - GitHub sources: 2_alb
First of all, let’s define the module backend configuration to store its deployment state:
terraform {
  backend "s3" {
    bucket  = "hands-on-cloud-terraform-remote-state-s3"
    key     = "managing-alb-using-terraform-alb.tfstate"
    region  = "us-west-2"
    encrypt = "true"
    dynamodb_table = "hands-on-cloud-terraform-remote-state-dynamodb"
  }
}
We’ll use only one input variable here – AWS Region:
variable "aws_region" {
  default     = "us-east-1"
  description = "AWS Region to deploy VPC"
}
The main file will contain lots of local variables for handling:
- information about remote state bucket
- infrastructure module exports
The terraform_remote_state data source will help us to grab infrastructure module outputs from the infrastructure module state file stored in the S3 bucket.
locals {
  remote_state_bucket_region    = "us-west-2"
  remote_state_bucket           = "hands-on-cloud-terraform-remote-state-s3"
  infrastructure_state_file     = "managing-alb-using-terraform-infrastructure.tfstate"
  prefix          = data.terraform_remote_state.infrastructure.outputs.prefix
  common_tags     = data.terraform_remote_state.infrastructure.outputs.common_tags
  vpc_id          = data.terraform_remote_state.infrastructure.outputs.vpc_id
  public_subnets  = data.terraform_remote_state.infrastructure.outputs.public_subnets
  private_subnets = data.terraform_remote_state.infrastructure.outputs.private_subnets
}
data "terraform_remote_state" "infrastructure" {
  backend = "s3"
  config = {
    bucket = local.remote_state_bucket
    region = local.remote_state_bucket_region
    key    = local.infrastructure_state_file
  }
}
The most important part of this module is the ALB resource and Security Group definition:
# ------------ Create AWS ALB Security Group -----------
module "alb_sg" {
  source = "terraform-aws-modules/security-group/aws"
  name        = "${local.prefix}-alb-sg"
  description = "Security group for ALB"
  vpc_id      = local.vpc_id
  egress_rules = ["all-all"]
}
# ------------ Create AWS ALB -----------
resource "aws_lb" "web" {
  name            = "${local.prefix}-alb"
  subnets         = local.public_subnets
  security_groups = [module.alb_sg.security_group_id]
  tags = merge(
    {
      Name = "${local.prefix}-alb"
    },
    local.common_tags
  )
}
Note: for Security Groups management, we’re using the terraform-aws-modules/security-group/aws module.
For future reference from other modules, we need to export the following outputs:
- ALB Security Group ID
- ALB DNS name
- ALB ARN
- ALB DNS Zone ID
output "alb_security_group_id" {
  value = module.alb_sg.security_group_id
}
output "alb_dns_name" {
  value = aws_lb.web.dns_name
}
output "alb_arn" {
  value = aws_lb.web.arn
}
output "alb_dns_zone_id" {
  value = aws_lb.web.zone_id
}
You have to apply this module code after the base infrastructure module (1_infrastructure) because we’re using VPC subnets defined by that module:
terraform init
terraform apply -auto-approve
IP-based ALB Target Group
One of the most common configurations of an Application Load Balancer is the IP-based Target Group, where you define ALB targets by their IP addresses. If routable from the VPC, you can use IP addresses from another VPC or even on-premises infrastructure. In this section of the article, we’ll define ALB Listener Configuration, ALB Target Group, a couple of EC2 instances, and attach EC2 instances to the ALB Target Group using their private IPs.
- Module subfolder name:
3_ip_target_group - GitHub sources: 3_ip_target_group
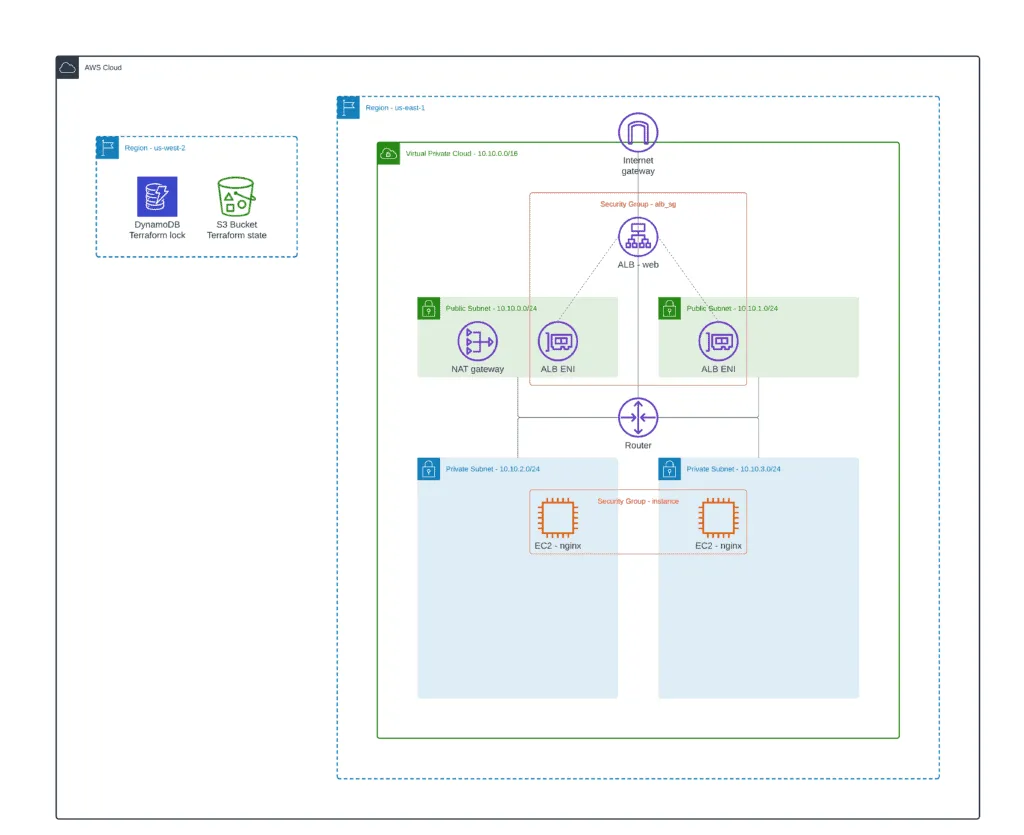
During deployment, EC2 instances will install Nginx exposing the default web page on port 80. Both EC2 instances are protected by their own Security Group, allowing traffic only from the Application Load Balancer.
Module backend configuration will be the following:
terraform {
  backend "s3" {
    bucket  = "hands-on-cloud-terraform-remote-state-s3"
    key     = "managing-alb-using-terraform-alb-ip-target-group.tfstate"
    region  = "us-west-2"
    encrypt = "true"
    dynamodb_table = "hands-on-cloud-terraform-remote-state-dynamodb"
  }
}
We need to define only one Terraform variable for this module – AWS Region:
variable "aws_region" {
  default     = "us-east-1"
  description = "AWS Region to deploy VPC"
}
Similarly to the previous module, we’ll use the following local variable to reference values from the infrastructure and ALB modules defined above:
locals {
  remote_state_bucket_region = "us-west-2"
  remote_state_bucket        = "hands-on-cloud-terraform-remote-state-s3"
  infrastructure_state_file  = "managing-alb-using-terraform-infrastructure.tfstate"
  alb_state_file             = "managing-alb-using-terraform-alb.tfstate"
  prefix          = data.terraform_remote_state.infrastructure.outputs.prefix
  common_tags     = data.terraform_remote_state.infrastructure.outputs.common_tags
  vpc_id          = data.terraform_remote_state.infrastructure.outputs.vpc_id
  public_subnets  = data.terraform_remote_state.infrastructure.outputs.public_subnets
  private_subnets = data.terraform_remote_state.infrastructure.outputs.private_subnets
}
data "terraform_remote_state" "infrastructure" {
  backend = "s3"
  config = {
    bucket = local.remote_state_bucket
    region = local.remote_state_bucket_region
    key    = local.infrastructure_state_file
  }
}
data "terraform_remote_state" "alb" {
  backend = "s3"
  config = {
    bucket = local.remote_state_bucket
    region = local.remote_state_bucket_region
    key    = local.alb_state_file
  }
}
For the testing purposes, we’ll output the ALB DNS name:
output "alb_dns_name" {
  value = data.terraform_remote_state.alb.outputs.alb_dns_name
}
As we discussed, we need a couple of EC2 instances with Nginx servers up and running which we’ll export through the ALB:
locals {
  ec2_ami               = data.aws_ami.ubuntu.id
  ec2_instance_type     = "t2.small"
  alb_security_group_id = data.terraform_remote_state.alb.outputs.alb_security_group_id
}
data "aws_ami" "ubuntu" {
  most_recent = true
  filter {
    name   = "name"
    values = ["ubuntu/images/hvm-ssd/ubuntu-*-20.04-amd64-server-*"]
  }
  filter {
    name   = "virtualization-type"
    values = ["hvm"]
  }
  owners = ["099720109477"] # Canonical
}
module "instance_sg" {
  source = "terraform-aws-modules/security-group/aws"
  name        = "${local.prefix}-nginx-sg"
  description = "Security group for nginx web servers"
  vpc_id      = local.vpc_id
  egress_rules = ["all-all"]
  ingress_with_source_security_group_id = [
    {
      rule                     = "http-80-tcp"
      source_security_group_id = local.alb_security_group_id
    }
  ]
}
resource "aws_instance" "nginx" {
  count                       = length(local.private_subnets)
  ami                         = local.ec2_ami
  instance_type               = local.ec2_instance_type
  vpc_security_group_ids      = [module.instance_sg.security_group_id]
  subnet_id                   = local.private_subnets[count.index]
  associate_public_ip_address = true
  user_data = <<EOT
#!/bin/bash
apt update -y
apt install nginx -y
systemctl enable nginx
  EOT
  tags = merge(
    {
      Name = "${local.prefix}-nginx-${count.index + 1}"
    },
    local.common_tags
  )
}
Now, it’s time to jump to the most interesting part – the Application Load Balancer Listener and Target Group configuration.
Create ALB Target Group
First of all, let’s define a couple of local variables which we’ll use during the ALB configuration:
locals {
  resource_name             = trimsuffix(substr("${local.prefix}-ip-tg", 0, 32), "-")
  alb_arn                   = data.terraform_remote_state.alb.outputs.alb_arn
  alb_sg                    = data.terraform_remote_state.alb.outputs.alb_security_group_id
}
Next, we need to create an ALB Target Group. A Target Group tells a load balancer where to direct traffic to EC2 instances, fixed IP addresses, or AWS Lambda functions. In this example, we’ll use fixed IP addresses to define the traffic destination.
resource "aws_lb_target_group" "web" {
  name     = local.resource_name
  port     = 80
  protocol = "HTTP"
  vpc_id   = local.vpc_id
  target_type = "ip"
  health_check {
    healthy_threshold   = 5
    unhealthy_threshold = 2
    timeout             = 5
    interval            = 30
  }
  tags = merge(
    {
      Name = local.resource_name
    },
    local.common_tags
  )
}Note: the most important parameter here is the target_type = "ip". Without this parameter, you’ll not be able to use IP addresses as the destination for the traffic.
Create ALB Listener
To allow the Application Load Balancer to accept the traffic defined in the ALB Listener configuration, we need to define the ALB Security Group rule that will allow HTTP traffic (TCP/80).
Note: we’re covering the HTTPS (SSL certificate and Cognito) support for ALB in a separate section of this article.
module "web_http_sg" {
  source = "terraform-aws-modules/security-group/aws"
  create_sg           = false
  security_group_id   = local.alb_sg
  ingress_cidr_blocks = ["0.0.0.0/0"]
  ingress_rules       = ["http-80-tcp"]
  egress_rules        = ["http-80-tcp"]
}
Now, it’s time to define an ALB Listener. The ALB listener allows you to specify the protocol and port that ALB should listen to for incoming traffic. ALB Listener rules defined for a Listener determine how the load balancer routes incoming traffic to registered targets. The ALB Listener configuration routes traffic to the ALB Target Group.
resource "aws_lb_listener" "web_http" {
  load_balancer_arn = local.alb_arn
  port              = 80
  protocol          = "HTTP"
  default_action {
    type             = "forward"
    target_group_arn = aws_lb_target_group.web.arn
  }
}
Create ALB Target Group Attachment
Finally, we need to add EC2 instances with Nginx to the ALB Target Group. The aws_lb_target_group_attachment resource in Terraform is responsible for registering instances and containers within an Application Load Balancer (ALB) Target Group.
resource "aws_lb_target_group_attachment" "web" {
  count            = length(aws_instance.nginx)
  target_group_arn = aws_lb_target_group.web.arn
  target_id        = aws_instance.nginx[count.index].private_ip
  port             = 80
}
Now, you can apply our module to deploy EC2 instances and define ALB configuration to the cloud.
Open the ALB’s DNS addresses in your browser, and you’ll see the default Nginx web page.

Note: as soon as we’re using shared ALB, you have to destroy the current module changes before moving forward. Use terraform destroy -auto-approve command.
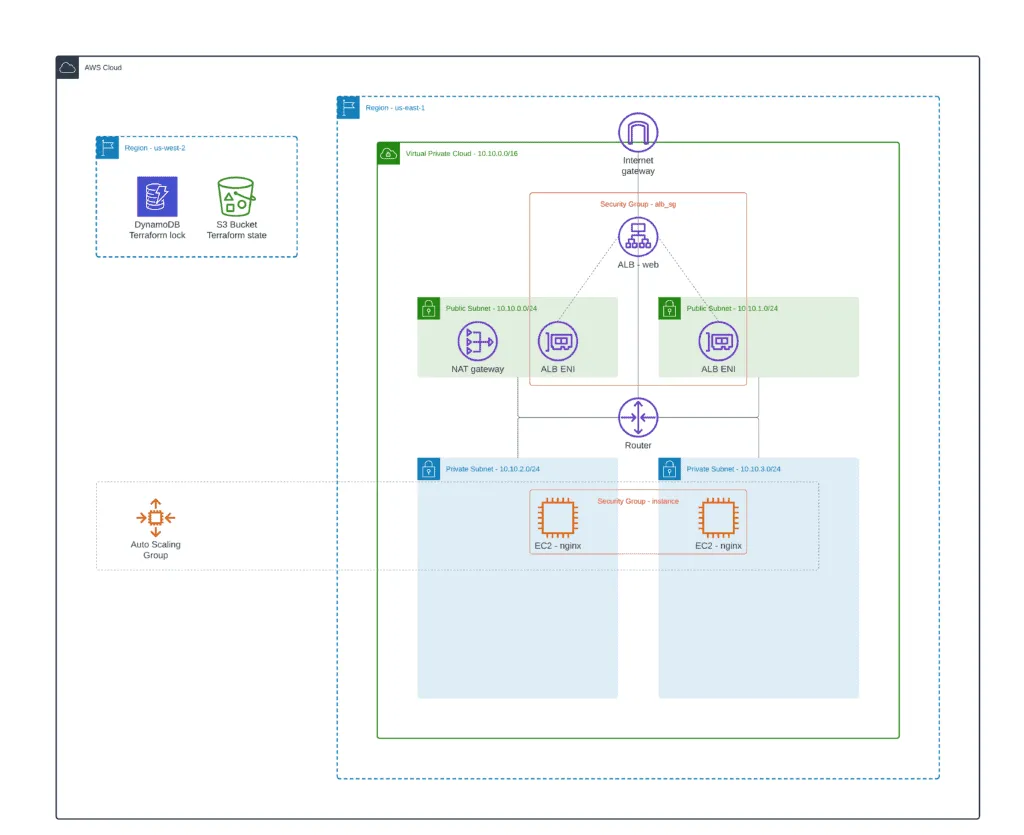
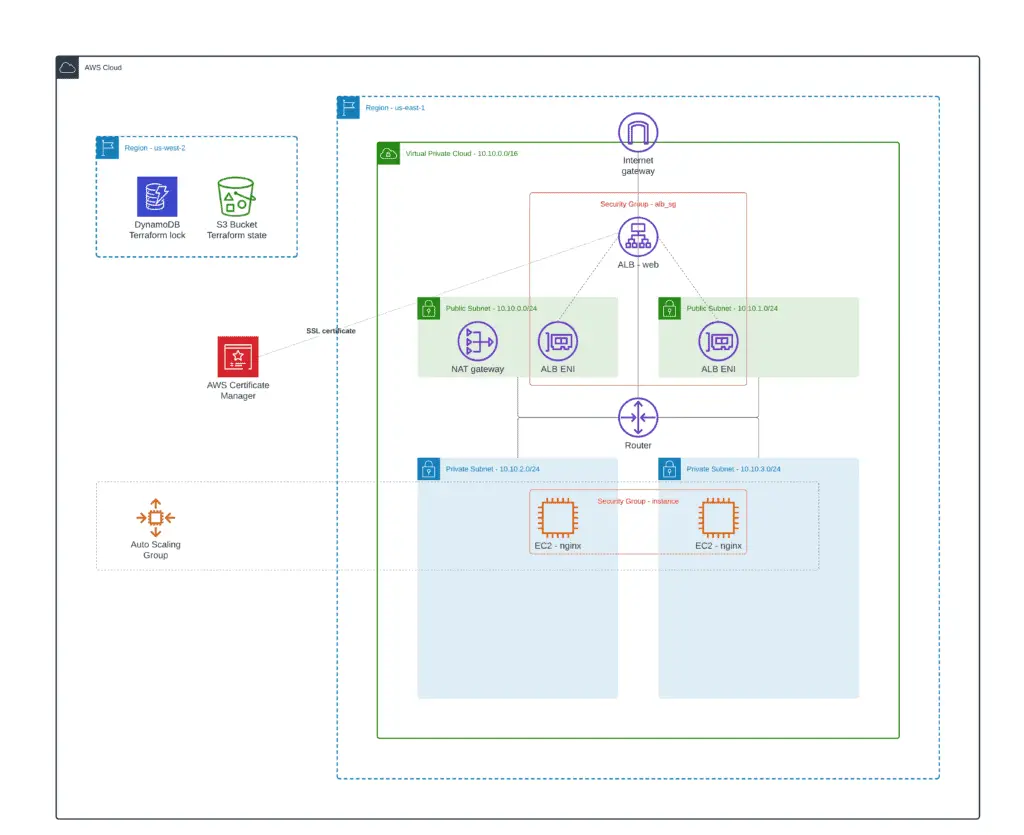
Using ALB Target Group with Auto Scaling Group
Another common use case for using AWS Application Load Balancer is attaching it to the Auto Scaling Group. Such a scenario allows you to automatically scale in and out your EC2 instances based on defined conditions to support any traffic volume from your application users. We’ll attach ALB to Auto Scaling Group in this article section.
- Module subfolder name:
4_autoscaling_target_group - GitHub sources: 4_autoscaling_target_group
As soon as the configuration is very similar to the previous one, we’ll provide only the required Terraform resources. If you need a complete code example, check out provided module location on GitHub.
Launch configuration
A Launch configuration is a template an EC2 Auto Scaling Group uses to launch EC2 instances. When you create a Launch configuration, you specify instances configuration, such as the Amazon Machine Image (AMI) ID, the instance type, a key pair, one or more security groups, and a block device mapping.
To define an Auto Scaling Group, we need to define a Launch configuration for our EC2 instances:
locals {
  ec2_ami           = data.aws_ami.ubuntu.id
  ec2_instance_type = "t2.small"
  min_instance      = 2
  max_instance      = 5
  resource_name     = trimsuffix(substr("${local.prefix}-nginx-asg", 0, 32), "-")
}
data "aws_ami" "ubuntu" {
  most_recent = true
  filter {
    name   = "name"
    values = ["ubuntu/images/hvm-ssd/ubuntu-*-20.04-amd64-server-*"]
  }
  filter {
    name   = "virtualization-type"
    values = ["hvm"]
  }
  owners = ["099720109477"] # Canonical
}
module "instance_sg" {
  source = "terraform-aws-modules/security-group/aws"
  name        = local.resource_name
  description = "Security group for nginx web servers"
  vpc_id      = local.vpc_id
  egress_rules = ["all-all"]
  ingress_with_source_security_group_id = [
    {
      rule                     = "http-80-tcp"
      source_security_group_id = local.alb_sg
    }
  ]
}
resource "aws_launch_configuration" "web" {
  name_prefix = local.resource_name
  image_id      = local.ec2_ami # ubuntu 20.04 AMI (HVM), SSD Volume Type
  instance_type = local.ec2_instance_type
  security_groups             = [module.instance_sg.security_group_id]
  associate_public_ip_address = true
  user_data = <<-EOF
#!/bin/bash
apt update
apt -y install nginx
chkconfig nginx on
service nginx start
  EOF
  lifecycle {
    create_before_destroy = true
  }
}
resource "aws_autoscaling_group" "web" {
  name = local.resource_name
  min_size         = local.min_instance
  desired_capacity = local.min_instance
  max_size         = local.max_instance
  health_check_type = "ELB"
  target_group_arns    = [aws_lb_target_group.web.arn]
  launch_configuration = aws_launch_configuration.web.name
  metrics_granularity = "1Minute"
  vpc_zone_identifier = local.public_subnets
  # Required to redeploy without an outage.
  lifecycle {
    create_before_destroy = true
  }
  tag {
    key                 = "Name"
    value               = local.resource_name
    propagate_at_launch = true
  }
}
The user_data parameter used in aws_launch_configuration resource is a special interface used by AWS for EC2 instances. Usually, this option is filled with scripted instructions to the instance, which instance will execute at the boot time. For most OSs, this is done by cloud-init.
The aws_autoscaling_group Terraform resource specifies an automatic attachment of EC2 instances defined in Launch Configuration (the launch_configuration parameter) to the ALB Target group (the target_group_arns parameter).
Auto Scaling Policies
Auto Scaling Policies allow you to add or remove EC2 instances based on specific metrics. When you configure Auto Scaling Policies, you define how to scale the capacity of your instances group in response to changing demand. Amazon EC2 Auto Scaling can then scale out your group (add more instances) to deal with high demand at peak times and scale in your group (run fewer instances) to reduce costs during periods of low utilization.
Now, we can define Auto Scaling Policies to stale EC2 instances count up and down:
locals {
  asg_name = aws_autoscaling_group.web.name
}
resource "aws_autoscaling_policy" "web_scale_out_policy" {
  name                   = "web_policy_up"
  scaling_adjustment     = 1
  adjustment_type        = "ChangeInCapacity"
  cooldown               = 300
  autoscaling_group_name = local.asg_name
}
resource "aws_cloudwatch_metric_alarm" "web_cpu_alarm_up" {
  alarm_name          = "web_cpu_alarm_up"
  comparison_operator = "GreaterThanOrEqualToThreshold"
  evaluation_periods  = "2"
  metric_name         = "CPUUtilization"
  namespace           = "AWS/EC2"
  period              = "120"
  statistic           = "Average"
  threshold           = "60"
  dimensions = {
    AutoScalingGroupName = local.asg_name
  }
  alarm_description = "This metric monitor EC2 instance CPU utilization"
  alarm_actions     = [aws_autoscaling_policy.web_scale_out_policy.arn]
}
resource "aws_autoscaling_policy" "web_scale_in_policy" {
  name                   = "web_policy_down"
  scaling_adjustment     = -1
  adjustment_type        = "ChangeInCapacity"
  cooldown               = 300
  autoscaling_group_name = local.asg_name
}
resource "aws_cloudwatch_metric_alarm" "web_cpu_alarm_down" {
  alarm_name          = "web_cpu_alarm_down"
  comparison_operator = "LessThanOrEqualToThreshold"
  evaluation_periods  = "2"
  metric_name         = "CPUUtilization"
  namespace           = "AWS/EC2"
  period              = "120"
  statistic           = "Average"
  threshold           = "10"
  dimensions = {
    AutoScalingGroupName = local.asg_name
  }
  alarm_description = "This metric monitor EC2 instance CPU utilization"
  alarm_actions     = [aws_autoscaling_policy.web_scale_in_policy.arn]
}
The aws_autoscaling_policy resource defines which Auto Scaling Group (the autoscaling_group_name parameter) to changes and how (the scaling_adjustment parameter).
The aws_cloudwatch_metric_alarm resource describes the CloudWatch metrics’ limits that trigger Auto Scaling Groups.
Path-Based Routing / Blue-Green Deployment
Path-based routing is one of the unique features offered by ALB. Path-based routing or URL-based routing allows the Application Load Balancer to forward the incoming traffic to specific targets based on the Rules configured in the Listener configuration.
In this article section, we’ll use two Auto Scaling Groups of EC2 instances (blue and green versions of your application) and define the ALB Listener configuration to forward a portion of the incoming traffic to each environment.
- Module subfolder name:
5_blue_green_deployment - GitHub sources: 5_blue_green_deployment

As soon as the configuration is very similar to the previous one, we’ll provide only the required Terraform resources. If you need a complete code example, check out provided module location on GitHub.
As soon as you’ve defined Auto Scaling Groups for your blue and green environment, you need to adjust the ALB Listener configuration and define traffic volume to each Target Group.
resource "aws_lb_listener" "web_http" {
  load_balancer_arn = local.alb_arn
  port              = 80
  protocol          = "HTTP"
  default_action {
    type = "forward"
    forward {
      target_group {
        arn    = aws_lb_target_group.blue.arn
        weight = 50
      }
      target_group {
        arn    = aws_lb_target_group.green.arn
        weight = 50
      }
    }
  }
}
In the provided example, we split 50% of the incoming traffic to each environment equally. Now, you can parameterize weights using Terraform variables and execute the module several times, gradually shifting traffic to either blue or green environment.
Manage custom ALB Listener rules
The ALB Listener rules define how the load balancer routes request to the targets to one or more target groups. Each rule consists of a priority, one or more actions, and conditions. Each rule must include exactly one of the following actions forward, redirect, or fixed-response, and it must be the last action to be performed. Each rule can include zero or one of the following conditions:
- Host header
- HTTP request method
- Path pattern
- HTTP query string
To create an ALB Listener Rule using Terraform, you need to use one or more aws_lb_listener_rule resources defined in the following way:
resource "aws_lb_listener_rule" "rule_example" {
  listener_arn = local.alb_arn
  priority     = 100
  action {
    type             = "forward"
    target_group_arn = local.alb_target_group_id
  }
  condition {
    path_pattern {
      values = ["/ip/*"]
    }
  }
}
ALB Listener Rules allow you to define fine-grained traffic forwarding rules for almost any use case required by your application.
Sending ALB access logs to S3
Elastic Load Balancing provides access logs that capture detailed information about requests sent to your load balancer. Each log entry contains information such as when the request was received, the client’s IP address, latencies, request paths, and server responses. You can use these access logs to analyze traffic patterns and troubleshoot your application issues.
Access logging is an optional feature of Elastic Load Balancing that is disabled by default. After enabling access logging for your load balancer, Elastic Load Balancing captures the logs and stores them in the Amazon S3 bucket you specify as compressed files. You can disable access logging at any time.
- Module subfolder name:
6_access_logging - GitHub sources: 6_access_logging
We can use an existing terraform module to provision an S3 bucket with a built-in IAM policy to allow AWS Load Balancers to ship access logs:
module "s3_bucket" {
  source = "cloudposse/lb-s3-bucket/aws"
  name                     = local.resource_name
  access_log_bucket_name   = local.resource_name
  access_log_bucket_prefix = local.resource_name
  force_destroy            = true
}
Input Variables
access_log_bucket_name– the name of the S3 bucket to which ALB will send access logs.access_log_bucket_prefix– prefix to prepend to the S3 bucket nameforce_destroy– a boolean flag that allows the bucket to be destroyed even if it contains objects. These objects are not recoverable.name– the name of the S3 bucket
To enable the ALB access logging to the S3 bucket, you need to use the access_logs parameter in the aws_lb resource:
resource "aws_lb" "web" {
  name            = "${local.prefix}-alb"
  subnets         = local.public_subnets
  security_groups = [module.alb_sg.security_group_id]
  idle_timeout    = 400
  access_logs {
    bucket  = data.terraform_remote_state.alb_access_logging.access_log_s3_id
    prefix  = "${local.prefix}-logs" # where alb logs will be stored
    enabled = true
  }
  tags = merge(
    {
      Name = "${local.prefix}-alb"
    },
    local.common_tags
  )
}
Handling HTTPS traffic (SSL / AWS Certificates Manager)
We can create an HTTPS listener to terminate SSL traffic on the ALB and encrypt your application clients’ connections. This feature enables traffic encryption between your load balancer and the clients which initiate SSL or TLS sessions.
- Module subfolder name:
7_https_listener - GitHub sources: 7_https_listener
Create SSL certificate
To use an HTTPS listener, you must define at least one SSL/TLS server certificate for your load balancer. The load balancer uses a server certificate to terminate the front-end connection and decrypt client requests before sending them to the targets. We can create an SSL certificate using AWS Certificate Manager (ACM).
Here’s an example of defining and automatically validating an SSL certificate using ACM and Route53:
locals {
  domain_name = "demo.hands-on-cloud.com"
  alt_name    = ["*.demo.hands-on-cloud.com"]
}
resource "aws_acm_certificate" "my_domain" {
  domain_name               = local.domain_name
  subject_alternative_names = local.alt_name
  validation_method         = "DNS"
  tags = {
    Environment = "test"
  }
  lifecycle {
    create_before_destroy = true
  }
}
data "aws_route53_zone" "my_domain" {
  name         = local.domain_name
  private_zone = false
}
resource "aws_route53_record" "my_domain" {
  for_each = {
  for dvo in aws_acm_certificate.my_domain.domain_validation_options : dvo.domain_name => {
    name   = dvo.resource_record_name
    record = dvo.resource_record_value
    type   = dvo.resource_record_type
  }
  }
  allow_overwrite = true
  name            = each.value.name
  records         = [each.value.record]
  ttl             = 60
  type            = each.value.type
  zone_id         = data.aws_route53_zone.my_domain.zone_id
}
resource "aws_acm_certificate_validation" "my_domain" {
  certificate_arn         = aws_acm_certificate.my_domain.arn
  validation_record_fqdns = [for record in aws_route53_record.my_domain : record.fqdn]
}
Alternatively, ACM allows you to import SSL certificates. Of course, you need to buy an SSL certificate from a trusted authority.
Create an HTTPS listener
After defining the SSL certificate, we can move to the HTTPS listener for our load balancer. Also, we need not forget to allow port 443 in the ALB’s Security Group.
# ------- ALB Security Group Rule --------
module "web_http_sg" {
  source = "terraform-aws-modules/security-group/aws"
  create_sg           = false
  security_group_id   = local.alb_sg
  ingress_cidr_blocks = ["0.0.0.0/0"]
  ingress_rules       = [
    "http-80-tcp",
    "https-443-tcp"
  ]
  egress_rules        = ["http-80-tcp"]
}
# ------- ALB HTTP Listener --------
resource "aws_lb_listener" "web_http" {
  load_balancer_arn = local.alb_arn
  port              = 80
  protocol          = "HTTP"
  default_action {
    type = "redirect"
    redirect {
      port        = "443"
      protocol    = "HTTPS"
      status_code = "HTTP_301"
    }
  }
}
# ------- ALB HTTPS Listener --------
resource "aws_lb_listener" "web_https" {
  load_balancer_arn = local.alb_arn
  port              = 443
  protocol          = "HTTPS"
  certificate_arn = aws_acm_certificate_validation.my_domain.certificate_arn
  default_action {
    type             = "forward"
    target_group_arn = aws_lb_target_group.web.arn
  }
}
The web_http ALB Listener resource accepts HTTP connections to the ALB and automatically redirects them to the HTTPS connection endpoint. We’re enforcing HTTPS connections for our ALB here.
Integration with AWS Cognito
Amazon Cognito lets you add user sign-up, sign-in, and access control to your web and mobile apps quickly and easily. Amazon Cognito scales to millions of users and supports sign-in with social identity providers, such as Apple, Facebook, Google, Amazon, and enterprise identity providers via SAML 2.0 and OpenID Connect.
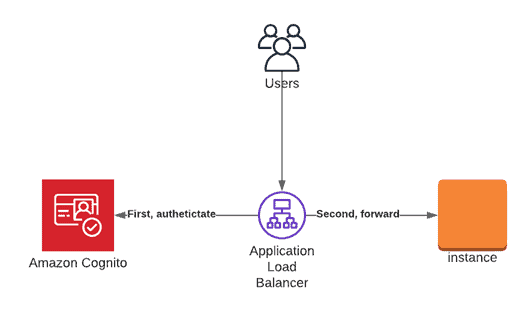
Amazon Cognito enables simple, secure user authentication, authorization, and user management for web and mobile apps. With Cognito, a user or visitor can sign in with a username and password through Amazon or a third party like Facebook, Google, or Apple.
Let’s extend our Application Load Balancer HTTPS configuration with AWS Cognito Authentication:
- Module subfolder name:
8_integration_with_cognito - GitHub sources: 8_integration_with_cognito
Create Cognito User Pool
We’ll use an existing Terraform module to create a Cognito User Pool. Then it will create a listener rule that is configured for Cognito authentication.
module "cognito" {
  source = "git::https://www.github.com/rhythmictech/terraform-aws-elb-cognito-auth?ref=v0.1.1"
  name                = local.user_pool_domain
  callback_urls       = local.callback_urls
  listener_arn        = local.https_listener_arn
  target_group_arn    = local.target_group_arn
  user_pool_domain    = local.user_pool_domain
  create_cognito_pool = true
}
After running terraform apply, go to the Cognito service, and you will see a newly created user pool named managing-alb-using-terraform-user-pool. If you’d like to use an existing user pool, set the create_cognito_pool parameter to false.

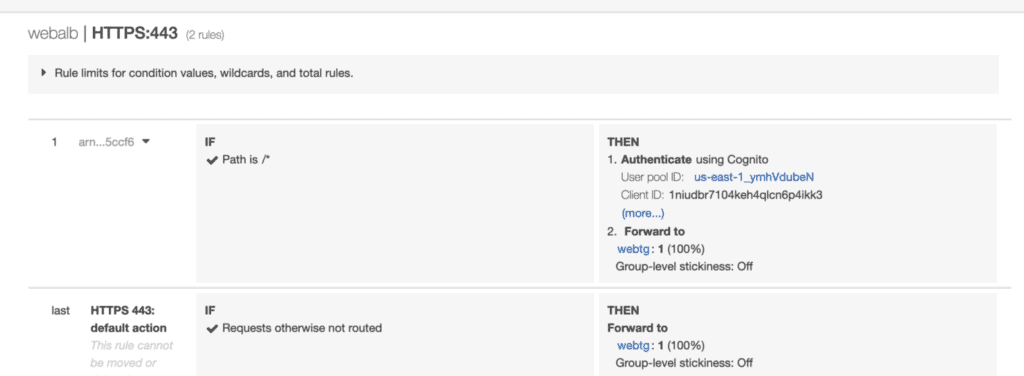
You can also check the load balancer’s HTTPS listener rule to see the new Authenticate action added to the first rule before existing Forward to action:
Sign up a new user
Open the load balancer’s DNS name in the browser, and you should be redirected to the authentication page from Amazon Cognito:

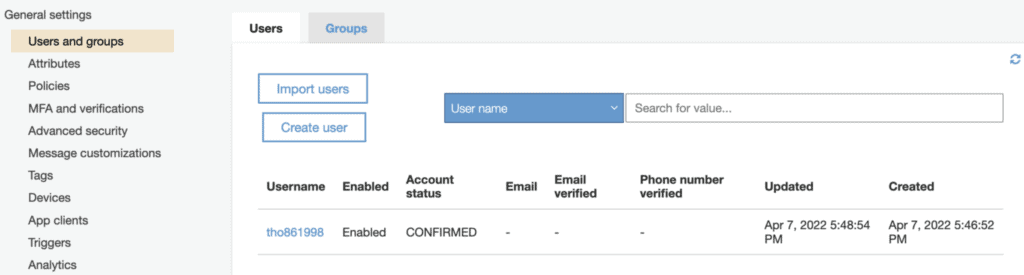
Create a new user at Cognito User Pool to access this web page (you have to confirm the created users on Cognito manually).
After you confirm the user, you now have access to the web page:

Integration with Lambda
AWS Lambda is a serverless compute service that runs your code in response to events and automatically manages the underlying compute resources. Lambda is an excellent feature from AWS to host your source code without worrying about setting up server infrastructure. It is also scalable and production-grade, so you do not need to worry about making your application production-ready. Simply write your code, deploy it as a service, and share the public URL.
- Module subfolder name:
9_integration_with_lambda - GitHub sources: 9_integration_with_lambda
Lambda function
Let’s develop a simple Lambda function that will return a JSON object with a randomly generated password:
import json
import random
import string
import random
import string
import re
def lambda_handler(event, context):
    max = 8
    password = ''.join(random.choices(string.ascii_lowercase+string.ascii_uppercase, k=max))
    mandatory = ''.join(''.join(random.choices(choice)) for choice in [string.ascii_lowercase, string.ascii_uppercase, "_@", string.digits])
    password_list = list(password+mandatory)
    random.shuffle(password_list)
    while re.match("^[0-9]|@|_",''.join(list(password_list))) != None:
        random.shuffle(password_list)
        password_list=list(password+mandatory)
    response_json = {
        'password': ''.join(password_list)
    }
    return {
        'statusCode': 200,
        'statusDescription': '200 OK',
        'isBase64Encoded': False,
        'headers': {
            'Content-Type': 'application/json'
        },
        'body': json.dumps(response_json)
    }
To deploy this Lambda function using Terraform, you need to define several resources, that will create the required function role, policy, CloudWatch Log Group, archive the function code, and deploy it to the cloud:
locals {
  lambda_source_dir = "${path.module}/lambdas/password_generator"
  lambda_archive    = "${path.module}/lambdas/password_generator.zip"
}
# Data resource to archive Lambda function code
data "archive_file" "lambda_zip" {
  source_dir  = local.lambda_source_dir
  output_path = local.lambda_archive
  type        = "zip"
}
# Lambda function policy
resource "aws_iam_policy" "lambda_policy" {
  name        = "${local.prefix}-lambda-policy"
  description = "${local.prefix}-lambda-policy"
  policy = <<EOF
{
  "Version": "2012-10-17",
  "Statement": [
    {
      "Action": [
        "logs:CreateLogGroup",
        "logs:CreateLogStream",
        "logs:PutLogEvents"
      ],
      "Effect": "Allow",
      "Resource": "*"
    }
  ]
}
EOF
}
# Lambda function role
resource "aws_iam_role" "iam_for_terraform_lambda" {
  name = "${local.prefix}-lambda-role"
  assume_role_policy = <<EOF
{
  "Version": "2012-10-17",
  "Statement": [
    {
      "Action": "sts:AssumeRole",
      "Principal": {
        "Service": "lambda.amazonaws.com"
      },
      "Effect": "Allow"
    }
  ]
}
EOF
}
# Role to Policy attachment
resource "aws_iam_role_policy_attachment" "terraform_lambda_iam_policy_basic_execution" {
  role = aws_iam_role.iam_for_terraform_lambda.id
  policy_arn = aws_iam_policy.lambda_policy.arn
}
# Lambda function declaration
resource "aws_lambda_function" "password_generator" {
  filename = local.lambda_archive
  source_code_hash = data.archive_file.lambda_zip.output_base64sha256
  function_name = "${local.prefix}-lambda"
  role = aws_iam_role.iam_for_terraform_lambda.arn
  handler = "index.lambda_handler"
  runtime = "python3.9"
}
# CloudWatch Log Group for the Lambda function
resource "aws_cloudwatch_log_group" "lambda_loggroup" {
  name = "/aws/lambda/${aws_lambda_function.password_generator.function_name}"
  retention_in_days = 14
}
Target Group for Lambda Function
AWS Lambda function can be a part of ALB Target Groups. So, let’s integrate our Lambda function with the ALB:
resource "aws_lb_target_group" "lambda" {
  name        = local.resource_name
  target_type = "lambda"
  tags = merge(
    {
      Name = local.resource_name
    },
    local.common_tags
  )
}
resource "aws_lambda_permission" "alb" {
  statement_id  = "AllowExecutionFromALB"
  action        = "lambda:InvokeFunction"
  function_name = aws_lambda_function.password_generator.arn
  principal     = "elasticloadbalancing.amazonaws.com"
  source_arn    = aws_lb_target_group.lambda.arn
}
resource "aws_lb_target_group_attachment" "alb" {
  target_group_arn = aws_lb_target_group.lambda.arn
  target_id        = aws_lambda_function.password_generator.arn
  depends_on       = [aws_lambda_permission.alb]
}
Test the URL
We can access the ALB URL using the curl command-line tool:
$ curl https://demo.hands-on-cloud.com
{"password": "uyO_5QZeaaol"}
Integration with AWS Web Application Firewall (WAF)
AWS WAF is a web application firewall that helps protect your web applications or APIs against common web exploits and bots that may affect availability, compromise security, or consume excessive resources. AWS WAF gives you control over how traffic reaches your applications by enabling you to create security rules that control bot traffic and block common attack patterns, such as SQL injection or cross-site scripting. So, the last use case we’d like to cover in this article is how to integrate the Application Load Balancer with AWS Web Application Firewall (WAF).
- Module subfolder name:
10_waf_integration - GitHub sources: 10_waf_integration
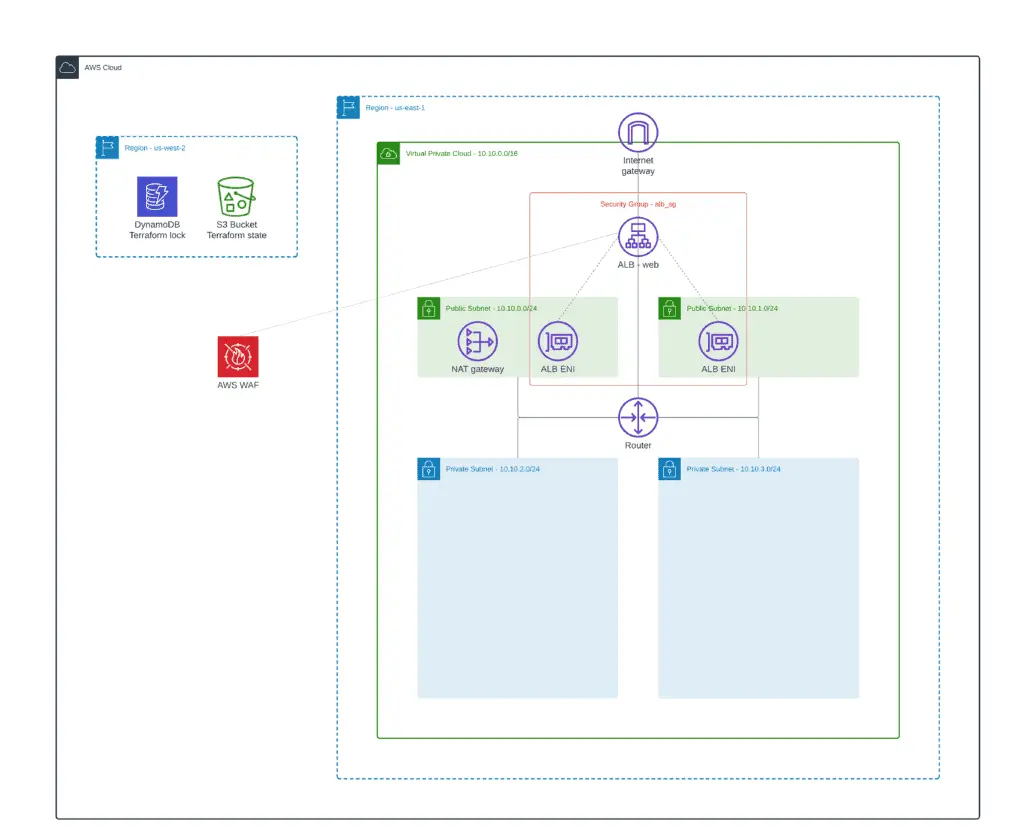
To make the integration happen, we’ll use the existing module for managing WAF using Terraform. For demo purposes, we’ll define just a couple of WAF rules. Check out a complete module example if you’re interested in other examples:
module "label" {
  source = "cloudposse/label/null"
  namespace = "eg"
  stage     = "prod"
  name      = "waf"
  delimiter = "-"
  tags = {
    "BusinessUnit" = "XYZ",
  }
}
module "waf" {
  source = "cloudposse/waf/aws"
  geo_match_statement_rules = [
    {
      name     = "rule-11"
      action   = "allow"
      priority = 11
      statement = {
        country_codes = ["US"]
      }
      visibility_config = {
        cloudwatch_metrics_enabled = true
        sampled_requests_enabled   = false
        metric_name                = "rule-11-metric"
      }
    }
  ]
  managed_rule_group_statement_rules = [
    {
      name            = "rule-20"
      override_action = "count"
      priority        = 20
      statement = {
        name        = "AWSManagedRulesCommonRuleSet"
        vendor_name = "AWS"
        excluded_rule = [
          "SizeRestrictions_QUERYSTRING",
          "NoUserAgent_HEADER"
        ]
      }
      visibility_config = {
        cloudwatch_metrics_enabled = false
        sampled_requests_enabled   = false
        metric_name                = "rule-20-metric"
      }
    }
  ]
  xss_match_statement_rules = [
    {
      name     = "rule-60"
      action   = "block"
      priority = 60
      statement = {
        field_to_match = {
          uri_path = {}
        }
        text_transformation = [
          {
            type     = "URL_DECODE"
            priority = 1
          },
          {
            type     = "HTML_ENTITY_DECODE"
            priority = 2
          }
        ]
      }
      visibility_config = {
        cloudwatch_metrics_enabled = false
        sampled_requests_enabled   = false
        metric_name                = "rule-60-metric"
      }
    }
  ]
  context = module.label.context
}
resource "aws_wafv2_web_acl_association" "example" {
  resource_arn = local.alb_arn
  web_acl_arn  = module.waf.arn
}
The aws_wafv2_web_acl_association resource attaches AWS WAF ACL created by the module to the Application Load Balancer.
Integration with Amazon CloudFront
You may need to use Amazon CloudFront with Application Load Balancer (ALB) to improve the performance and scalability of your site. CloudFront is a content delivery network (CDN) that helps speed up the delivery of static content, such as images, videos, and HTML files, from the origin server to end users. By pairing CloudFront with ALB, you can ensure that users receive content quickly and reliably regardless of location. CloudFront and AWS WAF also help protect your web application from malicious attacks by providing an additional layer of security around your origin servers.
For an example of Terraform ALB CloudFront integration, check the CloudFront Terraform examples – Easy AWS automation article.
Summary
This article covered how to create ALB using Terraform and manage its routing and rules. It also demonstrated Cognito, AWS Lambda, and AWS WAF integration.
