Easy Google Cloud Storage Python Tutorial
Google Cloud Storage is a reliable and highly scalable object storage service that provides an easy way to store and access data on the Google Cloud Platform. It allows the storage of objects of any size, ranging up to terabytes and petabytes, without any scalability or latency issues. Further, we can integrate storage into applications with a single, unified API. This object storage platform provides the same level of functionality as Amazon S3 or Azure Blob Storage.
In conjunction with Google Cloud Storage (GCS), Python offers several advantages, such as the ability to access and use powerful data-oriented tools, such as Pandas, NumPy, SciPy, and gspread. These tools allow us to store, retrieve and analyze large volumes of data from the cloud without any performance issues. These tools allow us to utilize GCS for various applications, from data analytics and Machine Learning to data science.
This article will explore how to work with Google Cloud Storage using Python.
Understanding the Different Storage Classes on GCP
There are various storage classes on GCP, each with unique features and benefits. Some examples include:
- Coldline: This storage is for storing data that is not accessed very often, such as used once a month, e.g., archiving Data
- NearLine: This storage is a lower-cost option for storing data that is not accessed as frequently. e.g hourly retrieval
- Regional (Standard): This stores data in a specific region. It offers high durability and high availability.
- Multi-Regional (Standard): It is for hot data optimized for geo-redundancy and the lowest end-user latency.
When you create buckets on Cloud Storage, the choice of storage class is based on the specific needs and the trade-off between cost and performance.
For this tutorial, I will use the regional storage class with the local “US-EAST1” region, as this is eligible for free pricing.
Exploring the Usage Pricing
GCP offers four different storage classes for your buckets, and each of these storage classes is priced a little differently. Data that is accessed frequently will go to Multi-Regional or Regional Storage. Data that is accessed less often will go to Nearline or Coldline.
Depending on the kind of bucket you set up on Cloud Storage, you might also be charged extra for retrieval and early deletion. This is especially true for your archival storage buckets, such as Nearline and Coldline buckets. The GCP also charges additional for the operations you’ll perform, uploading and downloading objects, moving objects, deleting, and so on. And over and above all these, you’ll have to pay charges for network usage. There are typically no charges for ingress traffic. There are charges for egress traffic.
Additionally, GCP also provides a fairly generous free tier option as well. There are no charges if you’re below this free tier limit. You can learn more about pricing here.
Methods for Interacting with GCP Cloud Storage
There are several methods available for interacting with google cloud storage API, such as:
- Cloud Console: Offers a web-based interface for managing data in a browser
- Client Libraries: Allows users to access and manipulate data using a preferred programming language
- Command line: Enables interaction with Cloud Storage via the terminal using a command-line interface e.g., gsutil
- REST APIs: Enables interaction with Cloud Storage via the terminal using a command-line interface
Creating a Google Cloud account and project
Setup GCP project
To start with Google Cloud Storage python, we must use an existing project or create a new one on the Google Cloud Console(GCP). In case you don’t have your own Google account, you can sign up for it now using our fantastic offer (Receive $350 in free credits and free usage of 20+ products on Google Cloud):

Sign up today to receive $350 in free credits and free usage of 20+ products on Google Cloud
Create a new project
Once you have an active GCP account, you can create a new project.
On the main screen of the Google Cloud Platform Console, find “Select a project” by going to the projects menu at the top of the page. Expand the list of all active projects and then click on the option to create a “New Project.”
When the “New Project” creation window appears, enter a meaningful name in the Project name field. We’ll use “HandsOnCloudStoragePythonDemo” as the project name, something you can easily associate with this how-to article.
Enable Cloud Storage API
Now we have to enable the Cloud Storage API for our project because this is the core API with the necessary functionalities to manipulate the Google Cloud Storage bucket.
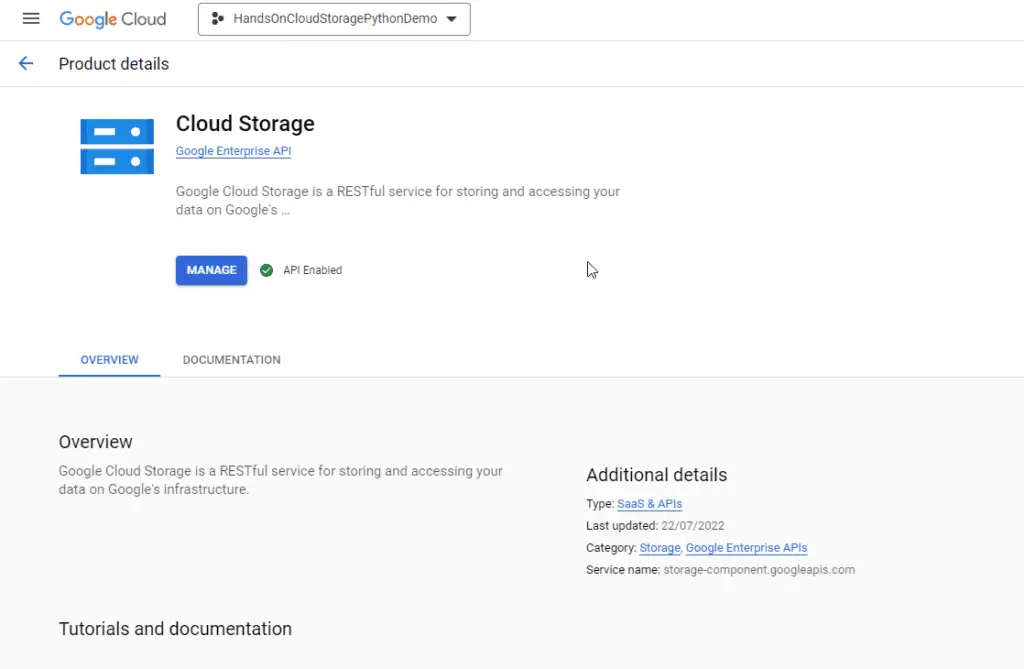
At the top of the screen, use the search engine to find “Cloud Storage” in the marketplace section. Make sure to enable the API.
Creating Google Service Account
Now we need to create a Service Account in the project. This will allow our libraries to interact with cloud APIs on behalf of our account users.
There’re two steps involved in the process:
- Create a Service account (create credentials)
- Create a key for the Service account
To achieve this goal, use the left-side navigation pane and select APIs and Services -> Credentials menu.
Create credentials for the Service account. This is a special account used for application-level authentication from your scripts or backend applications.
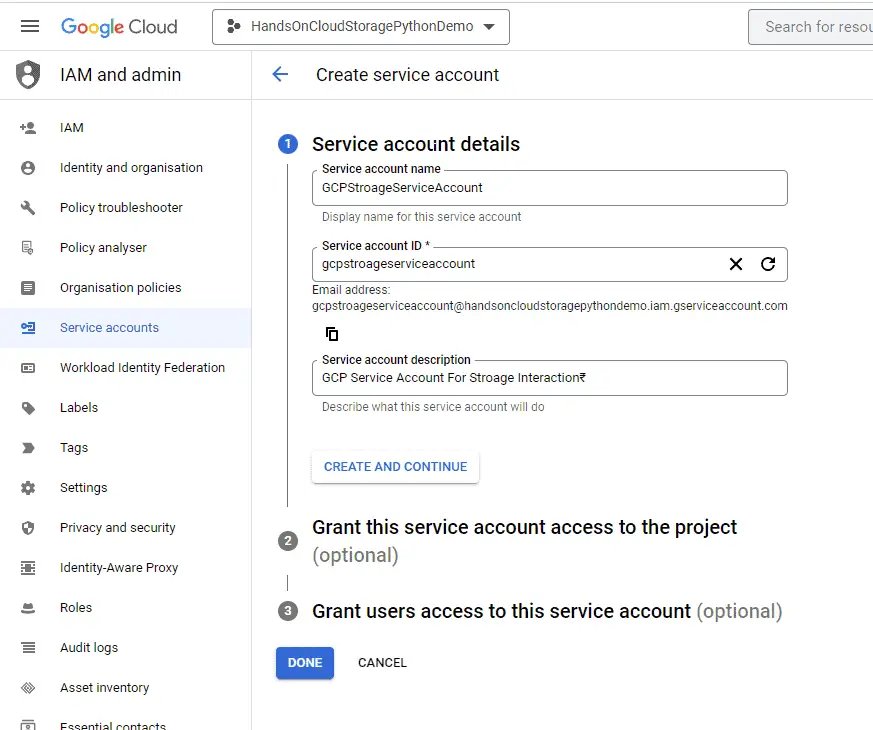
Fill in Service account details:
- Service account name – the name of the Service account (login), for example, GCPStroageServiceAccount.
- Service account ID – Google will generate it based on your input in the previous field. Usually, there’s no need to change anything here.
- Service account description – Type something meaningful not to forget the purpose of this Service account.
Next, we need to grant Service account access to our project. Select Editor. This role will provide the required permission to interact with the account resources.
The last step is optional, so we click the Done button.
Generating a Service Key
At this step, we need to create an API key for the Service Account, which we’ll be using in our python code to interact with Google Cloud APIs on behalf of our service accounts.
Click on the Service account button to configure it.
Now we go to the Keys tab and select “Add key -> Create new key“.
Choose the JSON key type, and then click on the CREATE button to save the file with the key.
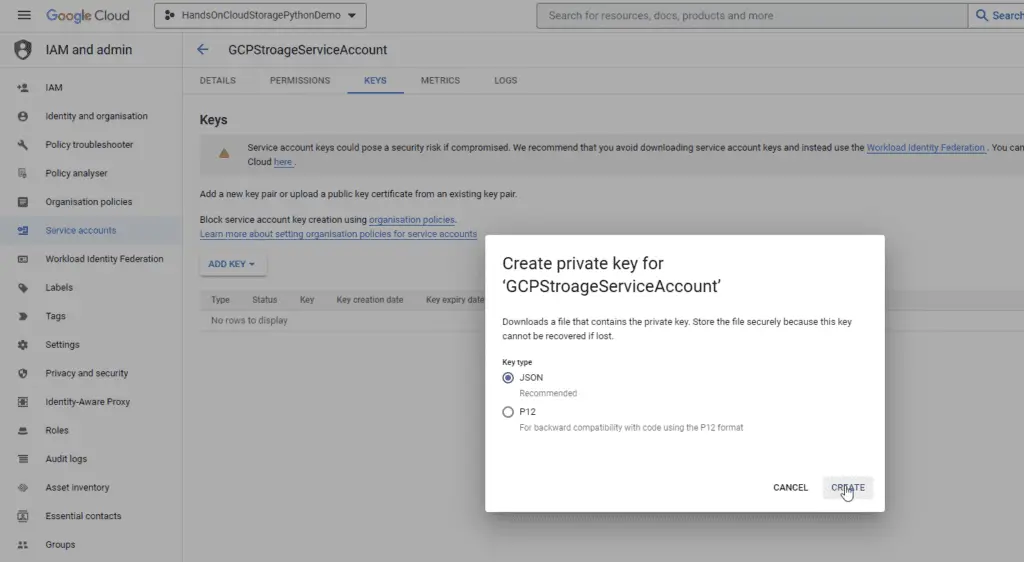
The downloaded key file needs to be moved to the same folder where the example Python script will be created.
How do I install cloud storage Python SDK?
Before starting, it’s crucial to ensure that all necessary system dependencies are properly installed. These dependencies may include libraries or frameworks that the library requires to work efficiently. The Google Cloud Storage library may not function properly without these installed system dependencies.
Install Client Library
The google-cloud-storage package is the official Google Python package for interacting with google cloud storage API. This API is compatible with all currently supported Python versions. However, the recommended minimum supported python version is Python >= 3.7. I recommend updating to an actively supported version of Python if you currently use an end-of-life-supported version.
Let’s install the necessary client libraries to connect our application to Google Cloud. The most common way of installing these dependencies is by using the pip command as shown below:
pip install google-cloud-storageAlternatively, sometimes it is a good idea to create isolated Python environments for projects as this will help to ensure a clean development environment. To create isolated Python environments, you can use tools like virtualenv or pyenv. These tools allow you to easily create a new environment, activate it, and install the necessary client libraries for your project using pip.
Once the library is installed, we will be ready to start using the storage API in our Python code
Managing Files in a GCP Bucket
How to Create Google Cloud Storage Bucket using Python?
To create a new bucket, we can use the following code example:
from google.cloud import storage
def create_bucket(bucket_name):
# Create a client for interacting with the GCP Storage API, using the ServiceAccount key file
client = storage.Client.from_service_account_json('/path/to/service/account/key.json')
# Creates the new bucket
bucket = client.create_bucket(bucket_name, location='US-EAST1')
print(f"Bucket {bucket.name} created.")
if __name__ == "__main__":
# The name for the new bucket
bucket_name = "handsoncloud-new-bucket"
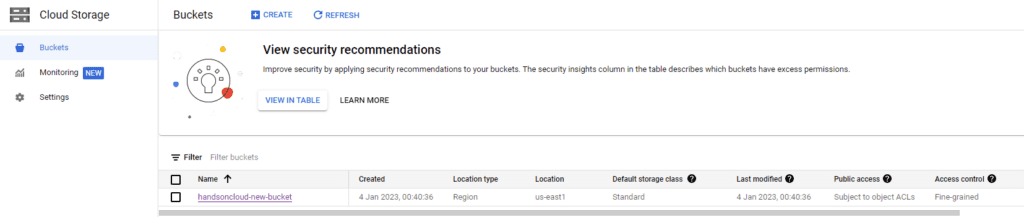
create_bucket(bucket_name)The above code samples define a function called create_bucket() that takes a bucket name as an argument. After, the function authenticates the connection to GCP using a service account key file and then calls the client.create_bucket() method to create the bucket. When the code is run, the create_bucket() function is called with a specific bucket name and location as ‘US-EAST1’.
Here’s an example output:
> python .\createBucket.py
Bucket handsoncloud-new-bucket created.
As we can see, a new bucket has been created with the specified name on object storage.
How to upload a file to Google Cloud Storage using Python?
To upload a file in the existing bucket, we can use the following code example:
# Imports the Google Cloud client library & Install Google Cloud Storage
from google.cloud import storage
def upload_file(bucket_name):
    # Create a client for interacting with the GCP Storage API, using the ServiceAccount key file
    client = storage.Client.from_service_account_json('handsoncloudstoragepythondemo-fc0192d7ccc9.json')
    # Create a bucket object
    bucket = client.bucket(bucket_name)
    # Set the name of the file you want to upload
    file_name = 'my-file.txt'
    # Create a blob object from the file
    blob = bucket.blob(file_name)
    # Read the contents of the file
    with open(file_name, 'rb') as f:
        contents = f.read()
    # Upload the file to the bucket
    blob.upload_from_string(contents)
    print(f'File {file_name} uploaded to {blob.public_url}')
if __name__ == "__main__":
    # The name for the new bucket
    bucket_name = "handsoncloud-new-bucket"

    upload_file(bucket_name)
Here’s an example output after running the following command :
> python .\uploadfile.py
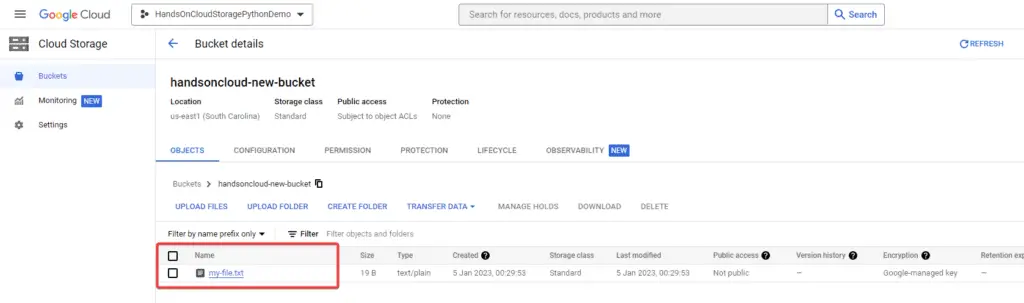
File my-file.txt uploaded to https://storage.googleapis.com/handsoncloud-new-bucket/my-file.txtIn Google Console, the bucket has been updated with the new file.
How to rename a file to Google Cloud Storage using Python?
To rename a file in an existing bucket, we can use the following code example:
from google.cloud import storage
def rename_file(bucket_name):
    # Create a client for interacting with the GCP Storage API, using the ServiceAccount key file
    client = storage.Client.from_service_account_json('handsoncloudstoragepythondemo-fc0192d7ccc9.json')
    # Create a bucket object
    bucket = client.bucket(bucket_name)
    # Set the name of the file you want to rename
    file_name = 'my-file.txt'
    # Set the new name of the file
    new_file_name = 'my-new-file.txt'
    # Create a blob object from the file
    blob = bucket.blob(file_name)
    # Rename the file
    bucket.rename_blob(blob, new_file_name)
    print(f'File {file_name} renamed to {new_file_name}.')
if __name__ == "__main__":
    # The name for the new bucket
    bucket_name = "handsoncloud-new-bucket"

    rename_file(bucket_name)
Here’s an example output:
> python .\renameFile.py
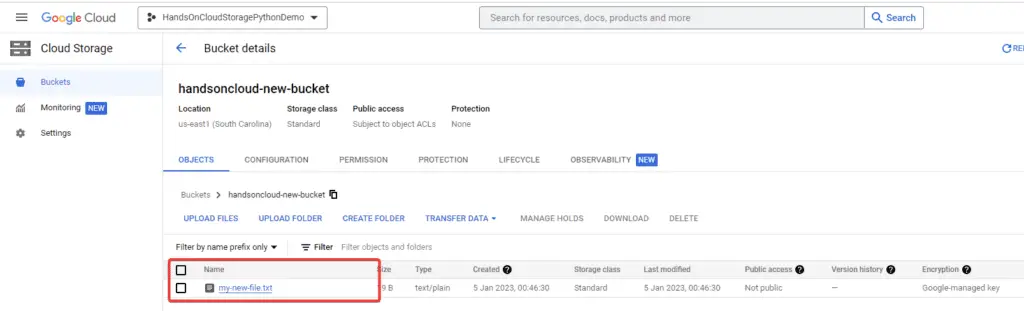
File my-file.txt renamed to my-new-file.txt.As we can see, the bucket has been updated with the new name.
How to update File Metadata using Python?
Similarly, to update the metadata of the existing file, we can use the following code :
# Imports the Google Cloud client library & Install Google Cloud Storage
from google.cloud import storage
def change_metadata(bucket_name):
# Create a client for interacting with the GCP Storage API, using the ServiceAccount key file
client = storage.Client.from_service_account_json('handsoncloudstoragepythondemo-fc0192d7ccc9.json')
# Create a bucket object
bucket = client.bucket(bucket_name)
# Set the name of the file you want to upload
file_name = 'my-file.txt'
# Create a blob object from the file
blob = bucket.blob(file_name)
# Set the metadata for the file
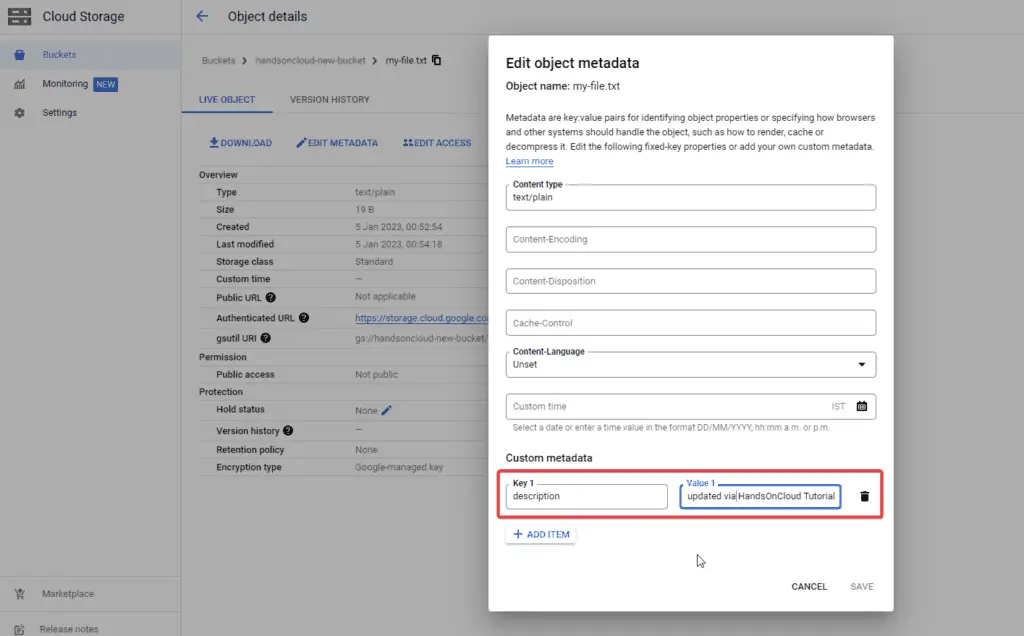
metadata = {'description': 'This file metadata is updated via HandsOnCloud Tutorial'}
blob.metadata = metadata
# Update the file with the new metadata
blob.patch()
print(f'Metadata for file {file_name} updated.')
if __name__ == "__main__":
# The name for the new bucket
bucket_name = "handsoncloud-new-bucket"
change_metadata(bucket_name)Here’s an example output:
> python .\changeMetadata.py
Metadata for file my-file.txt updated.
As we can see, the file has been updated with new metadata.
How to delete a file on Google Cloud Storage using Python?
To delete a file from an existing object bucket, we can use the following code.
# Imports the Google Cloud client library & Install Google Cloud Storage
from google.cloud import storage
def delete_file(bucket_name):
    # Create a client for interacting with the GCP Storage API, using the ServiceAccount key file
    client = storage.Client.from_service_account_json('handsoncloudstoragepythondemo-fc0192d7ccc9.json')
    # Create a bucket object
    bucket = client.bucket(bucket_name)
    # Set the name of the file you want to delete
    file_name = 'my-file.txt'
    # Create a blob object from the file to object storage
    blob = bucket.blob(file_name)
    # Delete the file from the bucket
    blob.delete()
    print(f'File {file_name} deleted.')
if __name__ == "__main__":
    # The name for the new bucket
    bucket_name = "handsoncloud-new-bucket"

    delete_file(bucket_name)
Here is the console output after successful execution.
> python .\deleteFile.py
File my-file.txt deleted.
How to download a file from Google Cloud Storage using Python?
To download a file from an existing bucket, we can use the following code:
# Imports the GCP client library & Install Google Cloud Storage
from google.cloud import storage
import os
def download_file(bucket_name, file_name, local_directory):
    # Create a client for interacting with the GCP Storage API, using the ServiceAccount key file
    client = storage.Client.from_service_account_json('handsoncloudstoragepythondemo-fc0192d7ccc9.json')
    # Create a bucket object
    bucket = client.bucket(bucket_name)
    blob = bucket.blob(file_name)
    # Download the file to a local directory
    local_path = os.path.join(local_directory, file_name)
    blob.download_to_filename(local_path)
    print('File downloaded successfully')
if __name__ == "__main__":
    # The name for the new bucket
    bucket_name = "handsoncloud-new-bucket"

    #Parameters are bucket_name, file_name, directory path to download the file:
    download_file( bucket_name, 'my-file.txt', './')
Here’s an example output:
> python .\downloadFile.py
File downloaded successfully
Upon successful execution, this will download files from the bucket to our local machine.
Managing Folders in a GCP Bucket
How to create a folder on Google Cloud Storage using Python?
To create a folder within a bucket, here is the example code
# Imports the GCP client library & Install Google Cloud Storage
from google.cloud import storage
def create_folder(bucket_name):
    # Create a client for interacting with the GCP Storage API, using the ServiceAccount key file
    client = storage.Client.from_service_account_json('handsoncloudstoragepythondemo-fc0192d7ccc9.json')
    # Create a bucket object
    bucket = client.bucket(bucket_name)
    # Set the name of the folder you want to create
    folder_name = 'handsOnCloud-SubFolder'
    # Create a blob object for the folder
    folder = bucket.blob(folder_name)
    # Create the folder
    folder.upload_from_string('')
    print(f'Folder {folder_name} created.')
if __name__ == "__main__":
    # The name for the new bucket
    bucket_name = "handsoncloud-new-bucket"

    create_folder(bucket_name)
Here’s an example output:
> python .\createFolder.py
Folder handsOnCloud-SubFolder created.
How to delete a folder on Google Cloud Storage using Python?
Similarly, to delete a folder within a bucket, use the following example code:
from google.cloud import storage
def delete_folder(bucket_name):
    # Create a client for interacting with the GCP Storage API, using the ServiceAccount key file
    client = storage.Client.from_service_account_json('handsoncloudstoragepythondemo-fc0192d7ccc9.json')
    # Create a bucket object
    bucket = client.bucket(bucket_name)
    # Set the name of the folder you want to create
    folder_name = 'handsOnCloud-SubFolder'
    # Delete the folder itself
    folder = bucket.blob(folder_name)
    folder.delete()
    print(f'Folder {folder_name} deleted.')
if __name__ == "__main__":
    # The name for the new bucket
    bucket_name = "handsoncloud-new-bucket"

    delete_folder(bucket_name)
Here’s an example output:
> python .\deleteFolder.py
Folder handsOnCloud-SubFolder deleted.
Additionally, in case you want to delete all the content inside the folder, then you can loop as below
# Delete all the blobs inside the folder
blobs = bucket.list_blobs(prefix=folder_name)
for blob in blobs:
    blob.delete()
Managing Batch Operations in a GCP Bucket
In Google Cloud Storage API, we can use the Client.batch() context manager to handle batch calls for deletion and multiple uploads in conjunction with deferred requests.
Deferred requests are useful when you want to make multiple API calls in a short period of time and want to reduce the overhead of making each call individually. Instead of making each call individually, you can add the requests to a batch request and execute them all at once when the Client.batch() context manager is closed. This can reduce the number of network roundtrips and improve the performance of your code.
To use the Client.batch() context manager, you need to create a storage client and then use the Client.batch() method to create a batch context manager. You can then make deferred requests within the context of the manager.
How to upload multiple files on Google Cloud Storage using Python?
To upload multiple files to a bucket, you can use the Client.batch() context manager in conjunction with the Blob.upload_from_filename() method, as previously mentioned.
Here are the snippets code samples:
from google.cloud import storage
import os
def upload_files(bucket_name, local_directory):
    # Create a client for interacting with the GCP Storage API, using the ServiceAccount key file
    client = storage.Client.from_service_account_json('handsoncloudstoragepythondemo-fc0192d7ccc9.json')
    # Create a bucket object
    bucket = client.bucket(bucket_name)
    # Use a batch context manager to upload the files in the local directory
    with client.batch():
      for root, dirs, files in os.walk(local_directory):
        for file in files:
          local_path = os.path.join(root, file)
          remote_path = file
          blob = bucket.blob(remote_path)
          print(f'Uploading file: {local_path}')
          try:
            blob.upload_from_filename(local_path)
          except Exception as e:
            print(f'Error uploading file: {e}')
    print('File uploaded successfully')
if __name__ == "__main__":
    # The name for the new bucket
    bucket_name = "handsoncloud-new-bucket"

    upload_files(bucket_name, 'filesList')
If I have the following directory structure where I want to upload all the files inside the folder “FilesList” to the cloud storage.
│====uploadViaBatch.py
│
├───filesList
│ test1.txt
│ test2.txt
│ test3.txt
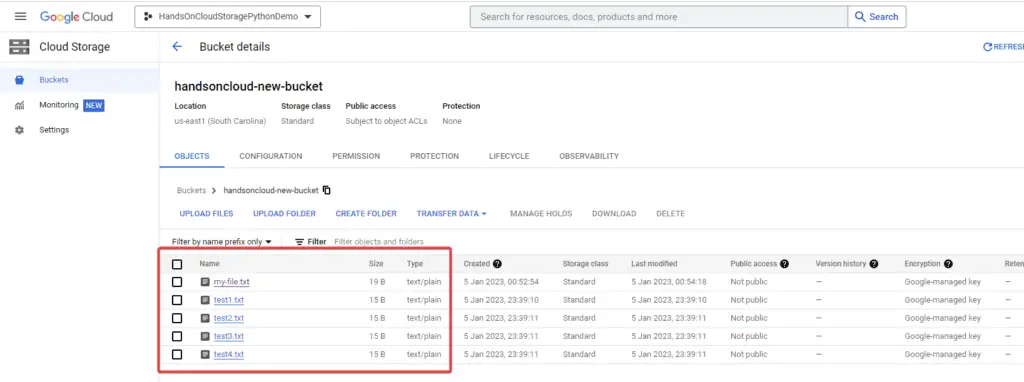
│ test4.txt> python .\uploadViaBatch.py
Uploading file: filesList\test1.txt
Uploading file: filesList\test2.txt
Uploading file: filesList\test3.txt
Uploading file: filesList\test4.txtThe final result in the bucket will be as below:
How to delete multiple files on Google Cloud Storage using Python?
If your cloud bucket has the following structure and you want to delete all the files inside the ‘folder1‘ folder at once, you can use the following code
handsoncloud-new-bucket/
├── folder1/
│   ├── test1.txt
│   ├── test2.txt
│   └── test3.txt
├── folder2/file4.txt
├── file5.txt
├── file6.jpg
Use the following snippets code samples to delete multiple files at once :
from google.cloud import storage
import os
def delete_files(bucket_name, prefix):
    # Create a client for interacting with the GCP Storage API, using the ServiceAccount key file
    client = storage.Client.from_service_account_json('handsoncloudstoragepythondemo-fc0192d7ccc9.json')
    # Create a bucket object
    bucket = client.bucket(bucket_name)
    # Use a batch context manager to delete the files with the given prefix
    with storage_client.batch():
      for blob in bucket.list_blobs(prefix=prefix):
        print(f'Deleting file: {blob.name}')
        blob.delete()
if __name__ == "__main__":
    # The name for the new bucket
    bucket_name = "handsoncloud-new-bucket"

    delete_files(bucket_name, 'folder1')
This code will delete all the files with the given prefix in the bucket.
Managing Permission in a GCP Bucket
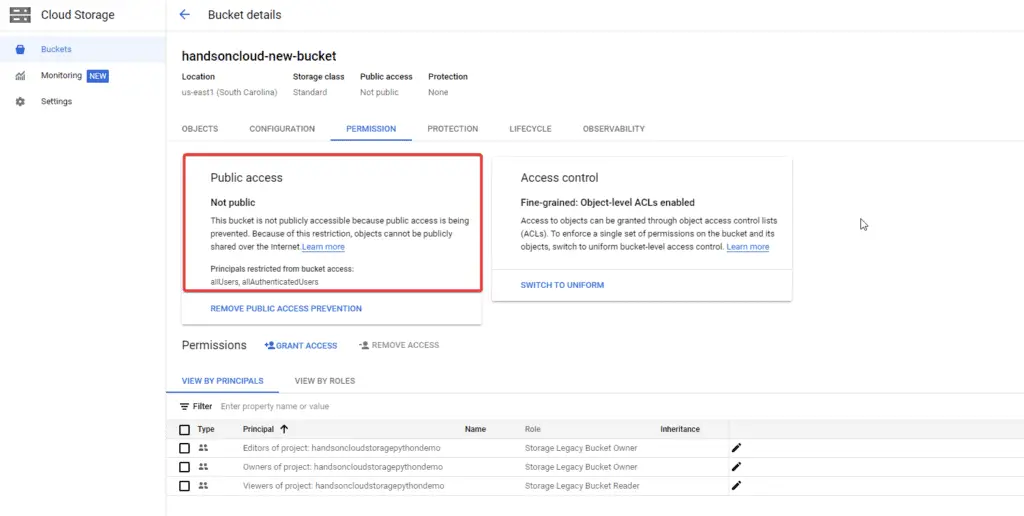
How to disable public access on Google Cloud Storage using Python?
To disable public access to a bucket and its subdirectories, the following is the code example:
from google.cloud import storage
from google.cloud.storage.constants import PUBLIC_ACCESS_PREVENTION_ENFORCED
def remove_bucket_public_acccess(bucket_name):
    # Create a client for interacting with the GCP Storage API, using the ServiceAccount key file
    client = storage.Client.from_service_account_json('handsoncloudstoragepythondemo-fc0192d7ccc9.json')
    # Create a bucket object
    bucket = client.bucket(bucket_name)
   # Set the acl property of the bucket to restrict public access
    bucket.iam_configuration.public_access_prevention = (
        PUBLIC_ACCESS_PREVENTION_ENFORCED
    )
    bucket.patch()
    print(f'Public access to bucket {bucket_name} has been removed.')
if __name__ == "__main__":
    # The name for the new bucket
    bucket_name = "handsoncloud-new-bucket"

    remove_bucket_public_acccess(bucket_name)
Here’s an example output:
> python .\removePublicAccessFromBucket.py
Public access to bucket handsoncloud-new-bucket has been removed.
As you can see, public access to the bucket is now prevented
How to modify user access on Google Cloud Storage using Python?
This API allows you to set and modify access controls for buckets and objects stored in GCP. You can specify which users should have access to your data and what level of access they should have.
# Imports the Google Cloud client library & Install Google Cloud Storage
from google.cloud import storage
from google.cloud.storage.constants import PUBLIC_ACCESS_PREVENTION_ENFORCED
def remove_user_acl(bucket_name, user_email):
    # Create a client for interacting with the GCP Storage API, using the ServiceAccount key file
    client = storage.Client.from_service_account_json('handsoncloudstoragepythondemo-fc0192d7ccc9.json')
    # Create a bucket object
    bucket = client.bucket(bucket_name)
    # Reload fetches the current ACL from object storage service.
    bucket.acl.reload()
    # You can also use `group`, `domain`, `all_authenticated` and `all` to
    # remove access for different types of entities.
    bucket.acl.user(user_email).revoke_read()
    bucket.acl.user(user_email).revoke_write()
    bucket.acl.user(user_email).revoke_owner()
    bucket.acl.save()
    print(f"Removed user {user_email} from bucket {bucket_name}.")
if __name__ == "__main__":
    # The name for the new bucket
    bucket_name = "handsoncloud-new-bucket"
    user_email  = "test@gmail.com"
    remove_user_acl(bucket_name , user_email )
Here’s an example output:
> python .\removeUserACLfromBucket.py
Removed user test@gmail.com from bucket handsoncloud-new-bucket.
How to enable public access on Google Cloud Storage using Python?
To make a bucket publicly accessible, we can use the following code example:
# Imports the GCP library & Install Google Cloud Storage
import google.cloud
from google.cloud import storage
from typing import List
def make_bucket_public(
    bucket_name: str,
    members: List[str] = ["allUsers"],
):
    # Create a client for interacting with the GCP Storage API, using the ServiceAccount key file
    client = storage.Client.from_service_account_json('handsoncloudstoragepythondemo-fc0192d7ccc9.json')
    # Create a bucket object
    bucket = client.bucket(bucket_name)

    policy = bucket.get_iam_policy(requested_policy_version=3)
    policy.bindings.append(
        {"role": "roles/storage.objectViewer", "members": members}
    )
    bucket.set_iam_policy(policy)
    print(f"Bucket {bucket.name} is now publicly readable")
if __name__ == "__main__":
    # The name for the new bucket
    bucket_name = "handsoncloud-new-bucket"

    make_bucket_public(bucket_name)
Here’s an example output:
> python .\makeStoragePublic.py
Bucket handsoncloud-new-bucket is now publicly readable
we can see now all the files are public on the internet.

How to generate pre-signed URLs using Python?
Pre-signed URLs are a way to grant temporary access to an object. In GCP, follow the code example to generate a pre-signed URL for any object.
import datetime
import sys
from google.cloud import storage
def get_presigned_url (bucket_name, blob_name) :
    # Create a client for interacting with the GCP Storage API, using the ServiceAccount key file
    client = storage.Client.from_service_account_json('handsoncloudstoragepythondemo-fc0192d7ccc9.json')
    # Create a bucket object
    bucket = client.bucket(bucket_name)

    blob = bucket.blob(blob_name)
    url = blob.generate_signed_url(
        version="v4",
        # Generate URL for 15 minutes
        expiration=datetime.timedelta(minutes=15),
        # Only Allow GET Call.
        method="GET",
    )
    print("Generated GET signed URL:")
    print(url)
    return url
if __name__ == "__main__":
    # The name for the new bucket
    bucket_name = "handsoncloud-new-bucket"
    blob_name = "my-file.txt"

    get_presigned_url(bucket_name, blob_name)
Here is an example of the output after generating a pre-signed URL :
> python .\generatePreSignedURL.py
Generated GET signed URL:
https://storage.googleapis.com/handsoncloud-new-bucket/my-file.txt?X-Goog-Algorithm=GOOG4-RSA-SHA256&X-Goog-Credential=XXX%40handsoncloudstoragepythondemoXXX.iam.gserviceaccount.com%2F20230105%2Fauto%2Fstorage%2Fgoog4_request&X-Goog-Date=20230105T202227Z&X-Goog-Expires=900&X-Goog-SignedHeaders=host&X-Goog-Signature=a4c46ff90a12f64c58db38a272981cb7ce97d7bcbf13a9a1f1c66c33c4a7147c80e9d4a1039d7cc58f8605a279c7a3165cf047019266e4d2e1aca14ed6f2f1f263393316f92ca9655f54dcffbfe1fed17b1912f2aac7e6c2fff48d17ba28b64582XXXXXXXd66415393b0d77acb6d36b82b523fd0039a71b512cb03011d510ca3459cb6d4b14496cbccd0b6970d031f4a81f21130da942692c4589e80b5a8a072f98c32c5d1d190825439927e92291a0c55d36e31d24a0c677c84e197288baeb95f479586
For other examples of using the Cloud Storage client library, refer to the official guide.
Summary
In conclusion, Google Cloud Storage is a powerful tool for storing and managing large amounts of data in the cloud. It is practically infinitely scalable, ensuring you can store and access as much data as you need without worrying about running out of space. Further, the service ensures consistency, assuring that you can access your data exactly as it was stored, without any loss or corruption. We can easily access and manipulate your data in various ways by using Python and the Google Cloud Storage library.
